Python GUI Guide: Introduction to Tkinter
 Shawn Hymel
Experiment 2: Lights and Buttons
Let's connect some hardware! If you want to dig deeper into user interface design, a book on design theory, like this one, might be a good place to start. By controlling hardware, we can begin to connect GUI design to the real world. Want to make your own Nest-style thermostat? This is a good place to start.
Hardware Connections
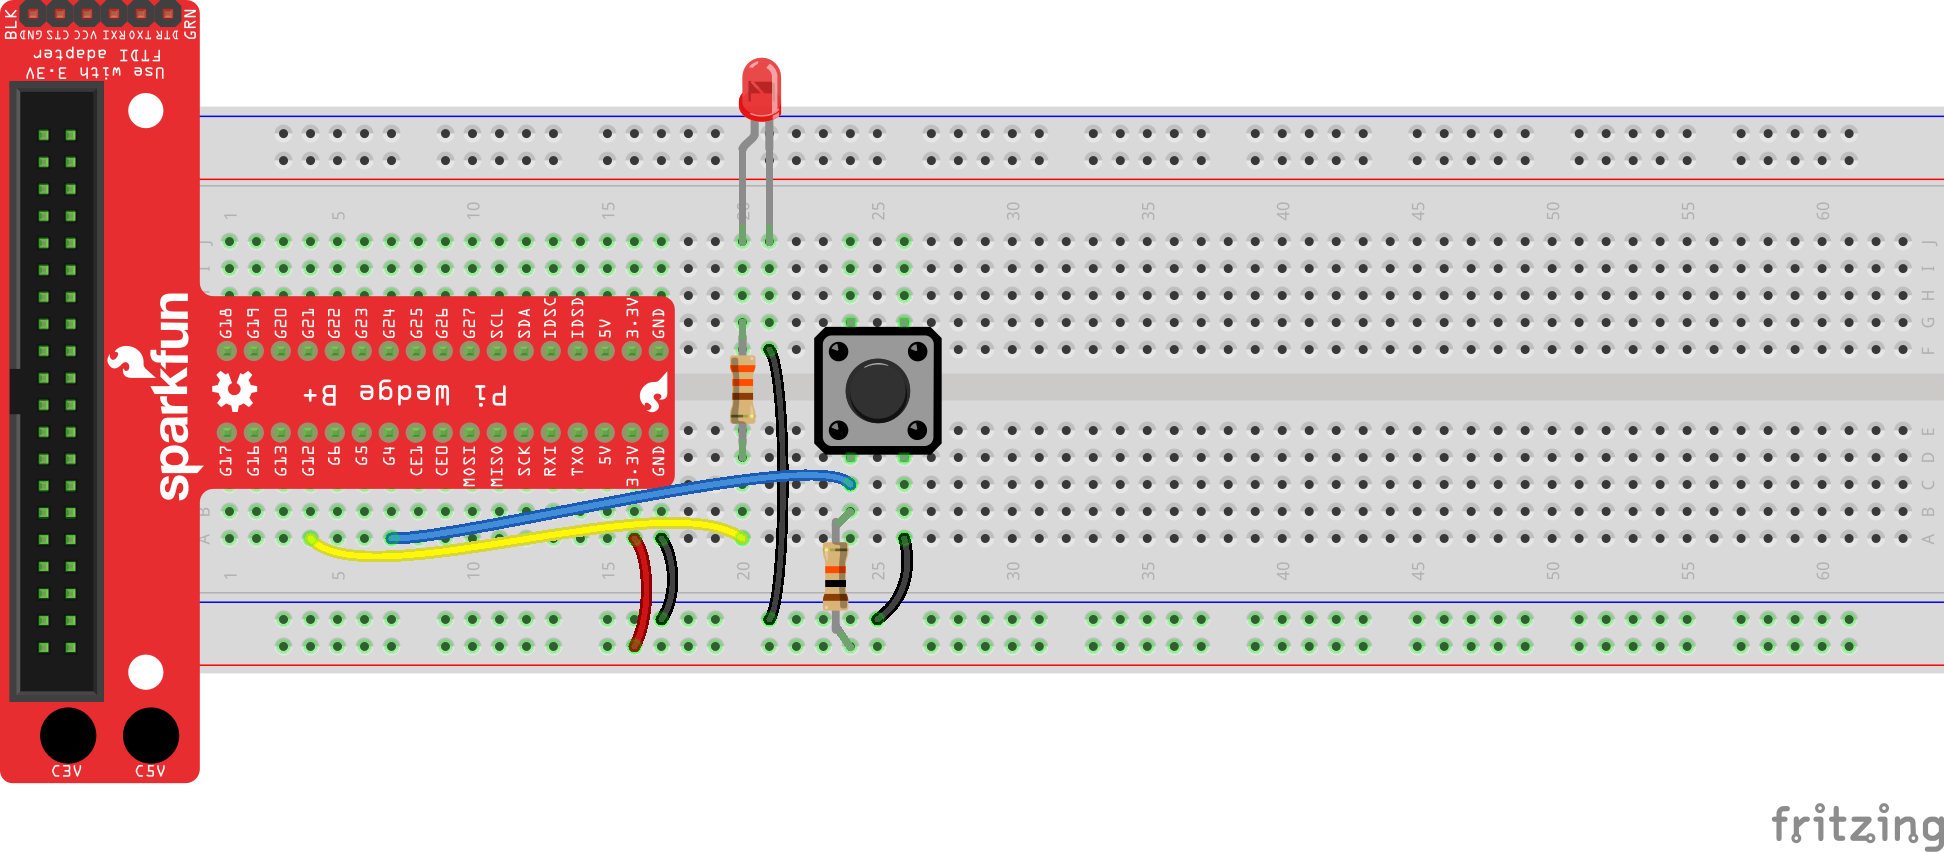
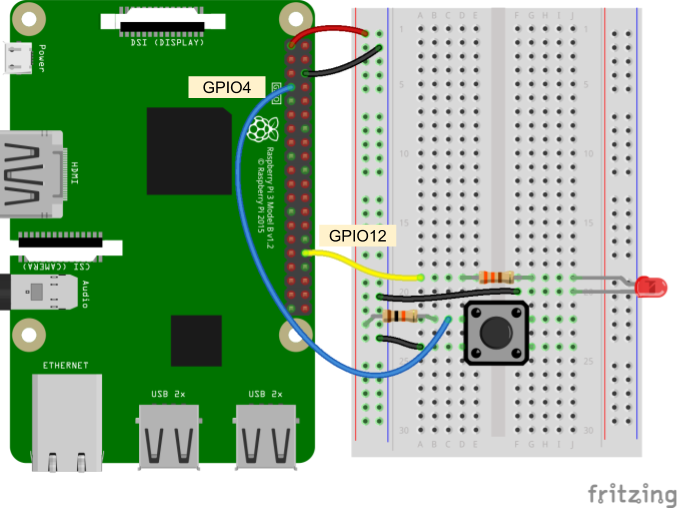
We'll start with a few basic examples that show how to control an LED and respond to a physical button push. Connect the LED, button, and resistors as shown in the diagrams.
If you have a Pi Wedge, it can make connecting to external hardware on a breadboard easier. If you don't, you can still connect directly to the Raspberry Pi with jumper wires.
Connecting through a Pi Wedge:
Connecting directly to the Raspberry Pi:
Code Part 1: LED Light Switch
Depending on your version of Raspbian, the RPi.GPIO package may or may not be already installed (e.g. Raspbian Lite does not come with some Python packages pre-installed). In a terminal, enter the following:
language:bash
pip install rpi.gpio
Copy the following code into a new file:
language:python
import tkinter as tk
from tkinter import font

import RPi.GPIO as GPIO

# Declare global variables
button_on = None
button_off = None

# Pin definitions
led_pin = 12

# This gets called whenever the ON button is pressed
def on():

    global button_on
    global button_off

    # Disable ON button, enable OFF button, and turn on LED
    button_on.config(state=tk.DISABLED, bg='gray64')
    button_off.config(state=tk.NORMAL, bg='gray99')
    GPIO.output(led_pin, GPIO.HIGH)

# This gets called whenever the OFF button is pressed
def off():

    global button_on
    global button_off

    # Disable OFF button, enable ON button, and turn off LED
    button_on.config(state=tk.NORMAL, bg='gray99')
    button_off.config(state=tk.DISABLED, bg='gray64')
    GPIO.output(led_pin, GPIO.LOW)

# Use "GPIO" pin numbering
GPIO.setmode(GPIO.BCM)

# Set LED pin as output and turn it off by default
GPIO.setup(led_pin, GPIO.OUT)
GPIO.output(led_pin, GPIO.LOW)

# Create the main window
root = tk.Tk()
root.title("LED Switch")

# Create the main container
frame = tk.Frame(root)

# Lay out the main container
frame.pack()

# Create widgets
button_font = font.Font(family='Helvetica', size=24, weight='bold')
button_on = tk.Button(frame, text="ON", width=4, command=on,
                        state=tk.NORMAL, font=button_font, bg='gray99')
button_off = tk.Button(frame, text="OFF", width=4, command=off,
                        state=tk.DISABLED, font=button_font, bg='gray64')

# Lay out widgets
button_on.grid(row=0, column=0)
button_off.grid(row=1, column=0)

# Run forever!
root.mainloop()

# Neatly release GPIO resources once window is closed
GPIO.cleanup()
Save your file with a name like tkinter_switch.py and run it with python tkinter_switch.py. You should see a new window pop up with two buttons: ON and OFF. OFF should be grayed out, so try pressing ON. The LED should turn on and OFF should now be the only available button to press. Press it, and the LED should turn off. This is the software version of a light switch!

Code to Note:
In the on() and off() function definitions, we enable and disable the buttons by using the .config() method. For example:
language:python
button_on.config(state=tk.DISABLED, bg='gray64')
button_off.config(state=tk.NORMAL, bg='gray99')
.config() allows us to dynamically change the attributes of widgets even after they've been created. In our switch example, we change their state and bg (background color) to create the effect of the switch being active or "grayed out."
You might also notice that we use the font module within Tkinter to create a custom font for the buttons. This allows us to change the typeface as well as make the font bigger and bolder. We then assign this new font to the buttons' text with font=button_font.
At the end of the code, we place the following line after our root.mainloop():
language:python
GPIO.cleanup()
This line tells Linux to release the resources it was using to handle all the pin toggling that we were doing after we close the main window. Without this line, we would get a warning next time we ran the program (or tried to use the RPi.GPIO module).
Code Part 2: Dimmer Switch
Since we proved we can turn an LED on and off, let's try dimming it. In fact, let's make a virtual dimmer switch! In a new file, copy in the following code:
language:python
import tkinter as tk

import RPi.GPIO as GPIO

# Declare global variables
pwm = None

# Pin definitions
led_pin = 12

# This gets called whenever the scale is changed--change brightness of LED
def dim(i):

    global pwm

    # Change the duty cycle based on the slider value
    pwm.ChangeDutyCycle(float(i))

# Use "GPIO" pin numbering
GPIO.setmode(GPIO.BCM)

# Set LED pin as output
GPIO.setup(led_pin, GPIO.OUT)

# Initialize pwm object with 50 Hz and 0% duty cycle
pwm = GPIO.PWM(led_pin, 50)
pwm.start(0)

# Create the main window and set initial size
root = tk.Tk()
root.title("LED Dimmer")
root.geometry("150x300")

# Create the main container
frame = tk.Frame(root)

# Lay out the main container (center it in the window)
frame.place(relx=0.5, rely=0.5, anchor=tk.CENTER)

# Create scale widget
scale = tk.Scale(   frame,
                    orient=tk.VERTICAL,
                    from_=100,
                    to=0,
                    length=200,
                    width=50,
                    sliderlength=50,
                    showvalue=False,
                    command=dim )

# Lay out widget in frame
scale.pack()

# Run forever!
root.mainloop()

# Stop, cleanup, and exit when window is closed
pwm.stop()
GPIO.cleanup()
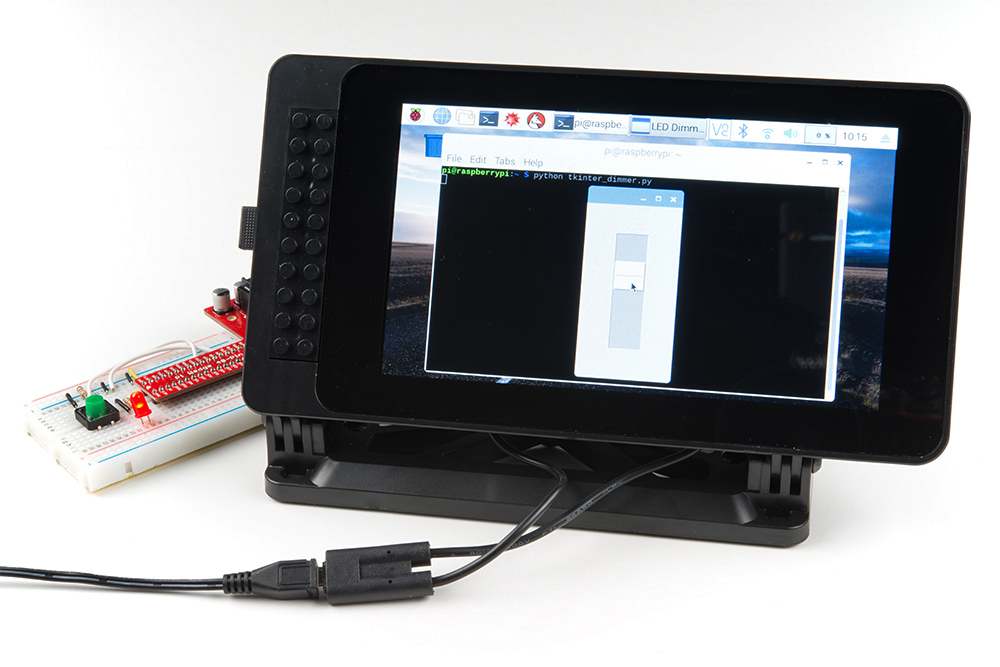
Give the file a name like tkinter_dimmer.py and run it. You should see a Scale widget pop up in a new window. Try sliding it, and you should see the attached LED get brighter.
Code to Note:
When constructing our Scale widget, we need to set a good number of attributes:
language:python
scale = tk.Scale(   frame,
                    orient=tk.VERTICAL,
                    from_=100,
                    to=0,
                    length=200,
                    width=50,
                    sliderlength=50,
                    showvalue=False,
                    command=dim )
By default, scales appear horizontally, so we use orient=tk.VERTICAL to have it work like a dimmer switch you might find in a house. Next, the Scale will count from 0 to 100 by default, but 0 will be at the top (in the vertical orientation). As a result, we swap the from_ and to parameters so that 0 starts at the bottom. Also, notice that from_ has an underscore after it; from is a reserved keyword in Python, so Tkinter had to name it something else. We use 0 through 100, as those are the acceptable values for the pwm.ChangeDutyCycle() method parameter.
We can adjust the size and shape of the Scale with length and width. We made it a little bigger than default so that you can manipulate it more easily on a touchscreen. The slider part of the Scale (the part you click and drag) can by sized with sliderlength. Once again, we make the slider larger so that it's easier to work with on a touchscreen.
By default, the numerical value of the Scale is shown next to the slider. We want to turn that off to provide a cleaner interface. The user only needs to drag the slider to a relative position; the exact number does not quite translate to perceived brightness anyway.
Additionally, by setting command=dim, we tell Tkinter that we want to call the dim() function every time the slider is moved. This allows us to set up a callback where we can adjust the PWM value of the LED each time the user interacts with the Scale.
Finally, notice that the dim(i) function now takes a parameter, i. Unlike our button functions in previous examples (which do not take any parameters), the Scale widget requires its callback (as set by command=dim) to accept one parameter. This parameter is the value of the slider; each time the slider is moved, dim(i) is called and i is set to the value of the slider (0-100 in this case).
Code Part 3: Respond to a Button Push
Blinking LEDs is fun, but what about responding to some kind of user input (I don't mean on the screen)? Responding to physical button pushes can be important if you don't want your user to have to use a touchscreen or mouse and keyboard. In a new file, enter the following code:
language:python
import tkinter as tk

import RPi.GPIO as GPIO

# Declare global variables
root = None
canvas = None
circle = None

# Pins definitions
btn_pin = 4

# Parameters
canvas_width = 100
canvas_height = 100
radius = 30

# Check on button state and update circle color
def poll():

    global root
    global btn_pin
    global canvas
    global circle

    # Make circle red if button is pressed and black otherwise
    if GPIO.input(btn_pin):
        canvas.itemconfig(circle, fill='black')
    else:
        canvas.itemconfig(circle, fill='red')

    # Schedule the poll() function for another 10 ms from now
    root.after(10, poll)

# Set up pins
GPIO.setmode(GPIO.BCM)
GPIO.setup(btn_pin, GPIO.IN)

# Create the main window
root = tk.Tk()
root.title("Button Responder")

# Create the main container
frame = tk.Frame(root)

# Lay out the main container (center it in the window)
frame.place(relx=0.5, rely=0.5, anchor=tk.CENTER)

# Create a canvas widget
canvas = tk.Canvas(frame, width=canvas_width, height=canvas_height)

# Lay out widget in frame
canvas.pack()

# Calculate top left and bottom right coordinates of the circle
x0 = (canvas_width / 2) - radius
y0 = (canvas_height / 2) - radius
x1 = (canvas_width / 2) + radius
y1 = (canvas_height / 2) + radius

# Draw circle on canvas
circle = canvas.create_oval(x0, y0, x1, y1, width=4, fill='black')

# Schedule the poll() function to be called periodically
root.after(10, poll)

# Run forever
root.mainloop()
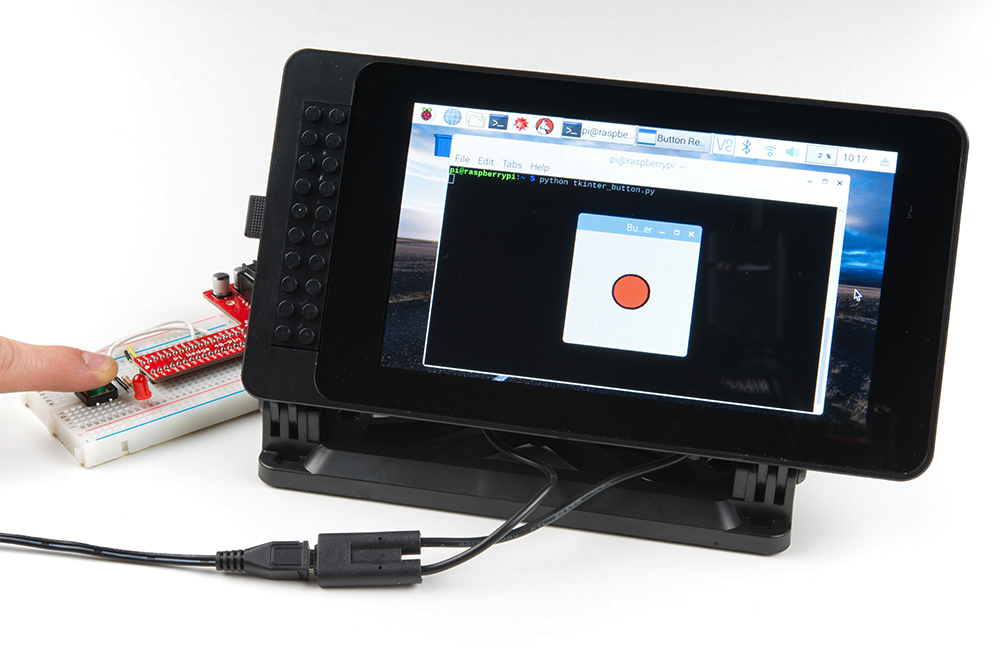
Save it (with a name like tkinter_button.py), and run it. You should see a black circle appear in the middle of your window. When you press the button on the breadboard, the circle should turn red. Neat.
Code to Note:
The most important part of this example is how to poll for a physical button press (or any other hardware interaction on the Pi's GPIO pins). You might have noticed that root.mainloop() is blocking. That is, it takes over your program, and your Python script essentially stops running while it sits in the mainloop method. In reality, there is a lot going on in the background: Tkinter is looking for and responding to events, resizing widgets as necessary, and drawing things to your screen. But for our purposes, it looks like the script just sits there while the GUI is displayed (if the user closes the main GUI window, root.mainloop() will exit).
Since we have a blocking method call, how do we check for a button push? That's where the .after() method comes into play. We set up the poll() function to be called every 10 ms without being in any sort of loop. Since we've moved into the realm of event-driven programming, we must do everything with callbacks!
language:python
root.after(10, poll)
This line says that after 10 ms, the poll() function should be called. The bulk of the poll() function is fairly straightforward: we see if the button has been pressed (the button's GPIO pin is low), and we change the color of the circle in the canvas if it is. However, the end of the function is very important:
language:python
root.after(10, poll)
That's right, at the very end of the poll() function, we tell our main window that it should call the poll() function again! This makes it so that we are checking the state of the button many times every second. We will use this concept of polling for hardware information (separately from the GUI mainloop()) in the next experiment.
We created a circle on the screen by drawing on the canvas with:
language:python
circle = canvas.create_oval(x0, y0, x1, y1, width=4, fill='black')
If you want to learn more about Tkinter's drawing methods, check out this guide on python-course.eu. Additionally, effbot.org has a good reference for all the different drawing methods.