Pyboard Hookup Guide
 LightningHawk
MicroPython Programming Examples
A cool feature of the pyboard is that you can write Python scripts in any text editor and save the file directly to the pyboard drive. No IDE is required! Let's explore the pyboard, control some peripheral, and do some experiments.
LED On
Let's start with some code. We are going to turn on all the onboard LEDS one by one and figure out which one is which.
Connect the pyboard to a computer's COM port using a USB cable. Navigate to the drive called "PYBFLASH". Open main.py in a text editor of your choice. Once opened you should see this:
language:python
# main.py -- put your code here!
Let's turn on LED 1 and make a note of its color and location.
language:python
# main.py -- put your code here!

import pyb
pyb.LED(1).on()
Save the file to the drive - don't change the name. For the script to run you must first reset the board. It is recommended you safely remove the hardware first by ejecting the drive from your computer and then press the RST button. Which LED is on and what color is it?
Now run through that same code three more times but change the number within the parenthesis after LED.
Toggling LEDs
In this example, we will toggle each of the onboard LEDs! Go to the PYBFLASH and open main.py in a text editor. Copy the code below.
language:python
# main.py -- put your code here!
# This code has been adapted from http://docs.micropython.org/en/latest/pyboard/pyboard/tutorial/leds.html

import pyb

#create an leds array with 4 LED objects
leds = [pyb.LED(i) for i in range(1,5)]

#turn off all 4 LEDs
for l in leds:
    l.off()

n = 3

#try and finally - https://docs.python.org/2.5/whatsnew/pep-341.html
try:
    while True:
        #get the remainders 1-4 by using modulus function
        #Use 0-3 to toggle each LED on and off - note that
        #leds[0] is the same as pyb.LED(1)
        n = (n + 1) % 4
        leds[n].toggle()
        pyb.delay(500)
finally:
    for l in leds:
        l.off()
Save main.py in the PYBFLASH drive. The red LED will be on while the program loads. After the LED is turned off, eject the PYBFLASH and then press the RST button. Your program will now execute. This is the process for loading a new script.
PWM and LED 4: The Blue One is Special
LED 4 is the blue LED towards the edge of the pyboard. This LED can be controlled through PWM. In the pyb module LED class, there is a method called intensity. When called it looks like pyb.LED.intensity([value]) where value is a number between 0-255.
In this example, we will change the intensity of the LED. Go to the PYBFLASH and open main.py in a text editor. Copy the code below.
language:python
# main.py -- put your code here!
# This script has been adapted from
# http://docs.micropython.org/en/latest/pyboard/pyboard/tutorial/leds.html

import pyb

led = pyb.LED(4)
#start the LED  intensity value with 0.
intensity = 254
try:
    while True:
        intensity = (intensity + 1) % 255
        led.intensity(intensity)
        #show the effect quickly with a shorter delay
        pyb.delay(15)
finally:
    # once 255 is reached turn off the LED
    pyb.LED(4).off()
Attaching a Servo
There are four dedicated 3-pin headers labeled X1, X2, X3, & X4. You can drive up to four hobby servo motors. At the top of the row is GND, the middle of the row is VCC and the bottom row are the 4 PWM signal lines. Once you've got a servo hooked up, we can look at what we can do within the Servo Class.
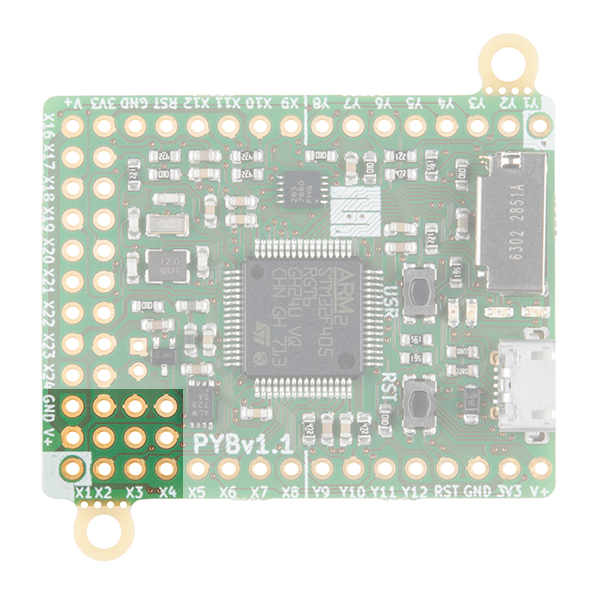
For this example, we will be using a generic sub-micro hobby servo and some jumper wire with pins. Assuming that headers are soldered on the board, connect the servo to the respective pins.
| pyboard |
Generic Sub-Micro Servo |
|---|---|
| GND | GND (Black) |
| V+ | Vcc (Red) |
| X1 | Control Signal (White) |
Follow the steps to load the python script again using the code below.
language:python
# main.py -- put your code here!
# This script has been adapted from
# http://docs.micropython.org/en/latest/pyboard/library/pyb.Servo.html

import pyb
#Create a Servo object at position X1
#if you connected the servo to X2, X3 or X4
#use the corresponding number in your servo object
myServo = pyb.Servo(1)
myServo.angle(0)
#Sweep the angle of the servo to 90 degrees taking 1250ms
myServo.angle(90, 1250)
Once the script is loaded, the servo connected to pin X1 will sweep between two positions and stop.