MCP4725 Digital to Analog Converter Hookup Guide
To DAC, or Not to DAC...
When learning about the world of microcontrollers, you will come across analog-to-digital converters quite frequently. These allows us to read in signals from analog sensors and convert them into a digital language our microcontrollers and other computational devices can understand. However, what if you need to do the opposite? What if you need your Arduino to speak the language of analog signals? Enter the MCP4725 Digital-toAnalog Converter Breakout.
This tiny IC allows you to do just that. By using the Arduino's I2C lines, you can create a wide variety of analog waveforms on the other end.
Covered in This Tutorial
In this tutorial, we will overview the breakout and discuss additional hardware details. Then an assembly section will discuss how to connect this breakout to a microcontroller. Last, the firmware will be broken down to help you understand how the digital to analog conversion happens.
Suggested Reading
Board Overview
Before we discuss hooking up the breakout, let's go over some of the features of this board.
Pinout
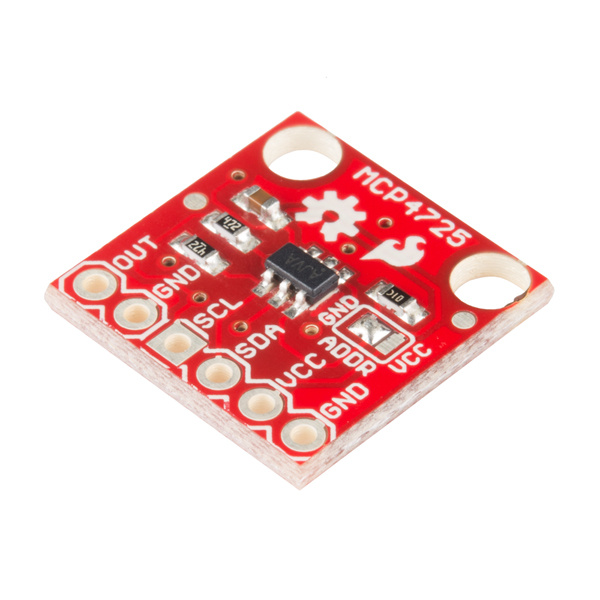
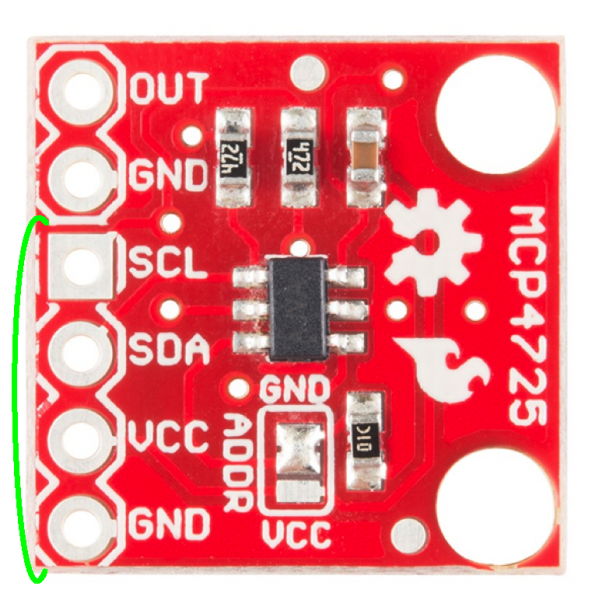
The first thing to point out is the pinout on this breakout now conforms to the standard I2C pinout we've started using on most devices that use the two-wire interface. Thus, it is easy to solder some headers on the breakout and plug it directly into an Arduino with the same pinout for the I2C pins. There is also the signal out and a GND pin grouped together to connect to an oscilloscope or whatever other device you're hooking up to the breakout.
Power
The breakout can be powered anywhere between 2.7V to 5.5V, making it great for both 5V and 3.3V microcontrollers.
I2C Communication
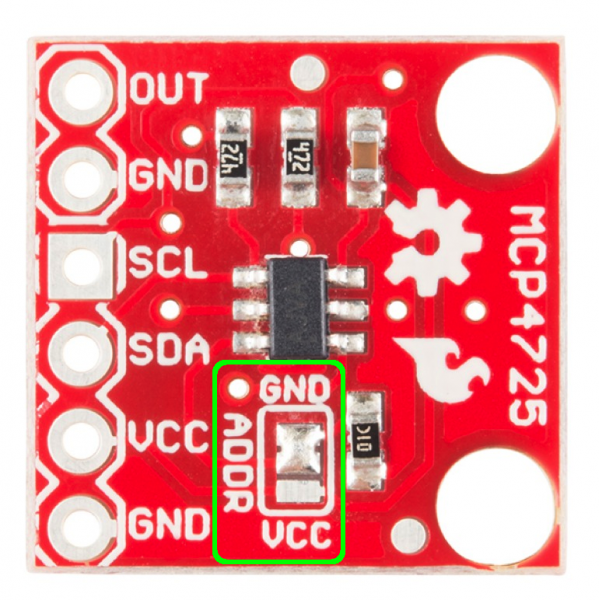
A few features have been added to this breakout to give the user more flexibility with the IC, particularly when it comes to adding multiple DACs to one bus. First, we've broken out the address selection pin (A0) to a jumper pad. By default, this pin is pulled LOW to GND. To change the address of your other device, simply de-solder the jumper and add a blob of solder to the middle pad and the Vcc pad.
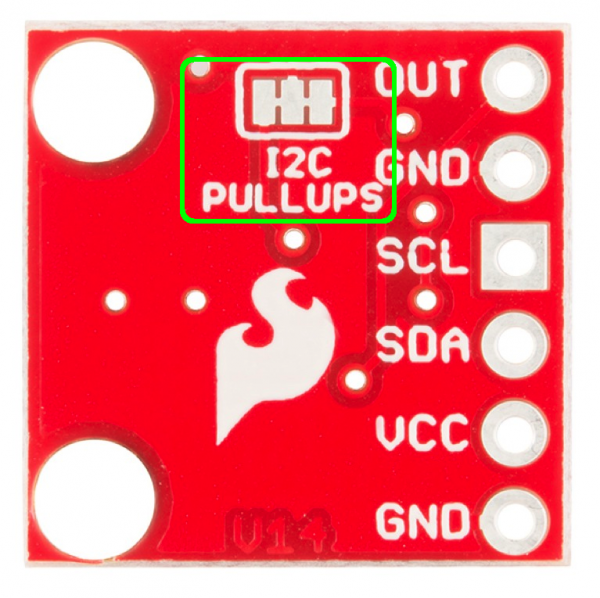
If you're going to have more than one MCP4725 on a bus, you'll also want to disable the pull-up resistors on all but one breakout. To make this easier, we've added another jumper on the back of the board. The pull-ups are enabled by default. If you need to disable them, you'll need to cut the traces on the jumper pad with an Xacto knife. If you ever need to re-enable the pull-ups, simply solder the three pads back together.
Last, there are two mounting holes to mount this board inside the enclosure of your choice.
Hooking it Up
To use the MCP4725, all you'll need is some male headers, a SparkFun RedBoard or other microcontroller, and a means to see your signal. Using an oscilloscope will be the easiest way to get started.
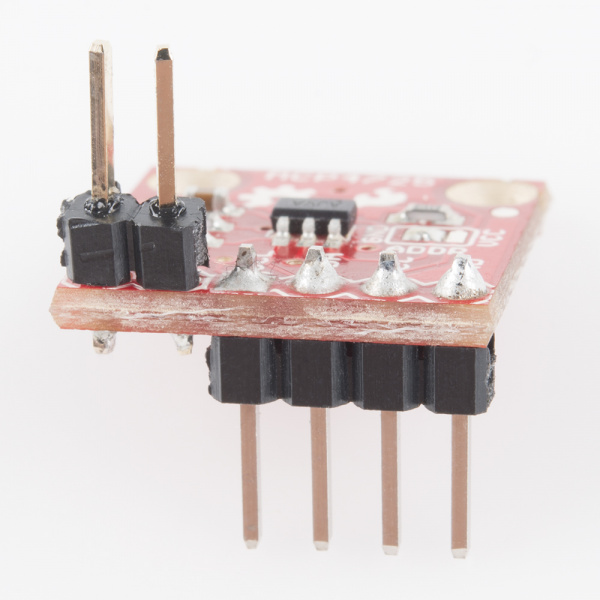
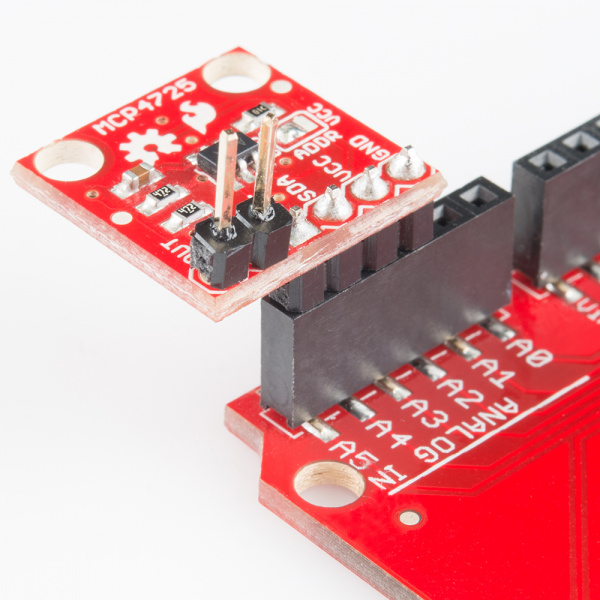
First, solder the headers onto your breakout. We recommend using a 4-pin header facing downward for the power and communication connections and using a 2-pin header facing up for the Out and GND pins. See the below image for an example.
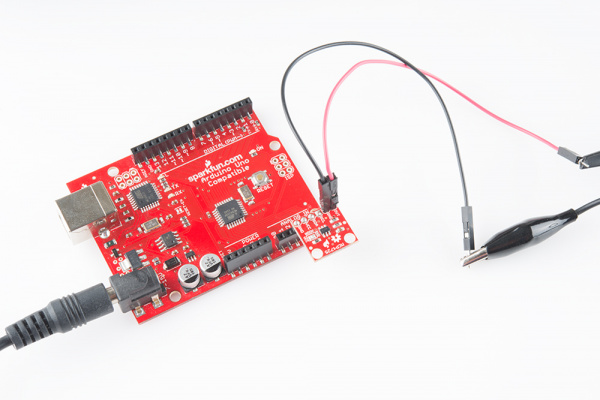
Most Arduino boards have the I2C on the A4 and A5 pins. Then, in the firmware we'll uplaod in the next section, we can set pins A2 and A3 as GND and Vcc respectively to power the breakout. If you prefer to wire everything to a breadboard, you can solder a 6-pin header and connect everything with some jumper wires.
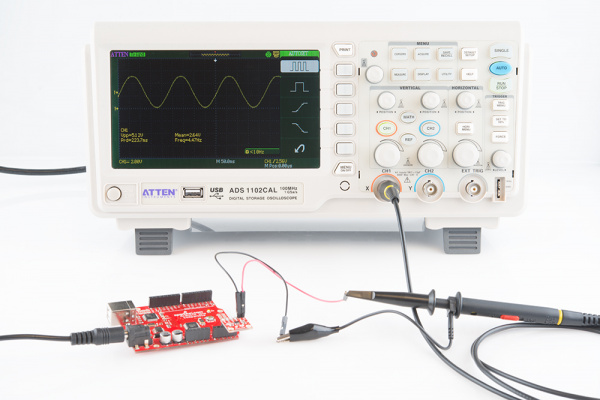
Last, it's time to connect the MCP4725 to whatever device you'll be sending analog signals. In this tutorial, we'll be visualizing the signal with an oscilloscope. Using the o-scope probes, you could connect to the headers directly, or you could use some jumper wires. Make sure to not mix up the Out and GND pins.
Firmware
With everything hooked up, it's time to upload some code to the Arduino that will allow the breakout to send analog signals. In this example, the code will generate a simple sine wave.
Open up the Arduino IDE, and copy in this snippet of code:
language:c
/******************************************************************************
MCP4725 Example Waveform Sketch
Joel Bartlett
SparkFun Electronics
Sept. 11, 2014
https://github.com/sparkfun/MCP4725_Breakout

This sketch takes data from a lookup table to provide
waveforms to be generated by the MCP4725 DAC.

Development environment specifics:
Arduino 1.0+
Hardware Version V14

This code is beerware; if you see me (or any other SparkFun employee) at the local,
and you've found our code helpful, please buy us a round!

Distributed as-is; no warranty is given.

This code builds off the sketch written by Mark VandeWettering, which can be found here:
http://brainwagon.org/2011/02/24/arduino-mcp4725-breakout-board/
*/

#include <Wire.h>//Include the Wire library to talk I2C

//This is the I2C Address of the MCP4725, by default (A0 pulled to GND).
//Please note that this breakout is for the MCP4725A0.
#define MCP4725_ADDR 0x60
//For devices with A0 pulled HIGH, use 0x61

//Sinewave Tables were generated using this calculator:
//http://www.daycounter.com/Calculators/Sine-Generator-Calculator.phtml


int lookup = 0;//varaible for navigating through the tables

int sintab2[512] =
{
  2048, 2073, 2098, 2123, 2148, 2174, 2199, 2224,
  2249, 2274, 2299, 2324, 2349, 2373, 2398, 2423,
  2448, 2472, 2497, 2521, 2546, 2570, 2594, 2618,
  2643, 2667, 2690, 2714, 2738, 2762, 2785, 2808,
  2832, 2855, 2878, 2901, 2924, 2946, 2969, 2991,
  3013, 3036, 3057, 3079, 3101, 3122, 3144, 3165,
  3186, 3207, 3227, 3248, 3268, 3288, 3308, 3328,
  3347, 3367, 3386, 3405, 3423, 3442, 3460, 3478,
  3496, 3514, 3531, 3548, 3565, 3582, 3599, 3615,
  3631, 3647, 3663, 3678, 3693, 3708, 3722, 3737,
  3751, 3765, 3778, 3792, 3805, 3817, 3830, 3842,
  3854, 3866, 3877, 3888, 3899, 3910, 3920, 3930,
  3940, 3950, 3959, 3968, 3976, 3985, 3993, 4000,
  4008, 4015, 4022, 4028, 4035, 4041, 4046, 4052,
  4057, 4061, 4066, 4070, 4074, 4077, 4081, 4084,
  4086, 4088, 4090, 4092, 4094, 4095, 4095, 4095,
  4095, 4095, 4095, 4095, 4094, 4092, 4090, 4088,
  4086, 4084, 4081, 4077, 4074, 4070, 4066, 4061,
  4057, 4052, 4046, 4041, 4035, 4028, 4022, 4015,
  4008, 4000, 3993, 3985, 3976, 3968, 3959, 3950,
  3940, 3930, 3920, 3910, 3899, 3888, 3877, 3866,
  3854, 3842, 3830, 3817, 3805, 3792, 3778, 3765,
  3751, 3737, 3722, 3708, 3693, 3678, 3663, 3647,
  3631, 3615, 3599, 3582, 3565, 3548, 3531, 3514,
  3496, 3478, 3460, 3442, 3423, 3405, 3386, 3367,
  3347, 3328, 3308, 3288, 3268, 3248, 3227, 3207,
  3186, 3165, 3144, 3122, 3101, 3079, 3057, 3036,
  3013, 2991, 2969, 2946, 2924, 2901, 2878, 2855,
  2832, 2808, 2785, 2762, 2738, 2714, 2690, 2667,
  2643, 2618, 2594, 2570, 2546, 2521, 2497, 2472,
  2448, 2423, 2398, 2373, 2349, 2324, 2299, 2274,
  2249, 2224, 2199, 2174, 2148, 2123, 2098, 2073,
  2048, 2023, 1998, 1973, 1948, 1922, 1897, 1872,
  1847, 1822, 1797, 1772, 1747, 1723, 1698, 1673,
  1648, 1624, 1599, 1575, 1550, 1526, 1502, 1478,
  1453, 1429, 1406, 1382, 1358, 1334, 1311, 1288,
  1264, 1241, 1218, 1195, 1172, 1150, 1127, 1105,
  1083, 1060, 1039, 1017,  995,  974,  952,  931,
   910,  889,  869,  848,  828,  808,  788,  768,
   749,  729,  710,  691,  673,  654,  636,  618,
   600,  582,  565,  548,  531,  514,  497,  481,
   465,  449,  433,  418,  403,  388,  374,  359,
   345,  331,  318,  304,  291,  279,  266,  254,
   242,  230,  219,  208,  197,  186,  176,  166,
   156,  146,  137,  128,  120,  111,  103,   96,
    88,   81,   74,   68,   61,   55,   50,   44,
    39,   35,   30,   26,   22,   19,   15,   12,
    10,    8,    6,    4,    2,    1,    1,    0,
     0,    0,    1,    1,    2,    4,    6,    8,
    10,   12,   15,   19,   22,   26,   30,   35,
    39,   44,   50,   55,   61,   68,   74,   81,
    88,   96,  103,  111,  120,  128,  137,  146,
   156,  166,  176,  186,  197,  208,  219,  230,
   242,  254,  266,  279,  291,  304,  318,  331,
   345,  359,  374,  388,  403,  418,  433,  449,
   465,  481,  497,  514,  531,  548,  565,  582,
   600,  618,  636,  654,  673,  691,  710,  729,
   749,  768,  788,  808,  828,  848,  869,  889,
   910,  931,  952,  974,  995, 1017, 1039, 1060,
  1083, 1105, 1127, 1150, 1172, 1195, 1218, 1241,
  1264, 1288, 1311, 1334, 1358, 1382, 1406, 1429,
  1453, 1478, 1502, 1526, 1550, 1575, 1599, 1624,
  1648, 1673, 1698, 1723, 1747, 1772, 1797, 1822,
  1847, 1872, 1897, 1922, 1948, 1973, 1998, 2023
};


void setup()
{
  Wire.begin();

  // Set A2 and A3 as Outputs to make them our GND and Vcc,
  //which will power the MCP4725
  pinMode(A2, OUTPUT);
  pinMode(A3, OUTPUT);

  digitalWrite(A2, LOW);//Set A2 as GND
  digitalWrite(A3, HIGH);//Set A3 as Vcc
}
//---------------------------------------------------
void loop()
{
  Wire.beginTransmission(MCP4725_ADDR);
  Wire.write(64);                     // cmd to update the DAC
  Wire.write(sintab2[lookup] >> 4);        // the 8 most significant bits...
  Wire.write((sintab2[lookup] & 15) << 4); // the 4 least significant bits...
  Wire.endTransmission();
  lookup = (lookup + 1) & 511;
}
Once the sketch is uploaded, fire up the o-scope, connect the probe, if you haven't yet, and you should be greeted with a nice looking sine wave.
Resources and Going Further
With that, you should be able to get your MCP4725 working the way you'd like and integrated into your next project. For more information on the MCP4725, please visit the links below.
Need more? Check out these other SparkFun tutorials:
