LDK Experiment 2: Multiple LED Circuits
 Dia
Dia 
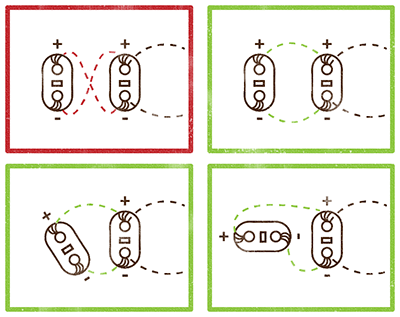
Adding LEDs to a Parallel Circuit
We’re going to use the circuit you made in LDK experiment 1 as the foundation for our parallel circuit. In a parallel circuit, you sew all of the positive pins to each other and all of the negative pins to each other. As in experiment 1, you never want to allow the positive and negative traces to come into contact with each other. For this circuit, don’t use any red or yellow LEDs you still have -- you’ll need those for the series circuit!
Note: Remember to take your battery out while you’re sewing, to prevent battery drain and short circuits while you're sewing.
Positive Trace
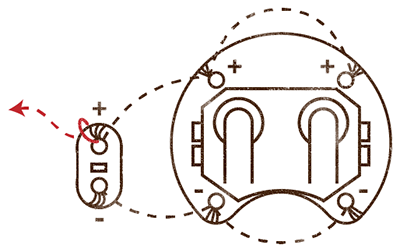
Start with your needle threaded and knotted. Sew a new stitch into the positive pin of the LED you used on the initial circuit, and add another tight stitch on top of the stitches holding it down. Due to the uninsulated nature of conductive thread, the thread you are currently sewing with is now conductively connected to your original circuit. The trace you start sewing now is a continuation of the positive trace that already existed in the original circuit.
From here, sew in a line to where you’d like the positive pin of your next LED. You’re going to need to keep the positive and negative traces parallel to each other (hence ‘parallel’ circuit), so don’t place the new LED such that its position is reversed from the original LED.
Sew the positive pin of the second LED down with three stitches, as you have done with all previous pins. From here on, I’m just going to tell you to sew the pins down, but please continue to use several stitches per pin! Continue sewing to the third LED, and sew that positive pin as well. Keep thinking in a parallel fashion as you locate the third LED.
That’s the end of the positive trace for this circuit. Go ahead and tie your thread off, and cut it.
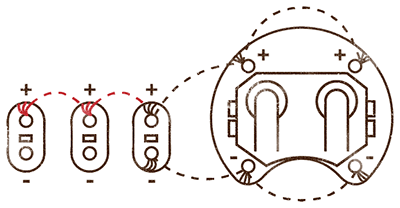
Negative Trace
Begin with a newly threaded needle. As you did on the positive trace, sew one stitch around the negative pin of your LED on the original circuit, to connect your new trace to the old.
Stitch from here in a line to the new LEDs, sewing each one down as you go. Be careful not to cross or contact your positive trace while you do this.

Knot and cut your thread on the finished negative trace, and do a quick check for stray threads, long knot-ends, and anything else that might cause a short circuit.
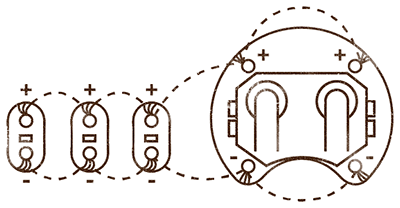
Double-check that you don't have any loose threads, crossed traces, or other visible problem spots. If everything looks good, slide your battery into the holder, positive side up. All three of your LEDs should light up. You’ve successfully completed a multi-LED parallel circuit!