LDK Experiment 1: Lighting Up a Basic Circuit
 Dia
Dia 
Introduction
Welcome to your first e-textiles circuit! We'll be going using the LilyPad Design Kit to create all of the examples in this tutorial series. If you've never sewn before or never worked with electronics, you're in the right place. This is a very simple project, with only two traces and two components to lay down.
Suggested Reading
Here are a few related tutorials that you might like to browse:
Gather Materials
These are all of the parts you'll need to complete this circuit. If you're using the LilyPad Design Kit, you've already got them all.
You'll also want to have scissors, fabric, an embroidery hoop, and possibly a needle threader.
Threading your needle
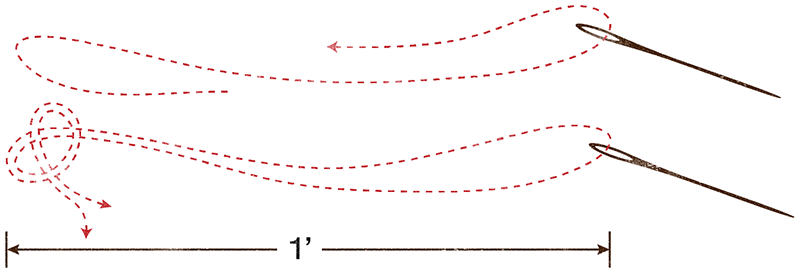
Select a needle to use for this project. The larger the needle, the easier it will be to thread, but the harder it will be to pull through a thick fabric. Balance the needs of your eyesight and hand steadiness with the heaviness of the fabric you’ll be using for this project. If threading a needle is difficult or frustrating for you, you may want to use a needle threader. These are inexpensive and available at any craft store that sells sewing supplies. Cut off a length of conductive thread roughly 2 feet long, and thread it through the needle. Pull it until your needle is in the middle of the length of thread, then pull the two ends together and tie them together into an overhand knot. You should now have a double length of thread about a foot long. In general, I recommend threading your needle with relatively short lengths of thread; try to avoid anything longer than two feet doubled over (four feet before doubling.) Conductive thread is more prone to knots and tangles than traditional thread, and a shorter length will help with that.
Preparing your fabric
For greatest ease, use an embroidery hoop. These are inexpensive and available at any craft store. The hoop will hold your fabric taut, which helps you to spot and repair potential problems early, as well as preventing the fabric from bunching or gathering while you sew.

Positive Trace
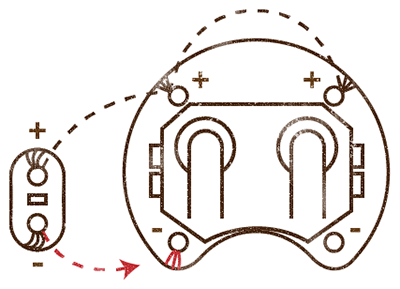
The positive trace will take power from the power supply to the positive side of the LED.
Start with your battery pack; this will supply power to your circuit. Don’t put the battery in yet; we won’t do that until the end. While you’re sewing, you’re liable to create small short circuits, just by touching across the circuit with your needle or the length of your thread. If the battery is on, these ‘incidental shorts’ will drain it.
Place the battery pack near where you would like to put your LED, making sure that you’ve got one hole with a plus sign and one hole with a negative sign pointed towards the intended LED location. These holes are called ‘pins,’ and you’re looking at the positive and negative pins of your battery pack. When you’ve got your battery pack placed where you’d like it, you can start sewing. Push the needle up through the fabric, bringing it through the positive hole furthest from where you’d like to put your LED. Pull the thread all the way through until the knot you made is firmly against the back of your fabric. Pass the needle back through the top of the fabric to the bottom, just outside of the hole, so that you form a small loop that the edge of the board is trapped in. Pull the thread tight again- your board should now be attached to the fabric by one stitch. This is your first stitch. You’ll repeat this process three times on this pin and on every pin you sew down in this circuit. Go ahead and tack this pin down with two more stitches, and it should look like this:

Next you need to sew to the second positive pin of the battery pack. You don’t want one big stitch between these two pins. Large stitches are loose, will move around, touching parts of the circuit they’re not meant to touch, and will cause shorts. Instead, put several small stitches between pins, making sure you’ve pulled them tight before you begin to stitch down the next pin. The easiest way to do this is with what’s called a running stitch.
Once you’re at your second positive pin, sew it down with three tight stitches, repeating the process from the first pin.

From here, it’s time to sew to the positive side of your LED. Continue with the same thread you’ve been using and sew a straight line from the second positive pin to where you would like the positive pin of your LED to be.
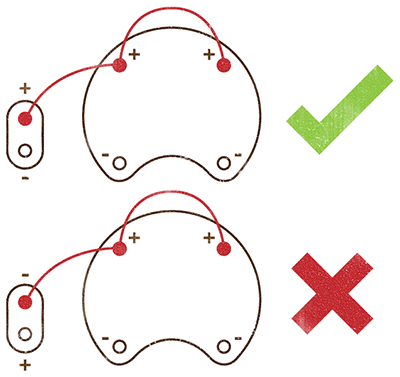
Double check that you’ve got the positive LED pin- LEDs are polarized, so if you sew it in backwards, it won’t light up. The good news is that this won’t damage your LED at all; you’ll just have to cut it back out and put it back in the other way.
Once you’re sure you’ve got the orientation right, you can sew down the positive pin with three stitches, just like you did with both positive battery pack pins.
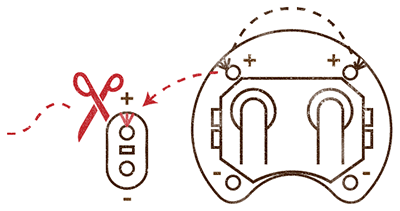
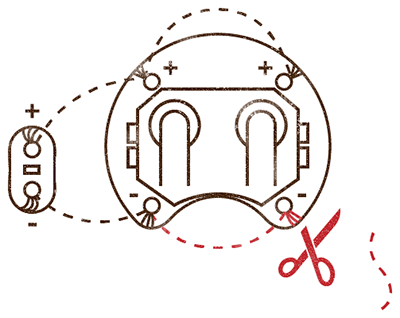
This is the end of the positive trace! We’re half done, and you can tie off your thread and cut it. Do not continue around the LED and sew down the next pin!
Negative Trace
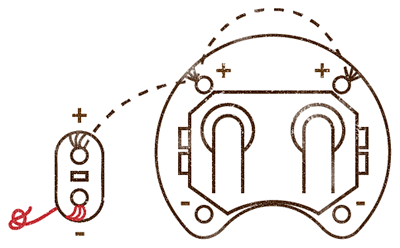
The negative trace will return current from the LED to the negative side of the battery pack. This way the current travels in a circle (hence ‘circuit’!), which passes through the LED, lighting it up.
Re-knot your thread and start at the negative pin of the LED, sewing it down with three stitches. As you did on the battery pack, make sure that the knot in your thread is flush against the back of the fabric, and draw all of the stitches tight.
Sew a line of small stitches from the negative pin of the LED to the closest negative pin of your battery pack, and sew it down with three stitches.
Almost done! Sew a few small stitches to the second negative pin (this should be the last open pin on your battery pack), and sew it down with three stitches. Tie off again, and cut your thread.
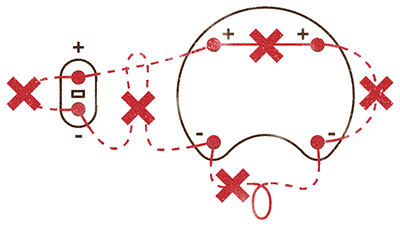
Take one last look at your circuit. You’re checking for loose or dangling threads or places where the positive and negative traces touch at all. If you find any, you’ll need to correct them. Cutting thread ends short and close to the knot will help.
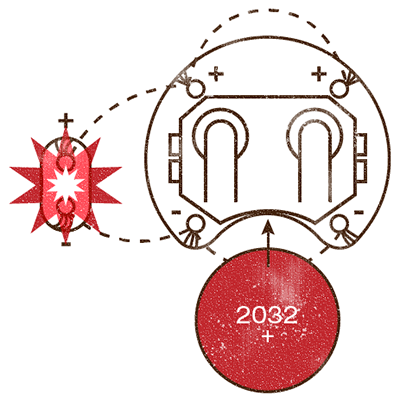
This is the moment of truth! Your battery has a smooth side with a + on it and a textured side. Slide it into the battery holder, + side up, textured side down. Your LED should immediately light up! There’s no switch or button on this circuit, so you’ll have to put the battery in to turn it on and take it out to turn it off. Congratulations on your first e-textiles circuit!
Resources and Going Further
Ready to learn more? Explore the next LDK experiment or have a look at some of our other e-textile tutorials.
- LDK Experiment 2 - The next step in the LDK curriculum
- Basic LilyPad Tutorial - This shows you how to put a similar circuit into a project!