LDK Experiment 2: Multiple LED Circuits
 Dia
Dia 
Introduction
Welcome to the second experiment of the LilyPad Design Kit, where we'll learn how to add more than one LED to a circuit. Additionally, we'll learn about the two types of standard circuit configurations: series and parallel.
When working with LEDs, you’ll use parallel circuits very often. In addition to being able to turn on more components with less voltage, they’re more durable. In a series circuit, if one LED gets damaged, all of the LEDs will stop working. In a parallel circuit, one broken LED won’t stop the others from lighting up! You may have heard of this effect, or experienced it firsthand, in Christmas lights.
In spite of the reasons to prefer parallel circuits for most projects, no education in basic circuits is complete without discussing series circuits, so we’ll give one a try!
Suggested Reading
Here are a few related tutorials that you might want to read over or refer to:
Gather Materials
Here are the components you'll need for this circuit. If you're using the LilyPad Design Kit, you've already got these!
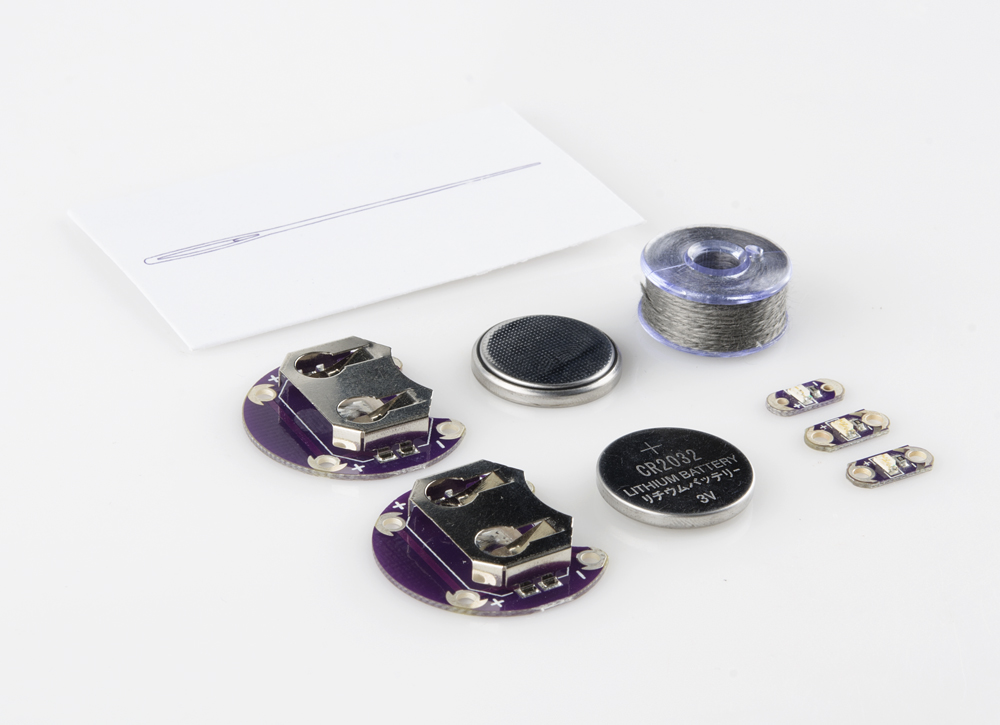
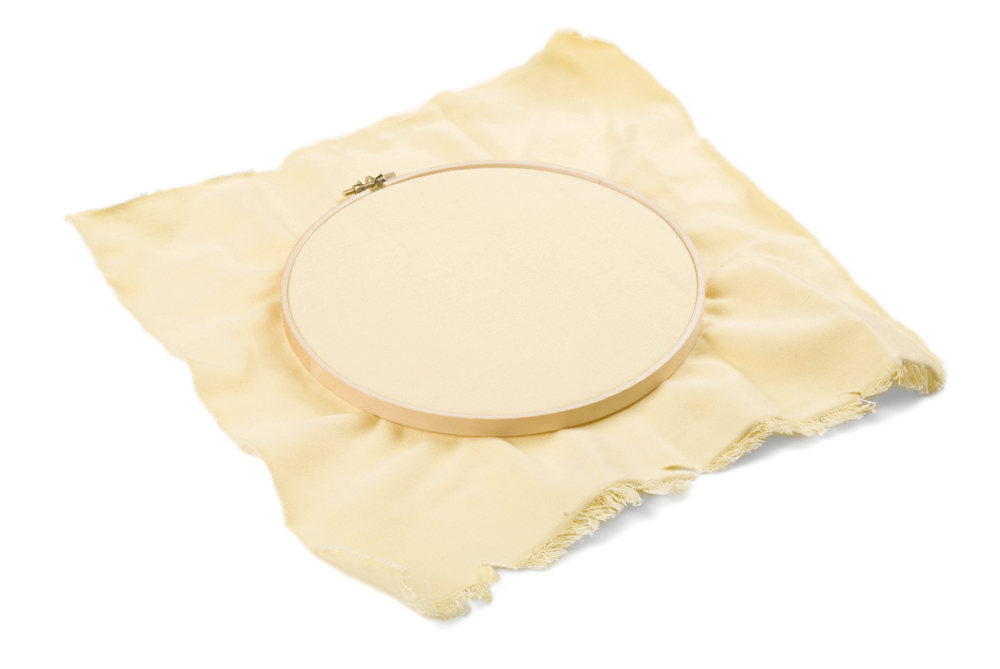
You’ll also want scissors, fabric, an embroidery hoop, and possibly a needle threader.
Go ahead and get the fabric set up in the embroidery hoop, and start with a threaded, knotted needle.
Adding LEDs to a Parallel Circuit
We’re going to use the circuit you made in LDK experiment 1 as the foundation for our parallel circuit. In a parallel circuit, you sew all of the positive pins to each other and all of the negative pins to each other. As in experiment 1, you never want to allow the positive and negative traces to come into contact with each other. For this circuit, don’t use any red or yellow LEDs you still have -- you’ll need those for the series circuit!
Note: Remember to take your battery out while you’re sewing, to prevent battery drain and short circuits while you're sewing.
Positive Trace
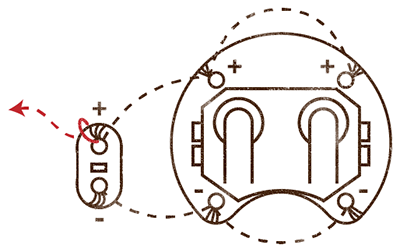
Start with your needle threaded and knotted. Sew a new stitch into the positive pin of the LED you used on the initial circuit, and add another tight stitch on top of the stitches holding it down. Due to the uninsulated nature of conductive thread, the thread you are currently sewing with is now conductively connected to your original circuit. The trace you start sewing now is a continuation of the positive trace that already existed in the original circuit.
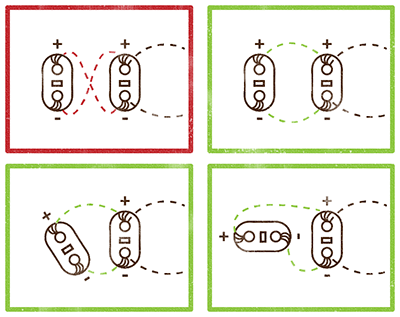
From here, sew in a line to where you’d like the positive pin of your next LED. You’re going to need to keep the positive and negative traces parallel to each other (hence ‘parallel’ circuit), so don’t place the new LED such that its position is reversed from the original LED.
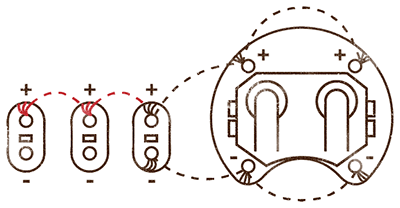
Sew the positive pin of the second LED down with three stitches, as you have done with all previous pins. From here on, I’m just going to tell you to sew the pins down, but please continue to use several stitches per pin! Continue sewing to the third LED, and sew that positive pin as well. Keep thinking in a parallel fashion as you locate the third LED.
That’s the end of the positive trace for this circuit. Go ahead and tie your thread off, and cut it.
Negative Trace
Begin with a newly threaded needle. As you did on the positive trace, sew one stitch around the negative pin of your LED on the original circuit, to connect your new trace to the old.
Stitch from here in a line to the new LEDs, sewing each one down as you go. Be careful not to cross or contact your positive trace while you do this.

Knot and cut your thread on the finished negative trace, and do a quick check for stray threads, long knot-ends, and anything else that might cause a short circuit.
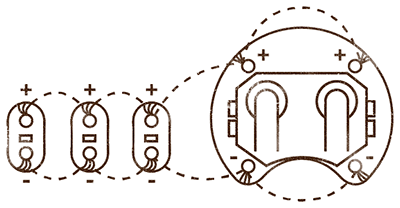
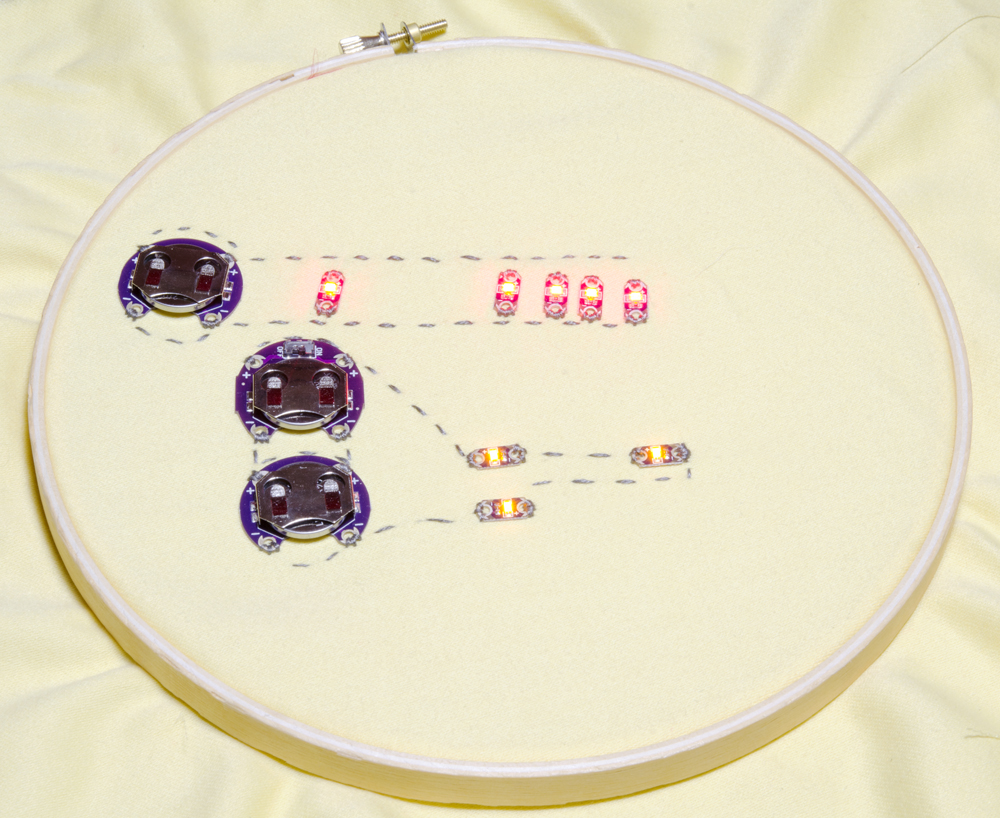
Double-check that you don't have any loose threads, crossed traces, or other visible problem spots. If everything looks good, slide your battery into the holder, positive side up. All three of your LEDs should light up. You’ve successfully completed a multi-LED parallel circuit!
Creating a Multi-LED Series Circuit
One of the things that’s very different about a series circuit is the power requirement. To create this circuit, you’re going to need more power than you needed for the parallel circuit, so we’ll be using two batteries instead of one. In the parallel circuit, we connected all of the positive pins to each other, and all of the negative pins to each other. In the series circuit, things are very different. We’ll be creating our circle by connecting each positive to a negative, each negative to a positive. You’ll want to use red and yellow LEDs for this circuit, because they have the lowest forward voltage drop requirement.
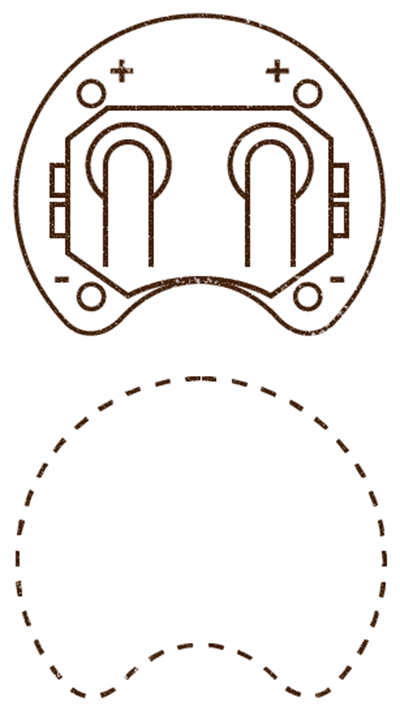
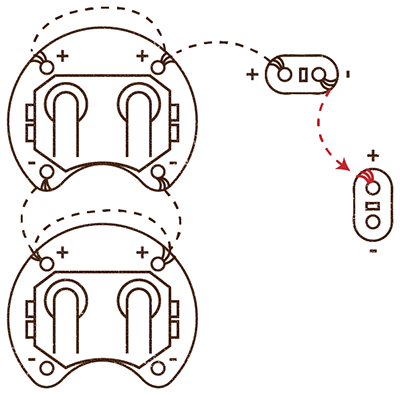
Once again, let’s start with the battery packs. You’ll need two of them, so we're going to combine them in a series circuit. Start by placing the battery pack you’d like to be on top, and make sure you leave room for another one on the fabric below it. Point the negative pins down towards the second battery pack location.

Sew down one negative pin with a few stitches.
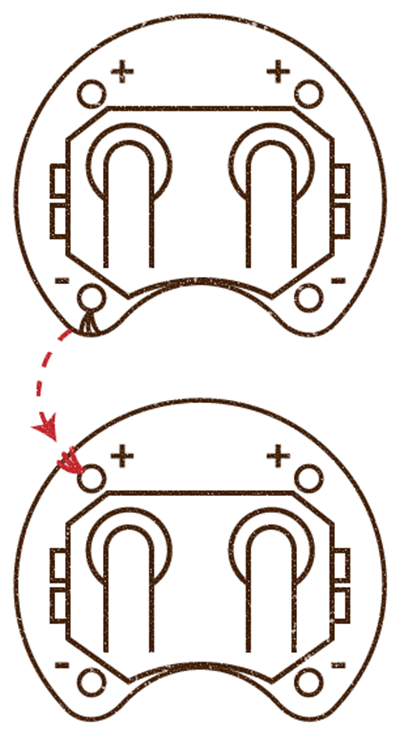
Next, place your second battery pack directly underneath the first one, with the positive pins pointed towards the negative pins of the first battery pack. Sew just one or two stitches from the negative pin you’ve already sewn down to the closest positive pin on the other pack, and stitch that positive pin down.
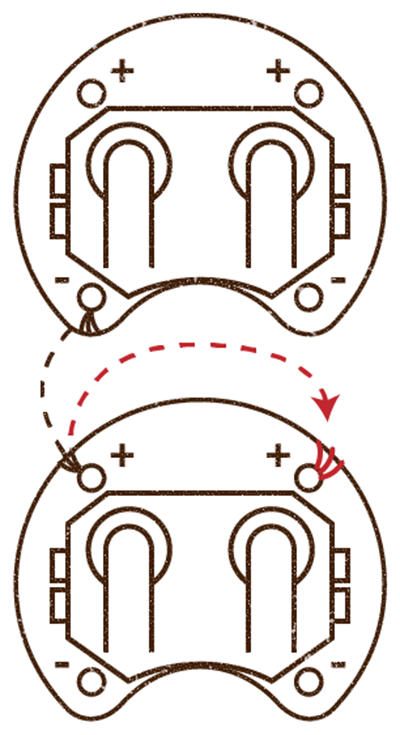
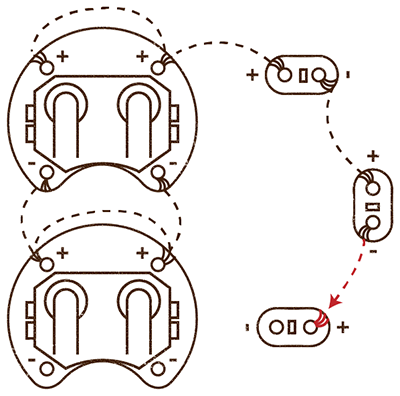
Sew from this positive pin, in several stitches to the other positive pin on this board, and sew the second pin down.
From this positive pin, take another stitch or two up to the remaining negative pin on the first battery pack.

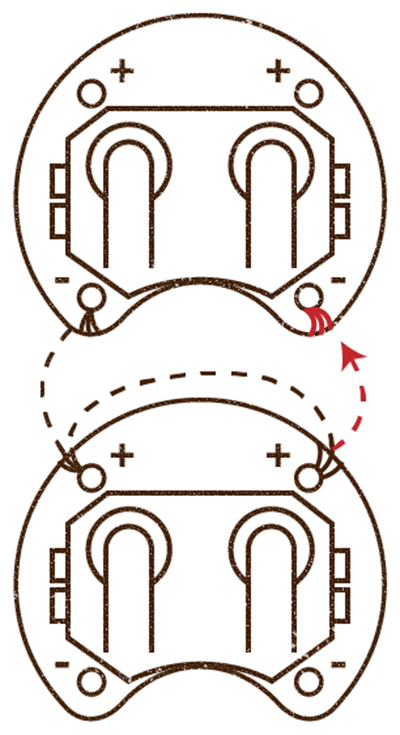
You should now have one set of negative pins attached to one set of positive pins, with another set of each unsewn positives and negatives pointed up and down, respectively. Knot and cut your thread, getting ready to sew a new trace. Start up at the unsewn positive traces, which should be at the top edge of your top battery pack. Sew down the pin furthest from the side you’d like your LEDs on, then sew a few stitches to the other positive pin and sew that down as well.
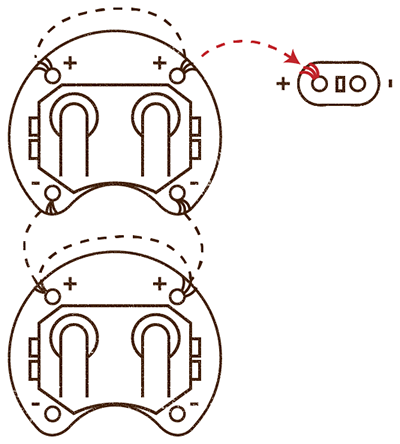
From here, sew to where you’d like your first LED, and sew down the positive pin. Knot and cut your thread here.
Re-knot your thread and sew down the negative pin of the same LED with the new length of thread. The positive and negative sides of this LED should not be connected to each other by any thread. Sew from this negative pin to where you would like the positive pin of the next LED to be, and sew that positive pin down. Once again, knot and cut your thread.
Start again with your new thread and sew the negative pin of the second LED to the positive pin of the third LED, then knot and cut your thread.
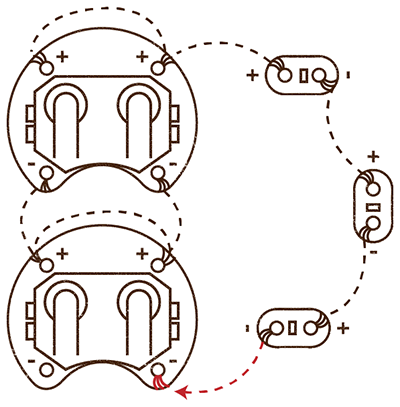
With this last independent length of thread, sew down the negative pin of the third LED, and sew from there to the nearest negative pin of the bottom battery pack; these negative pins should be the last ones left unsewn. continuing this trace, sew the first negative battery pin down.
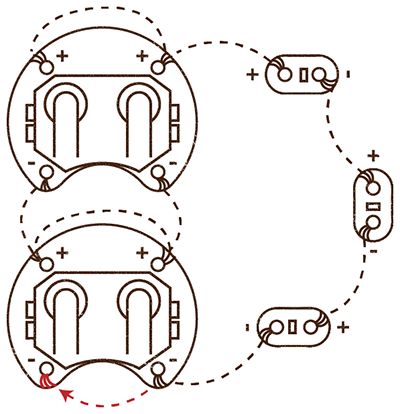
Sew a few stitches to the other negative pin of the battery pack, and sew that down as well. Knot and cut your thread, and take a quick look for long thread end, dangling thread, loose stitches, or other problems that could cause shorts.

Once you’re sure you don’t have any extraneous thread mucking up your circuit, put both batteries in. All three LEDs should light up! Depending on the colors you’ve used, you’re likely to see that the lights in the parallel circuit are significantly brighter than the ones in the series circuit.
Resources and Going Further
Ready to learn more? Explore the next LDK experiment or have a look at some of our other e-textile tutorials.