LDK Experiment 1: Lighting Up a Basic Circuit
 Dia
Dia 
Positive Trace
The positive trace will take power from the power supply to the positive side of the LED.
Start with your battery pack; this will supply power to your circuit. Don’t put the battery in yet; we won’t do that until the end. While you’re sewing, you’re liable to create small short circuits, just by touching across the circuit with your needle or the length of your thread. If the battery is on, these ‘incidental shorts’ will drain it.
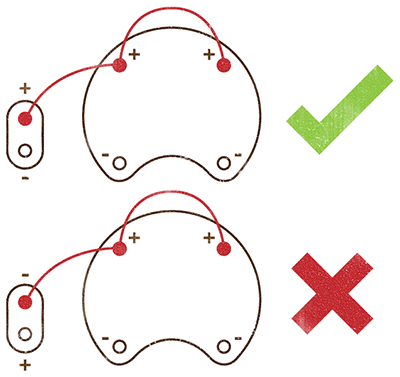
Place the battery pack near where you would like to put your LED, making sure that you’ve got one hole with a plus sign and one hole with a negative sign pointed towards the intended LED location. These holes are called ‘pins,’ and you’re looking at the positive and negative pins of your battery pack. When you’ve got your battery pack placed where you’d like it, you can start sewing. Push the needle up through the fabric, bringing it through the positive hole furthest from where you’d like to put your LED. Pull the thread all the way through until the knot you made is firmly against the back of your fabric. Pass the needle back through the top of the fabric to the bottom, just outside of the hole, so that you form a small loop that the edge of the board is trapped in. Pull the thread tight again- your board should now be attached to the fabric by one stitch. This is your first stitch. You’ll repeat this process three times on this pin and on every pin you sew down in this circuit. Go ahead and tack this pin down with two more stitches, and it should look like this:

Next you need to sew to the second positive pin of the battery pack. You don’t want one big stitch between these two pins. Large stitches are loose, will move around, touching parts of the circuit they’re not meant to touch, and will cause shorts. Instead, put several small stitches between pins, making sure you’ve pulled them tight before you begin to stitch down the next pin. The easiest way to do this is with what’s called a running stitch.
Once you’re at your second positive pin, sew it down with three tight stitches, repeating the process from the first pin.

From here, it’s time to sew to the positive side of your LED. Continue with the same thread you’ve been using and sew a straight line from the second positive pin to where you would like the positive pin of your LED to be.
Double check that you’ve got the positive LED pin- LEDs are polarized, so if you sew it in backwards, it won’t light up. The good news is that this won’t damage your LED at all; you’ll just have to cut it back out and put it back in the other way.
Once you’re sure you’ve got the orientation right, you can sew down the positive pin with three stitches, just like you did with both positive battery pack pins.
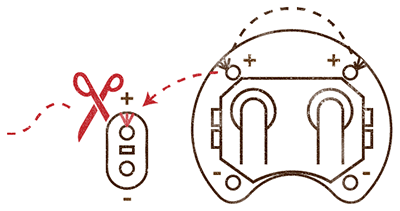
This is the end of the positive trace! We’re half done, and you can tie off your thread and cut it. Do not continue around the LED and sew down the next pin!