Firefly Jar Assembly Guide
 b_e_n,
  Mando
Mando 
Getting Started
This tutorial uses the Firefly Jar Kit.
Firefly Jar Kit
KIT-11833Ok, we're ready to get started with our Firefly kit. Please note that you'll have to snap apart your ProtoSnap LilyTwinkle Board into all of these separate components listed below. You may need to use snips to break them apart. Let's go over all the things you'll need to sew your project together:
LilyPad ProtoSnap includes:
- LilyTwinkle
- 4 LilyPad LEDs
- LilyPad Coin Cell Battery Holder (Switched)
- 3V Coin Cell Battery
** Other components include: **
- Bobbin of Conductive Thread
- Felt Jar Lid
- Two Identical Felt Jar Layers
- Sewing Needles

For the graphics in this tutorial, we'll be using a key that helps explain what is going on at each step:

Now let's get sewing!
Suggested Reading
If you've never worked with e-textiles before, you may want to have a look at these other tutorials.
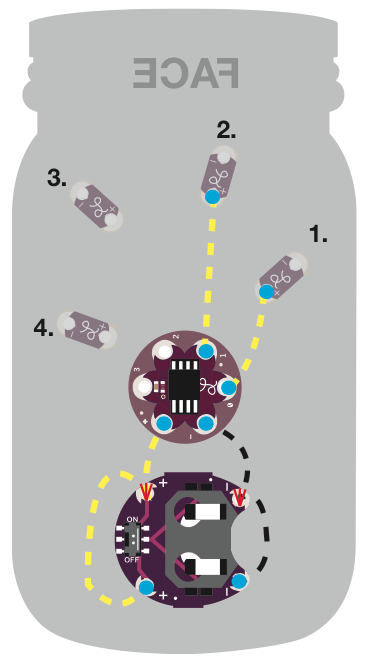
Step 1: Positively Powerful
NOTE!
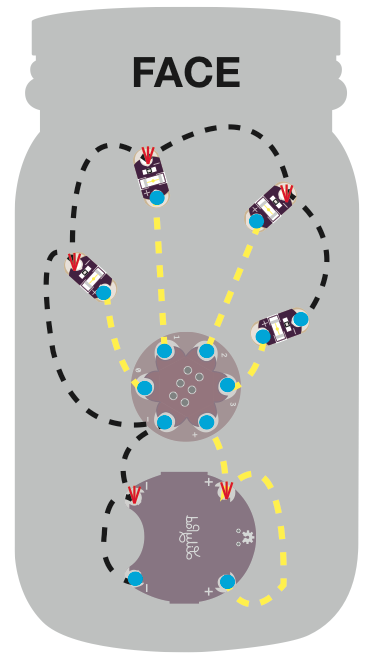
Be aware that the grayed out components on the schematic indicate that they are on the opposite side of the felt piece. Please pay attention to the direction of the word “FACE”.
NOTE!
You will only need one felt jar cutout to sew your components into. Put the other one away for now. Position your components similar to what you see in the schematics. Pay attention to which way FACE is oriented.
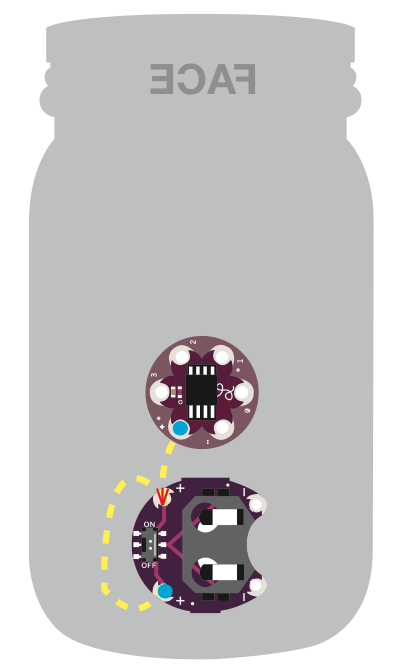
- Start by looping 2-3 times through and around the bottom positive pin of the battery holder.
- Sew up to the top positive pin. Loop through and around that pin 2-3 times.
- Sew up to the positive pin on the microcontroller. Loop and knot it there. Cut off any excess thread.
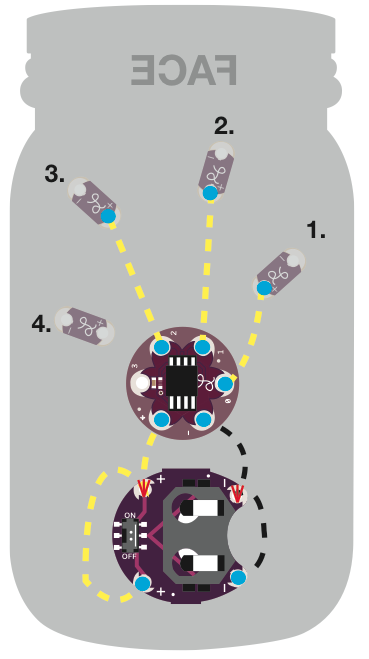
Step 2: Get Grounded
Be aware that the grayed out components on the schematic indicate that they are on the opposite side of the felt piece. Please pay attention to the direction of the word “FACE”.
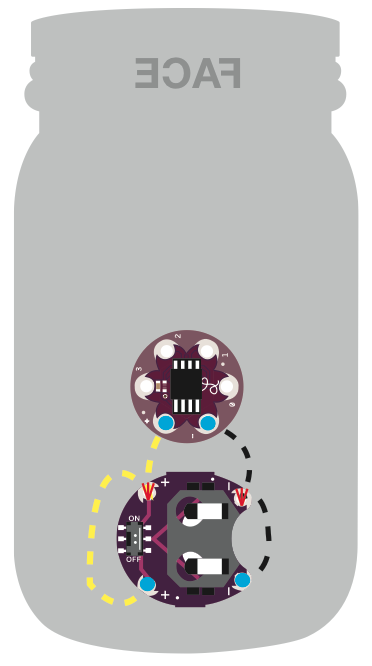
- With a new piece of thread loop 2-3 times through and around the bottom negative pin of the battery holder.
- Sew up to the top negative pin. Loop through and around that pin 2-3 times.
- Sew up to the negative pin on the microcontroller. Loop and knot it there. Cut off any excess thread.
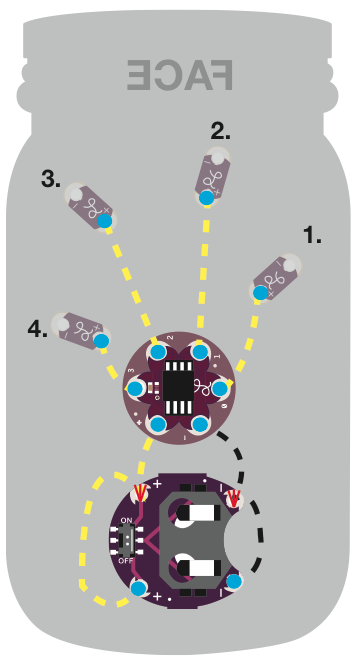
Step 3: First LED
Be aware that the grayed out components on the schematic indicate that they are on the opposite side of the felt piece. Please pay attention to the direction of the word “FACE”.
Be aware that the LEDs need to be placed light side up on the opposite side of this piece of felt. Step 8 shows you how it’s supposed to look. You’ll use a new piece of thread for each of these LEDs you sew into place for steps 3-6.
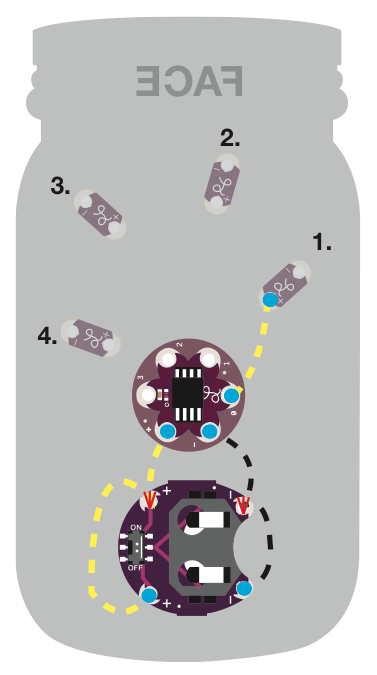
- Loop your new thread piece through and around pin 0 on the microcontroller 2-3 times.
- Sew up to the positive pin of LED 1. Loop and knot it there. Cut off any excess thread.
Step 4: LED: the Sequel
Be aware that the grayed out components on the schematic indicate that they are on the opposite side of the felt piece. Please pay attention to the direction of the word “FACE”.
- Loop your thread through and around pin 1 on the microcontroller 2-3 times.
- Sew up to the positive pin on LED 2. Loop and knot it there. Cut off any excess thread.
Step 5: LED the Third
Be aware that the grayed out components on the schematic indicate that they are on the opposite side of the felt piece. Please pay attention to the direction of the word “FACE”.
- Loop your thread through and around pin 2 on the microcontroller 2-3 times.
- Sew up to the positive pin of LED 3. Loop and knot it there. Cut off any excess thread.
Step 6: Last LED!
Be aware that the grayed out components on the schematic indicate that they are on the opposite side of the felt piece. Please pay attention to the direction of the word “FACE”.
- Lastly, loop your thread through and around pin 3 on the microcontroller 2-3 times.
- Sew up to the positive pin of LED 4. Loop and knot it there. Cut off any excess thread.
Step 7: You're SEW Negative!
Be aware that the grayed out components on the schematic indicate that they are on the opposite side of the felt piece. Please pay attention to the direction of the word “FACE”.
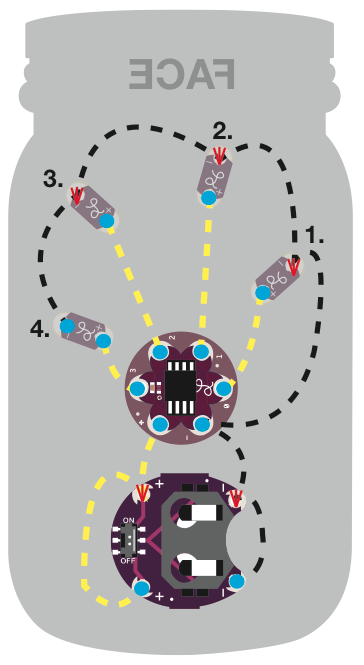
- Next, cut a long piece of thread (2 feet) and loop through and around the negative pin on the microcontroller 2-3 times and continue sewing up to your first negative pin on LED 1.
- Loop through and around it there 2-3 times and continue your trace from right to left. Loop 2-3 times through and around each of the negative pins on LEDs 2-4.
- Once you reach the negative pin on LED 4, loop and knot it there. Cut off any excess thread.
- Hooray! This completes your sewing. Check out Step 8 to see what to do next!
Step 8: Check Yourself
NOTE!
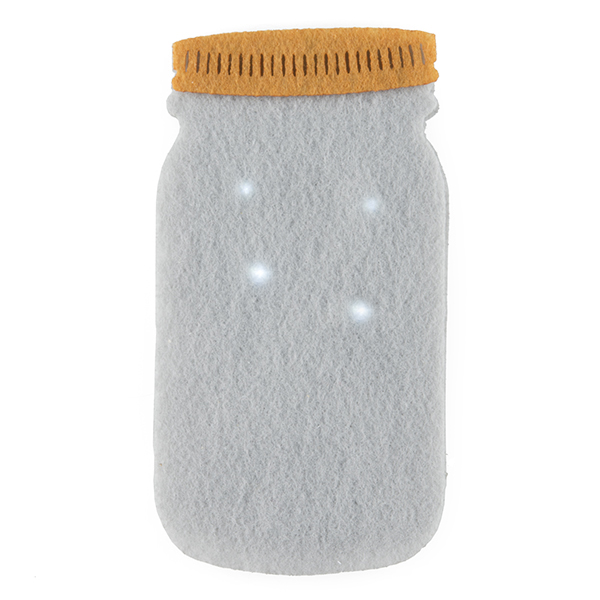
This felt pattern is now FLIPPED OVER TO THE FRONT FACING SIDE.
- Check to make sure your firefly jar looks like this from the front side where the LEDs are.
Step 9: Testing 1,2,3
Be aware that the grayed out components on the schematic indicate that they are on the opposite side of the felt piece. Please pay attention to the direction of the word “FACE”.

- Slide the coin cell battery, positive (+) side up, into the battery holder to test your project. Turn it on and make sure it lights up.
- Perform any troubleshooting if necessary. (Refer to the E-Textile Basics tutorial for help if you need it.)
NOTE!
Make sure to turn your switch off before continuing to step 10.
Step 10: Cover it Up
NOTE!
This felt pattern is now FLIPPED OVER TO THE FRONT FACING SIDE.
- Make sure to leave the back side of the sewn felt exposed so you can access the battery holder and switch.
There are two ways you can finish your firefly jar:
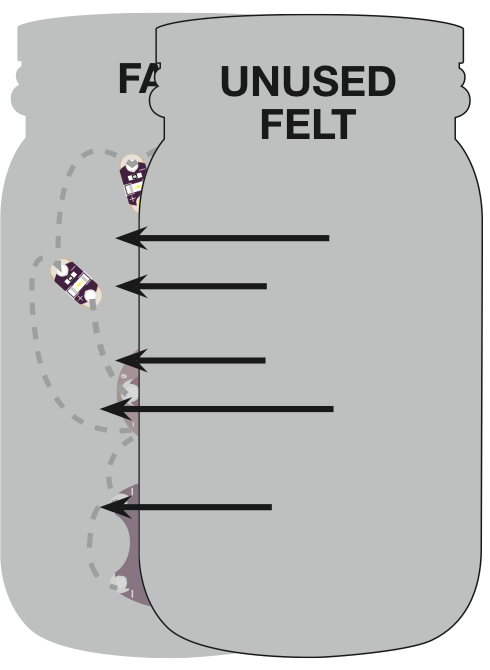
A. Lay the unused felt you set aside earlier over the LED exposed side of the sewn felt. Sew the edges together with regular thread or
B. Spray glue the unused felt. Stick that piece to the LED exposed side of the sewn felt.
Step 11: Put a Lid on It


- Take your felt lid and sew or spray glue it onto the top of the unused felt.
Step 12: Let there be Light!
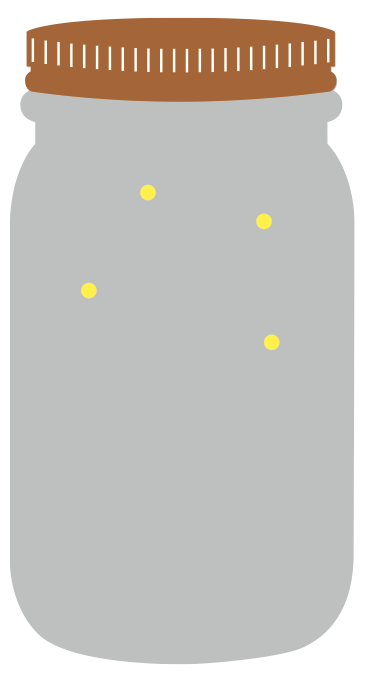
- Put your coin cell battery back in the battery holder, flip the switch to 'ON' and watch as your fireflies light up! Enjoy!
Further Reading
Now that you've mastered the art of firefly-jar e-texile fabrication, you may want to check out some of these other tutorials: