How to Install and Setup EAGLE
 jimblom
Introduction
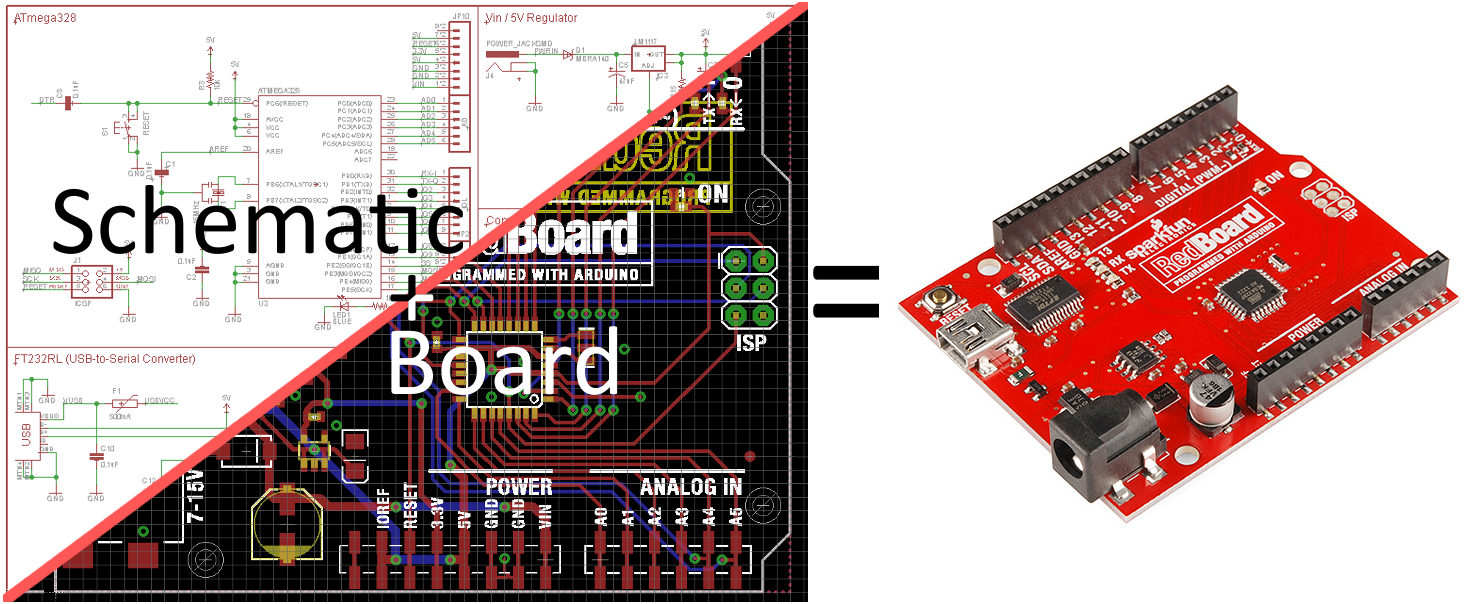
Printed circuit boards (PCBs) are the backbone of every electronic gizmo out there. They're not flashy like those microprocessors, or abundant like resistors, but they're essential to making all components in a circuit connect together just right.
We LOVE designing PCBs here at SparkFun. It's a love that we want to spread. It's a skill that benefits electronics enthusiasts of every caliber. Through this and a series of tutorials, we'll explain how to design a PCB using EAGLE -- the same software we use to design all of our PCBs.
This first tutorial goes over how to install the software, and tailor-fit its interface and support files.
Why EAGLE?
EAGLE is one of many PCB CAD softwares out there. So you might ask: "What makes EAGLE so special?" We're fond of EAGLE for a few reasons in particular:
- Cross-platform -- EAGLE can run on anything: Windows, Mac, even Linux. This is a feature not too many other PCB design softwares can boast.
- Lightweight -- EAGLE is about as svelte as PCB design software gets. It requires anywhere from 50-200MB of disk space (compared to the 10+GB more advanced tools might require). The installer is about 25MB. So you can go from download to install to making a PCB in minutes.
- Free/Low-Cost -- The freeware version of EAGLE provides enough utility to design almost any PCB in the SparkFun catalog. An upgrade to the next license tier (if you want to make a profit off your design) costs at least two orders of magnitude less than most high-end tools.
- Community support -- For those reasons, and others, EAGLE has become one of the go-to tools for PCB design in the hobbyist community. Whether you want to study the design of an Arduino board or import a popular sensor into your design, somebody has probably already made it in EAGLE and shared it.
Of course, EAGLE has its drawbacks too. More powerful PCB design tools out there might have a better autorouter, or nifty tools like simulators, programmers, and 3D viewers. For us though, EAGLE has everything we need to design simple-to-intermediate PCBs. It's an excellent place to start if you've never designed a PCB before.
Recommended Reading
Here are a few tutorial and concepts you may want to familiarize yourself with before dropping down into this rabbit hole:
Download, Install, Run
EAGLE is available from Autodesk either as part of the Fusion 360 software package or you can a free version of just EAGLE here. Grab the version that matches your operating system (the software is available for Windows, Mac and Linux). It's a relatively light download -- about 125MB.
EAGLE installs just like most programs. The download is an executable file; open it and follow the installation instructions.
Licensing EAGLE
One of our favorite things about EAGLE is that it can be used for free! The free download is limited version for hobbyists. The free download is a Personal Learning License that may be used by individuals for personal, non-commercial use. There are a few limitations to be aware of when using the free version:
- Your PCB design is limited to a maximum size of 80cm2 (12.4in2) of PCB real estate, which is still pretty darn big. Even if you're designing a big 'ol Arduino shield, you'll still be well under the maximum size.
- Only two signal layers allowed. If you need more layers look into upgrading to the single-user Fusion 360 license.
- Only two sheets in your schematic editor.
- The Personal Learning License is limited to personal, non-commercial use by individuals. If you're going to go out and sell your design, you'll want to check out the single-user EAGLE license included with a Fusion 360 License.
Those limitations still make EAGLE an amazing piece of software. Engineers here at SparkFun could design 99% of our boards using the freeware version, if not for that pesky non-profit stipulation. You still have access to all phases of the EAGLE software, including the Autorouter.
If you need to upgrade your license, this page goes over how to upgrade it. Autodesk also offers an Educator Plan for students and educators.
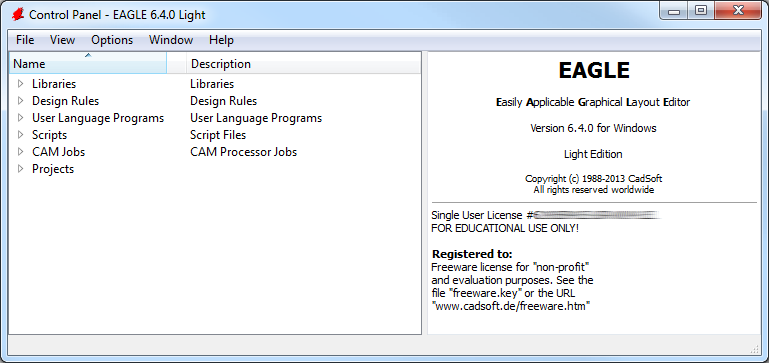
Exploring the Control Panel
The first time you open up EAGLE, you should be presented with the Control Panel view. The Control Panel is the "homebase" for Eagle, it links together all of the other modules in the software.
You can explore the six separate trees in the control panel, which highlight separate functions of the software:
- Libraries -- Libraries store parts, which are a combination of schematic symbol and PCB footprint. Libraries usually contain a group of related parts, e.g. the atmel.lbr stores a good amount of Atmel AVR devices, while the 74xx-us.lbr library has just about every TTL 74xx series IC there is.
- Design Rules (DRU) -- Design rules are a set of rules your board design must meet before you can send it off to the fab house. In this tree you'll find DRU files, which are a a pre-defined set of rules.
- User Language Programs (ULPs) -- ULPs are scripts written in EAGLE's User Language. They can be used to automate processes like generating bill of materials (bom.ulp), or importing a graphic (import-bmp.ulp).
- Scripts (SCR) -- Script files can be used to customize the EAGLE user interface. In one click you can set the color scheme and assign key bindings.
- CAM Jobs (CAM) -- CAM jobs can be opened up by the CAM processor to aid in the creation of gerber files.
- Projects -- This is where each of your projects are organized into a single project folder. Projects will include schematic, board design, and possibly gerber files.
If you select a file in a tree, information about it will appear in the right-hand portion of the window. This is a great way to explore libraries, project designs (EAGLE comes with some fun examples), or to get a good overview of what a script's purpose is.
Using the SparkFun Libraries
Included with EAGLE is an impressive list of part libraries, which you can explore in the Control Panel view. There are hundreds of libraries in here, some devoted to specific parts like resistors, or NPN transistors, others are devoted to specific manufacturers. This is an amazing resource! But it can also be a bit overwhelming. Even if you just want to add a simple through-hole electrolytic capacitor, there are dozens of libraries and parts to sort through to find the right thing.
Instead of using the hundreds of default libraries, you can use the SparkFun EAGLE Libraries, which are filtered down to only include the parts that we've used in designs ourselves. And they're constantly updated with new parts we've discovered.
Here's how you can install and use the SparkFun libraries instead of (or in addition to) the default ones:
Step 1: Download the SparkFun Libraries
The most recent version of the libraries can always be found in the GitHub repository. For help using GitHub, check out our Using GitHub tutorial. Basically, all you'll need to do from the main repository page is click "Download ZIP".
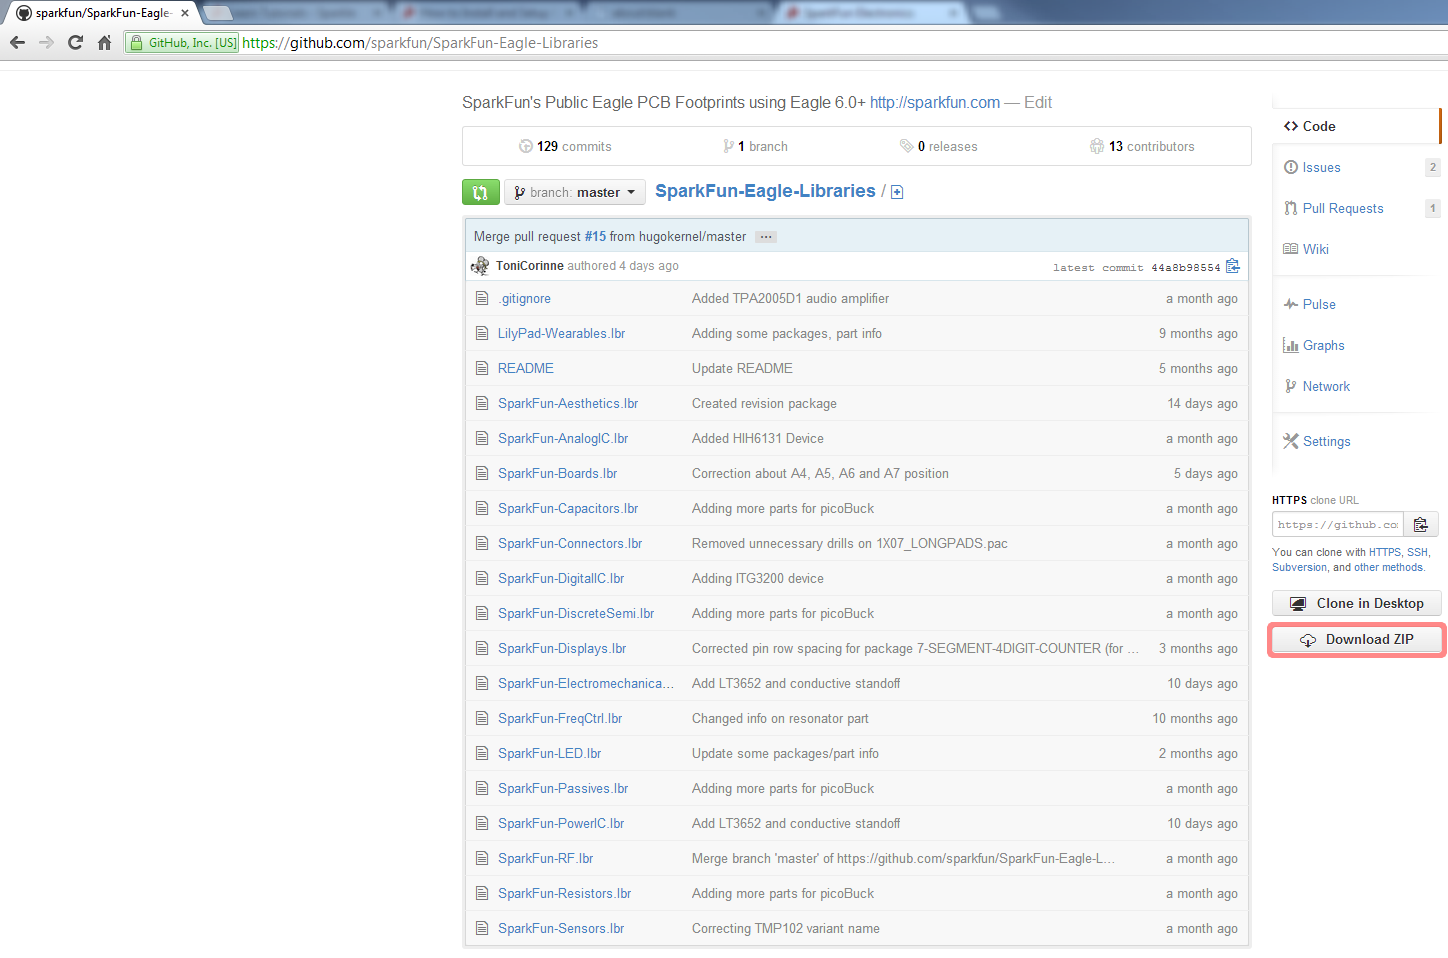
Save the ZIP file somewhere handy. Then extract the folder -- don't forget where it is!
Step 2: Updating the Directories Window
Back to the EAGLE Control Panel window now. Go to the "Options" menu and then select "Directories". This is a list of computer directories where EAGLE looks when it populates all six objects in the tree view...including libraries.
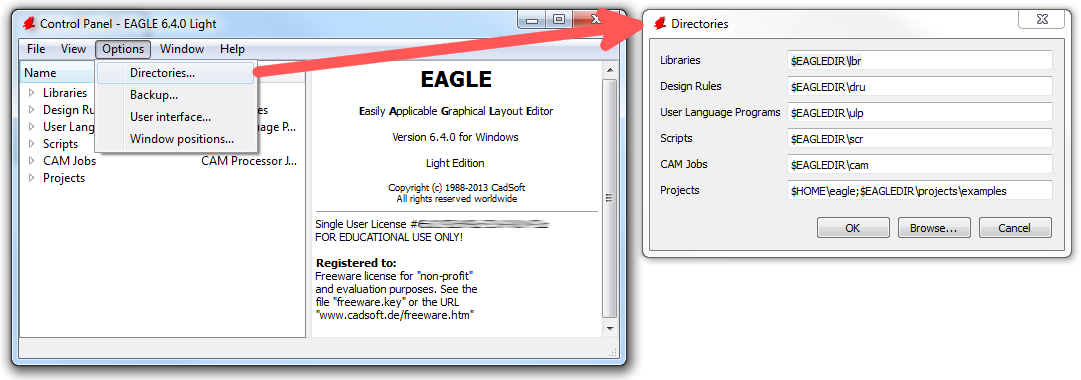
In the "Libraries" box is where we'll add a link to the directory where the SparkFun EAGLE libraries are stored. There are a few options here. If you'd like to keep the default libraries and add the SparkFun library, add a semicolon (;) after "$EAGLEDIR\lbr", and paste the SparkFun EAGLE Libraries directory location after that.
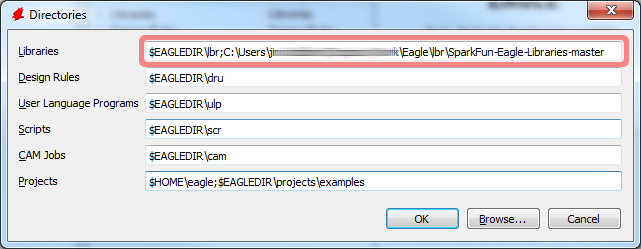
Note: Mac and Linux users should place a colon (:) between directories instead of the semicolon.
Step 3: "Using" Libraries
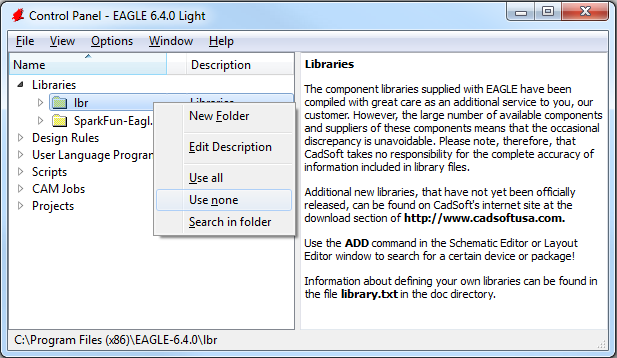
Now, when you go back and look at the "Libraries" tree, there should be two folders included, one of which should be our SparkFun Eagle Libraries. The last step is to tell EAGLE that, for now at least, we don't want to use the default libraries. To do this, right click on the "lbr" folder, and select "Use none".
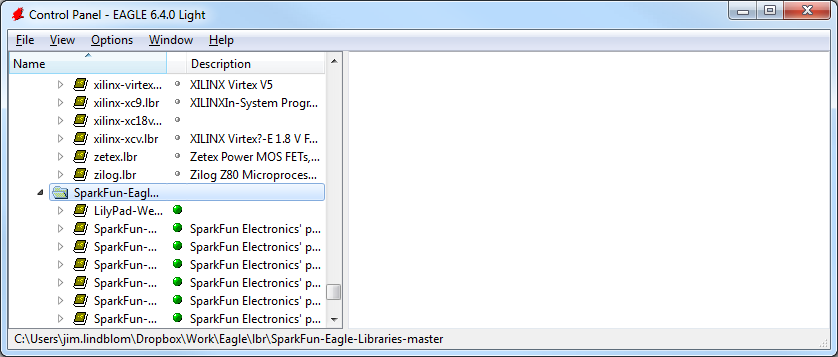
Then, right-click on the "SparkFun-Eagle-Libraries-master" folder, and select "Use all". Then check the libraries in each of the two folders. Next to them should be either a grey or green dot. A green dot next to a library means it's in use, a grey dot means it's not. Your libraries tree should look a little something like this:
If you've created library parts that you would like to share with SparkFun to include in our Eagle library, visit this tutorial to see how.
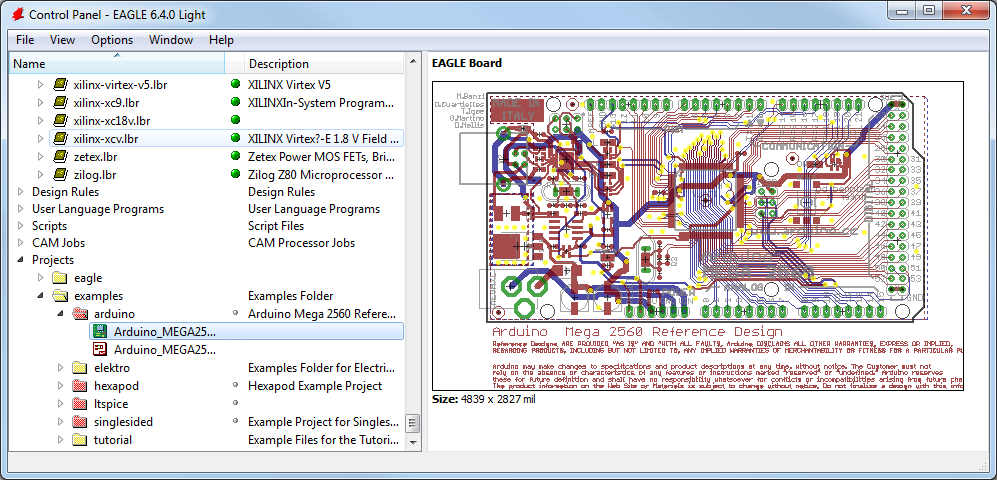
Opening a Project and Explore
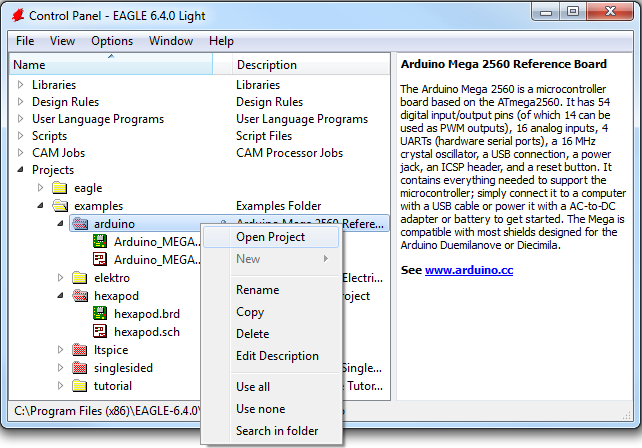
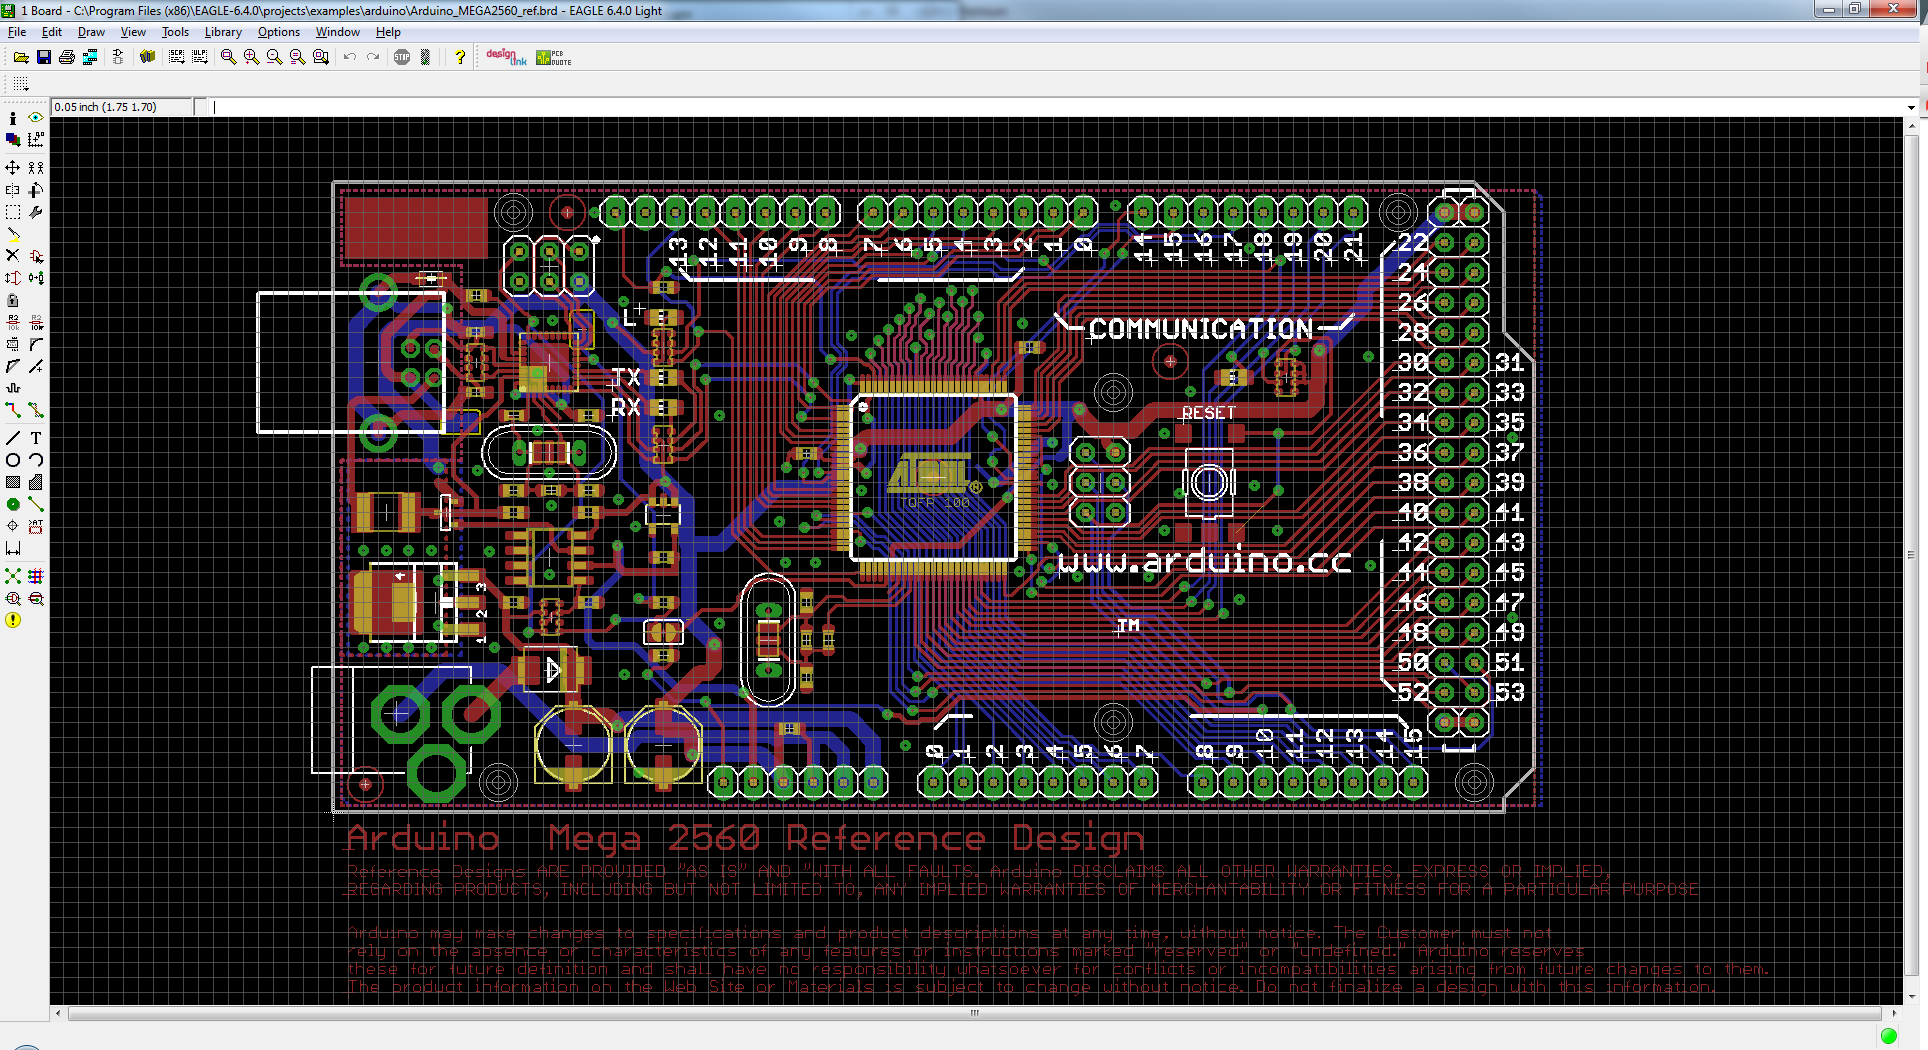
EAGLE is packaged with a handful of nifty example PCB designs. Open one up by expanding the "Projects" tree. From there, under the "examples" folder open up the "arduino" project by double-clicking the red folder (or right-clicking and selecting "Open project"). Note that, in this view, project folders are red and regular folders are the standard yellow.
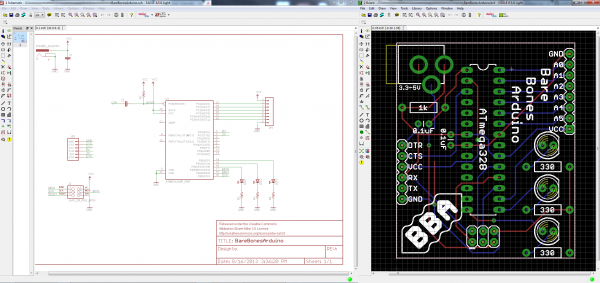
Opening the project should cause two more EAGLE windows to spawn: the board and schematic editors. These are the yin and the yang of EAGLE. They should be used together to create the finished product that is a functional PCB design.
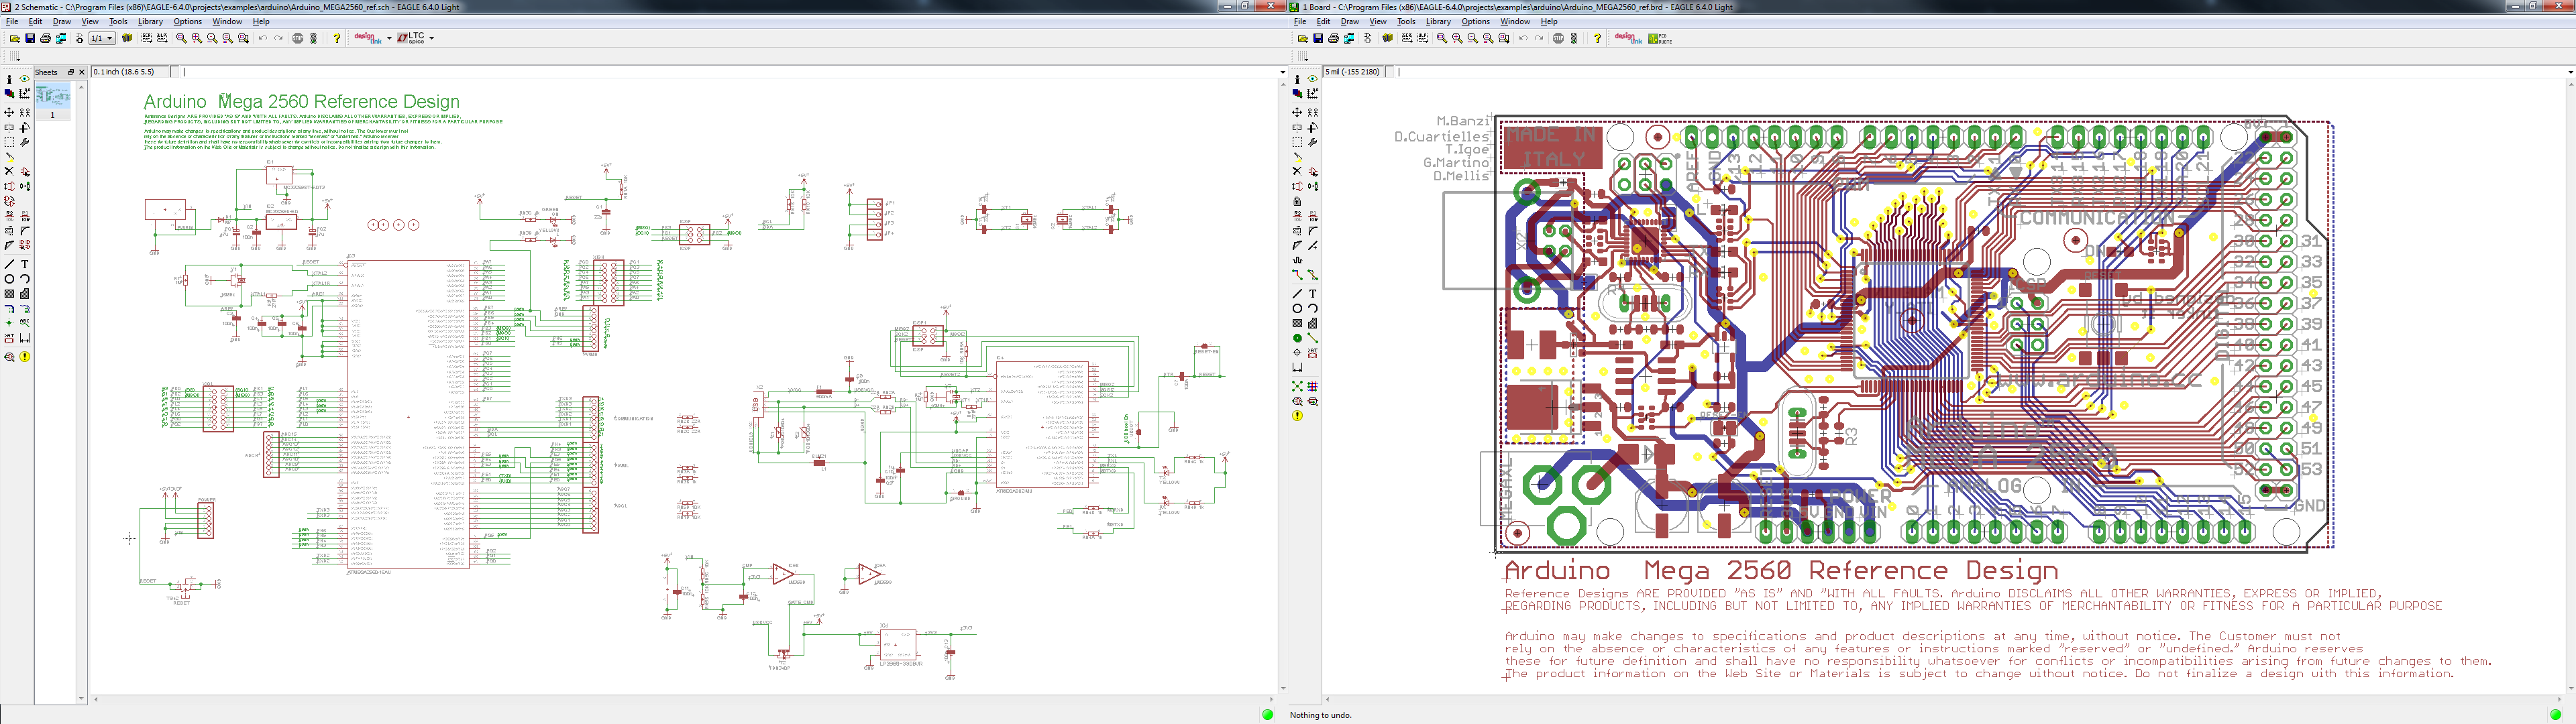
The schematic editor (on the left above) is a collection of red circuit symbols which are interconnected with green nets (or wires). A project's schematic is like the comments in a program's code. It helps tell the story of what the board design actually does, but it doesn't have much influence on the end product. Parts in a schematic aren't precisely measured, they're laid out and connected in a way that's easy to read, to help you and others understand what's going on with the board design.
The board editor is where the real magic happens. Here colorful layers overlap and intersect to create a precisely measured PCB design. Two copper layers -- red on top, blue on the bottom -- are strategically routed to make sure different signals don't intersect and short out. Yellow circles (on this design, but they're more often green) called "vias" pass a signal from one side to the other. Bigger vias allow for through-hole parts to be inserted and soldered to the board. Other, currently hidden, layers expose copper so components can be soldered to it.
Keep Both Windows Open!
Both of these windows work hand-in-hand. Any changes made to the schematic are automatically reflected in the board editor. Whenever you're modifying a design it's important to keep both windows open at all times.
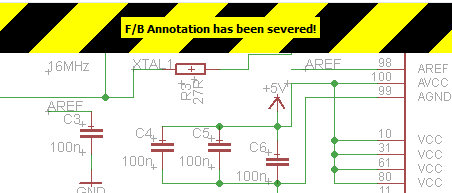
If, for instance, you closed the board window of a design, but continued to modify a schematic. The changes you made to the schematic wouldn't be reflected in the board design. This is bad. The schematic and board design should always be consistent. It's really painful to backtrack any changes in an effort to reattain consistency. Always keep both windows open!
There are a few ways to tell if you don't have consistency between windows. First, there's a "dot" in the lower-right hand corner of both windows. If the dot is green, everything is groovy. If the dot is magenta, a window's probably closed that shouldn't be. Second, and more obvious, if you close either of the two windows a big, huge warning should pop up in the other:
If you see that warning STOP doing anything, and get the other window back open. The easy way to get either a board or schematic window back open is by clicking the "Switch to board/schematic" icon --  /
/  (also found under the "File" menu).
Navigating the View
This is a subject that's usually glazed over, but it's important to know how to navigate around both of these windows.
To move around within an editor window, a mouse with a scroll wheel comes in very handy. You can zoom in and out by rotating the wheel forward and backward. Pressing the wheel down, and moving the mouse allows you to drag the screen around.
If you're stuck without a three-button mouse, you'll have to resort to the view options to move around the editor views. All of these tools are located near the middle of the top toolbar, or under the "View" menu. The zoom in --  -- and zoom out --
  -- tools are obviously handy. So is the "Zoom select" tool --
  -- which alters the view to your selection. But really, if you're serious about using EAGLE...get a mouse!
Configuring the UI
EAGLE's user interface is highly customizable. Anything from the background color, to layer colors, to key bindings can be modified to fit your preference. Better tailoring your interface can make designing a PCB much easier. On this page we'll talk about how we at SparkFun prefer to customize our UI. None of these steps are required. Customize your UI as you see fit. These are just the settings that we've grown accustomed to.
Setting the Background Color
The first adjustment we always make to the UI is the background color of the board editor. The standard white background doesn't always meld very well with the array of colored layers required for board design. Instead, we usually opt for a black background.
To change the background color, go up to the "Options" menu and select "User interface".
Inside the "Layout" box you can set the background to black, white, or a specific color.
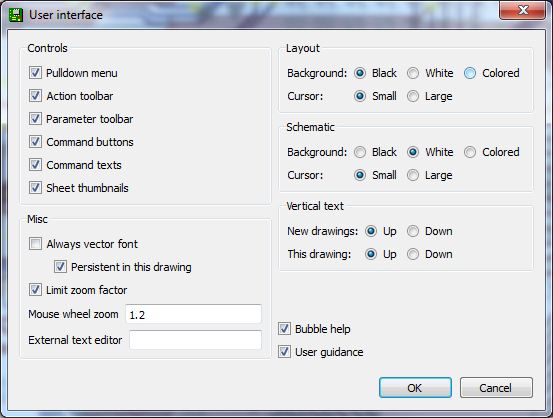
There are other options in this box to be explored, but you may want to hold off on adjusting most until you have more experience with the software.
Adjusting the Grid
Another UI improvement we like to make in the board editor is turning the grid on. Dimensions and sizes are so important to the design of your PCB, having some visible reminders of size can be very helpful. To turn the grid view on, click the  icon near the top-left corner of the board window (or go to the "View" menu and select "Grid").
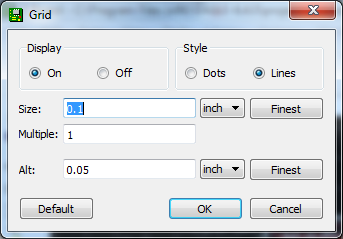
Switch the "Display" radio button over to "On". We'll also make the grid a bit less fine by setting the "Size" to 100 mil (0.1") and "Alt" to 50 mil (0.05").
Running Scripts
Scripts are a much more streamlined way to quickly configure your interface. With one click of the button, you can automatically set up all of your colors and key binds. Script files can also be shared, and run by anyone. Running the SparkFun EAGLE script will get your UI to exactly match ours.
First, click here to download the script (in a zip folder). Unzip the "spk.scr" file to a location you'll remember.
Then you'll need to run the script. In the board window click on the Script icon --  (or go to "File" then "Execute Script"). In the file browser, select the "spk.scr" file you just downloaded and unzipped.
This should automatically set up your color scheme to look a little something like this:
This UI setup presents a nice logical view of the layers. The important copper layers are very visible, but distinct (red on top, blue on bottom, green for vias), and the silkscreen is white as it is on most PCB designs.
All of these colored layers will make more sense as you continue to use and explore EAGLE.
SparkFun Custom Eagle Settings
To find SparkFun's most up-to-date script, and other useful files, check out our EAGLE settings repository hosted on GitHub!
Resources and Going Further
If you've got EAGLE set up, and you're chomping at the bit to start designing a PCB, your next step should be over to our 2-part Using EAGLE tutorials: Using EAGLE: Schematic and Using EAGLE: Board Layout. That pair of tutorials will explain how to go from a schematic design, to laying out and routing a PCB, to generating gerber files and sending them to a fab house.
Or here are some other tutorials in our EAGLE series:
- How to Create SMD PCBs -- This should logically follow the PTH EAGLE tutorial. It's a bit more advanced and fast-paced.
- How to Create SMD Footprints -- If you want to create unique parts in a library, check out this tutorial.
- Making Custom Footprints in EAGLE -- Another footprint-making tutorial. This one details a unique process for making a custom 1:1 footprint.