Using GitHub to Share with SparkFun
 SFUptownMaker
Introduction
In early 2013, SparkFun made the decision to share all of the code and design files for our products via GitHub. While we've always striven to provide as much information on our products as possible (including complete source files; after all, we are all about Open Source!), in the past, that's been a very one-way channel. Our customers can see the source, download it, and use it as they please, but there's been no (easy) way for them to share changes with us (and, by extension, with the rest of the community).
By moving our product source to GitHub, we hope to change that. Obviously, the sheer number of products we have means that migrating them to GitHub is a slow process; in fact, we're not really trying to get all of our older products moved over at all. New products (those we design in house, anyway) will always launch with a GitHub repo containing at a minimum the source files for the product and most likely containing example code, getting started information, and a (curated, but open) wiki that can be used to exchange information with other users about the product.
What is git?

Git is a source control package originally developed by Linus Torvalds for tracking changes during development of the Linux kernel. It's intended to make collaboration on projects easier by allowing locally stored repositories to be synchronized against a remotely stored master copy.
As is so often the case, the choice of source control package tends to be a deeply personal and subjective matter. We chose git (and GitHub) because they offer good support for all the tools we use at a reasonable price and are free for our customers to use to interact with us.
So what's GitHub, then?
GitHub is, at it's most basic, a web-based collaboration tool based on the git source control package. It allows multiple users to access git projects (called "repositories"), track changes, manage revisions, and merge with each other's different version.
The demarcation between git and GitHub can be fuzzy at times, until you get used to the tools. In general, things happening on the command line are using the git tool, and GitHub interactions will be done through the web page interface.
Suggested Reading
This tutorial isn't meant to get you up to speed on how to use git, in general- it's really just a step-by-step guide to show you how to make a change in a SparkFun repository and share that change with us. If you want to learn more about git and GitHub in general, we've got a great tutorial about GitHub. Git is a phenomenal tool, even if you're not collaborating. Once you get the hang of it, it's super easy to use and extremely powerful.
Gitting Started
We're going to use the command line tools for git for this tutorial. While it may feel a bit archaic, the git command line interface has a couple of serious advantages:
- The command line interface is truly multiplatform. Following these instructions on a Mac, PC, or Linux box will all yield the same results.
- The command line interface is stable. There are lots of gui-based interfaces out there, and they change regularly. Even the official GitHub gui changes relatively often.
- The command line interface is predictable. It doesn't do things you don't ask it to do, as some graphical interfaces do.
Install the GitHub Client
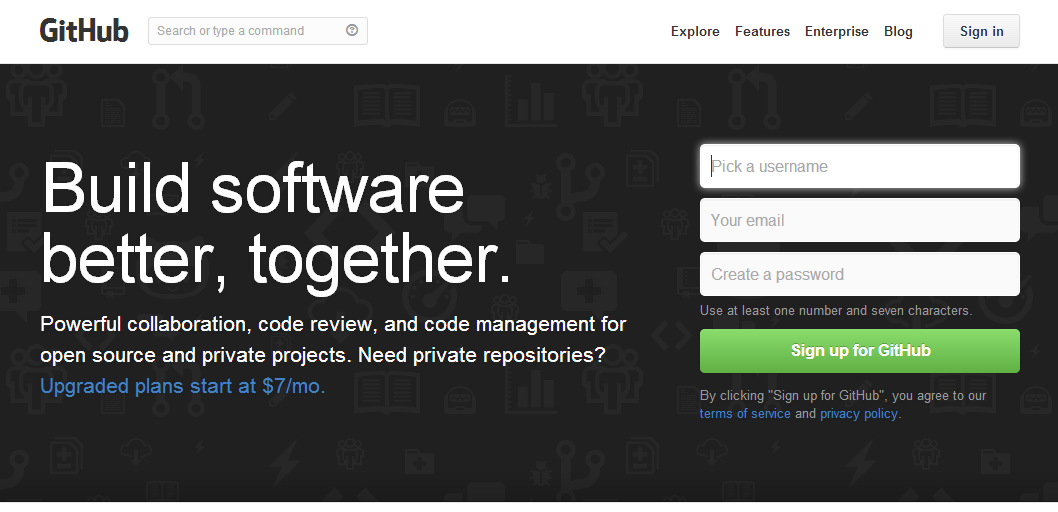
Visit the GitHub website, sign up for an account if you don't already have one, and install the client. I'm not going to go into the details of doing this here, because there are better instructions on their website. Go ahead and get this taken care of; I'll wait.
Once you've finished your installation, open a Git Shell window. Again, I'll let you follow their instructions on how to do this. I'm working in Windows 7, but the appearance of the command line window should be pretty similar no matter which operating system you're using. Regardless of the details (for example, the command line prompt you see), the git commands should behave the same way.
Once you've got the shell open, go ahead and type "git" and hit enter. The result should look something like this:
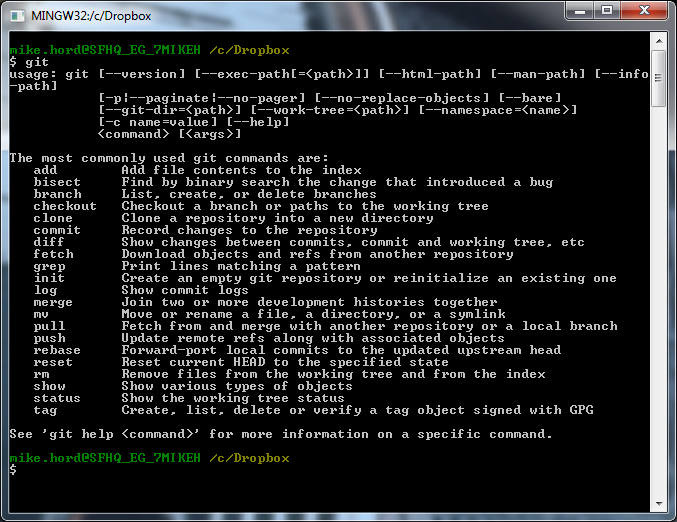
If you don't see the command summary, you're in the wrong kind of shell. Make sure that you launched a Git Shell, which should have installed with git.
Don't worry too much about these commands. We're really just concerned with whether or not you're in the right place to start working with git.
Forking a Repository
Now that we've gotten our client installed, we need to grab the repository that we want to make our changes on. We'll use the repository for the other GitHub tutorial for this example.
Fork Globally...
The first step is to fork the repository from SparkFun's account to your own. While there are other ways to take a copy of the repository and work with it, forking is the preferred method, because it makes it easier to submit pull requests (which notify the original owner that you have changes that you'd like considered for inclusion) later.
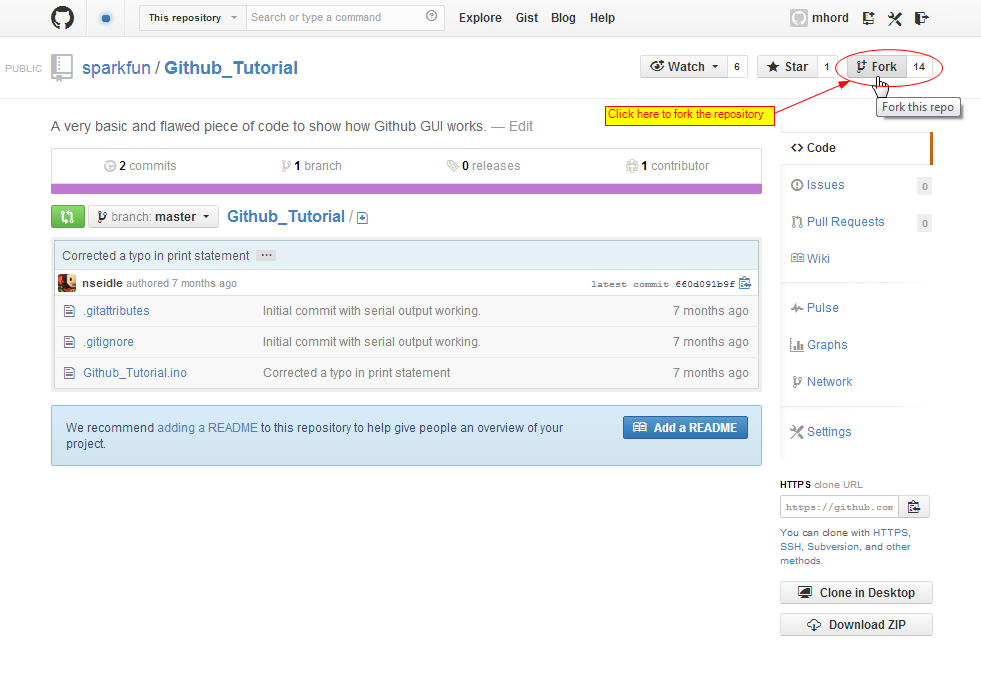
Once you're on the repository page, look for the "Fork this repo" button. You can see it in the image above; forking is core functionality of GitHub, so, even if the interface has changed slightly, you should be able to find it. Click the button and you'll see something like this:

Looks just like the old version, no? If you'll note, though, the account name is different--now it's in my account rather than the SparkFun account.
...Code Locally
Now we need to make a local copy. While you can edit simple text files directly on GitHub, it's reasonable to assume most of your work will be done on a local terminal. Pick a location to store the files that you'll be working with (I store mine in a folder called "Projects" in my DropBox folder; git plays very well with DropBox!). Here's a sequence of commands to get those files from GitHub to your local computer and store them in a directory of your choosing:
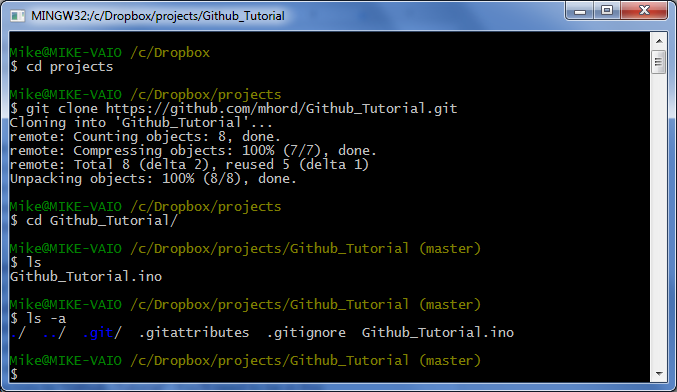
Let's take the commands here one at a time:
cd projects- change directory to "projects". This is where I keep, well, my projects.git clone https://github.com/mhord/Github_Tutorial.git- Tell git you want to clone the repository located at this address. The address is case sensitive and git will choke if it's not exactly right. Cloning creates a copy of the repository, complete with push and pull links back to the original on GitHub. We'll talk about what this means in a bit.cd Github_Tutorial/- change directory to "Github_Tutorial". You'll need to be in this directory whenever you're working with this repository.ls- list the files in the directory.ls -a- list all the files currently in the directory. Files and folders prepended with a '.' will not normally show up when you type "ls", so you need the -a switch to see them.
The .git directory contains all the "under-the-hood" stuff git needs to work its magic. Never, ever mess with it. .gitattributes contains some bookkeeping information telling git how to deal with certain file types; you don't really need to worry about it now, as it's not something you'll be modifying and is not found in all repositories. .gitignore is a text file telling git which files it should skip when committing changes. A good example of files that you might want to exclude are .o files when building a software project, or the .b#x and .s#x files that EAGLE creates as back-ups when you're editing board layouts or schematics.
Other files should be pretty self-explanatory--they're the "meat", the stuff you're really interested in editing.
Committing, Pushing and Pulling
Now that you've got a local copy and a copy on your GitHub account, there are four things that you'll need to know how to do in order to collaborate with SparkFun:
- Commit - committing is the process which records changes in the repository. Think of it as a snapshot of the current status of the project. Commits are done locally.
- Push - pushing sends the recent commit history from your local repository up to GitHub. If you're the only one working on a repository, pushing is fairly simple. If there are others accessing the repository, you may need to pull before you can push.
- Pull - a pull grabs any changes from the GitHub repository and merges them into your local repository.
- Sync - syncing is like pulling, but instead of connecting to your GitHub copy of the forked repo, it goes back to the original repository and brings in any changes. Once you've synced your repository, you need to push those changes back to your GitHub account.
Committing
The first step in getting a change back to us is to commit it to your local repository. Look at this sequence of commands:
Again, one command at a time:
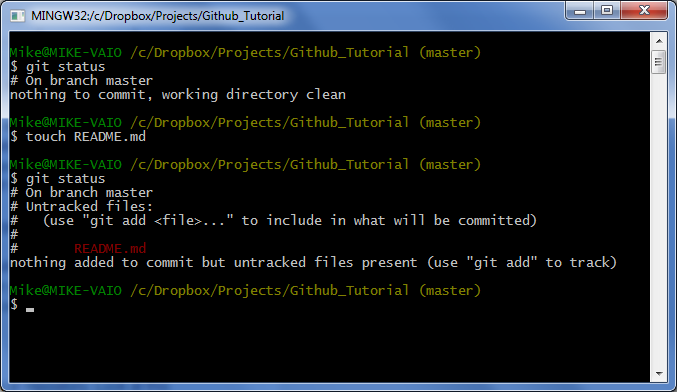
git status- checks the current status of the repository. This tells you a lot of things; at the moment, it's telling you that you don't have any uncommitted changes in your repository.touch README.md- create a README file. The .md suffix is indicative that the file will be formatted in Markdown, which is widely used for formatting on the GitHub website.git status- same command, second time. This time, you can see that there's a new file, but it's "untracked". That means it won't be included in the commit. You'll need to add it, first.
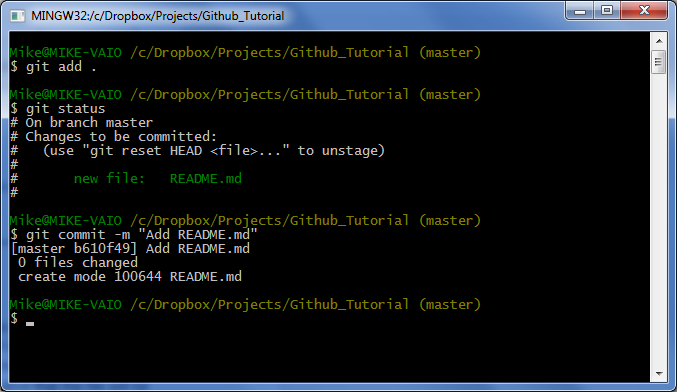
git add .- add all untracked files to the repository (at least, those untracked files which are not omitted by the .gitignore file). You can, of course, add files individually by replacing the.with the file name.git status- now the README.md file is showing as a new file to be committed.git commit -m "Add README.md"- commit the recent changes. The-mswitch allows you to enter a short double-quoted commit message. Omitting that switch will cause git to open a text editor so you can enter a longer message; save and close the text editor when you're done.
Pushing
Pushing sends your changes up to GitHub, so they can be shared with the rest of the world. It also serves as a hedge against data loss.
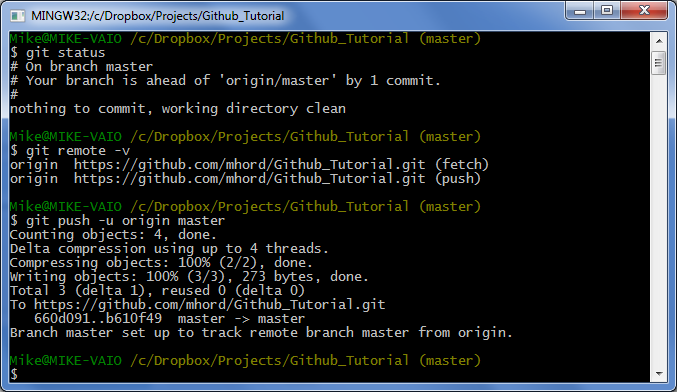
git status- our status tells us we have no local changes pending, but that the remote is one commit behind. This isn't actually checking against the remote repository, just letting us know how many times we've committed since our last push.git remote -v- check out where our remote target is. We'll revisit this in a bit, when we start working on syncing to the original repository.git push -u origin master- push the changes in branch master (we're going to skip branches, in order to keep this tutorial kind of easy) to remote location origin, and remember the settings (-u).
Pulling
Pulling is the opposite of pushing--it retrieves changes from the remote location and applies them to your local repository. You probably won't do it that much; it's more useful in a group environment where more than one person is submitting changes to a single repository.
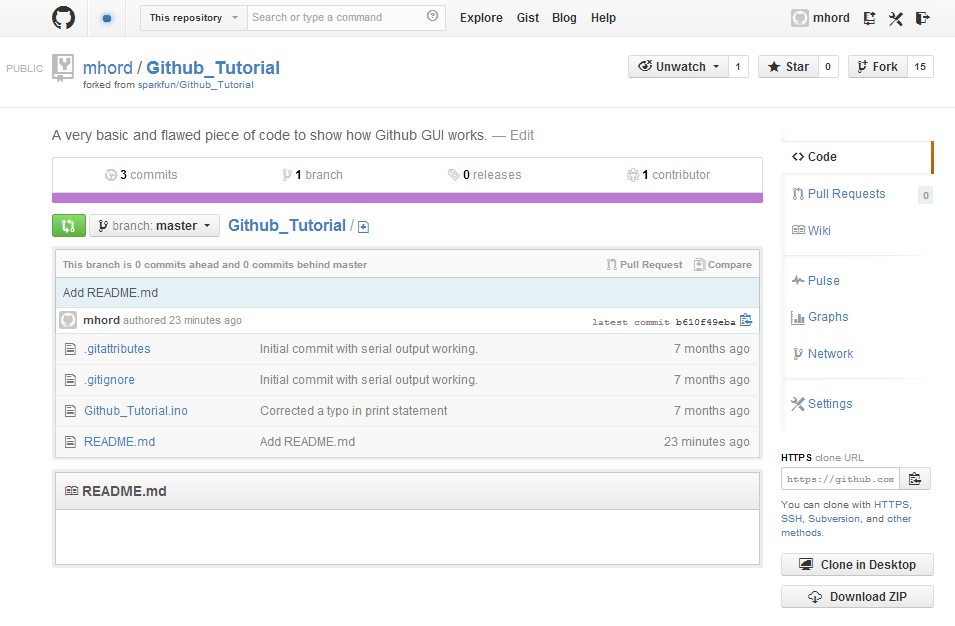
Visit the repository page again; you'll see that, since we pushed it back to GitHub, the README.md file is now in the file list. We can change the text in that file right on GitHub, then pull the change back down to our local repository. Start by clicking the file name link. That'll give you this page:
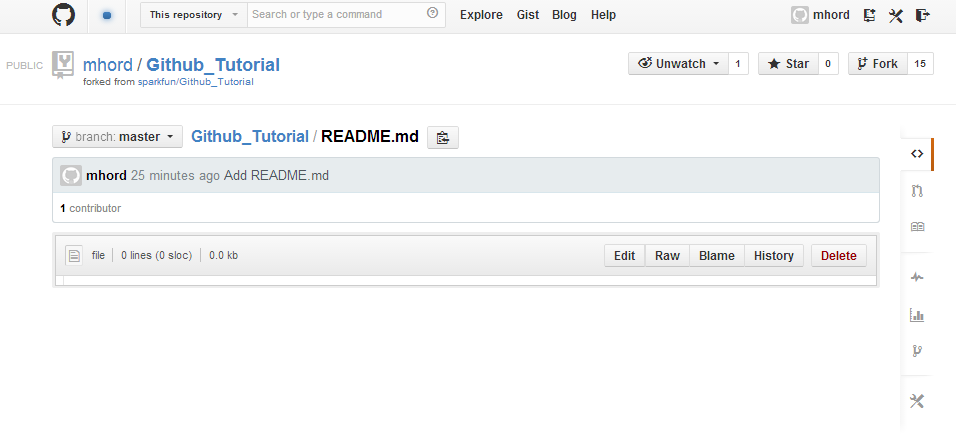
Since we didn't put anything in the file after we created it, there's nothing on the page. You can add something to the file by clicking the "Edit" button:

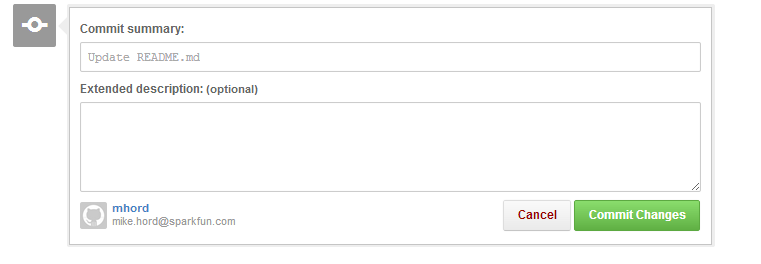
At the bottom of the page, you'll find a commit window which lets you put in a description, an extended description, and commit the changes.
Now that you've made a change on the server which is not reflected in your local repository, we'll need to pull it down.
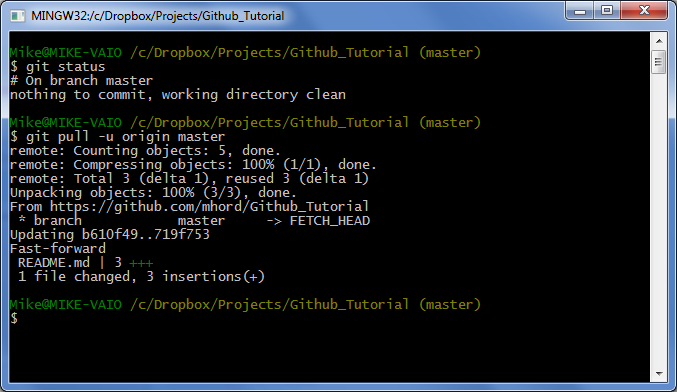
git status- note that even though we know there's a difference on the server, git status does not reflect that, because it only gives us status on the local repository.git pull -u origin master- the syntax is the same as push, but the changes go in the other direction.
At this point, our local repository is in sync with our GitHub repository. But what about the original repository? What if something has changed there, and we want to bring those changes into our copy (both local and on GitHub)?
Syncing with the Original Repository
Syncing is the process of getting changes from the original remote repository, the one you forked from in the first place, and bringing them into your local repository so that you can ensure that you're making changes on the most up-to-date version of the original. Since you don't have access to change the directory on the SparkFun GitHub page, like I do, you'll have to just follow along--without any changes to the original repository, a sync is meaningless.
I made a small change to one of the files in the repository, so now we've got a fairly common scenario: most of the repository matches, but I have a new file I want to send to SparkFun, and SparkFun has some changes that I need to include.
Adding the Remote Repository
Before you can pull it to your local repository, you need to add the original repository's information to your local repository. Here's how to do that:
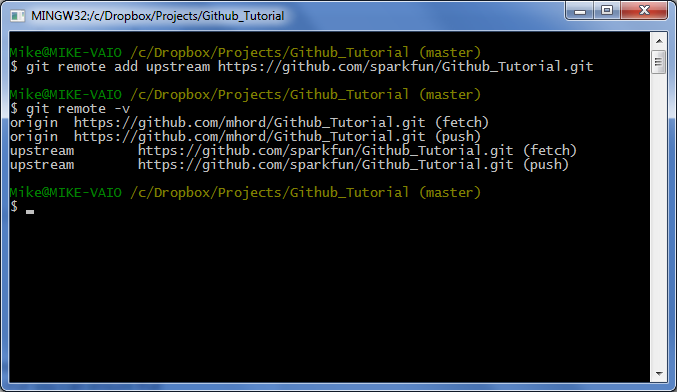
git remote add upstream https://github.com/sparkfun/Github_Tutorial.git- add a remote endpoint to grab code differences from.git remote -v- you can see here that we now have two different remotes to interface: our personal copy and SparkFun's copy. This will allow us to keep our copy up-to-date with SparkFun's in much the same way as we do with our own remote repository.
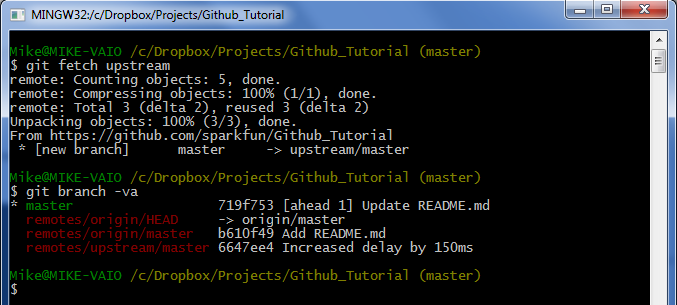
git fetch upstream- fetch works like pull, except it creates a new branch for the incoming data rather than attempting to merge it immediately. This is a "safe" operation; you'll need to manually merge the incoming data.git branch -va- the-vaswitch displays all local and remote branches. A branch is just what it sounds like--the change log branches off from the original, and changes to the branch are tracked independently of changes to other branches.
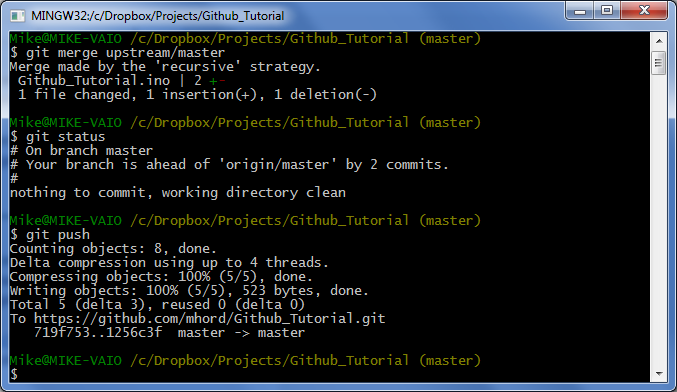
git merge upstream/master- merge attempts to reconcile differences between two branches, bringing the changes in the branch named (in this case "upstream/master") into the currently active branch (since we haven't changed it, "master"). For most simple changes, merge will complete automatically. If it doesn't, this website has information about integrating an external merge tool with git, which is probably a good idea, since git's internal merge tool leaves a lot to be desired.git status- we're ahead of our remote again, since we pulled changes in from the master repository to our local repository. That means we need to...git push- now our GitHub repository is up-to-date with the latest changes in the SparkFun master copy. But what about the changes we made? How do we get them to the SparkFun repository?
At this point, you have all the tools and knowledge you need to fork a repository, make and commit changes to its contents, keep it up-to-date with SparkFun's master copy, and push it to GitHub. Only one thing remains: submitting a pull request, to ask SparkFun to include your changes in our master repository.
Pull Requests
The term "pull request" is a little confusing to some people. After all, aren't I asking to push files to your repository? In fact, no, you're requesting the master repository's owner to pull files from your repository. While the difference seems academic, it's a good one to remember: you are actively requesting someone else to add something to their workflow, so don't expect an instant response.
Pull Request Etiquette
As I mentioned above, a pull request, even a very important and well-structured one, is asking someone else to do work. To make it more likely that your pull request will be honored, here are some things you can do to make that work as easy as possible for the person at the receiving end:
- Keep it simple: Don't rewrite a library completely and expect us to accept the pull request. We simply don't have time to validate something that large.
- Keep it recent: Don't submit a pull request if your repository is wildly out-of-date. If we have to muck through dozens of unrelated changes caused by age to figure out which change you're submitting, we'll probably reject the pull request.
- Don't be offended: If we don't accept your pull request, please don't take it personally. We'll let you know why we rejected it, and we may make the suggested changes anyway, if it's easier for us to include them manually than by accepting the pull request.
Submitting a Pull Request
We're in a good position now to walk through a pull request: we've got changes in our repository that we want to send the SparkFun repository.
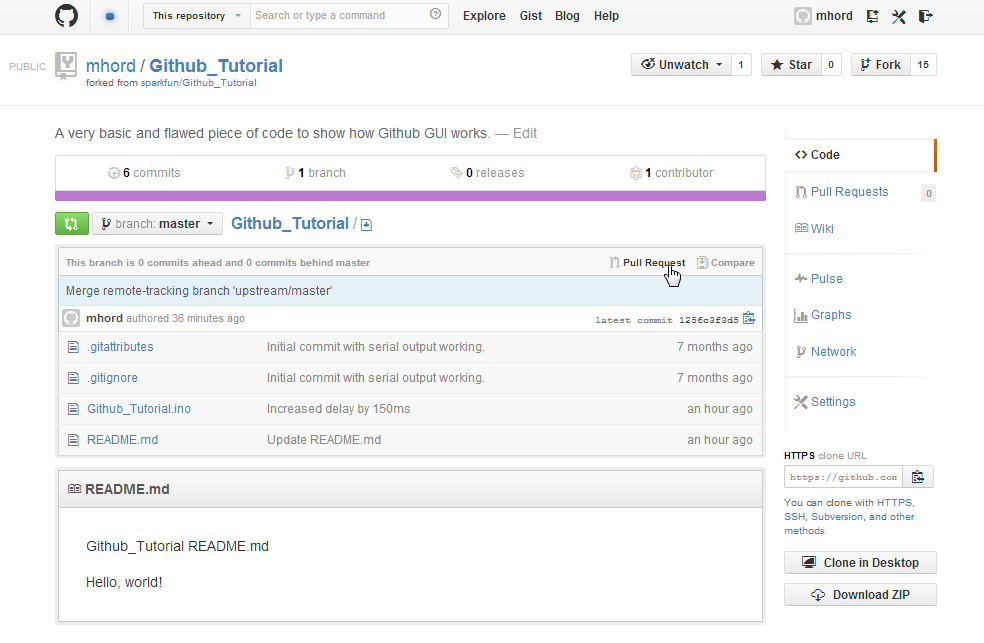
Click the "Pull request" button. Again, the interface may have changed, but the button will still be there, somewhere.
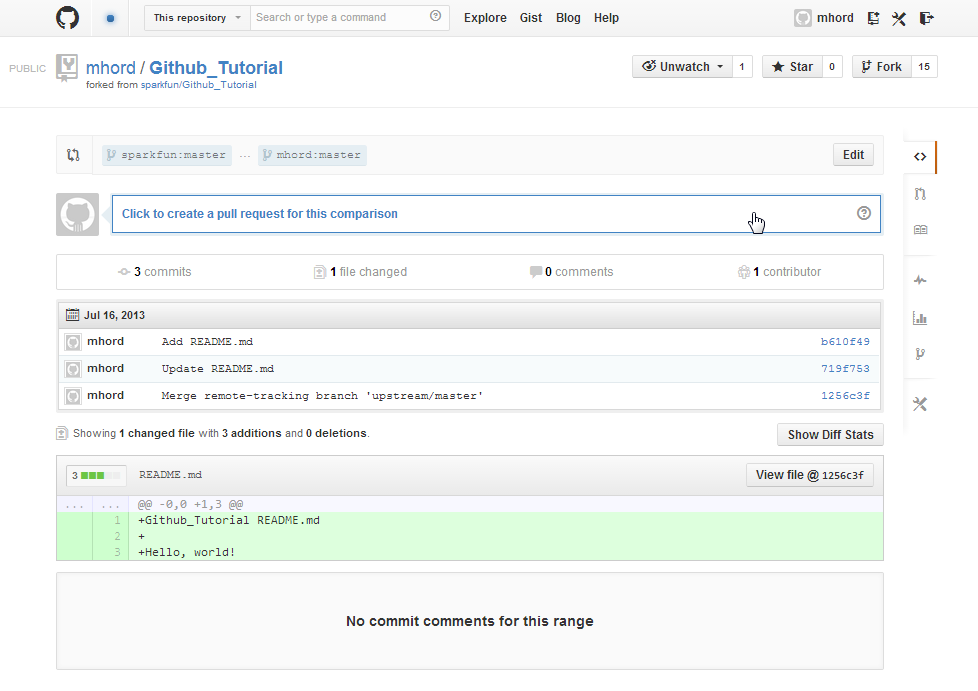
Click the "Click to create pull request for this comparison" button. That'll bring up this form:
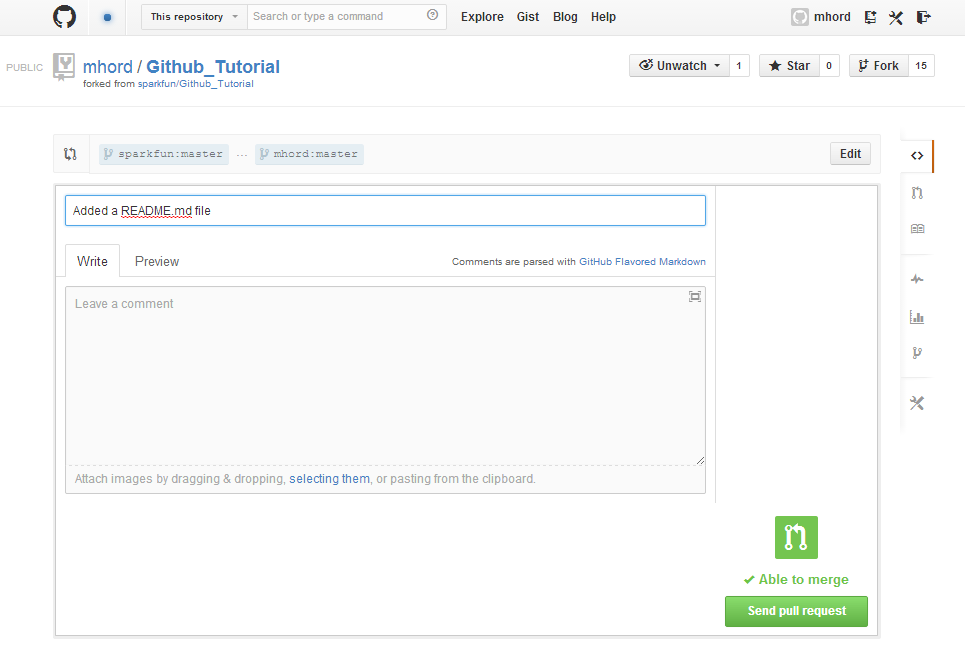
Put in a title, and a description. Be thorough. Your chances of having your pull request accepted are greatly increased if the icon in the lower right indicates that the pull can be automatically merged.
Click the "Send pull request" button to submit your pull request. You're done! All that's left is for us to accept (or deny) the pull request.
Thanks for taking the time to contribute!
Resources and Going Further
Git and GitHub are incredibly powerful tools which are gaining widespread momentum in the open source hardware community. If you're interested in learning more about them, here are some resources you can turn to:
- GitHub at Code School - Code School has a great introductory, interactive tutorial for learning about git and GitHub.
- GitHub's help page - Learn it, use it, love it
- GitHub "boot camp" - GitHub's official "Getting Started" page
- SparkFun's GitHub site