Getting Started with the LilyPad MP3 Player
 MikeGrusin
Building the Board into Your Project
Now that you know how it works, it's time to think about building the board into your dream project. The LilyPad MP3 Player is equally at home with conductive thread or soldered wire connections, so you can use it in "soft" or more traditional projects.
If this is your first time doing a fabric project, take a look at our Beginning LilyPad Arduino tutorial. It will give you an overview of the techniques you'll use working with LilyPad components and sewing with conductive thread.
Triggers
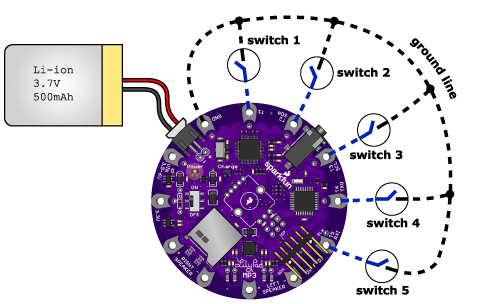
Electrically, we'll be connecting each trigger to a momentary switch, with the opposite side of the switch connected to ground. Because the switch is normally open, the trigger pin will be disconnected from ground and will "float" to a "high" state (3.3V) because of a pull-up resistor on the board.
When you activate a switch, the trigger will be connected to ground, which is "low" or 0V. The software knows that when a trigger is low, it's time to play the proper audio file.
Note that the very low voltages the LilyPad MP3 Player uses are completely safe. You can touch anything on the board without fear of damaging yourself or the board.
Switches
You can certainly use hardware switches if you wish. If you're doing a fabric project, you may want to use a soft switch. A soft switch acts just like its hardware cousin, but it is made with conductive thread or fabric. The conductive areas are normally separated, but when you press / brush against / twist / fold the switch, the conductive surfaces touch each other and conduct electricity. There are lots of ways to make soft switches, and because this field is so new there is lots of room for new ideas. Invent someting amazing! Here's one example where SparkFun engineer Dia made a soft switch that looks like a flower that you brush against to activate.
Because there are five triggers, you can have up to five soft switches. You'll run each trigger to one side of a switch. The other side of each soft switch will be connected to ground. You can run one ground line to all the switches.
Speakers
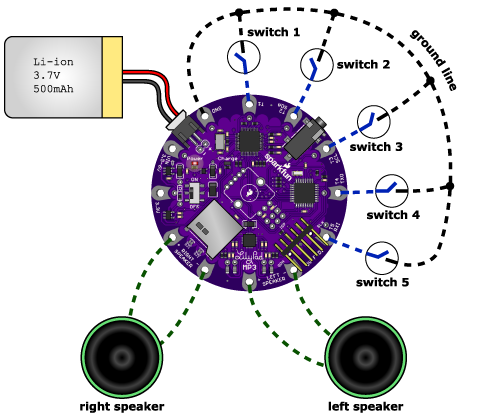
The only other lines you need to run are to the speakers. Remember that these lines should only be attached to real speakers or other coil-based transducers; if you need an analog audio output, use the headphone jack. As the speakers use more current than the switches, you should make the speaker connections a bit beefier than the others. Be careful not to short the speaker lines together or to any other connection, and be careful about loose threads at the "Left Speaker -" connection which is close to the 5V FTDI header.
Battery
To keep the battery from flopping around and possibly breaking its wires, we recommend sewing a little pocket to hold it snugly. Don't sew it in permanently; you may need to remove it for washing or replacement. Speaking of which...
Washing
The LilyPad MP3 Player is washable, but because conductive thread connections can be fragile, we recommend washing your project as little as possible. Please hand-wash, and be sure to remove the Lipo battery and micro-SD card before washing. Because water can get into lots of little crevices, allow everything to air-dry for several days before powering it up again.