ESP32 OTA Updates over BLE from a React Web Application
 Englandsaurus
Arduino Sketch
On the Arduino side things are relatively simple. We have a begin function that initializes our BLE Server, services and characteristics. pOtaCharacteristic is initialized with NOTIFY and WRITE, which allows it to write to the flag and also receive data from our Client. For NOTIFY, we need to also add a BLE2902 descriptor to the characteristic. For WRITE, a callback must be attached so the ESP32 does something with the data every time the characteristic is written. Check out how pOtaCharacteristic is initialized in the begin() function below.
language:c
pOtaCharacteristic = pService->createCharacteristic(
                     CHARACTERISTIC_UUID_FW,
                     BLECharacteristic::PROPERTY_NOTIFY | BLECharacteristic::PROPERTY_WRITE
                     );
pOtaCharacteristic->addDescriptor(new BLE2902());
pOtaCharacteristic->setCallbacks(new otaCallback(this));
The callback itself is where all of the magic happens. Upon boot-up, the ESP32 has an updateFlag that is false. The first time the callback is called (i.e. the application wants to start writing a new version) the ESP32 configures its OTA Handler and begins the partition. On every subsequent callback, the size of the received data is checked. If it is a full 512 bytes, the ESP32 writes it to the OTA partition then writes a few bytes to the characteristic it just read to notify the WebApp that it's ready for another packet. If we have an incomplete packet, we know we're at the end of the road so we write those bytes to the partition, check to see if the partition is okay, and if it is, we reboot with our new firmware. The code for this callback is below.
language:c
void otaCallback::onWrite(BLECharacteristic *pCharacteristic)
{
  std::string rxData = pCharacteristic->getValue();
  if (!updateFlag) { //If it's the first packet of OTA since bootup, begin OTA
    Serial.println("BeginOTA");
    esp_ota_begin(esp_ota_get_next_update_partition(NULL), OTA_SIZE_UNKNOWN, &otaHandler);
    updateFlag = true;
  }
  if (_p_ble != NULL)
  {
    if (rxData.length() > 0)
    {
      esp_ota_write(otaHandler, rxData.c_str(), rxData.length());
      if (rxData.length() != FULL_PACKET)
      {
        esp_ota_end(otaHandler);
        Serial.println("EndOTA");
        if (ESP_OK == esp_ota_set_boot_partition(esp_ota_get_next_update_partition(NULL))) {
          esp_restart();
        }
        else {
          Serial.println("Upload Error");
        }
      }
    }
  }

  uint8_t txData[5] = {1, 2, 3, 4, 5};
  //delay(1000);
  pCharacteristic->setValue((uint8_t*)txData, 5);
  pCharacteristic->notify();
}
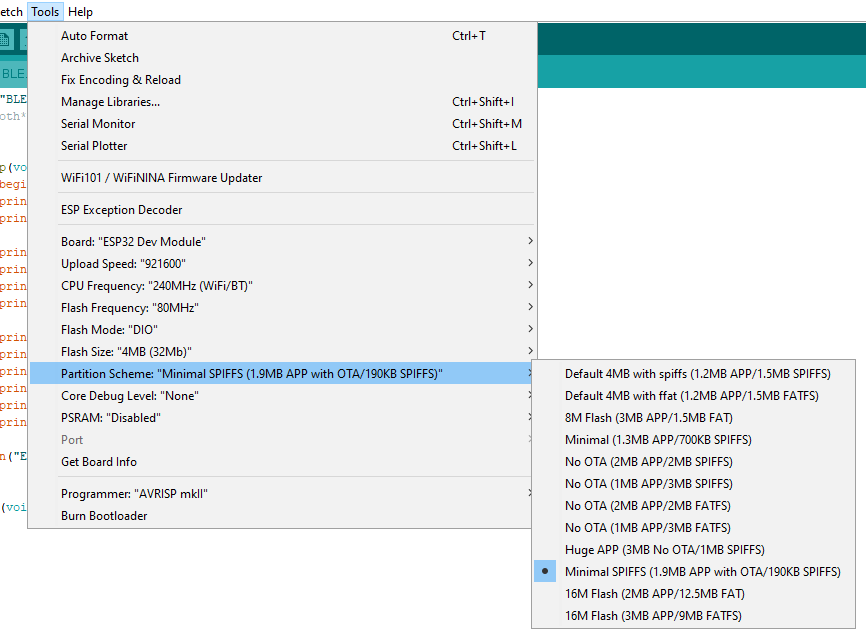
Compiling for OTA
If you're going to do OTA updates, you'll have to make sure that your flash size and partition scheme are set properly in Arduino. I usually like to choose Minimal SPIFFS (1.9 MB APP with OTA/190KB SPIFFS) in the ESP32 Dev Modules options for partition scheme because I rarely use SPIFFS.
You can also configure your partition table manually if you'd like, but we won't cover that in this tutorial. You'll also need to change the hardware and software version numbers to reflect reality, these can be found at the beginning of BLE.cpp
Once you have the proper options selected, go ahead and go to Sketch -> Export Compiled Binary to compile and save the binary to your sketch folder. From here, we need rename and move this BIN to configure our GitHub repo so everything plays nicely together.