Driving Motors with Arduino
 bri_huang
Example Code
With your transistor and motor connected up, let's try a few simple examples.
Motor Blink
This is the easiest example to try. This is essentially the blink example code. But, instead of blinking an LED on pin 13, we are setting pin 9 HIGH and LOW. We increased the delay to 5 seconds so that the motor isn't starting and stopping every second. Copy this code into Arduino and upload it to your board. You should see that the motor turns on for 5 seconds and then stops for 5 seconds. If it doesn't work, go back and double-check your wiring.
language:c
//Simple Motor Blink
//Turns pin 9 on and off repeatedly

void setup()
{
  pinMode(9, OUTPUT);
}

void loop()
{
  digitalWrite(9, HIGH);
  delay(5000);  //wait for 5 seconds
  digitalWrite(9, LOW);
  delay(5000);  //wait for 5 seconds
}
Serial Motor Speed Control
On and off are fun, but what about controlling the speed of the motor. We connected the transistor to pin 9 (a PWM pin) so that we can also use analogWrite() to control the speed of the motor. This is a little example sketch that allows you to type in values into the Serial Monitor to pass values to your program.
Copy this code into Arduino and upload it to your board. After the upload is complete, open up the Serial Monitor. Type in a value from 0 to 255 and hit enter. You should see the motor spin up. What's the slowest speed you can set this to? What happens when you put a load on the end of the motor? This is a great application for creating kinetic sculptures and moving things.
language:c
//Serial control of motor speed
//Upload this sketch and then open up the Serial Monitor. Type in a value (0 - 255) and hit enter.

int motorSpeed;

void setup()
{
  Serial.begin(9600);  //initiate Serial communication
  Serial.println("Type in a vale from 0 - 255 and hit enter.");
  pinMode(9, OUTPUT);
}

void loop()
{
  if (Serial.available() > 0)
  {
    motorSpeed = Serial.parseInt();
    Serial.print("Setting motor speed to: ");
    Serial.println(motorSpeed);
    analogWrite(9, motorSpeed);
  }
}
Can I change the direction?
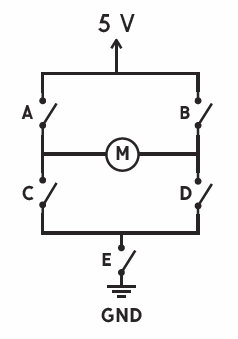
The next thing you probably want to do is change or control the direction that the motor spins. Unfortunately, you can't do this with a single transistor. If you want to change the direction the motor spins, you can manually reverse the wires on the circuit, but there is no way to do this in code without introducing a new piece of hardware. To control speed and direction, you need 5 transistors arranged in a configuration called an H-Bridge.
In the diagram below, we have shown the transistors as simple switches. If we closed switch A and D, current flows through the motor from left to right. If we close switch B and C, current flows through the motor in the opposite direction from right to left.
Check out the tutorial on getting started with the H-Bridge Robot.