DIY Light-Up Shoes
 Feldi
Feldi 
Example Code
The below code is designed to animate a strip of 39 addressable LEDs. In order to test before soldering, our first step will be to program the microcontrollers.
language:c
/******************************************************************************
LED Sneakers by
Melissa Felderman @ SparkFun Electronics

This sketch directly lifts code from Adafruits Neopixel Library.
To learn more about the neopixel library and to view more sample code,
please visit here:
https://learn.adafruit.com/adafruit-neopixel-uberguide/overview
*****************************************************************************/
#include <Adafruit_NeoPixel.h>
#ifdef __AVR__
  #include <avr/power.h>
#endif

#define PIN 6

int numPix = 39 //UPDATE THIS WITH THE NUMBER OF LEDs ON YOUR STRIP

Adafruit_NeoPixel strip = Adafruit_NeoPixel(numPix, PIN, NEO_GRB + NEO_KHZ800);


void setup() {

  strip.begin();
  strip.show(); // Initialize all pixels to 'off'
}

void loop() {

  rainbow(20);
  rainbowCycle(20);
  theaterChaseRainbow(50);
}


void rainbow(uint8_t wait) {
  uint16_t i, j;

  for(j=0; j<256; j++) {
    for(i=0; i<strip.numPixels(); i++) {
      strip.setPixelColor(i, Wheel((i+j) & 255));
    }
    strip.show();
    delay(wait);
  }
}

// Slightly different, this makes the rainbow equally distributed throughout
void rainbowCycle(uint8_t wait) {
  uint16_t i, j;

  for(j=0; j<256*5; j++) { // 5 cycles of all colors on wheel
    for(i=0; i< strip.numPixels(); i++) {
      strip.setPixelColor(i, Wheel(((i * 256 / strip.numPixels()) + j) & 255));
    }
    strip.show();
    delay(wait);
  }
}


//Theatre-style crawling lights with rainbow effect
void theaterChaseRainbow(uint8_t wait) {
  for (int j=0; j < 256; j++) {     // cycle all 256 colors in the wheel
    for (int q=0; q < 3; q++) {
      for (int i=0; i < strip.numPixels(); i=i+3) {
        strip.setPixelColor(i+q, Wheel( (i+j) % 255));    //turn every third pixel on
      }
      strip.show();

      delay(wait);

      for (int i=0; i < strip.numPixels(); i=i+3) {
        strip.setPixelColor(i+q, 0);        //turn every third pixel off
      }
    }
  }
}

// Input a value 0 to 255 to get a color value.
// The colours are a transition r - g - b - back to r.
uint32_t Wheel(byte WheelPos) {
  WheelPos = 255 - WheelPos;
  if(WheelPos < 85) {
    return strip.Color(255 - WheelPos * 3, 0, WheelPos * 3);
  }
  if(WheelPos < 170) {
    WheelPos -= 85;
    return strip.Color(0, WheelPos * 3, 255 - WheelPos * 3);
  }
  WheelPos -= 170;
  return strip.Color(WheelPos * 3, 255 - WheelPos * 3, 0);
}
When you are ready, copy and paste the below program into a new window in your Arduino IDE. Update the value for int numPix to reflect the number of pixels on your strip around the shoe's sole. Make sure the correct board is selected by going to Tools > Board > Qduino Mini. Then, connect your Qduino to your computer via USB. Turn it on, and select the active port from Tools > Port. Now all you need to do is upload the program to your Qduino by hitting the upload button!
Testing Your Code
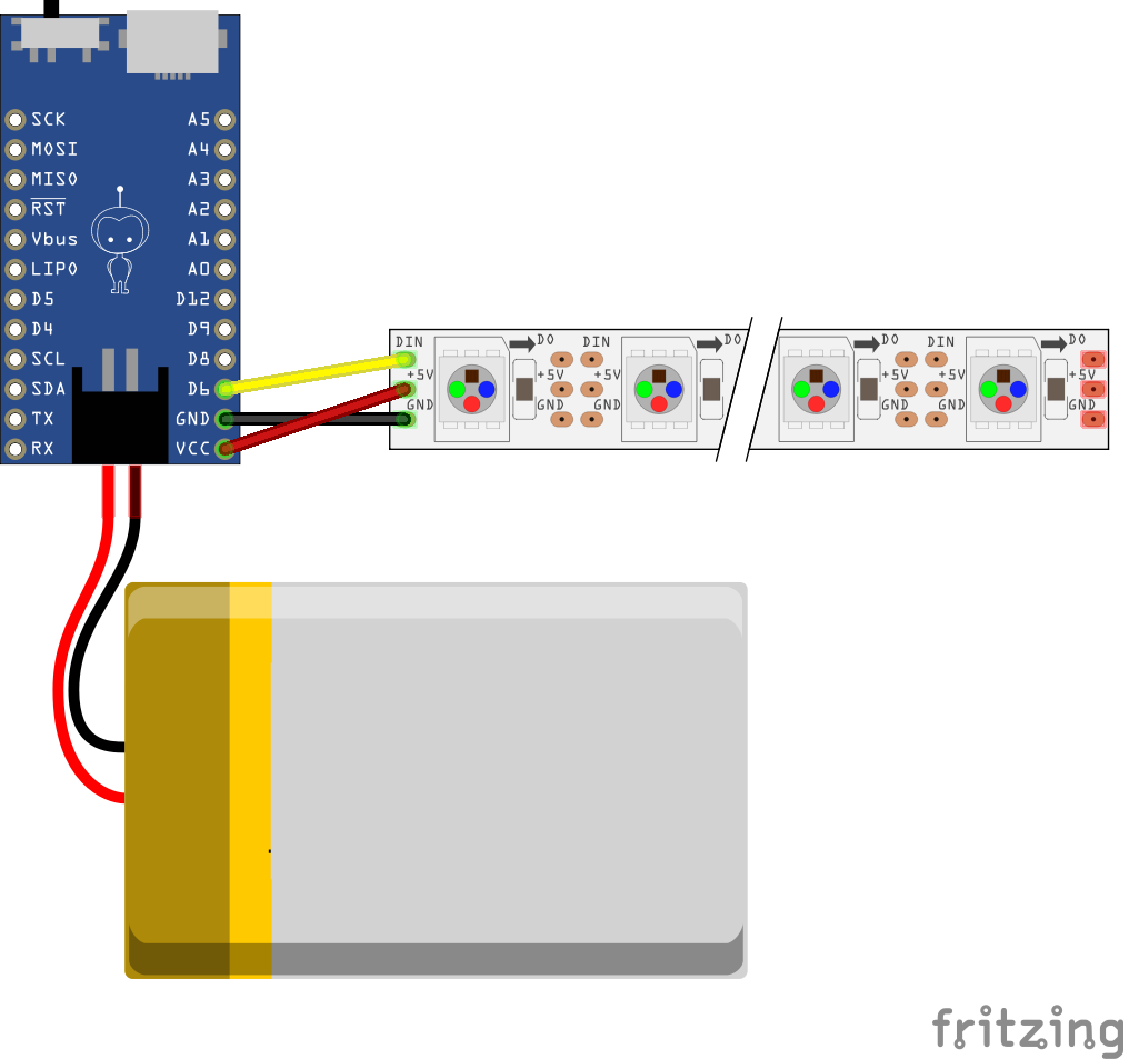
To test the program before putting it together on the shoe, try using a combination of IC hooks, alligator clips, and jumper wires to create the circuit shown below and turn on your Qduino. Make sure to connect the LiPo battery to the Qduino for sufficient power. If the LEDs animate with rainbow patterns, you are ready to move on!
Since each shoe will have a Qduino attached to control its own set of addressable LEDs, make sure to upload code to the second Qduino. Follow the steps to upload code. make sure to have the correct board and COM port selected when uploading to the second Qduino.