Build Your Own High-Concentration CO2 Detector
Project Setup - STC3x Arduino Library
Arduino Setup: This example assumes you are using the latest version of the Arduino IDE on your desktop. If this is your first time using Arduino IDE, library, or board add-on, please review the following tutorials.
Installing the SparkFun STC3x and SHTC3 Arduino Libraries
The SparkFun STC3x Arduino library helps you configure and get CO2 data from the STC31 sensor. This Arduino example prints out CO2 concentration percentages compensated with humidity and temperature data measured by the SHTC3 along with a static value for barometric pressure.
- Open the Arduino IDE.
- Install the SparkFun STC31 and STHC3 Arduino libraries with the Arduino Library Manager. Open the tool and search for "SparkFun STC31" and "SparkFun SHTC3". Make sure to install the latest releases.
- If you'd prefer to manually install the libraries, you can download them from the GitHub Repository (STC3x Library and SHTC3 Library) or you can download a ZIP of the repositories here: STC3x Library (ZIP) and SHTC3 Library (ZIP)
- If necessary, install board definitions for the IoT RedBoard - ESP32. Open the Board Manager and search for "ESP32" to install the latest release of Espressif's ESP32 boards package.
Arduino Examples
Let's take a closer look at a few of the examples included in the STC3x Arduino Library
Example 01 - Basic Readings
Note: This is the same code we used in the video seen on the Introduction Tab.
The first example demonstrates how to get basic CO2 data from the sensor along with temperature measurements from the on-chip temperature sensor. It initializes the STC31 with default settings to measure CO2 in air up to 25% concentration. Open the example by navigating to File > Libraries > SparkFun STC3x Arduino Library > Example1_BasicReadings. Select your Board (Sparkfun RedBoard IoT if you're following along to the letter) and Port and click the "Upload" button. After the code finishes uploading, open the serial monitor with the baud set to 115200 and you should see CO2 concentrations and temperature (in °C) print out every second. Try breathing on the sensor and you should see the values move slightly (we only breath out roughly 4% CO2).
Code to Note
The STC31 has four measurement modes to adjust what gas/environment it's measuring in along with the percentage volume of CO2. Possible values for setBinaryGas are
//  STC3X_BINARY_GAS_CO2_N2_100   : Set binary gas to CO2 in N2.  Range: 0 to 100 vol%
//  STC3X_BINARY_GAS_CO2_AIR_100  : Set binary gas to CO2 in Air. Range: 0 to 100 vol%
//  STC3X_BINARY_GAS_CO2_N2_25    : Set binary gas to CO2 in N2.  Range: 0 to 25 vol%
//  STC3X_BINARY_GAS_CO2_AIR_25   : Set binary gas to CO2 in Air. Range: 0 to 25 vol%

if (mySensor.setBinaryGas(STC3X_BINARY_GAS_CO2_AIR_25) == false)
{
  Serial.println(F("Could not set the binary gas! Freezing..."));
  while (1)
Example 02 - PHT Compensation
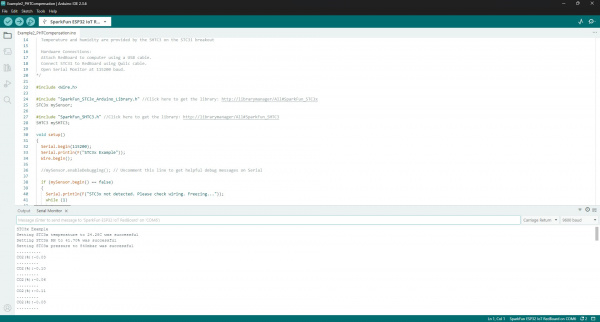
The second example shows how to use the SHTC3 to send actual temperature and humidity data to the STC31 to improve the accuracy of the CO2 data from the sensor. The example initializes the STC31 to measure in air at concentrations up to 25% volume, sets the temperature and humidity values to those measured by the SHTC3 and then sets the barometric pressure to an arbitrary value (840 millibars). Open the example by navigating to File > Libraries > SparkFun STC3x Arduino Library > Example2_PHTCompensation. After uploading, open the serial monitor with the baud set to 115200 and you should see the values set for pressure, temperature and humidity followed by CO2 measurements print out every second:
Code to Note
Since we don't have a pressure sensor to provide real-time pressure data the example sets the barometric pressure to match the pressure at SparkFun headquarters (840 millibars). You'll most likely want to adjust this value to the pressure in millibars (mbar) to your location. For example, typical barometric pressure at sea level is typically ~1013 millibars.
//If we have a pressure sensor available, we can compensate for ambient pressure too.
//As an example, let's set the pressure to 840 mbar (== SF Headquarters)
uint16_t pressure = 840;
If you are interested in picking up a dedicated pressure sensor, we have plenty to choose from. Click the button below to find all of our options!
Example 05 - Automatic Self Calibration
We are going to jump to the fifth example that demonstrates how to enable the STC31's automatic self calibration feature. Automatic calibration helps improve the STC31's accuracy when used in applications where the target gas is not present most of the time. Refer to the STC31 Field Calibration Guide for more information. Open the example by navigating to File > Libraries > SparkFun STC3x Arduino Library > Example5_AutomaticSelfCalibration. Once the code upload completes, open the serial monitor with the baud set to 115200 and after the sensor initializes, you should see "Forced Recalibration was successful" print out followed by "Automatic self calibration is enabled!". After these prints, the code will begin to print out CO2 and temperature data from the STC31 once every second.
Code to Note
Before running the STC31 in automatic calibration mode, the example attempts to perform a forced recalibration with a concentration of 0%. This is used to improve the sensor's accuracy with a known reference value.
if (mySensor.forcedRecalibration(0.0) == true) // Force a recalibration with a concentration of 0%
{
  Serial.println(F("Forced Recalibration was successful!"));
}
else
{
  Serial.println(F("Forced Recalibration FAILED! Please check the debug messages for more details"));
}
