Ardumoto Shield Kit Hookup Guide
This Tutorial is Retired!
This tutorial covers concepts or technologies that are no longer current. It's still here for you to read and enjoy, but may not be as useful as our newest tutorials.
View the updated tutorial: Ardumoto Kit Hookup Guide
 jimblom
 Introduction
The Ardumoto Shield is an easy-to-use dual motor controller for Arduino. Combined with an Arduino, the Ardumoto makes a fantastic controller platform for RC vehicles or even small autonomous robots.
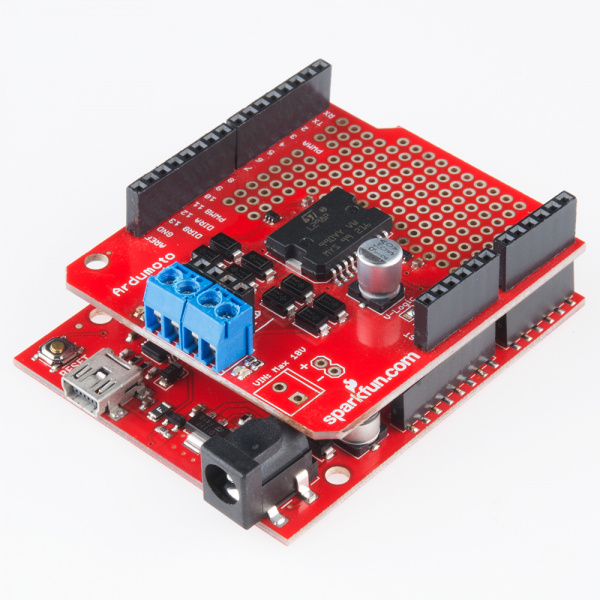
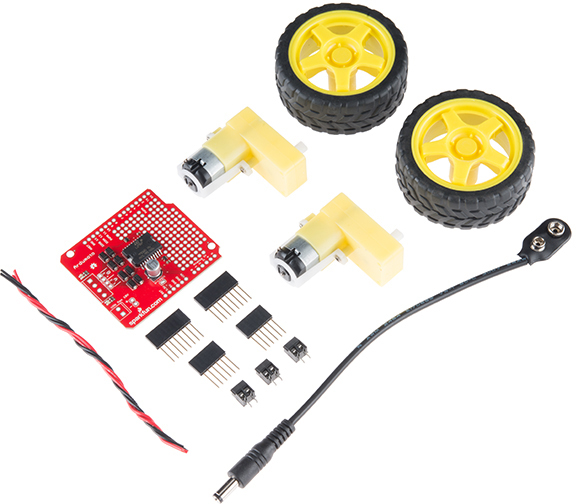
We sell the Ardumoto Shield either alone, or with a set of motors and wheels in our ArduMoto Shield Kit. This kit includes the Shield as well pairs of tires, motors, connectors, and wires. And, of course, it's all stuffed in a classic SparkFun red box (which may come in handy as a robot chassis).
Covered in this Tutorial
This tutorial covers assembly and use of both the Ardumoto Shield and the Ardumoto Shield Kit. Digging deeper, we'll get into some assembly tips, and finish with an example Arduino sketch.
The tutorial is split into sections covering:
- Meet the L298 -- This section covers the L298 full-bridge motor driver at the heart of the Ardumoto.
- Ardumoto Overview -- A quick rundown of the Ardumoto's inputs, outputs and features.
- Ardumoto Shield Assembly Tips -- Tips and tricks for assembling your Ardumoto Shield.
- Motor and Wheel Assembly -- Some open-ended ideas to help you assemble the motors and wheels included with the Ardumoto Shield Kit.
- Example Code -- Finally, some example code to get your robot rolling.
If all you have is the shield, everything but the "Motor and Wheel Assembly" section will apply.
Required Tools & Materials
To follow along with this tutorial, you'll need an Ardumoto Shield or the Ardumoto Shield Kit, and an Arduino or Arduino-compatible development board.

SparkFun Ardumoto - Motor Driver Shield
DEV-09815
SparkFun Ardumoto Shield Kit
KIT-13201Equipping the Ardumoto Shield (Non-kit version)
If all you have is the shield, you'll also probably want a couple of DC motors to drive. The Ardumoto can control most small DC motors, like any of those in our DC motor category.
You'll also need a handful of connectors to get everything wired up together. We recommend Stackable Headers to connect your Ardumoto to your Arduino. And two or three 3.5mm Screw Terminals to help connect motors to your Ardumoto.
As an example, here are the contents of the Ardumoto Shield Kit, which should be enough to get you started:
Powering the Shield
Both the Shield and the Kit will require a power source. Batteries are usually your best bet -- we recommend a 9V alkaline battery, which will work perfectly with the included 9V-to-Barrel Jack Adapter.
Required Tools
Finally you'll also need a few tools, including a soldering iron, solder, wire strippers, and a screwdriver:


Suggested Reading
The Ardumoto is a great platform for first-time motor users (and experienced ones too!). There are, however, a few concepts you should be familiar with before clicking over to the next few pages. Here are some tutorials we recommend reading first:
- Motors and Selecting the Right One - Learn all about motors before learning how to control them.
- Arduino Shields -- This tutorial provides an overview of shields in general. It also contains an assembly guide for attaching headers to your shield.
- Pulse Width Modulation (PWM) -- PWM is used to control the speed of our motors.
- How to Solder -- Through Hole -- To electrically secure the connectors and headers, you'll need to solder them to your shield.
- Voltage, Current, Resistance, and Ohm's Law -- When we dive into the L298, it'll be good to know the basics of voltage and current.