Arduino ProtoShield Quickstart Guide
This Tutorial is Retired!
View the updated tutorial: SparkFun Arduino ProtoShield Hookup Guide
 jimblom,
  bboyho
Example Code
How Do I Use It?
Well, that's mostly up to you! There are a few things I will point out, though:
Using the LEDs
As the assembly guide points out, you have to wire the LEDs to whichever Arduino pin you'd like. Once you've done that, you can program your Arduino to run the ever-important 'Blink' sketch (in Arduino, go to File->Examples->Digital->Blink):
language:c
int ledPin =  13;

void setup()   {
  pinMode(ledPin, OUTPUT);
}

void loop()
{
  digitalWrite(ledPin, HIGH);
  delay(1000);
  digitalWrite(ledPin, LOW);
  delay(1000);
}
Make sure you change the value of ledPin to whatever digital pin your LED is connected to; in the above example it is tied to pin 13. That sketch should turn the LED on for a second, off for a second, on for a second, off for a second, and so on.
Note that both LEDs have one leg tied to ground through a 330Ω resistor, and the other leg connected to either JC2 or JC3 (and then to whatever pin you have them connected to on your Arduino). This means that you have to digitalWrite the pin HIGH to turn the LED on, and LOW to turn it off.
Using the Button
As with the LEDs, before you can use the button you have to connect it to a digital or analog pin of your choice. For a perfect example of how to use the button, check out the 'Button' example (in Arduino go to File->Examples->Digital->Button):
language:c
const int buttonPin = 2;
const int ledPin =  13;

int buttonState = 0;

void setup() {
  pinMode(ledPin, OUTPUT);
  pinMode(buttonPin, INPUT);
}

void loop(){
  buttonState = digitalRead(buttonPin);

  if (buttonState == HIGH) {
    digitalWrite(ledPin, HIGH);
  }
  else {
    digitalWrite(ledPin, LOW);
  }
}
Make sure you change buttonPin and ledPin according to how you've wired them, the example assumes they're connected to digital pins 2 and 13, respectively.
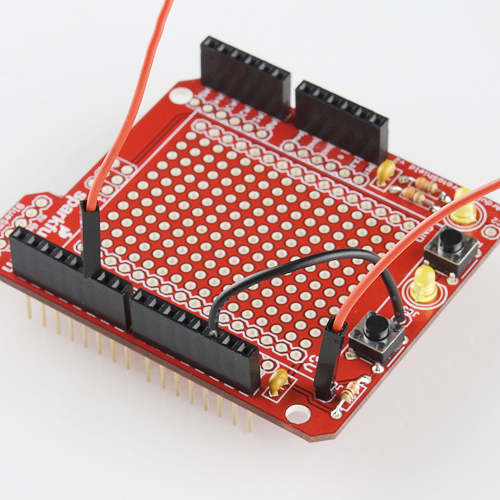
The button on the ProtoShield is 'pulled high', meaning one side of the button is connected, through a resistor, to +5V and also to 'JC1' (which should then be connected to an Arduino pin of your choice). The other end of the button is simply connected to ground. This means that when the button is pressed it will read as LOW, otherwise it will be HIGH. In the example above, the LED will be on unless the button is being pressed.
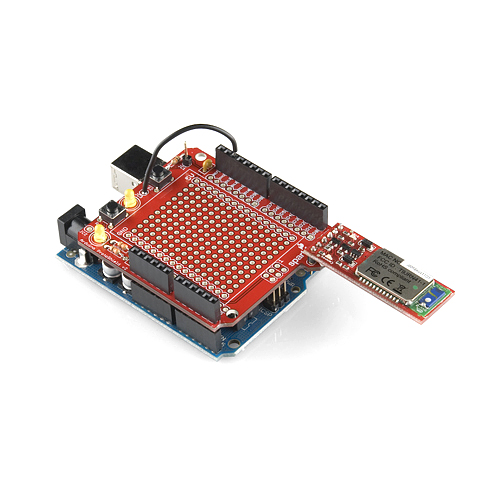
Using the BlueSMiRF Port
Bluetooth is a really simple, and effective way to add wireless communication to your project. The BlueSMiRF Gold works as, essentially, a serial cable minus the wires. Only four connections are required to communicate with the BlueSMiRF - 5V, GND, RX and TX.
When you connect the BlueSMiRF to your ProtoShield, take care to match the 'VCC', 'GND', 'TX-O', and 'RX-I' labels of the BlueSMiRF with the '5V', 'GND', 'D0', and 'D1' labels of the shield.
You can use the standard 'Serial.print' and 'Serial.read' commands to send and receive serial data. Here's an example that builds on the previous code, adding serial communication:
language:c
int ledPin = 13;
int buttonPin = 2;

int buttonState = LOW;
int oldButtonState = HIGH;
char serInput;

void setup()
{
  pinMode(ledPin, OUTPUT);
  pinMode(buttonPin, INPUT);
  digitalWrite(ledPin, HIGH);

  Serial.begin(115200);
}

void loop()
{
  buttonState = digitalRead(buttonPin);

  if (Serial.available() > 0)
  {
    serInput = Serial.read();
    Serial.println("Miny, Moe.");
  }
  if (buttonState != oldButtonState)
  {
    if (buttonState == HIGH)
    {
      digitalWrite(ledPin, HIGH);
      Serial.print("Meeny, ");
    }
    else
    {
      digitalWrite(ledPin, LOW);
      Serial.print("Eeny, ");
    }
  }

  oldButtonState = buttonState;
}
This example will actually work with both the standard USB serial connection, or a BlueSMiRF. Give it a try! Note that the baud rate is set to 115200 bps, this is the default baud rate of the BlueSMiRF. Pressing the button will turn the LED off and send "Eeny, " out the serial port. Releasing the button will turn the LED back on and print "Meeny, ". Sending any character to the Arduino, over a serial connection, will print "Miny, Moe.".
If you want to communicate between your computer and the BlueSMiRF, you will need a bluetooth dongle of some sort. Many options exist to add bluetooth to your computer (if it doesn't already have it). For beginners, I'd recommend the Bluetooth USB module; another, more advanced, option is the USB BlueDongle.