Adding WiFi to the NVIDIA Jetson
 D___Run___
Connecting to Your Network
Upon reboot of your system, you should now have WiFi connection available to you! Open a command prompt to verify a succefful driver installation by checking if you have a wireless network device installed. Open a terminal and type the following command:
ifconfig wlan0 [Enter]
You should get a response similar to the screen capture below. Notice that we have two wlan connections... wlan0 and wlan1 with only one connected and an IP address assigned to it.

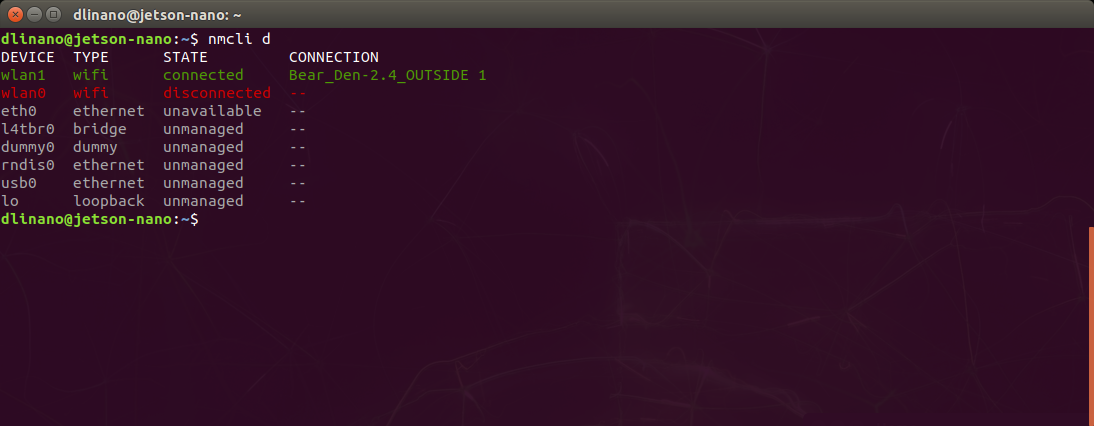
To set up your connection from the command prompt you can use the NetworkManager tool from Ubuntu as outlined here. First, we will list all of our possible network connections by typing the following command:
nmcli d [Enter]
You should get a connection listing similar to something like this screen capture:
Next we will make sure that the WiFi module is turned on by typing the following command:
nmcli r wifi on[Enter]
Now we can scan and list off all visible WiFi networks available to us by typing the following command:
nmcli d wifi list [Enter]
You should get a list of possible networks available to you including current status in terms of signal strength, data rate, channel, security, etc.
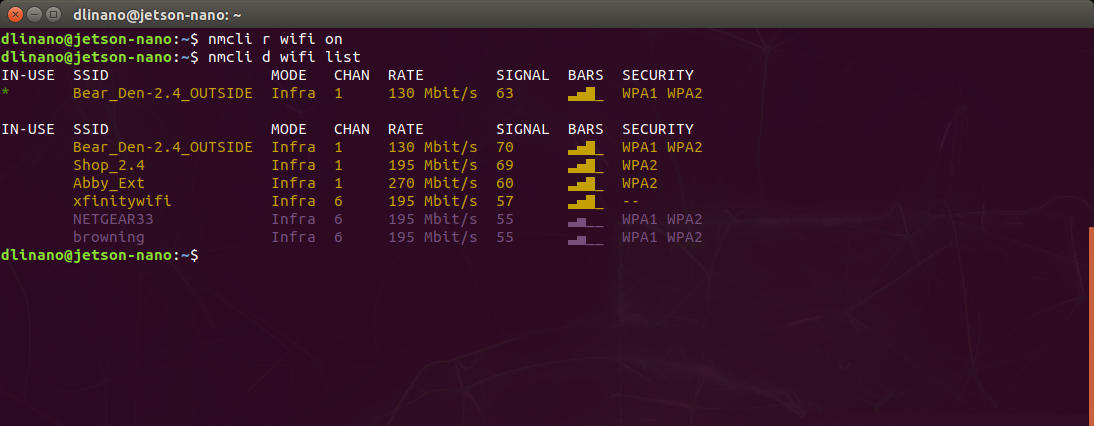
Make sure that you see the wireless network that you are going to connect to.
To connect to a given network make sure you have its SSID and password ready. Both are case sensitive! Type the following command with [SSID] being your SSID and [PASSWORD] being the password for that network:
nmcli d wifi connect [SSID] password [PASSWORD] [Enter]
If all goes according to plan, you should get a connection confirmation!
Testing Your Connection
With your WiFi adapter connected to the internet you can now test it! Obviously in desktop mode with a keyboard and mouse you can open your browser and navigate to your favorite website.
If you are using SSH and able to connect SSH over WiFi and your laptop, you have also scored a win in terms of the WiFi adapter and its connection. Either way you can also test your Nano's connection and ability to access the internet with a simple ping command pointed at Google. Run the following command from the terminal on your Nano:
ping 8.8.8.8 [Enter]
You should get a response every few seconds reporting the data that comes back from the ping. You should be looking for packets both sent and received. If received packets is returned as 0, you do not have a connection established to the internet and should repeat the process of connecting above.