Useful Strategies for Makers: Part 1
As a middle school technology educator who has a Fab Lab for a classroom, I spend a lot of time thinking about useful tips, tricks, and strategies for young makers. Just as we teach developing readers and writers how to skim a text for main ideas or create an outline for an essay, are there similar strategies or techniques that we can model for young makers to help them successfully navigate the making process and develop a maker mindset?

We're joined by guest blogger Jaymes Dec, for a series of insightful posts on strategies for young makers in and outside the classroom.
Jaymes Dec is the Fab Lab Integrator at the Marymount School, a K-12 all-girls independent school in Manhattan. He was recently named a “Teacher of the Future” by the National Association of Independent Schools and a Fab Learn Fellow by Stanford University. After graduating from the Interactive Telecommunications Program at NYU in 2008, Jaymes was the Program Manager at GreenFab, a high school program for students from the South Bronx that taught science, technology, engineering and math skills through classes on sustainable design and green technologies. Jaymes is a co-founder of The NYC Makery, a pop-up Makerspace for children in New York City. He is on the Advisory Board for Curiosity Hacked (formerly Hacker Scouts) and proudly serves as the President of the non-profit organization, Nerdy Derby, Inc.

As a middle school technology educator who has a Fab Lab for a classroom, I spend a lot of time thinking about useful tips, tricks, and strategies for young makers.
Just as we teach developing readers and writers how to skim a text for main ideas or create an outline for an essay, are there similar strategies or techniques that we can model for young makers to help them successfully navigate the making process and develop a maker mindset?
Over the last several months, I decided to ask the experts. I interviewed designers, engineers, and makers about how they get through several stages of the making process. Some of the questions I asked included:
- How do you get ideas for projects? Do you have any strategies for getting inspired?
- What do you do before you begin a project?
- Do you have any tips or tricks that you use when designing a project?
- What do you do when you get stuck or have a problem?
- As you get closer to finishing, how do you push yourself to complete a project?
- What are some strategies for improving your skills or becoming a better maker?
- What are some some tips for documenting your projects?
I started to collect a list of their answers, tips and tricks that I call “Useful Strategies for Makers”. I am going to share them here in a series of blog posts. Many of them might seem obvious, some of them might seem silly, but I hope you and your students find them helpful as you explore the joys of learning by making!
For Inspiration
When your students are seeking an idea for a project, it can be fun to have them think about ways to resurrect or repurpose obsolete technologies. With the forward march of technological change, we unfortunately wind up throwing away old machines and devices all the time. A lot of these devices have working components like motors, gears, and sensors. Cassette tape players, VCRs, and computer printers can be a rich resource for project ideas and inspiration. At the beginning and end of each school year, I send out an email to our entire school staff asking for old machines, and electronic devices. I keep them in a “junk closet” in my classroom. Don’t throw old devices away. Have your students take them apart and try to come up with novel ways to reuse the working parts. I know it might seem funny to think of older 3D printers as obsolete, but the technology has improved so much in recent years that people are already coming up with novel uses for older 3D printers. I really loved this idea to turn an old 3D printer into an air hockey playing robot:
http://cienciaycacharreo.blogspot.com.es/2014/02/new-project-air-hockey-robot-3d-printer.html
Do you or your students have any ideas for repurposing the parts from a 3D printer? Let us know in the comments.
Before they Begin
After your students have an idea for something that they want to make, it can be helpful to ask them to list all of the reasons why they want to make the project. Is it to solve a specific problem? Is it just for fun or whimsy? To explore the properties of a material? To see what they can do with a new tool? This list will come in handy as they figure out how to build a project as well as inform their material selection. Later on, as they get deeper into the project, the list of whys can also serve as inspiration to keep going and finish up the project.
As they Build their Project
Any seasoned maker will tell you that projects rarely work the first time. It’s crucial that students design and prototype with this fact in mind. Any complex project is really going to be a combination of simpler subsystems. Have students break down their projects into those subsystems and get each one working on their own before combining them together. This way if there is a problem, it’s easier to figure out where the problem is occurring.
When Students Get Stuck
If students are truly growing and pushing their abilities as makers, they will inevitably come up against obstacles and problems. It can be hard to isolate a problem. When faced with an issue or something is not working with a project, encourage your students to figure out what parts of their project are working so that they can narrow down the list of places where there might be an issue.
Especially in projects that have a programming component, it is common for students to experience bugs in their code. Often their program just is not behaving how they expect. But how can you help your students to isolate bugs in their code? Ask them to find out which parts of the code are working. Have them break their code into smaller parts and test each individual part. If they know what parts of their code are working, it’s going to be easier to for them to isolate where the problem is occurring.
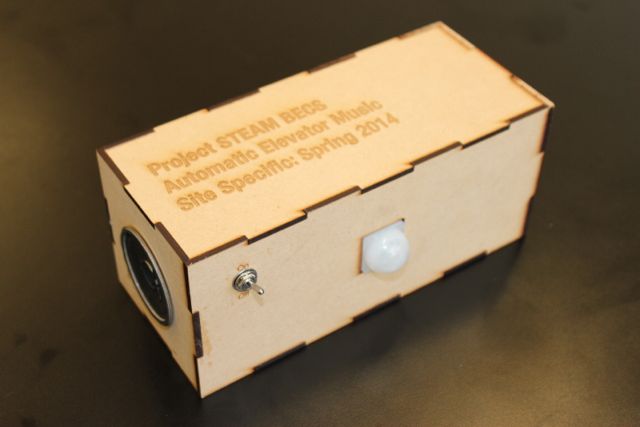
When some of my 9th Grade students were making a device that plays music whenever anyone enters the elevator in school, they combined two basic Arduino sketches: one that the reads the values of a PIR Motion sensor and sent them to the Serial monitor, and one that plays MP3s files off an Arduino Shield. The two basic sketches worked fine on their own, but when they combined them, the sensor values would not display in the Serial monitor. Something about the combined code was conflicting and causing the bug. Sure enough, it turned out that they connected their sensor to a pin that was being used by the MP3 player code. They simply moved their sensor to a different pin to solve the issue. By breaking their code into two different systems and testing them individually, they were able to discover that the problem was occurring someplace where the two sketches conflicted. When students are trying to find out why their project is not working, get them to focus on figuring out which parts of the project are working, and isolate the problem by process of elimination.
When Students say they’re Done
Sometimes students will say that they are done with their projects before they really are. Maybe they want to move on to another project, or they are just tired of working on their project. That’s understandable. Have those students look at their list of reasons that they wanted to make the project in the first place. Does the project satisfy that list of whys? If so, then maybe they are done. If not, they still have work to do.
In a week or so, I’ll post the next set of “Useful Strategies for Makers”. In the meantime, please share your ideas in the comments:
What strategies have you developed to get through the making process?
How do you help students get inspired, get unstuck, and become a better maker?


