Tips for a Better E-Textiles Workshop
Here are a few tips for creating your e-textiles workshop and activities.

Here in the Education Department we are always scurrying off to do fun workshops. Before I joined the team, I had some experience with small workshop for five to fifteen students in a classroom setting, but doing a large conference or event with a steady stream of visitors to a booth was new to me. For events with large crowds or grab-n-go prep, having a streamlined activity or project really cuts down on both prep time and logistical confusion. Here are some e-textile specific tips and tricks to help with planning your workshops. A lot of these tips could work for other activities as well, so feel free to adapt them to other electronics activities such as paper circuits or simple electronics projects.
Choosing an Activity
For an introductory e-textile project, usually one LED and a battery is a great place to start, especially in a setting with time constraints or large crowds. Add variety for your students by letting them choose the color of the LED and a customize a design to sew it onto.
Below are two examples of projects we use at events. Both use similar hardware but have a different style (one a hangable art piece and the other a wearable take-away).
E-Textile Fabric Art
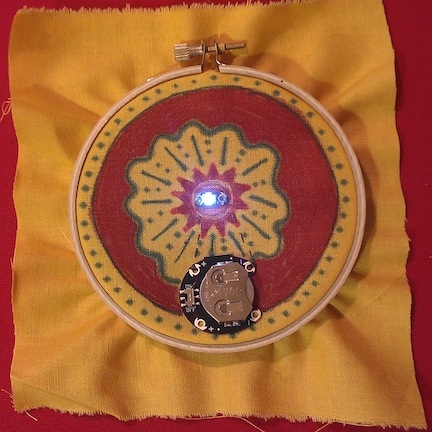
Load a 4” embroidery hoop with a piece of fabric, then create a design with markers to act as the base for a light up art piece. Sew on a battery holder and one LED with conductive thread. Students can remove the fabric and sew into another project or leave in the hoop and hang as a wall decoration.
Suggested Materials:
- LilyPad Coin Cell Battery Holder - Switched - 20mm DEV-11285
- LilyPad LED White (5pcs) DEV-10081 (One LED per student)
- Conductive Thread Bobbin - 30ft (Stainless Steel) DEV-10867
- Sewing Needles
- Fabric Squares (6” x 6”)
- Markers
- 4” Embroidery Hoops
- Glue Guns, Scissors, General Crafting Supplies
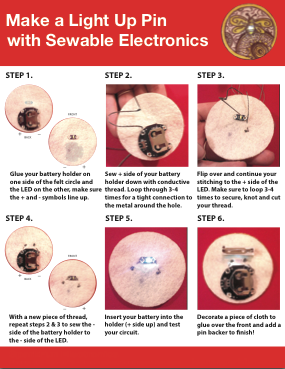
E-Textile Pin
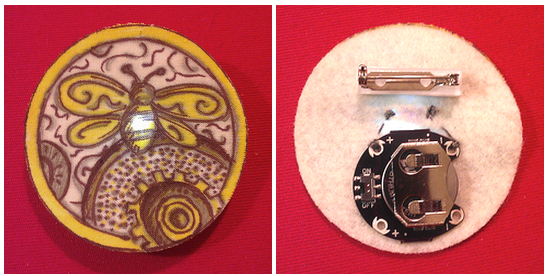
Create a light up pin by sewing a battery holder and LED to a circle of felt, then have students draw a design on muslin (or other thin fabric) and glue on top. Attach a pin back and you’ll have a quick light up pin project for students to walk away with.
Suggested Materials:
- LilyPad Coin Cell Battery Holder - Switched - 20mm DEV-11285
- LilyPad LED White (5pcs) DEV-10081 (One LED per student)
- Conductive Thread Bobbin - 30ft (Stainless Steel) DEV-10867
- Sewing Needles
- Felt Circles (for backing)
- Muslin Circles (for top layer)
- Markers
- Adhesive Pin Backs
- Glue Guns, Scissors, General Crafting Supplies
Additional Project Resources:
Here are some more ideas for single LED projects: Single LED Pinterest Board
These instructions for a basic single LED circuit with conductive thread can be used as a base for a project design: LilyPad Design Kit Experiment 1: Lighting Up a Basic Circuit
Demo Projects and Training
Having multiple demos out for participants to check out, try out, and pass around will help students visualize their project. If you have time, try building a few ‘in progress’ demos as well highlighting a certain stage of the build/project - think along the lines of cooking shows or craft shows on television which have stations set up with portions of the demonstration completed in order to show the next step in real time. When teaching basic stitching skills to beginners working with conductive thread, having a demo you can sew along with the student or as a quick demonstration can prove invaluable. In a pinch photos of each step for reference will work as well. If in a situation with a projector set up - large images/photos on screen can help with explanations. Taking a cue from our soldering workshops which utilize a giant cardboard soldering iron as a visual, we are developing large scale demos for e-textiles and paper circuits for students to follow along with.
Train Your Volunteers Ahead of Time
If you have a staff of volunteers to help run our event try and set up a time to meet a few days before and build the project together. This gives your helpers hands-on experience with any potential frustrations students may have with the build process as well as better insight into troubleshooting any potential problems crafting the project. For all of our Education events we plan a brief meeting where assistant teachers can voice any questions or concerns they have about their role in the activity or contribute any suggestions they may have about making the event run smoother.
Packing/Day of Tips:
Always bring more supplies than you think you need!
Plan ahead both in the hardware and craft materials side of things to have extra supplies in case of hardware failure, small pieces lost on the ground, or unsalvageable mistakes (in a time crunch, rather than untangle a mess of conductive thread you can just cut it and start with a fresh piece). If working with kits, bring along some spare components and extra thread, needles, or fabric to work with.
Bins, Bins, Bins!
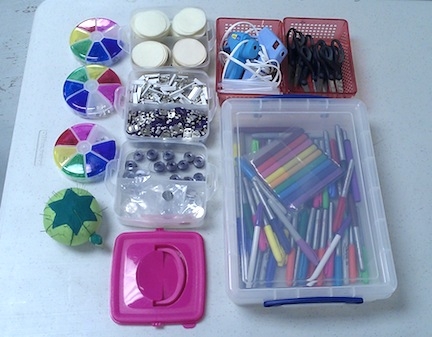
Whenever possible, separate any necessary components, tools, or crafting materials into bins with lids or stacking totes. In this photo, we pre-distributed parts into bins that would be set out on the tables once we arrived at a venue. This keeps everything organized during travel, set up, and helps make cleanup a breeze. We also used some of our Round Parts Boxes and color coded each compartment with permanent markers to create easy carrying cases for LilyPad LEDs that students can select their LED from during an event. This worked really well with some of our younger participants, who pointed to their favorite color on the lid to choose their LED.
Materials Tips:
Thread the Needle
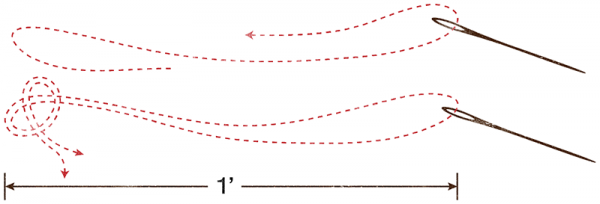
One of the biggest hurdles in working with conductive thread can be threading the needle. Conductive thread is more prone the fraying than traditional threads and can be challenging especially for those students new to sewing in general. A needle threader is essential to have on hand to make threading quicker and easier, but in large event where participants are stopping by a booth setting or don’t have a lot of time to make their project, pre-threading needles with conductive thread can be helpful. Last week at the Discovery Museum we prepped needles with thread and knotted the ends before placing in a central pin cushion for volunteers and students to grab from when needed. During slow times, one of the assistant teachers would replenish the pin cushion so there were always needles ready to go for the next batch of projects.
Glue Guns!
I know what you’re thinking - I thought we were doing a sewing activity?! Having a few glue guns on hand for e-textiles will save you a mountain of headaches. A quick dab of glue on the back of an LED or battery holder will let students place their components and sew without worrying about them sliding all around their fabric. We pre-glued battery holders ahead of time on circular felt templates for an e-textile pin activity, letting the student choose where to put the LED and cutting down on build time. Another use for glue guns is to help insulate the ends of fraying threads after your project is sewn down, or quick fixes for any stray pieces.
Do you have any tried and true strategies you’ve used in your classroom or even that you’d like to share? We would love to hear what instructors are doing out in the field as well. Leave a comment with your suggestions.


My personal favorite introductory activity is to do a simple circuit with copper tape, LED, and fold over battery on paper (see Jie Qi's work - very simple and quick). Then for a first e-textile activity I have people make a bracelet with 3 LEDs (curl the wires), and a switch made from two snaps.
Everyone always makes mistakes, but I encourage those as teaching opportunities (literally I'll say, "Hey everyone, look at what __ did. It's great! Because now we know how to fix it...'). My students always seem to learn more when I allow these mistakes. The most common mistake is to connect both the positives and negatives of the LEDs to the battery. However, that eliminates the point of the switch. Instead, connect either the positive or negative to the battery and connect the other line to a snap. (For instance, positives of LEDs to the battery. Negatives of the LEDs to the snap far away from the battery. Negative of the battery to the snap near the battery - see the diagram linked in Lovell's guide below).
This teaches so many concepts in a very concrete way: polarization, basic conductive sewing, parallel circuits, and a switch.
Obviously there are more details to how I teach this, and I'm happy to share. The bracelet idea comes from Emily Lovell's soft circuits guide (http://alumni.media.mit.edu/~emme/guide.pdf) and I've adapted my instruction of it.