SparkFun Qwiic MicroPressure Hookup Guide
 Alex the Giant, Ell C
Example Code
Once the library is installed, go ahead and open up File->Examples->SparkFun MicroPressure Library->Example1_BasicReadings. Make sure to select your board (SparkFun RedBoard) and COM port before hitting upload to begin experimenting with the pressure sensor.
Alternatively, you can copy and paste the code below to a shiny new Arduino file:
language:c
/*
  Basic test of the Qwiic MicroPressure Sensor
  By: Alex Wende
  SparkFun Electronics
  Date: July 2020
  License: This code is public domain but you buy me a beer if you use this and we meet someday (Beerware license).
  Feel like supporting our work? Buy a board from SparkFun!
  https://www.sparkfun.com/products/16476

  This example demonstrates how to get started with the Qwiic MicroPressure Sensor board, and read pressures in various units.
*/

// Include the SparkFun MicroPressure library.
// Click here to get the library: http://librarymanager/All#SparkFun_MicroPressure

#include<Wire.h>
#include <SparkFun_MicroPressure.h>

/*
 * Initialize Constructor
 * Optional parameters:
 *  - EOC_PIN: End Of Conversion (defualt: -1)
 *  - RST_PIN: Reset (defualt: -1)
 *  - MIN_PSI: Minimum Pressure (default: 0 PSI)
 *  - MAX_PSI: Maximum Pressure (default: 25 PSI)
 */
//SparkFun_MicroPressure mpr(EOC_PIN, RST_PIN, MIN_PSI, MAX_PSI);
SparkFun_MicroPressure mpr; // Use default values with reset and EOC pins unused

void setup() {
  // Initalize UART, I2C bus, and connect to the micropressure sensor
  Serial.begin(115200);
  Wire.begin();

  /* The micropressure sensor uses default settings with the address 0x18 using Wire.

     The mircropressure sensor has a fixed I2C address, if another address is used it
     can be defined here. If you need to use two micropressure sensors, and your
     microcontroller has multiple I2C buses, these parameters can be changed here.

     E.g. mpr.begin(ADDRESS, Wire1)

     Will return true on success or false on failure to communicate. */
  if(!mpr.begin())
  {
    Serial.println("Cannot connect to MicroPressure sensor.");
    while(1);
  }
}

void loop() {
  /* The micropressure sensor outputs pressure readings in pounds per square inch (PSI).
     Optionally, if you prefer pressure in another unit, the library can convert the
     pressure reading to: pascals, kilopascals, bar, torr, inches of murcury, and
     atmospheres.
   */
  Serial.print(mpr.readPressure(),4);
  Serial.println(" PSI");
  Serial.print(mpr.readPressure(PA),1);
  Serial.println(" Pa");
  Serial.print(mpr.readPressure(KPA),4);
  Serial.println(" kPa");
  Serial.print(mpr.readPressure(TORR),3);
  Serial.println(" torr");
  Serial.print(mpr.readPressure(INHG),4);
  Serial.println(" inHg");
  Serial.print(mpr.readPressure(ATM),6);
  Serial.println(" atm");
  Serial.print(mpr.readPressure(BAR),6);
  Serial.println(" bar");
  Serial.println();
  delay(500);
}
Once you have the code, go ahead and click on the upload button, open your serial monitor, and watch the magic happen!
For this particular example, I purchased uxcell Pneumatic Hose 4mm OD 2.5mm from Amazon, but any tubing with an inner diameter of 2.5mm will work.
Attach the tubing over the protruding MPR sensor like so:

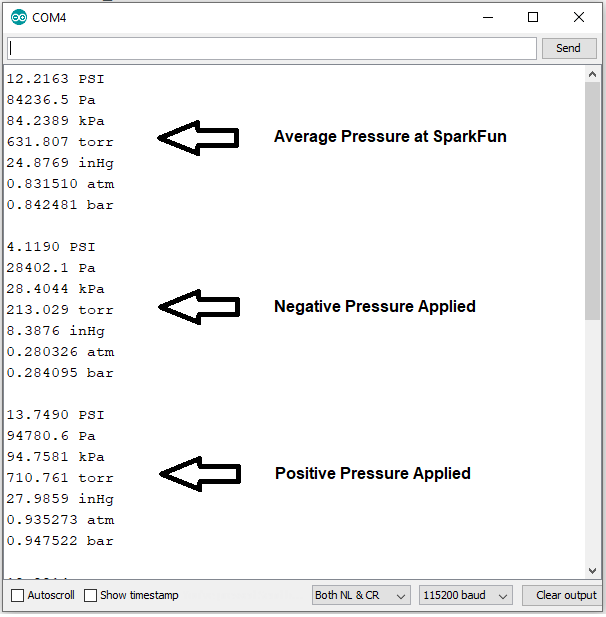
Open up your Serial Monitor and make sure your baud is at 115200. You should see the average pressure being output in multiple different measurements. If you apply negative pressure to the tubing, you'll see the measurements go down, positive pressure will show the measurements going up. Note the output below: