RETIRED (Phant Examples) - SparkFun Inventor's Kit for Photon Experiment Guide - Exp 6 Part 2
This Tutorial is Retired!
This tutorial covers concepts or technologies that are no longer current. It's still here for you to read and enjoy, but may not be as useful as our newest tutorials.
 Joel_E_B,
  jimblom,
  HelloTechie,
  b_e_n,
  Knutson,
  RBERLIA
Introduction
Phant is No Longer in Operation
As an example, try looking at the Photon Remote Water Level Sensor Tutorial which uses ThingSpeak.
Experiment 6: Environment Monitor
(RETIRED) Part 2: Posting Environment Data to Data.SparkFun.com
As you may have already experienced, using the serial port on a Photon can be very cumbersome. Let's come up with some way to show off the sensor readings without having to fuss with terminal programs. SparkFun's Data.SparkFun.com service is a great, FREE, utility for posting, storing, and reading sets of data. It's powered by Phant, an open-source, Node.js-based tool that can be run on any server or computer.
To get the most out of this example, you should create a data.sparkfun.com data stream of your own. Go to data.sparkfun.com/streams/make, then fill out the form to look something like this:
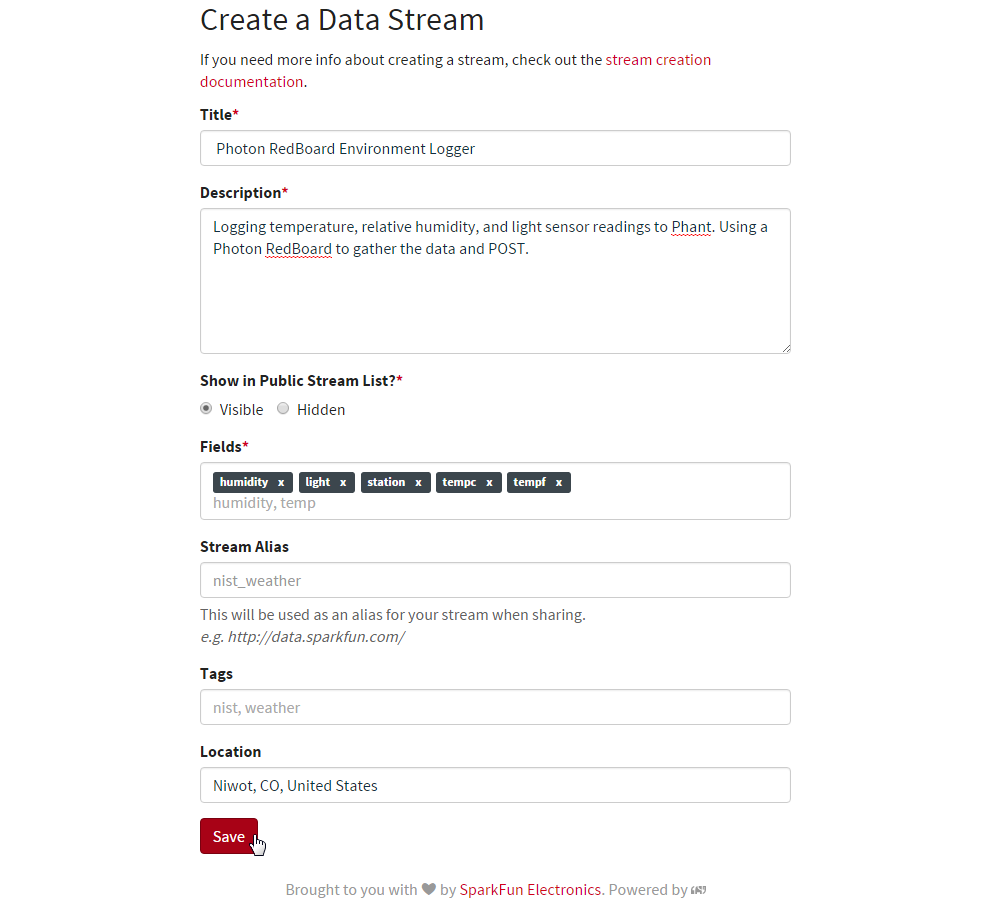
Phant Field Names: The most critical box in the Phant stream creation is the "Fields" list. For this example, make sure those five strings are typed exactly as:
humidity, light, station, tempc, tempf.
After creating the stream, you'll be given a set of keys – long strings of random characters. Don't lose the keys! Either copy them down, or use the "Email me my keys" feature.
New Photon Code
Create a new application, or paste this code over the previous example.
<
pre style="height:500px;overflow:scroll;white-space:pre-wrap;white-space:-moz-pre-wrap;white-space:-pre-wrap;white-space:-o-pre-wrap;word-wrap:break-word;" data-language="language:c,c">
/////////////////////
// Pin Definitions //
/////////////////////
const int RHT03_DATA_PIN = D3; // RHT03 data pin
const int LIGHT_PIN = A0; // Photocell analog output
const int LED_PIN = D7; // LED to show when the sensor's are being read
/////////////////////////// // RHT03 Object Creation // /////////////////////////// RHT03 rht; // This creates a RTH03 object, which we'll use to interact with the sensor
/////////////////////////////////////////////// // Phant (data.sparkfun.com) Keys and Server // /////////////////////////////////////////////// // These keys are given to you when you create a new stream: const char server[] = "data.sparkfun.com"; // Phant destination server const char publicKey[] = "LQLwdljGJ2TqXgxvAlGv"; // Phant public key const char privateKey[] = "A1x5rDzw47HWPqyog0lo"; // Phant private key Phant phant(server, publicKey, privateKey); // Create a Phant object
/////////////////////// // Post Rate Control // /////////////////////// // data.sparkfun.com limits how often you can post to the service. You are allowed up // to 100 posts every 15 minutes. unsigned long lastPost = 0; // lastPost keeps track of the last UNIX time we posted const unsigned int POST_RATE_S = 60; // This sets the post rate to 60 seconds. Avoid setting it below 10s.
////////////////////////// // Station Name Globals // ////////////////////////// String stationName = ""; // String object to keep track of our Photon's name
void setup() { Serial.begin(9600); // Start the serial interface at 9600 bps
rht.begin(RHT03_DATA_PIN); // Initialize the RHT03 sensor

pinMode(LIGHT_PIN, INPUT); // Set the photocell pin as an INPUT.
pinMode(LED_PIN, OUTPUT); // Set the LED pin as an OUTPUT
digitalWrite(LED_PIN, LOW); // Initially set the LED pin low -- turn the LED off.

// getDeviceName() -- defined at the bottom of this code -- polls Particle's
// server to get the name of the Photon running this application.
getDeviceName(); // Update the stationName String
}
void loop() { // This conditional should only run when the last successful post to Phant // was POST_RATE_S (60 seconds) or longer ago. // Time.now() returns the current UNIX timestamp (number of seconds since January 1, 1970). // It should increase by 1 every second. On a successful POST, we set lastPost equal to Time.now(). if (lastPost + POST_RATE_S <= Time.now()) { digitalWrite(LED_PIN, HIGH); // Turn the LED on to indicate we're posting int update = rht.update(); // Get new values from the RHT03.
    if (update == 1) // If the RHT03 update was successful
    {
        int postResult = 0; // This variable will keep track of whether or not

        //while (postResult <= 0)
        // Phant posts aren't always successful. Our postToPhant() function,
        // defined below, will return 1 if it was successful. Or a negative
        // number if it failed.
        while (postToPhant() <= 0)
        {
            Serial.println("Phant post failed. Trying again."); // Debug statement
            // Delay 1s, so we don't flood the server. Little delay's allow the Photon time
            // to communicate with the Cloud.
            for (int i=0; i<1000; i++)
                delay(1);
        }
        // After a successful Phant POST:
        Serial.println("Phant post success!"); // Debug print
        // Set lastPost to current time, so we don't post for another POST_RATE_S seconds:
        lastPost = Time.now();
    }
    else // If the RHT03 update failed:
    {
        delay(RHT_READ_INTERVAL_MS); // Delay to give the sensor time to reset
    }
    digitalWrite(LED_PIN, LOW); // Turn the LED off to indicate we're done posting (/trying to post)
}
}
// postToPhant() gathers all of our sensor data, bundles it into a Phant post, // and sends it out to data.sparkfun.com. // It'll return either 1 on success, or a negative number if the post fails int postToPhant(void) { Serial.println("Posting to Phant!"); // Debug statement
// Use phant.add(<field>, <value>) to add data to each field.
// Phant requires you to update each and every field before posting,
// make sure all fields defined in the stream are added here.
phant.add("humidity", rht.humidity(), 1); // These first three phant adds set a field value to float variable
phant.add("tempc", rht.tempC(), 1); // The third parameter -- valid for float variables -- sets the number
phant.add("tempf", rht.tempF(), 1); // of decimal points after the number.
phant.add("light", analogRead(LIGHT_PIN)); // We can also add an integer
phant.add("station", stationName); // phant.add(<field>, <String>) is perfectly valid too!

// phant.particlePost() performs all of the Phant server connection and HTTP POSTING for you.
// It'll either return a 1 on success or negative number on fail.
// It uses the field/value combinations added previously to send Phant its data.
// MAKE SURE YOU COMMIT A phant.add() FOR EVERY FIELD IN YOUR STREAM BEFORE POSTING!
return phant.particlePost();
}
/////////////////////////////// // Get Device Name Functions // /////////////////////////////// // These sets of functions poll Particle's server for the name of our Photon. // This method is described in Particle's documentation here: // https://docs.particle.io/reference/firmware/photon/#get-device-name // Function handlers are used here -- when the Spark.subscribe function // returns, it will call the nameHandler([topic], [data]) function with our // Photon's name. bool validName = false; // Boolean to track if we have a valid name or not
// nameHandler() is a function handler. It's passed to Spark.subscribe() and // called when that function returns. // The [data] variable should have the name of our Photon when it's done. void nameHandler(const char *topic, const char *data) { stationName = String(data); // Store the name in the stationName global variable validName = true; // Set validName to true, so getDeviceName can stop blocking. }
// getDeviceName manages the spark subscribing and publishing required to get our // Photon's name. It'll block for up to 30 seconds. On success it'll return a // positive number. On fail, it'll return 0. int getDeviceName(void) { Spark.subscribe("spark/", nameHandler); Spark.publish("spark/device/name");
int timeout = 30;
while ((!validName) && (timeout > 0))
{
    Serial.println("Waiting for name..." + String(timeout--));
    delay(1000); // Spark.process() is called during delay()
}

Serial.println("Station name = " + stationName);

return timeout;
}
If you created a Phant stream of your own, paste your public and private keys into the publicKey[] and privateKey[] variable values. If you haven't created your own stream yet, feel free to take ours for a test drive. You can find the stream here. Just please, please don't abuse it. Don't set your post rate to faster than 60 seconds, and, once you've verified it works, try creating a stream of your own.
What You Should See
After uploading the code, keep an eye on your Photon's blue, D7 LED. It should illuminate when the device is attempting to send data to data.sparkfun.com, and it'll turn off when it's done. To check if your data has been posted to Phant, load up the stream in your web browser (click here if you're using our test stream). You should see a new row of data at the top, stamped with your Photon's name, data, and a recent timestamp.

Every minute you should see a new row of data appear. Let it run all night! See how cold your room gets. Or find out if anyone's turning the lights on while you're sleeping.
Now that your data is on data.sparkfun.com, you can have all sorts of fun with it. For instance, you can load your public key into analog.io -- our friends who've created a beautiful front-end graphing interface for Phant. Or you can try to create graphs of your own -- check out this tutorial using Google Charts.
Code to Note
This application introduces the Phant library, a useful tool to make posting to Phant as painless as can be. To set the Phant library up in your sketch, begin by declaring your keys and the Phant server (data.sparkfun.com):
language:c
const char server[] = "data.sparkfun.com"; // Phant destination server
const char publicKey[] = "LQLwdljGJ2TqXgxvAlGv"; // Phant public key
const char privateKey[] = "A1x5rDzw47HWPqyog0lo"; // Phant private key
Phant phant(server, publicKey, privateKey); // Create a Phant object
The last line there creates a Phant object -- phant (lowercase 'p') -- which we'll use throughout the rest of the application to send data to Phant. This constructor call gives the Phant object almost everything it needs to know about your Phant stream: the server and the keys.
Posting data to Phant is a two step process: adding field/data combinations, and posting them to the server. To pair your fields with data, call the phant.add(<field>, <value>) function where <field> is a String matching exactly one of the fields in your stream. The <value> part of the Phant post can be almost any data type: in our example we're adding float's, ints, and a String.
The entire Phant post takes place in our int postToPhant(void) function:
language:c
int postToPhant(void)
{
    phant.add("humidity", rht.humidity(), 1); // These first three phant.add's pair a field with a float
    phant.add("tempc", rht.tempC(), 1); // The third param - optional for floats - sets the precision
    phant.add("tempf", rht.tempF(), 1); // (the number of decimal points after the number).
    phant.add("light", analogRead(LIGHT_PIN)); // We can also add an integer
    phant.add("station", stationName); // Or add a String is perfectly valid too!

    return phant.particlePost(); // Post our values to the Phant server
}
After you've commited an add for every field in your Phant stream, call phant.particlePost() to send them out to the server. This function takes care of the TCP connection, and sends out a valid HTTP POST to the Phant server. When it's done, it'll either return a 1 on success, or yield a negative number if it fails.
Troubleshooting
If you're not seeing any data from your Photon being posted to the stream, it may be failing on the phant.particlePost() function. There are a few reasons the Phant POST might fail:
- No Internet connection -- make sure your Photon is pulsing cyan.
- Invalid POST -- make sure you have a
phant.addfor every field in your stream. Also make sure there aren't any typos in the field names. - Stream overload -- Phant streams on data.sparkfun.com are limited to 300 posts every 15 minutes. Our shared stream is subject to that same limitation. Consider making a stream of your own. It's free!
We still use serial in this example, but really only for debugging. If you're still not having any luck, open up your serial port and see what it has to say.
Resources and Going Further
Need a little project inspiration for using the Particle Photon example a different data-streaming service and/or IoT platform? Check out this tutorial to log data with ThingSpeak.