Reducing Arduino Power Consumption
 Alex the Giant
Saving Power with Software
So far we've talked about how to reduce the power of the Arduino, but we haven't talked about why it uses the power it does. Inside the ATmega328P, lies a series of circuits that work together to offload work from the processor, and each of these draws some amount of power. The Arduino's analogWrite() function, for example, doesn't have the processor create a PWM signal by counting the clock cycles itself. Instead, the Arduino uses one of the built in timers to count clock cycles and send an interrupt request to the processor. From there, the processor stops what it's doing and handles the interrupt by switching the pin's state. By offloading some of the work, the microcontroller is able to do multiple things at the same time. Some of the other circuitry built into the ATmega328P include:
- 3 timers
- Watchdog timer
- Brown-out detect
- Analog to digital conversion
Each of these independent components need power to work, and, unless you manually disable them, they will continue to draw power. The brown-out detection actively monitors the system voltage to ensure it doesn't drop below its threshold. If it does, the controller powers down until the voltage is increased above that threshold. The analog to digital converter (ADC) does just as the name suggests, it take the analog voltage (which can be any value from 0V up to VCC) and converts it to a digital value that the microcontroller can use (0-1023 for 10-bit converters). If your project doesn't need to use the ADC, disabling it will cut down on the power draw drastically.
But what if you still need the ADC? Thankfully there are registers where you can disable some of these circuits with software. Using software allows you to enable the circuits you need, when you need them, and, when you're done, you can disable them again. All of the registers are well documented in the datasheet for the ATmega328p, but, if directly writing to registers makes you uncomfortable, there is a library available that you can download from the link below. For instructions on how to install an Arduino library, check out this tutorial.
This library allows you to set how long to enter into sleep mode, from a few milliseconds, up to indefinitely. It also allows you to specify which parts of the micro to disable, making it a pretty powerful and versatile library for your low-power needs.
In this first example, let's load the sketch below onto our Arduino, which is running off of 5V at 16MHz. To see how little current is needed in sleep mode, I'm using a bare bones Arduino by using the ATmega328P on a breadboard to minimize the current I'm using.
language:c
#include "LowPower.h"

void setup()
{
  pinMode(13,OUTPUT);
}

void loop()
{
  digitalWrite(13,HIGH);
  delay(2000);
  digitalWrite(13,LOW);
  LowPower.powerDown(SLEEP_2S, ADC_OFF, BOD_OFF);
}
In this sketch the Arduino blinks an LED on for two seconds and is then powered down for two seconds, and during that time the ADC and brown-out detect (BOD) are disabled. When powered down, the Arduino's current drops from 14mA, down to just 6uA! If we use some of the other power saving tricks from previous sections, we can see in the table below just how low we can get the sleep current.
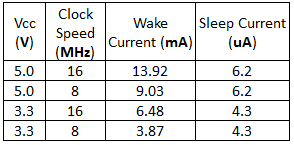
If you're wondering why clock speed doesn't affect the sleep current, during power down the clock is also disabled. Obviously you won't want to keep the Arduino in low-power mode. But, in projects where you don't need to take readings continuously, shutting the Arduino down 50% of the time, and using the techniques we covered, can allow the battery to last over seven times longer!