Qwiic Distance Sensor (RFD77402) Hookup Guide
 Englandsaurus
Example Code
You should have downloaded the SparkFun RFD77402 Library in the previous step, if not, go back to the previous step and go ahead and download it as you'll be needing it shortly. This hookup guide goes over the 3 examples contained within the library.
Example 1 - Basic Readings
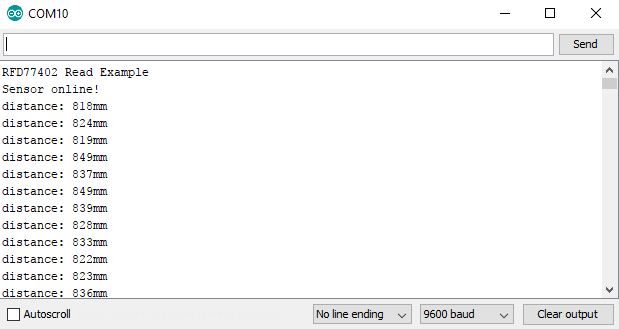
Example 1 gets us started taking some basic distance readings from the sensor. Simply upload the example code below, open your serial monitor with a baud rate of 9600 and start getting readings!
language:c
#include <SparkFun_RFD77402_Arduino_Library.h> //Use Library Manager or download here: https://github.com/sparkfun/SparkFun_RFD77402_Arduino_Library
RFD77402 myDistance; //Hook object to the library

void setup()
{
  Serial.begin(9600); //Begins Serial communication
  while (!Serial);
  Serial.println("RFD77402 Read Example");

  if (myDistance.begin() == false) //Initializes the sensor. Tells the user if initialization has failed.
  {
    Serial.println("Sensor failed to initialize. Check wiring.");
    while (1); //Freeze!
  }
  Serial.println("Sensor online!");
}

void loop()
{
  myDistance.takeMeasurement(); //Tell sensor to take measurement and populate distance variable with measurement value

  unsigned int distance = myDistance.getDistance(); //Retrieve the distance value

  Serial.print("distance: "); //Print the distance
  Serial.print(distance);
  Serial.print("mm");
  Serial.println();
}
The first example simply outputs distances one after another, the output should look something like the image below.
Example 2 - Confidence Values
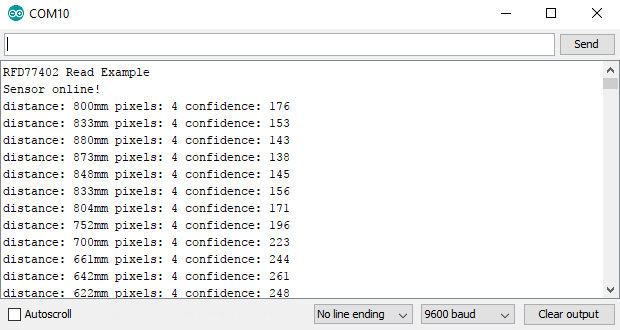
The second example gets us going on rejecting or accepting our data as a successful reading (i.e. the sensor is not maxed out). This is done simply by using the getConfidenceValue() function, which returns a value anywhere between 0 and 2047, with 2047 being the "most confident". In other words, a confidence value of 2047 means that the sensor is getting a very strong, clean, TOF flight reading. This is a great way to ignore any data that is out of the sensors range. The below example code will get you started taking these confidence readings. This sketch will also check the distance value against error codes to see if the sensor is giving us an error, and if so, which one.
language:c
#include <SparkFun_RFD77402_Arduino_Library.h> //Use Library Manager or download here: https://github.com/sparkfun/SparkFun_RFD77402_Arduino_Library
RFD77402 myDistance; //Hook object to the library

void setup()
{
  Serial.begin(9600);
  while (!Serial);
  Serial.println("RFD77402 Read Example");

  if (myDistance.begin() == false)
  {
    Serial.println("Sensor failed to initialize. Check wiring.");
    while (1); //Freeze!
  }
  Serial.println("Sensor online!");
}

void loop()
{

  byte errorCode = myDistance.takeMeasurement();
  if (errorCode == CODE_VALID_DATA) //Checks to see that data is not any of the error codes
  {
    unsigned int distance = myDistance.getDistance();
    byte pixels = myDistance.getValidPixels();
    unsigned int confidence = myDistance.getConfidenceValue(); //Pulls the confidence value from the sensor

    Serial.print("distance: ");
    Serial.print(distance);
    Serial.print("mm pixels: ");
    Serial.print(pixels);
    Serial.print(" confidence: ");
    Serial.print(confidence);

//Error Codes are outlined below

    if(distance > 2000) Serial.print(" Nothing sensed");
  }
  else if (errorCode == CODE_FAILED_PIXELS)
  {
    Serial.print("Not enough pixels valid");
  }
  else if (errorCode == CODE_FAILED_SIGNAL)
  {
    Serial.print("Not enough signal");
  }
  else if (errorCode == CODE_FAILED_SATURATED)
  {
    Serial.print("Sensor pixels saturated");
  }
  else if (errorCode == CODE_FAILED_NOT_NEW)
  {
    Serial.print("New measurement failed");
  }
  else if (errorCode == CODE_FAILED_TIMEOUT)
  {
    Serial.print("Sensors timed out");
  }

  Serial.println();
}
Opening the serial monitor to 9600 baud should yield an output similar to the one shown earlier.
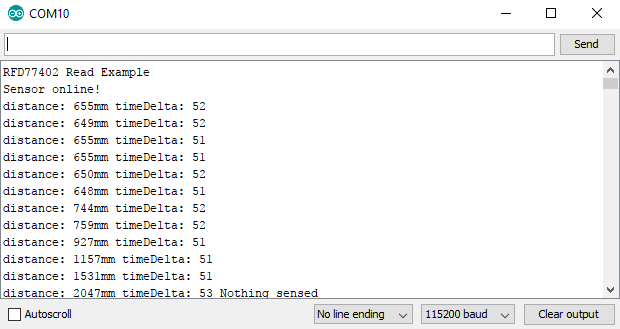
Example 3 - Fast Readings
The following example allows you to use your distance sensor not only to measure distance but time in between samples as well. Enabling a faster I2C speed cuts down on the time where we are talking to the sensor, so we are able to accurately guage time in between readings. This allows the user to compute velocity and even acceleration if they'd like. Check out the Equations of Motion for a little bit better explanation if you're new to physics.
In the below example, make note of two things, the first is in the setup() function. Notice how we call a non-default begin() function that initializes the sensor with I2C_SPEED_FAST, which increases the clock speed on the I2C bus. The second thing to make note of are the three lines at the beginning of our void loop(), which starts the timer function and allows us to know the time in between readings.
language:c
#include <SparkFun_RFD77402_Arduino_Library.h> //Use Library Manager or download here: https://github.com/sparkfun/SparkFun_RFD77402_Arduino_Library
RFD77402 myDistance; //Hook object to the library

void setup()
{
  Serial.begin(115200);
  while (!Serial);
  Serial.println("RFD77402 Read Example");

  //Initialize sensor. Tell it use the Wire port (Wire1, Wire2, softWire, etc) and at 400kHz (I2C_SPEED_FAST or _NORMAL)
  if (myDistance.begin(Wire, I2C_SPEED_FAST) == false)
  {
    Serial.println("Sensor failed to initialize. Check wiring.");
    while (1); //Freeze!
  }
  Serial.println("Sensor online!");
}

void loop()
{
  long startTimer = millis();
  byte errorCode = myDistance.takeMeasurement();
  long timeDelta = millis() - startTimer;

  if (errorCode == CODE_VALID_DATA)
  {
    unsigned int distance = myDistance.getDistance();
    byte pixels = myDistance.getValidPixels();
    unsigned int confidence = myDistance.getConfidenceValue();

    Serial.print("distance: ");
    Serial.print(distance);
    Serial.print("mm timeDelta: ");
    Serial.print(timeDelta);

    if(distance > 2000) Serial.print(" Nothing sensed");
  }
  else if (errorCode == CODE_FAILED_PIXELS)
  {
    Serial.print("Not enough pixels valid");
  }
  else if (errorCode == CODE_FAILED_SIGNAL)
  {
    Serial.print("Not enough signal");
  }
  else if (errorCode == CODE_FAILED_SATURATED)
  {
    Serial.print("Sensor pixels saturated");
  }
  else if (errorCode == CODE_FAILED_NOT_NEW)
  {
    Serial.print("New measurement failed");
  }
  else if (errorCode == CODE_FAILED_TIMEOUT)
  {
    Serial.print("Sensors timed out");
  }

  Serial.println();
}
Opening the serial monitor to 115200 baud should yield something like the below image.