Programming the pcDuino
This Tutorial is Retired!
This tutorial covers concepts or technologies that are no longer current. It's still here for you to read and enjoy, but may not be as useful as our newest tutorials.
 SFUptownMaker
Accessing GPIO Pins
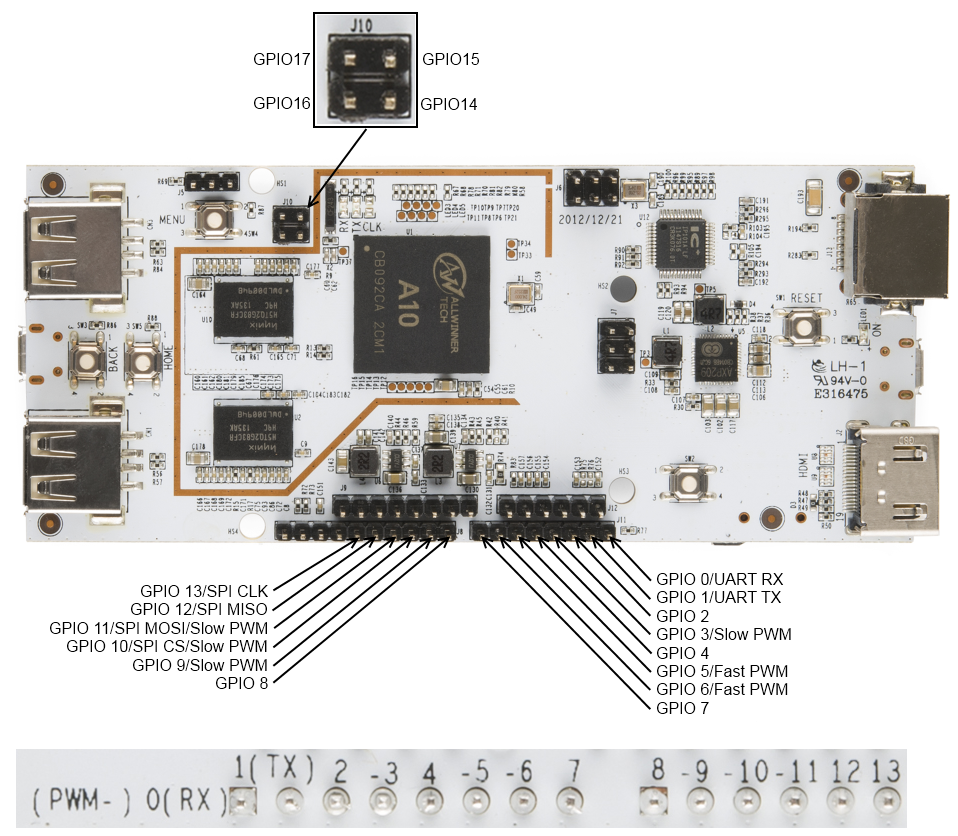
The pcDuino comes with 18 pins that can be accessed as, among other things, general purpose I/O.
Hardware
Accessing GPIO pins is not hard; simply open the file associated with the pin you wish to access and read or write that file. The files are located in the following locations:
language:text
/sys/devices/virtual/misc/gpio/mode/
/sys/devices/virtual/misc/gpio/pin/
Each pin has its own file. Note that there are 20 files; only 18 of them are actually mapped to available pins. The files map to the pins as seen in the image below:
Some pins can do double (or triple) duty. Writing certain strings to the "mode" file will activate the various different modes (serial, SPI, input, output, etc) for the particular pin you're accessing; we'll cover those different values in later exercises. For now, you really only need to worry about three of them:
- '0' - make the pin an INPUT
- '1' - make the pin an OUTPUT
- '8' - make the pin an INPUT, with a pull-up resistor
The logic on these pins is 3.3V; attempting to use 5V devices can cause damage to your pcDuino. The output current capacity is not as high as it is on Arduino-type boards, but should be sufficient to drive a small LED fairly easily.
GPIO in C++
Here is an example program for using C++ to read and write GPIO pins. It's pretty simple: it waits for a button attached to GPIO2 to be pressed (thereby pulling the pin low), then turns LEDs attached to the various GPIO pins on one at a time, then back off again.
language:cpp
#include <fcntl.h>
#include <stdio.h>
#include <string.h>
#include <unistd.h>

#include "gpio_test.h"

// These arrays will become file descriptors for the 18 IO pin and mode files.
int pinMode[18];
int pinData[18];

int main(void)
{
  int i = 0;       // Loop iterator

  char inputBuffer = HIGH; // create and clear a buffer for data from pins

  char path[256]; // nice, long buffer to hold the path name for pin access

  // This first loop does four things:
  //   - initialize the file descriptors for the pin mode files
  //   - initialize the file descriptors for the pin data files
  //   - make the pins outputs
  //   - set all the pins low
  for (i = 2; i <= 17; i++)
  {
    // Clear the path variable...
    memset(path,0,sizeof(path));
    // ...then assemble the path variable for the current pin mode file...
    sprintf(path, "%s%s%d", GPIO_MODE_PATH, GPIO_FILENAME, i);
    // ...and create a file descriptor...
    pinMode[i] = open(path, O_RDWR);
    // ...then rinse, repeat, for the pin data files.
    memset(path,0,sizeof(path));
    sprintf(path, "%s%s%d", GPIO_PIN_PATH, GPIO_FILENAME, i);
    pinData[i] = open(path, O_RDWR);
    // Now that we have descriptors, make the pin an output, then set it low.
    setPinMode(pinMode[i], OUTPUT);
    setPin(pinData[i], LOW);
    printf("Pin %d low\n", i);  // Print info to the command line.
  }

  // Now, we're going to wait for a button connected to pin 2 to be pressed
  //  before moving on with our demo.
  setPinMode(pinMode[2], INPUT_PU);

  do
  {
    printf("Waiting for button press...\n");
    // This lseek() is very important- must read from the top of the file!
    lseek(pinData[2], 0, SEEK_SET);
    // Read one byte from the pinData register. The first byte will be '1' if
    //   the pin is high and '0' if it is low.
    read(pinData[2], &inputBuffer, 1);
    usleep(100000);       // Sleep for 1/10 second.
  } while (inputBuffer == HIGH);

  // After the button press, let's scan through and turn the lights on one
  //   at a time, the back off again. After that, we're done.
  for (i = 3; i <= 17; i++)
  {
    setPin(pinData[i], HIGH);
    printf("Pin %d HIGH\n", i);
    usleep(250000);
  }

  for (i = 17; i >=3; i--)
  {
    setPin(pinData[i], LOW);
    printf("Pin %d LOW\n", i);
    usleep(250000);
  }
}

// These two 'set' functions are just wrappers to the writeFile() function to
//   make the code prettier.
void setPinMode(int pinID, int mode)
{
  writeFile(pinID, mode);
}

void setPin(int pinID, int state)
{
  writeFile(pinID, state);
}

// While it seems okay to only *read* the first value from the file, you
//   seemingly must write four bytes to the file to get the I/O setting to
//   work properly. This function does that.
void writeFile(int fileID, int value)
{
  char buffer[4];  // A place to build our four-byte string.
  memset((void *)buffer, 0, sizeof(buffer)); // clear the buffer out.
  sprintf(buffer, "%c", value);
  lseek(fileID, 0, SEEK_SET);   // Make sure we're at the top of the file!
  write(fileID, buffer, sizeof(buffer));
}
GPIO Access in Python
Here's the same program realized in Python. Again, it simply waits for a button on GPIO2 to be pressed, then scans through the other GPIO pins, making them first high, then low.
language:python
#!/usr/bin/env python

import time, os

## For simplicity's sake, we'll create a string for our paths.
GPIO_MODE_PATH= os.path.normpath('/sys/devices/virtual/misc/gpio/mode/')
GPIO_PIN_PATH=os.path.normpath('/sys/devices/virtual/misc/gpio/pin/')
GPIO_FILENAME="gpio"

## create a couple of empty arrays to store the pointers for our files
pinMode = []
pinData = []

## Create a few strings for file I/O equivalence
HIGH = "1"
LOW =  "0"
INPUT = "0"
OUTPUT = "1"
INPUT_PU = "8"

## First, populate the arrays with file objects that we can use later.
for i in range(0,18):
  pinMode.append(os.path.join(GPIO_MODE_PATH, 'gpio'+str(i)))
  pinData.append(os.path.join(GPIO_PIN_PATH, 'gpio'+str(i)))

## Now, let's make all the pins outputs...
for pin in pinMode:
  file = open(pin, 'r+')  ## open the file in r/w mode
  file.write(OUTPUT)      ## set the mode of the pin
  file.close()            ## IMPORTANT- must close file to make changes!

## ...and make them low.
for pin in pinData:
  file = open(pin, 'r+')
  file.write(LOW)
  file.close()

## Next, let's wait for a button press on pin 2.
file = open(pinMode[2], 'r+') ## accessing pin 2 mode file
file.write(INPUT_PU)          ## make the pin input with pull up
file.close()                  ## write the changes

temp = ['']   ## a string to store the value
file = open(pinData[2], 'r') ## open the file
temp[0] = file.read()       ## fetch the pin state

## Now, wait until the button gets pressed.
while '0' not in temp[0]:
  file.seek(0)      ## *MUST* be sure that we're at the start of the file!
  temp[0] = file.read()   ## fetch the pin state
  print "Waiting for button press..."
  time.sleep(.1)  ## sleep for 1/10 of a second.

file.close()  ## Make sure to close the file when you're done!

## Now, for the final trick, we're going to turn on all the pins, one at a
##   time, then turn them off again.
for i in range(3,17):
  file = open(pinData[i], 'r+')
  file.write(HIGH)
  file.close()
  time.sleep(.25)

for i in range(17,2, -1):
  file = open(pinData[i], 'r+')
  file.write(LOW)
  file.close()
  time.sleep(.25)