Processor Interrupts with Arduino
 JordanDee, Ell C
Example: Interrupting an LED Sequence
Interrupts can also come in handy when dealing with long sequences of things. Let's look at another simple example with LEDs - let's say that we are going to use the built-in RGB LED on a LilyPad USB Plus to cycle through a sequence of colors, fading each color on and off. The fade cycle time for each color is 10 seconds and we have a number of these boards sewn into costumes on stage. What happens if one of these costumes gets out of sync?
Rather than having to wait for the cycle to end and trying to reset the board in sync with the other boards, we can add an interrupt to pin 10 (this is interrupt 0 on the LilyPad USB Plus board). When the button is pressed, the interrupt is triggered and we move on to the next color. This allows us to get the offending costume in sync faster and the show can go on.
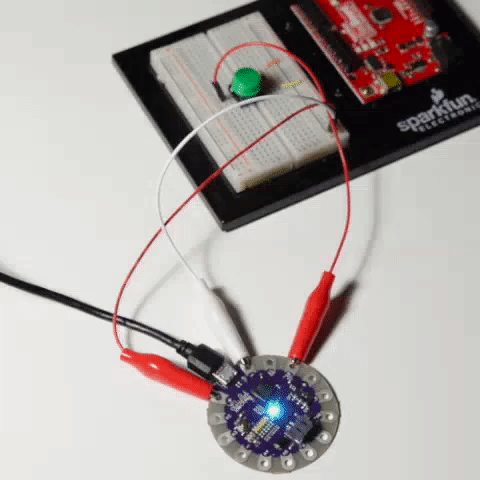
Let's make this happen for ourselves. If you'd like to follow along, grab a LilyPad USB Plus. You'll need the buttons, jumpers, and power supply from the previous experiment. You will also need a few alligator clip to pigtail wires to connect to the LilyPad sew tabs.
Hook it all up as you see here:

Select the board and COM port for the the LilyPad USB Plus. Then upload the code below.
/*
Example: Interrupting an LED sequence
SparkFun Electronics

Follow the tutorial at:
https://learn.sparkfun.com/tutorials/processor-interrupts-with-arduino#example-interrupting-an-led-sequence

This code is released under the MIT License (http://opensource.org/licenses/MIT)

******************************************************************************/

// Cycling through a series of colors using the built-in LED on the LilyPad USBPlus. Using an interrupt to switch quickly between colors

// The built-in LED:

int RGB_red = 12;
int RGB_green = 13;
int RGB_blue = 14;

int x = 0;  // variable to be updated by the interrupt

//Fade variables
int ledMode = 0; //color mode to control LEDs
int colorSwitch = 0; //compare to current_FadeVal to know whether or not to switch colors yet
int prev_FadeVal = 0;
int current_FadeVal = 0;
boolean increasing = true;

//variables to keep track of the timing of recent interrupts
unsigned long button_time = 0;
unsigned long last_button_time = 0;


void setup() {

// Make all of our LED pins outputs:

  pinMode(RGB_red, OUTPUT);
  pinMode(RGB_green, OUTPUT);
  pinMode(RGB_blue, OUTPUT);
  attachInterrupt(0, increment, CHANGE);
  Serial.begin(9600);  //turn on serial communication

}

void loop()
{
  // In this code we'll step through seven rainbow colors (primary, secondary, tertiary).

  // Unlike digitalWrite, which can be only HIGH (on) or LOW (off),
  // analogWrite lets you smoothly change the brightness from 0 (off) to 255 (fully on).
  // When analogWrite is used with the RGB LED, you can create millions of colors!


  FadeColor();
}

// Interrupt service routine for interrupt 0
void increment() {

  button_time = millis();

  //check to see if increment() was called in the last 250 milliseconds
  if (button_time - last_button_time > 250)
  {
    //increment counter
    x++;

    //turn led off
    analogWrite(RGB_red,0);
    analogWrite(RGB_green,0);
    analogWrite(RGB_blue,0);

    Serial.println(x, DEC); //print x to serial monitor
    delay(10000);

    //set the last button time to the current button time
    last_button_time = button_time;

    //Switch colors
    if (ledMode < 7){
      ledMode++;
    }
    else {
      //start over with Red
      ledMode = 1;
    }

    //reset fade values
    prev_FadeVal = 0;
    current_FadeVal = 0;

  }
}

void FadeColor() {
  switch (ledMode) {
    case 1://FADE RED
      analogWrite(RGB_green, 0);
      analogWrite(RGB_blue, 0);
      analogWrite(RGB_red, prev_FadeVal);
      break;
    case 2://FADE YELLOW
      analogWrite(RGB_red, prev_FadeVal);
      analogWrite(RGB_green, prev_FadeVal);
      analogWrite(RGB_blue, 0);
      break;
    case 3://FADE GREEN
      analogWrite(RGB_red, 0);
      analogWrite(RGB_green, prev_FadeVal);
      analogWrite(RGB_blue, 0);
      break;
    case 4://FADE CLEAR BLUE
      analogWrite(RGB_red, 0);
      analogWrite(RGB_green, prev_FadeVal);
      analogWrite(RGB_blue, prev_FadeVal);
      break;
    case 5://FADE BLUE
      analogWrite(RGB_red, 0);
      analogWrite(RGB_green, 0);
      analogWrite(RGB_blue, prev_FadeVal);
      break;
    case 6://FADE MAGENTA
      analogWrite(RGB_red, prev_FadeVal);
      analogWrite(RGB_green, 0);
      analogWrite(RGB_blue, prev_FadeVal);
      break;

    default:
      analogWrite(RGB_red, prev_FadeVal);
      analogWrite(RGB_green, prev_FadeVal);
      analogWrite(RGB_blue, prev_FadeVal);
      break;
  }
  delay(100);

  if (increasing == true) {
    current_FadeVal += 5;
  }
  else { //decreasing
    current_FadeVal -= 5;
  }

  if (current_FadeVal > 255) {
    increasing = false;
    prev_FadeVal -= 5;//undo addition
    current_FadeVal = prev_FadeVal;

  }
  else if (current_FadeVal < 0) {
    increasing = true;
    prev_FadeVal += 5;//unto subtraction
    current_FadeVal = prev_FadeVal;
  }

  prev_FadeVal = current_FadeVal;

  if(current_FadeVal == colorSwitch)
  {
    if (ledMode < 7){
      ledMode++;
    }
    else {
      //start over with Red
      ledMode = 1;
    }
  }
}
Note that each time you press the button, you switch to the next color. Perhaps not the most common use case, but visually more obvious how interrupts address immediate needs.