OLED Display Hookup Guide
This Tutorial is Retired!
This tutorial covers concepts or technologies that are no longer current. It's still here for you to read and enjoy, but may not be as useful as our newest tutorials.
 Joel_E_B
Firmware
For this example, we'll be using the Adafruit OLED library fork by Technobly found on GitHub.
Download the library, and copy it to your libraries folder in Arduino. If you need a refresher on how to install a library, check out our tutorial.
Once you have the library installed, you can copy this example sketch into the Arduino IDE.
language:c
/*
Based on the LiquidCrystal Library
Demonstrates the use a SparkFun 16x2 OLED display. This OLED screen
utilizes the RS0010 chipset instead of the HD44780 chipset which means
the pin out will be slightly different. You will need 7 general
I/O pins to interface to this screen and 2 pins for power.
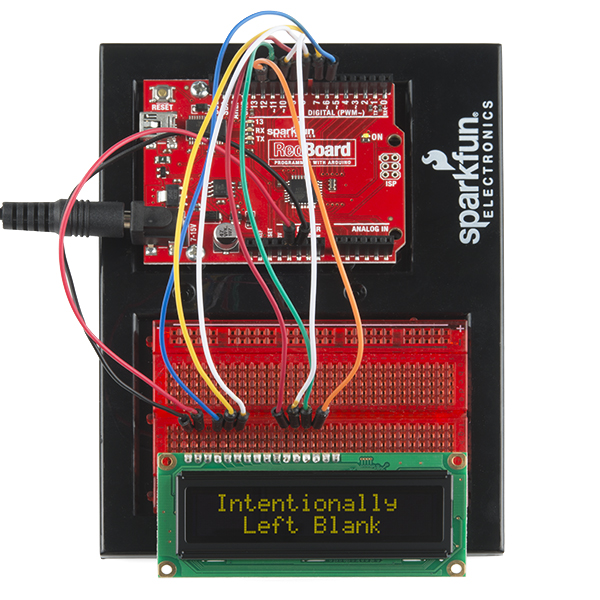
The circuit:
* GND (pin 1) to GND
* VDD (pin 2) to 5V
* RS (pin4) to digital pin 6
* R/W (pin 5) to digital pin 7
* Enable (pin 6) to digital pin 8
* D4 (pin 11) to digital pin 9
* D5 (pin 12) to digital pin 10
* D6 (pin 13) to digital pin 11
* D7 (pin 14) to digital pin 12
There is no need for the contrast pot as used in the LCD tutorial
Library originally added 18 Apr 2008
by David A. Mellis
library modified 5 Jul 2009
by Limor Fried (http://www.ladyada.net)
example added 9 Jul 2009
by Tom Igoe
modified 22 Nov 2010
by Tom Igoe
Library & Example Converted for OLED
by Bill Earl 30 Jun 2012
This example code is in the public domain.
*/
#include <Adafruit_CharacterOLED.h>//include the OLED library
// initialize the library with the OLED hardware
// version OLED_Vx and numbers of the interface pins.
// OLED_V1 = older, OLED_V2 = newer. If 2 doesn't work try 1 ;)
Adafruit_CharacterOLED lcd(OLED_V2, 6, 7, 8, 9, 10, 11, 12);
void setup()
{
lcd.begin(16, 2);// Initialize the LCD with 16 characters and 2 lines
}
void loop()
{
scrollingMarquee();
counter();
tempAndHumidity();
}
//-------------------------------------------------------------------------------------------
void scrollingMarquee()
{
//This function scroll text across the screen on both lines
lcd.clear(); // it's always good to clear the screen before movonh onto a new print
for(int j = 0; j < 17; j++)
{
lcd.setCursor(0, 0);
lcd.print("SPARK");
lcd.setCursor(0, 1);
lcd.print(" FUN ");
lcd.scrollDisplayRight();
delay(100);
}
}
//-------------------------------------------------------------------------------------------
void counter()
{
//this function prints a simple counter that counts to 10
lcd.clear();
for(int i = 0; i <= 10; i++)
{
lcd.home();// set the cursor to column 0, line 1
lcd.print("Counter = ");
lcd.print(i, DEC);
delay(500);
lcd.clear();
}
}
//-------------------------------------------------------------------------------------------
void tempAndHumidity()
{
//this function shows how you could read the data from a temerature and humidity
//sensor and then print that data to the LCD.
//these could be varaibles instead of static numbers
float tempF = 77.0;
float tempC = 25.0;
float humidity = 67.0;
lcd.clear();
lcd.home();
lcd.print(" Temp = ");
lcd.print((long)tempF, DEC);
lcd.print("F ");
lcd.print((long)tempC, DEC);
lcd.print("C");
lcd.setCursor(0, 1);
lcd.print(" Humidity = ");
lcd.print((long)humidity, DEC);
lcd.print("%");
delay(2500);
}
//-------------------------------------------------------------------------------------------
This example is very similar to the example sketch that comes with the library, but it adds a few more demonstration functions. The first function scrolls some text across the screen. The second function displays a simple counter. And the third function shows how you could display data from sensors or other variables to the display. These are just a few of the functions you can use to control the OLED display. Explore the library more to see what else is possible, or create your own functions.