HTU21D Humidity Sensor Hookup Guide
This Tutorial is Retired!
The HTU21D has been retired from the SparkFun catalog. We recommend looking at the Si7021 which is a drop in replacement for the HTU21D.
View the updated tutorial: Si7021 Humidity and Temperature Sensor Hookup Guide
Hooking It Up
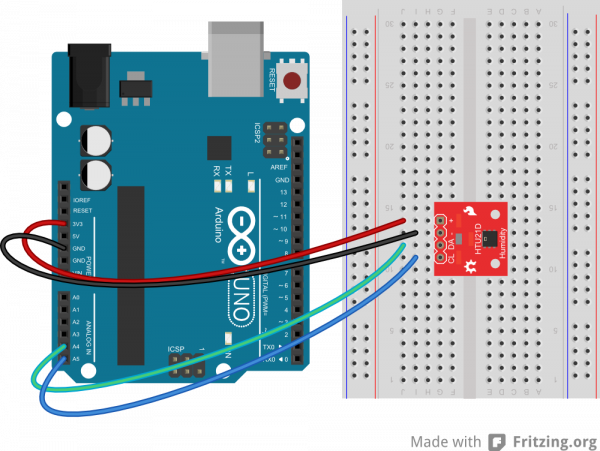
Wiring up the HTU21D humidity sensor is very easy! We recommend soldering four male headers to the breakout board and using the HTU21D in a breadboard.
Connections: Breakout board to Arduino
- VCC → 3.3V
- GND → GND
- SDA → A4
- SCL → A5
There are only four pins that need to be hooked up in order to start using this sensor in a project. One for VCC, one for GND, and two data lines for I2C communication. On an Arduino board connect the SDA pin on the breakout board to A4 and SCL to A5. If you have a newer Arduino, you can connect the SDA and SCL lines directly to the SDA and SCL lines broken out on the Arduino headers.
This board runs at 3.3V. Be sure to power the board from the 3.3V pin! Because I2C is an open drain signal, there's no need to worry about level shifting the signal; the 3.3V signal will be adequate to communicate with the Arduino and the signal will never reach a dangerous level for the pins on the HTU21D.
Note: This breakout board has built in 4.7k pull up resistors for I2C communications. If you're hooking up multiple I2C devices on the same bus, you may want to disable these resistors.
