GPS Logger Shield Hookup Guide
 jimblom
Example Sketch: µSD Card GPS Logging
Now that we have good GPS data, the final step is to start logging it to a µSD card.
Like the last example, this sketch uses TinyGPS++, it also uses Arduino's built-in SD library.
Upload the following code onto your Arduino.
language:c
    /******************************************************************************
  CSV_Logger_TinyGPSPlus.ino
  Log GPS data to a CSV file on a uSD card
  By Jim Lindblom @ SparkFun Electronics
  February 9, 2016
  https://github.com/sparkfun/GPS_Shield

  This example uses SoftwareSerial to communicate with the GPS module on
  pins 8 and 9, then communicates over SPI to log that data to a uSD card.

  It uses the TinyGPS++ library to parse the NMEA strings sent by the GPS module,
  and prints interesting GPS information - comma separated - to a newly created
  file on the SD card.

  Resources:
  TinyGPS++ Library  - https://github.com/mikalhart/TinyGPSPlus/releases
  SD Library (Built-in)
  SoftwareSerial Library (Built-in)

  Development/hardware environment specifics:
  Arduino IDE 1.6.7
  GPS Logger Shield v2.0 - Make sure the UART switch is set to SW-UART
  Arduino Uno, RedBoard, Pro, etc.
******************************************************************************/

#include <SPI.h>
#include <SD.h>
#include <TinyGPS++.h>

#define ARDUINO_USD_CS 10 // uSD card CS pin (pin 10 on SparkFun GPS Logger Shield)

/////////////////////////
// Log File Defintions //
/////////////////////////
// Keep in mind, the SD library has max file name lengths of 8.3 - 8 char prefix,
// and a 3 char suffix.
// Our log files are called "gpslogXX.csv, so "gpslog99.csv" is our max file.
#define LOG_FILE_PREFIX "gpslog" // Name of the log file.
#define MAX_LOG_FILES 100 // Number of log files that can be made
#define LOG_FILE_SUFFIX "csv" // Suffix of the log file
char logFileName[13]; // Char string to store the log file name
// Data to be logged:
#define LOG_COLUMN_COUNT 8
char * log_col_names[LOG_COLUMN_COUNT] = {
  "longitude", "latitude", "altitude", "speed", "course", "date", "time", "satellites"
}; // log_col_names is printed at the top of the file.

//////////////////////
// Log Rate Control //
//////////////////////
#define LOG_RATE 5000 // Log every 5 seconds
unsigned long lastLog = 0; // Global var to keep of last time we logged

/////////////////////////
// TinyGPS Definitions //
/////////////////////////
TinyGPSPlus tinyGPS; // tinyGPSPlus object to be used throughout
#define GPS_BAUD 9600 // GPS module's default baud rate

/////////////////////////////////
// GPS Serial Port Definitions //
/////////////////////////////////
// If you're using an Arduino Uno, RedBoard, or any board that uses the
// 0/1 UART for programming/Serial monitor-ing, use SoftwareSerial:
#include <SoftwareSerial.h>
#define ARDUINO_GPS_RX 9 // GPS TX, Arduino RX pin
#define ARDUINO_GPS_TX 8 // GPS RX, Arduino TX pin
SoftwareSerial ssGPS(ARDUINO_GPS_TX, ARDUINO_GPS_RX); // Create a SoftwareSerial

// Set gpsPort to either ssGPS if using SoftwareSerial or Serial1 if using an
// Arduino with a dedicated hardware serial port
#define gpsPort ssGPS  // Alternatively, use Serial1 on the Leonardo

// Define the serial monitor port. On the Uno, and Leonardo this is 'Serial'
//  on other boards this may be 'SerialUSB'
#define SerialMonitor Serial

void setup()
{
  SerialMonitor.begin(9600);
  gpsPort.begin(GPS_BAUD);

  SerialMonitor.println("Setting up SD card.");
  // see if the card is present and can be initialized:
  if (!SD.begin(ARDUINO_USD_CS))
  {
    SerialMonitor.println("Error initializing SD card.");
  }
  updateFileName(); // Each time we start, create a new file, increment the number
  printHeader(); // Print a header at the top of the new file
}

void loop()
{
  if ((lastLog + LOG_RATE) <= millis())
  { // If it's been LOG_RATE milliseconds since the last log:
    if (tinyGPS.location.isUpdated()) // If the GPS data is vaild
    {
      if (logGPSData()) // Log the GPS data
      {
        SerialMonitor.println("GPS logged."); // Print a debug message
        lastLog = millis(); // Update the lastLog variable
      }
      else // If we failed to log GPS
      { // Print an error, don't update lastLog
        SerialMonitor.println("Failed to log new GPS data.");
      }
    }
    else // If GPS data isn't valid
    {
      // Print a debug message. Maybe we don't have enough satellites yet.
      SerialMonitor.print("No GPS data. Sats: ");
      SerialMonitor.println(tinyGPS.satellites.value());
    }
  }

  // If we're not logging, continue to "feed" the tinyGPS object:
  while (gpsPort.available())
    tinyGPS.encode(gpsPort.read());
}

byte logGPSData()
{
  File logFile = SD.open(logFileName, FILE_WRITE); // Open the log file

  if (logFile)
  { // Print longitude, latitude, altitude (in feet), speed (in mph), course
    // in (degrees), date, time, and number of satellites.
    logFile.print(tinyGPS.location.lng(), 6);
    logFile.print(',');
    logFile.print(tinyGPS.location.lat(), 6);
    logFile.print(',');
    logFile.print(tinyGPS.altitude.feet(), 1);
    logFile.print(',');
    logFile.print(tinyGPS.speed.mph(), 1);
    logFile.print(',');
    logFile.print(tinyGPS.course.deg(), 1);
    logFile.print(',');
    logFile.print(tinyGPS.date.value());
    logFile.print(',');
    logFile.print(tinyGPS.time.value());
    logFile.print(',');
    logFile.print(tinyGPS.satellites.value());
    logFile.println();
    logFile.close();

    return 1; // Return success
  }

  return 0; // If we failed to open the file, return fail
}

// printHeader() - prints our eight column names to the top of our log file
void printHeader()
{
  File logFile = SD.open(logFileName, FILE_WRITE); // Open the log file

  if (logFile) // If the log file opened, print our column names to the file
  {
    int i = 0;
    for (; i < LOG_COLUMN_COUNT; i++)
    {
      logFile.print(log_col_names[i]);
      if (i < LOG_COLUMN_COUNT - 1) // If it's anything but the last column
        logFile.print(','); // print a comma
      else // If it's the last column
        logFile.println(); // print a new line
    }
    logFile.close(); // close the file
  }
}

// updateFileName() - Looks through the log files already present on a card,
// and creates a new file with an incremented file index.
void updateFileName()
{
  int i = 0;
  for (; i < MAX_LOG_FILES; i++)
  {
    memset(logFileName, 0, strlen(logFileName)); // Clear logFileName string
    // Set logFileName to "gpslogXX.csv":
    sprintf(logFileName, "%s%d.%s", LOG_FILE_PREFIX, i, LOG_FILE_SUFFIX);
    if (!SD.exists(logFileName)) // If a file doesn't exist
    {
      break; // Break out of this loop. We found our index
    }
    else // Otherwise:
    {
      SerialMonitor.print(logFileName);
      SerialMonitor.println(" exists"); // Print a debug statement
    }
  }
  SerialMonitor.print("File name: ");
  SerialMonitor.println(logFileName); // Debug print the file name
}
You may need to edit the gpsPort and SerialMonitor objects, toward the top of the code to get the example to work correctly on your Arduino. The sketch defaults to using SoftwareSerial for the GPS, which should work for most boards -- as long as the UART-Select switch is shifted towards SW-UART.
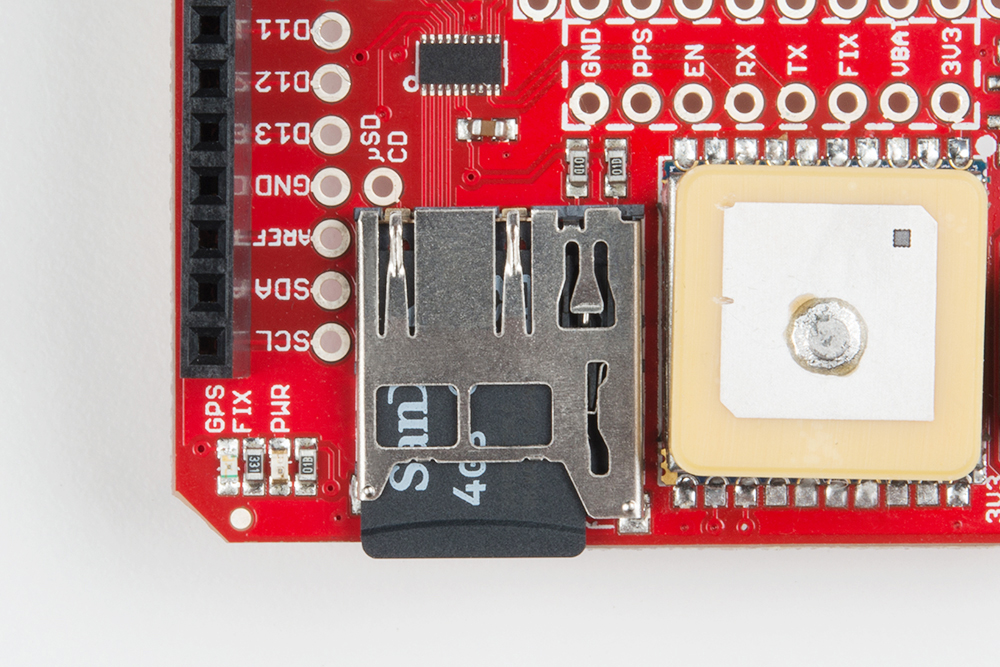
Before uploading the code, plug a µSD card into your GPS Logger Shield. Push it in gently until you hear a click. Then release, and let it latch into place.
Once that's in place, upload and run! You can check the serial monitor for debugging data, or just trust that the logger is logging.
Once the GPS module gets a good fix, the Arduino will start logging longitude, latitude, altitude, speed, course, date, time, and the number of visible satellites into a CSV file. The data is set to log once every five seconds, but that's easily tunable if you need more or less data.
After letting it log for a bit, turn off your Arduino, load the SD card into your computer, and check for a GPSLOG###.CSV file. Open it up in a spreadsheet program, or just use a text editor to see what your Arduino logged.

Now really test the logger! Power your Arduino up with a battery (our 9V to Barrel Jack Adapter is handy for that)...
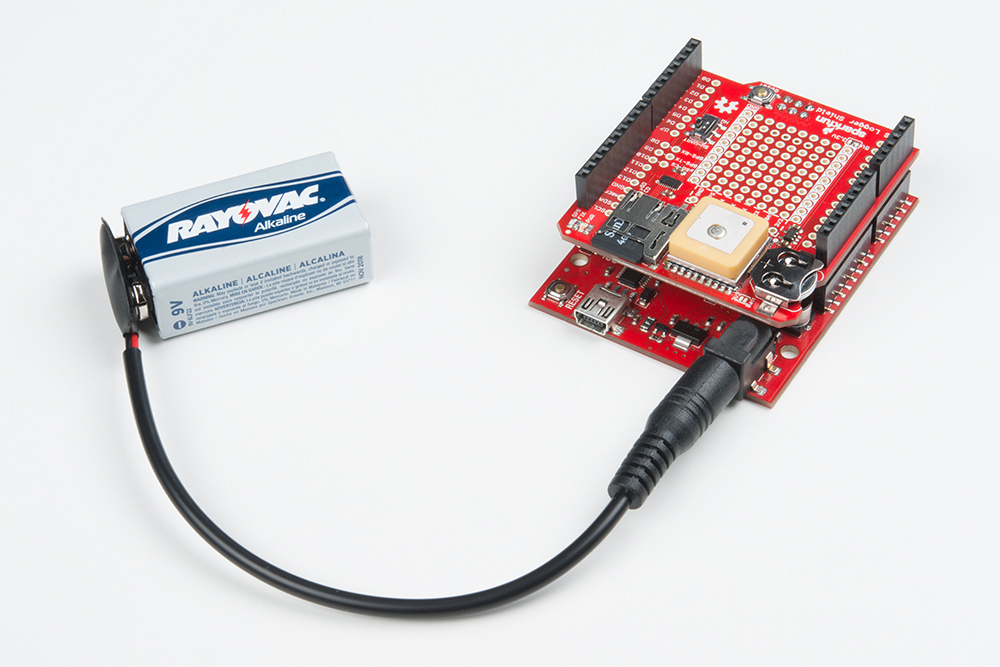
...and take your Arduino for a walk.