Getting Started with TJBot
 SFUptownMaker, jweisz, maryam
Introduction
TJBot is a kit developed at IBM to help people get started with their Watson AI service. It comes with a friendly little robot that you build yourself, a Raspberry Pi 3, and all the parts you need to make your robot wave, blink, talk, and listen.
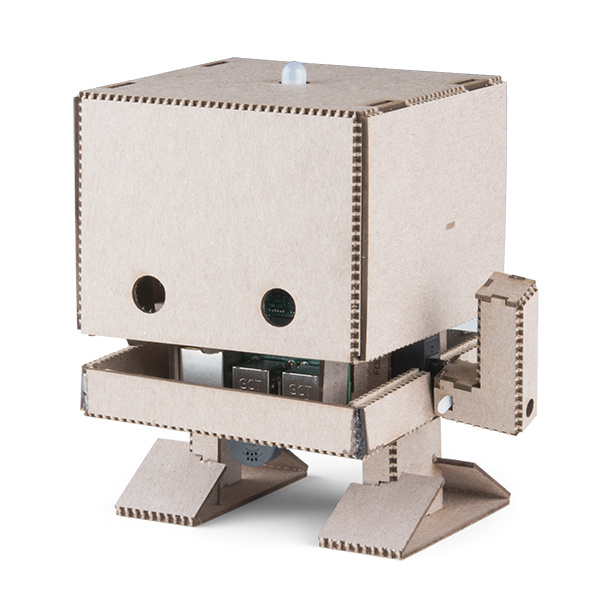
IBM TJBot, a Watson Maker Kit
KIT-14515Required Setup Tools
As a desktop, these devices are required:
- USB Mouse
- USB Keyboard
- HDMI monitor/TV/adapted VGA
- 5V Power Supply
Getting Started
Before you do anything else, we recommend setting up your Raspberry Pi, connecting it to the Internet, and updating the OS. Here we'll help you out with that.
Setting up the Pi
Connect up your monitor, keyboard, and mouse as you would with any computer. Insert the microSD card that came with the TJBot kit and then plug in the power supply. There's only one place that the power supply can physically be plugged in: the micro-B USB connector labeled "PWR IN". Again, we recommend our 5.1V Micro USB power supply to power your TJBot.
After powering up and letting the Pi boot, you should have an image on the screen that looks something like this:

Users in the United States may want to change the keyboard layout from UK to US, as the UK layout has some keys in places that you wouldn't expect. To do that, open the Raspberry menu, select "Preferences", then "Mouse and Keyboard Settings".
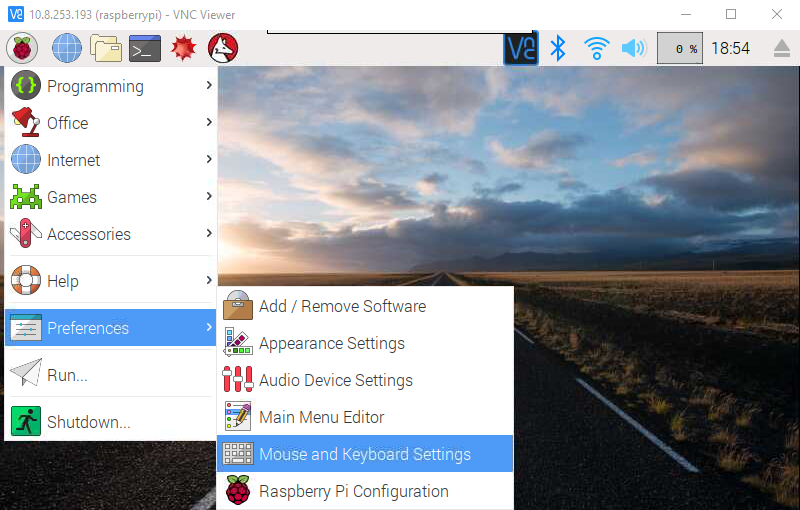
Under the "Keyboard" tab, you'll find a button called "Keyboard Layout...". Find your preferred keyboard layout in the window that pops up when you click that button.
Install TJBot
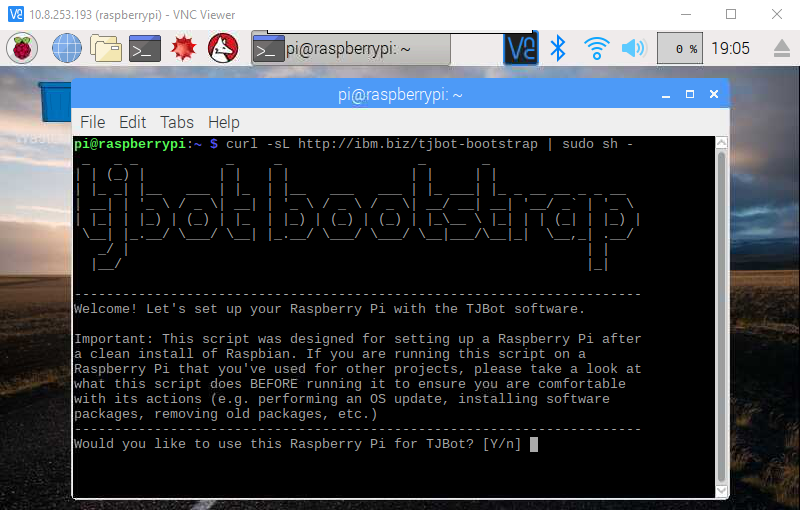
Installing TJBot is done with one script which can be run with one command. The command is:
curl -sL http://ibm.biz/tjbot-bootstrap | sudo sh -
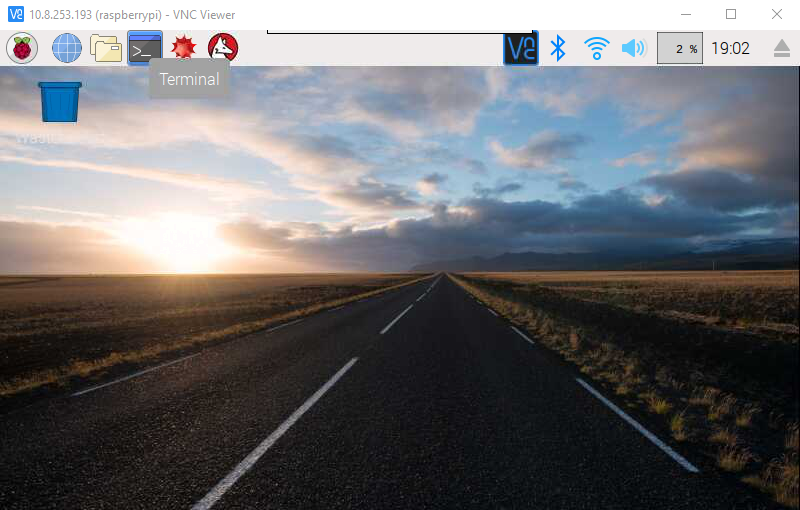
Copy that line and paste it into a terminal window. Open a terminal window by clicking on the button in the bar at the top of the screen highlighted in the image below.
Once you have pasted this line of code into the terminal window, hit the Enter key on the keyboard. That will pull the latest version of the TJBot Bootstrap script from the Internet. You'll get a window that looks something like this:
Presumably, you're running on the Raspberry Pi you want TJBot installed on, so type 'y', then hit Enter.
You'll be prompted to enter a name for your TJBot. Feel free to name the TJBot anything you wish, or just hit Enterto leave it unchanged. It really doesn't matter, I promise.
You'll then be asked if you wish to disable ipV6. Again, type 'y' and hit Enter.
The next question is whether to use Google's nameservers to speed up DNS queries. Again, hit 'y' and then Enter.
Then, the script will ask you if you wish to "force locale to US English (en-US)." You may answer yes or no to this question as you will, but if you're a user in the US, it makes sense to answer yes.
Upgrade the OS on the Raspberry Pi
You should now have a prompt that looks like this:

The script is asking a somewhat scary sounding question about upgrading your Raspberry Pi's operating system. It warns that this could take an hour or longer (GULP)! Don't worry, in our experience it takes about ten minutes or less depending on the speed of your Internet connection. In any case, you'll want to type 'y' again, then hit Enter to begin the update process. Keep an eye on the screen as the upgrade process runs, but you don't need to monitor it closely as the entire upgrade process is automatic. Screen after screen of text will scroll past during this process, and you don't need to worry about any of it.
Install Node.js
After the upgrade process is complete, you'll have this prompt, asking you about installing a newer version of Node.js.
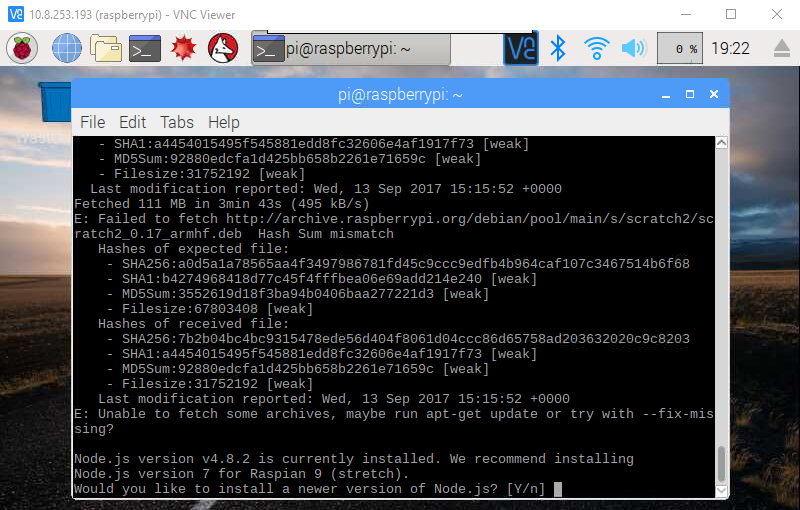
Again, answer yes to this question. Immediately after answering yes, you'll be asked which version of Node.js to install (6 or 7). Type '7', then hit Enter. You'll get another few screens of text as the script downloads and installs Node.js version 7 to your Raspberry Pi.
After Node.js is installed, the script will ask if you have a camera installed. If you didn't purchase a camera, answer no, as a camera doesn't come with the TJBot kit.
The next question is regarding "cloning" the TJBot project, and where that should be cloned to. Cloning in this case really just means downloading. The default location for downloading is to the desktop, which is as good a place as any and better than many. So just hit the Enter key to download the TJBot project to the desktop.
You'll now have a screen that looks as below.
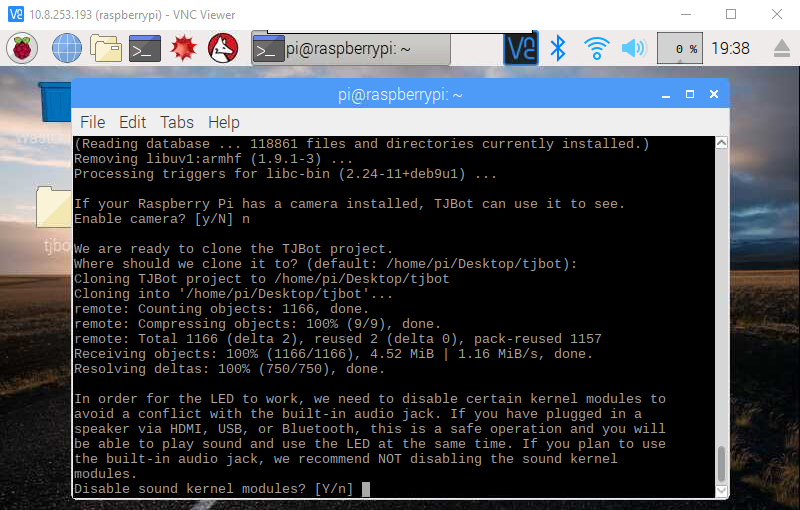
The script is asking "Disable sound kernel modules?" As the TJBot kit from SparkFun uses the audio jack for sound output instead of the HDMI or USB output options, you'll want to hit 'n' here. If you answer 'yes' to this question, audio won't work on later TJBot projects and you'll be sad.
Finish up!
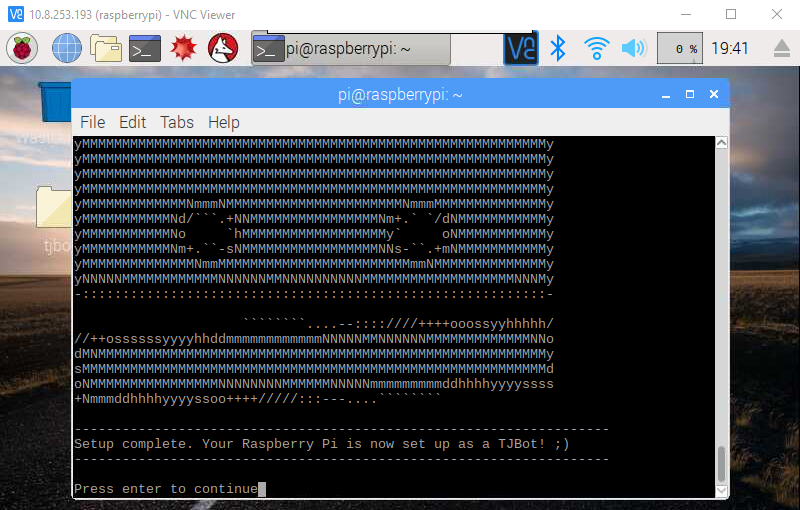
You'll now be treated to an ASCII art rendering of TJBot's face, a message saying that setup is complete, and an invitation to hit Enter to continue. Go ahead and hit Enter.
You'll now get a screenful of text about signing up for a free IBM Bluemix account, how to log in, create instances of services, get credentials, and other things as well! We are just going to ignore it for now, because we're going to walk you through all the steps in that window on the next pages.
Finally, you'll be asked if you want to run hardware tests. I suggest answering 'no' as some of the changes we made during the install process may cause these tests to fail even though nothing is wrong.
The last question is: "Do you want to reboot now?" You can answer 'yes' for an immediate reboot, or 'no' and reboot later. I recommend just going ahead and answering 'yes'.
IBM Cloud
TJBot's magical powers come from Watson, IBM's artificial intelligence service. In order to use Watson, you'll need to create a free IBM Cloud account.
We'll now walk you through signing up for a IBM Cloud account.
Sign Up for an IBM Account
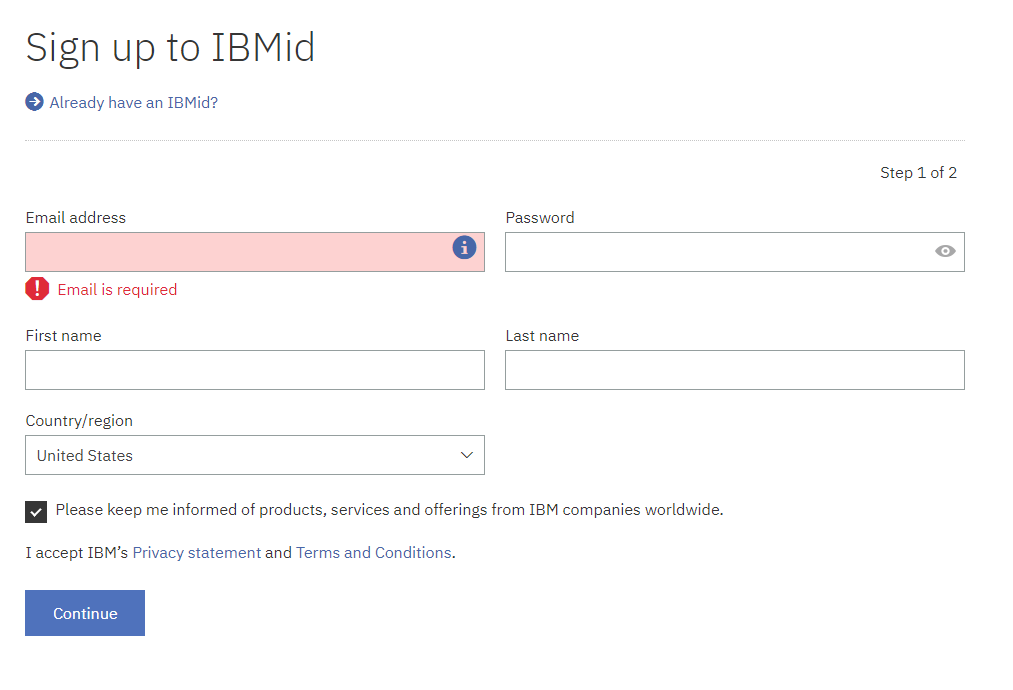
You'll need to go to this website to sign up for an IBM account. You'll then be able to use the IBMid you create to log into the IBM Cloud website.
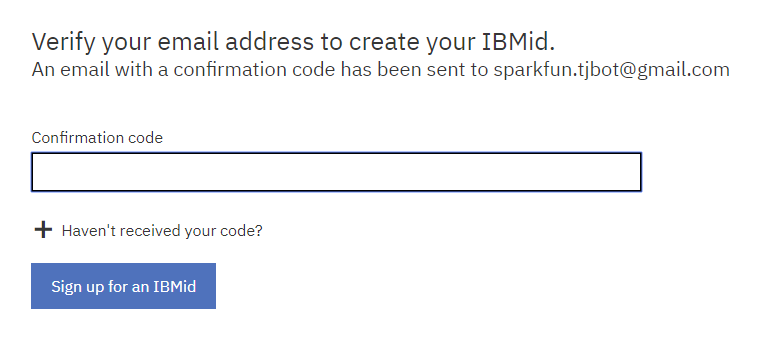
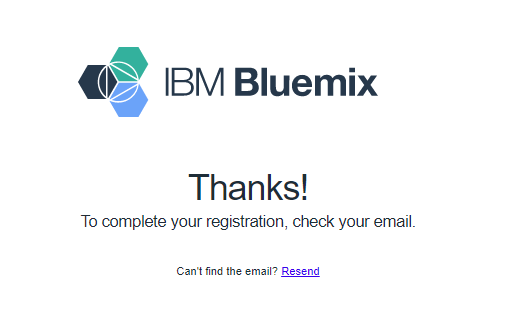
Fill in the blanks to create an account, then check your email. You should have a new message from IBM with a 7-digit confirmation code. Enter the code in the field as shown below.
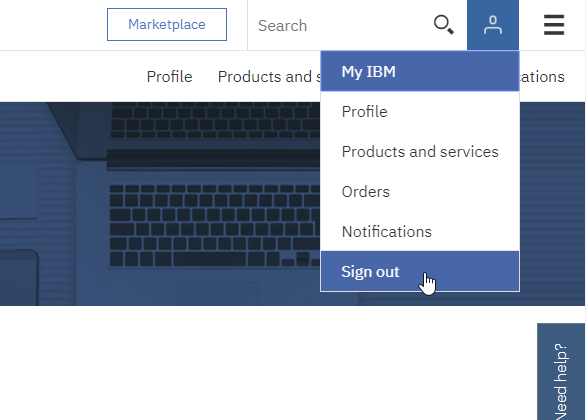
Once you've entered your confirmation code, you'll be taken to your IBM account dashboard. The only thing to do here is to log out using the menu in the upper right, as shown below.
Log In to IBM Cloud
Now you can log into the IBM Cloud website. Follow this link to the IBM Cloud registration page.
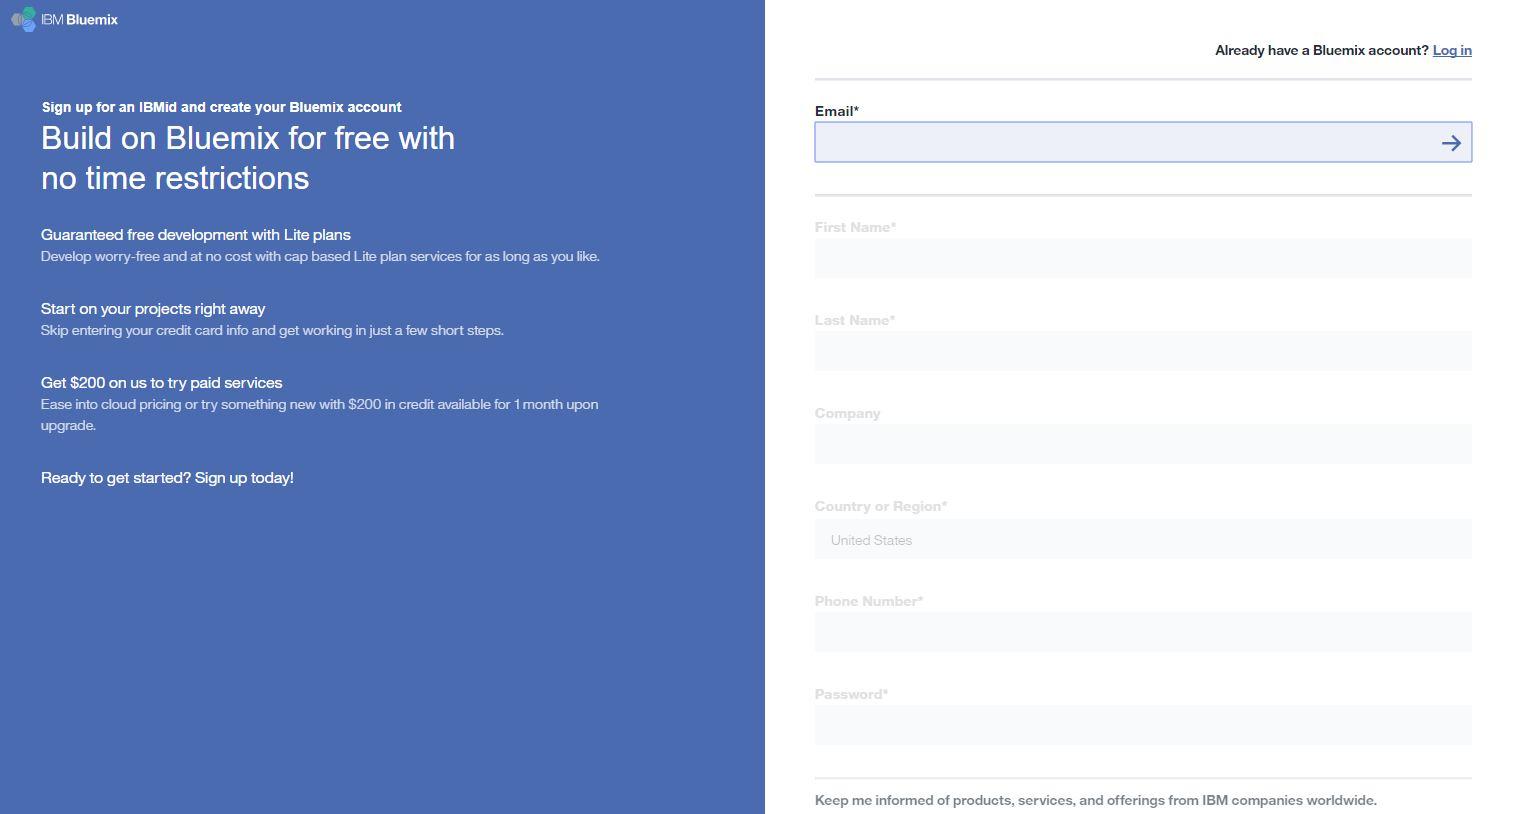
Put in the email address that you used for your IBMid and hit Enter. You'll be asked to provide a phone number.
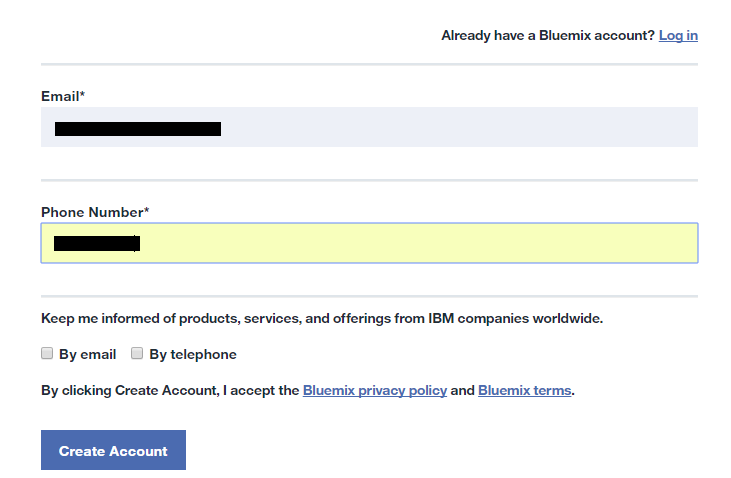
After you click "Create Account", you'll be asked to complete an anti-spambot captcha, and then you'll be taken to this page:
You'll get an e-mail shortly with an account confirmation link, as pictured below.

Click on the "Confirm Account" button to let IBM's Cloud team know you're a real person. That will open this page:

Click the blue "Login" button to be automatically logged into IBM Cloud.
Set Up IBM Cloud
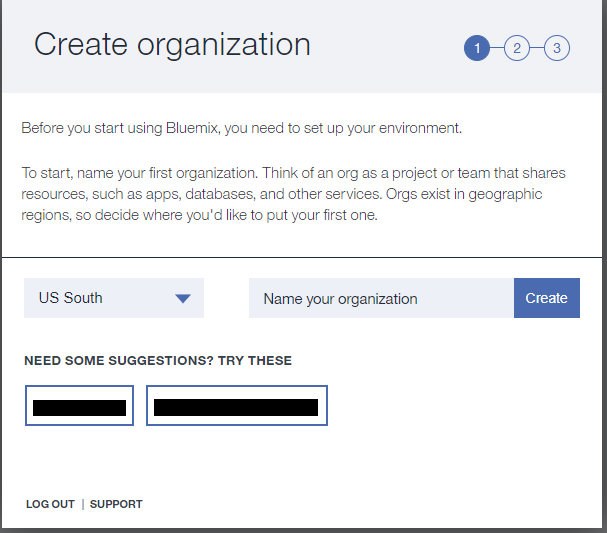
You'll now be asked to "Name your organization". This doesn't really matter and feel free to call it whatever you like, but it's a good idea to keep it short and easily typable for later usage.
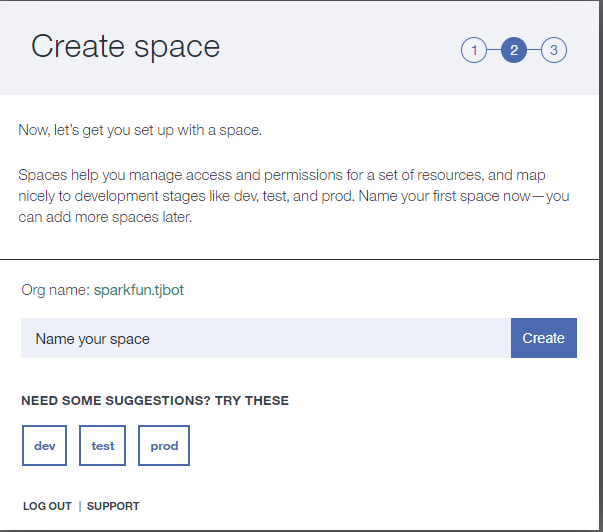
Once you've created your organization, you'll need to create a space. Again, the name doesn't really matter. I went with "test".
You'll now be notified that your account is "Good To Go!" and be given a summary of the organization and space names you just created.
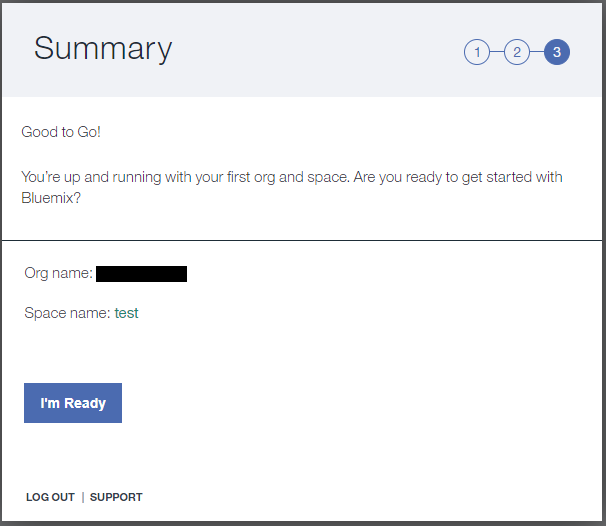
Click on the "I'm Ready" button.
The IBM Cloud Dashboard
Once the IBM Cloud is setup, you will be greeted with the IBM Cloud Dashboard after logging in as shown in the image below.
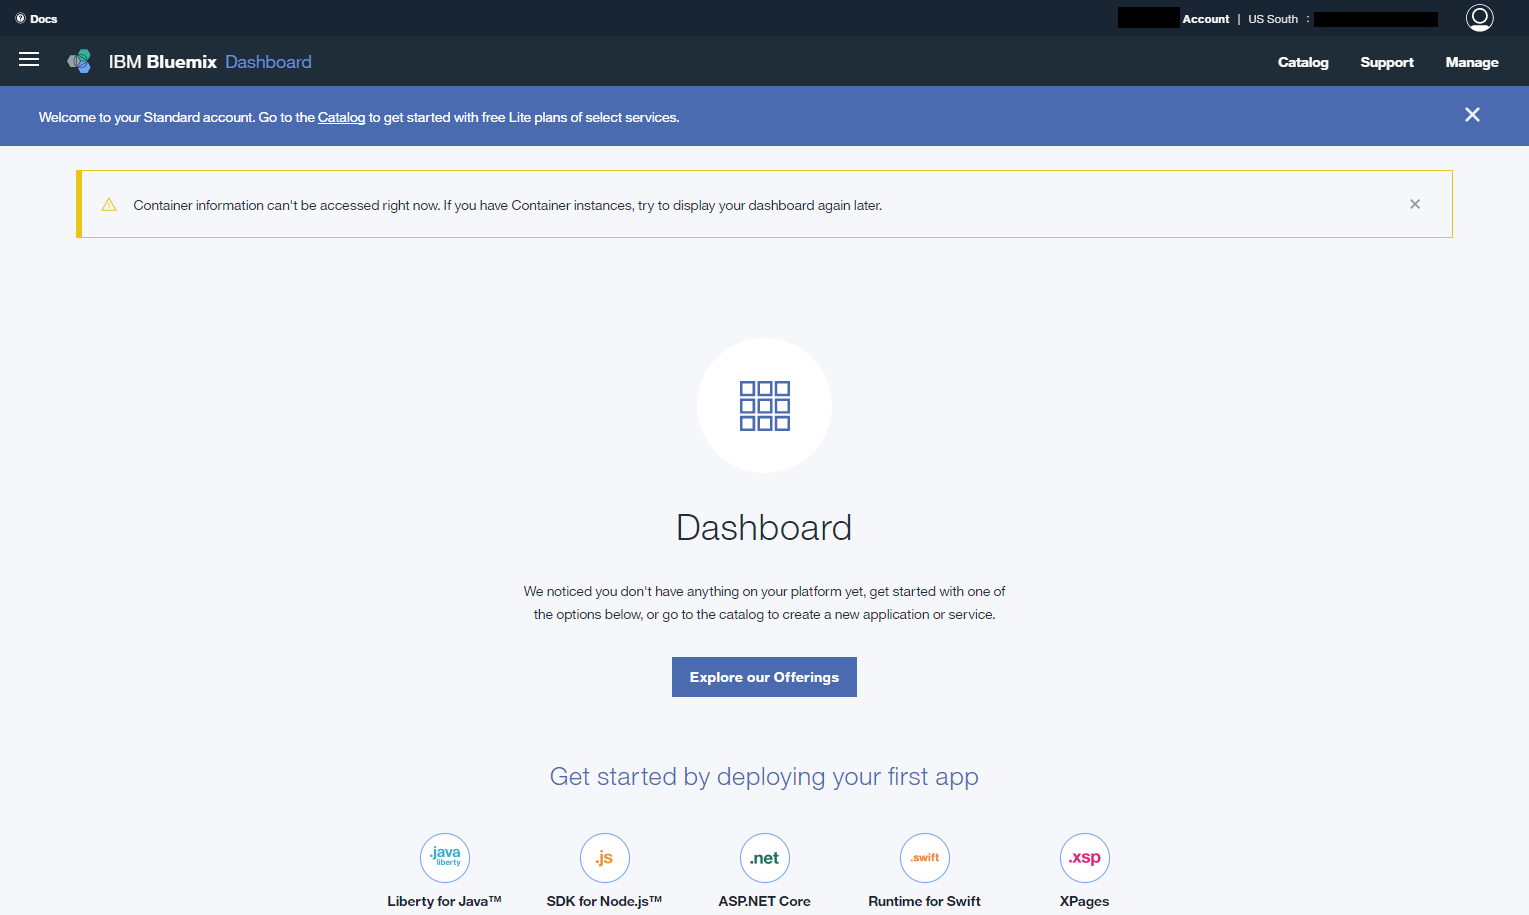
This is where you'll start out when you log in to your IBM Cloud account from now on. The last step we need to complete is to set up the payment information so we can access the paid services we need to make TJBot come alive.
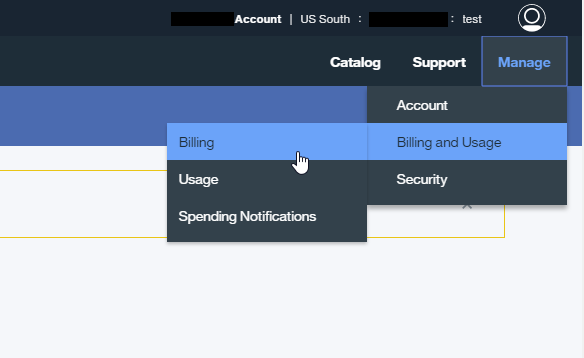
Start by selecting the "Billing" option under the "Manage" menu in the upper right corner of the dashboard, as seen below.
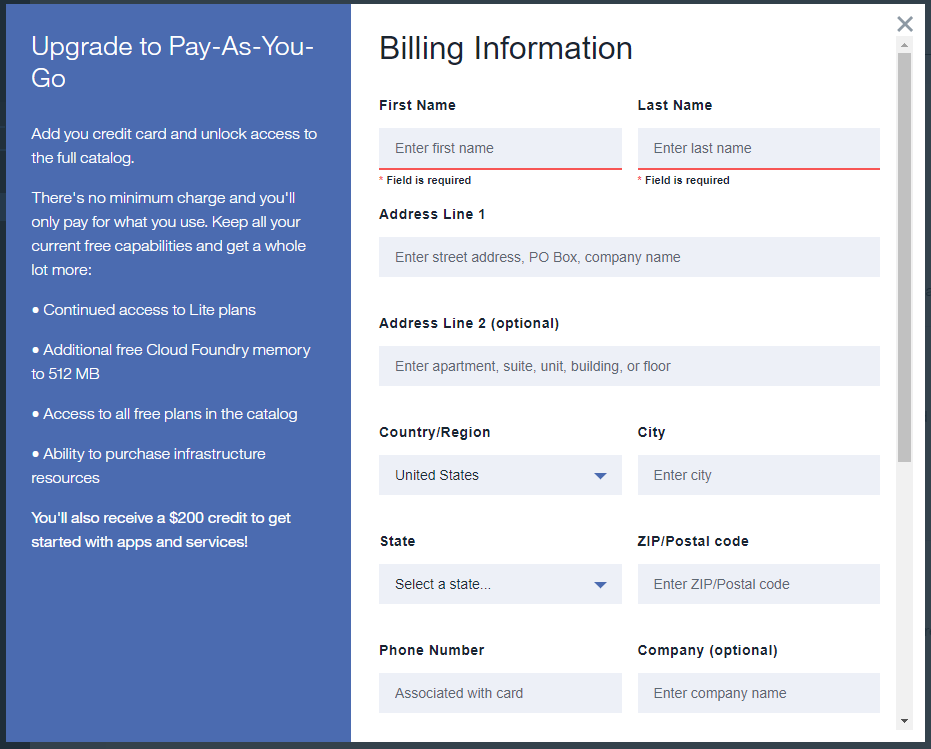
That will bring up this page. Click the "Add Credit Card" button in the middle of the page.

You'll be presented with this fairly standard billing information form. Fill it out and submit it.
You should now be the proud owner of an upgraded IBM Cloud account. You are now ready to complete the next steps of the tutorial. Now, let's have some fun with TJBot!
However, as of 12/26/2018, you can bypass this step:
- Open a second tab on your web browser and pull up the "lite" version of the service you wish to add (see examples below).
- While the "Create" button is greyed out, go back to the payment page and click "Add Credit Card".
- Without inputting any information, go back to the "lite" service tab and the "Create" button should be blue, and useable.
Voice Control an LED
Our first project is to set up TJBot to voice control an addressable LED. To begin, we need to hook up the LED to TJBot.
LED Hookup
Start by finding one of the LEDs included in the TJBot kit. It should look like the picture below and be about the size of a pencil eraser.
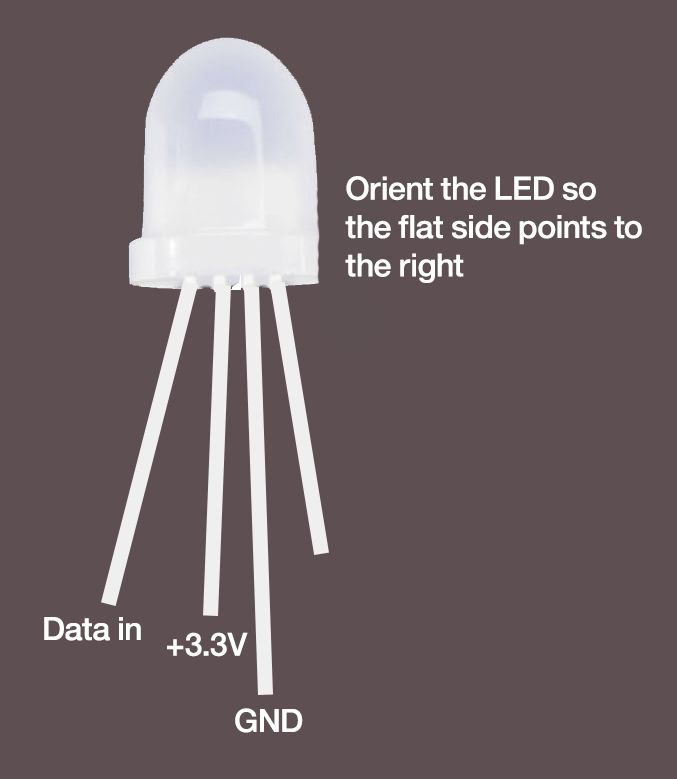
You now need to connect this LED to the Raspberry Pi. Find the F/F jumper wires that were included in your kit, and follow the diagram below to hook up the LED.
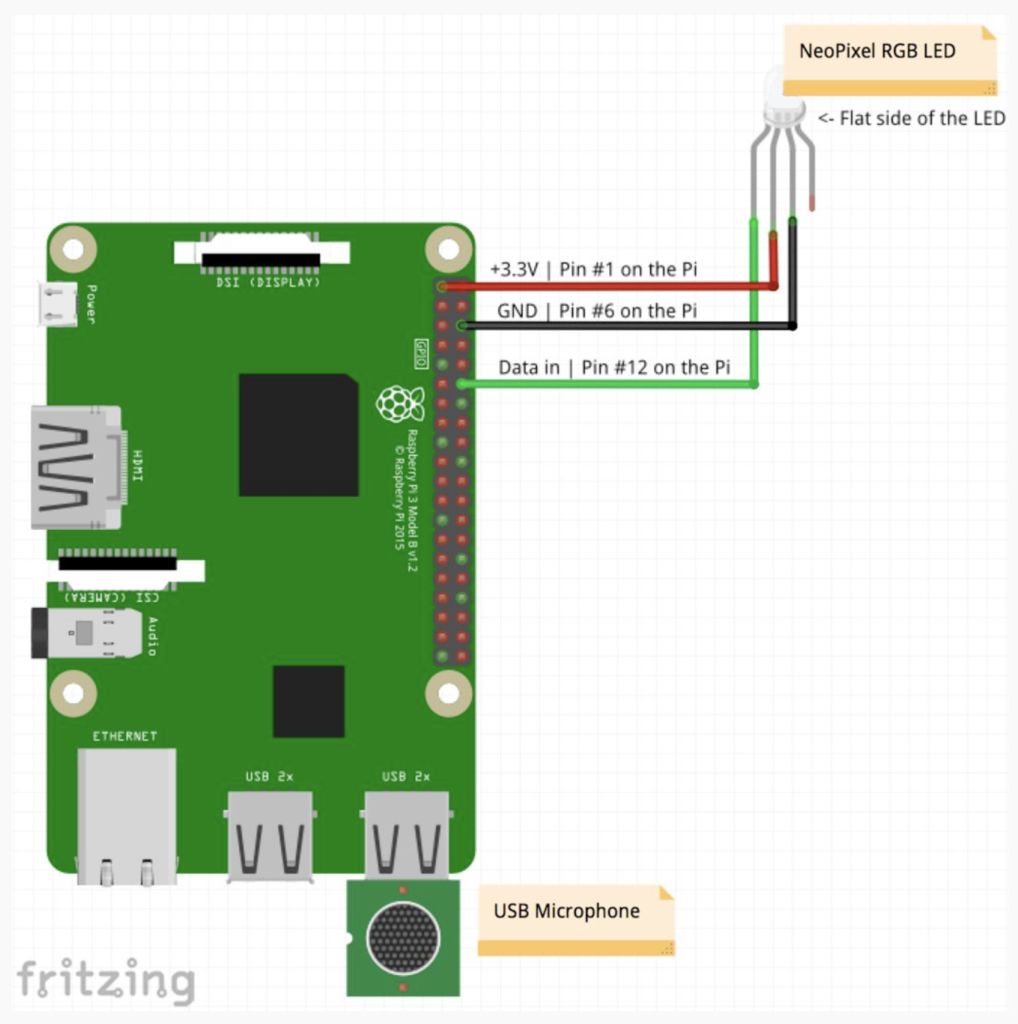
USB Microphone Hookup
Now is the time to plug the USB microphone into one of the USB ports on the Raspberry Pi. It doesn't matter which port you plug it into, just plug it in.
Set up a Speech-to-Text Instance on IBM Cloud
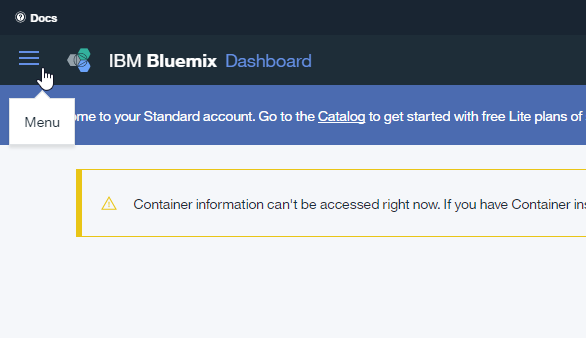
Go back to the IBM Cloud dashboard and click on the hamburger menu (Did you know this is called a hamburger menu? You learn something new every day!) in the upper left corner.
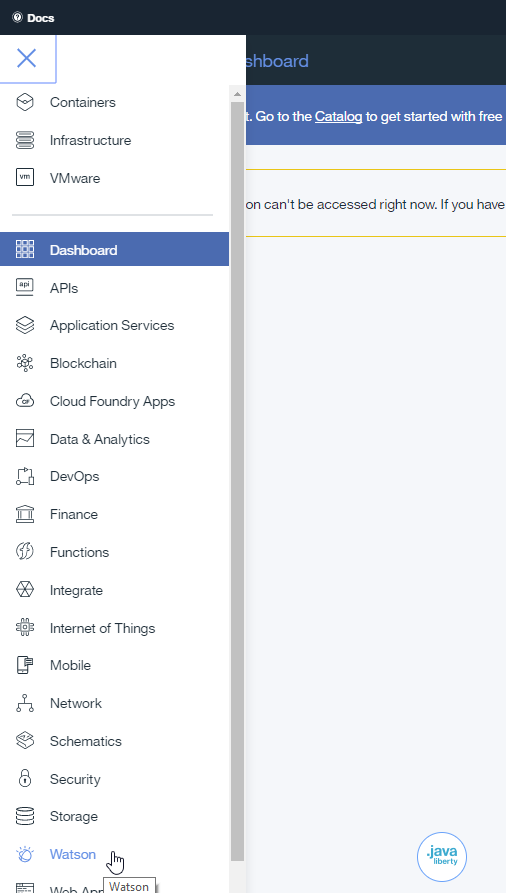
A menu will pop out of the left edge of the page. Find the entry for "Watson" in this menu (it's down near the bottom, and you may need to scroll to find it) and click on it.
You'll be told that you don't have any Watson service instances yet, and be invited to create one. Click on the "Create Watson service" button.

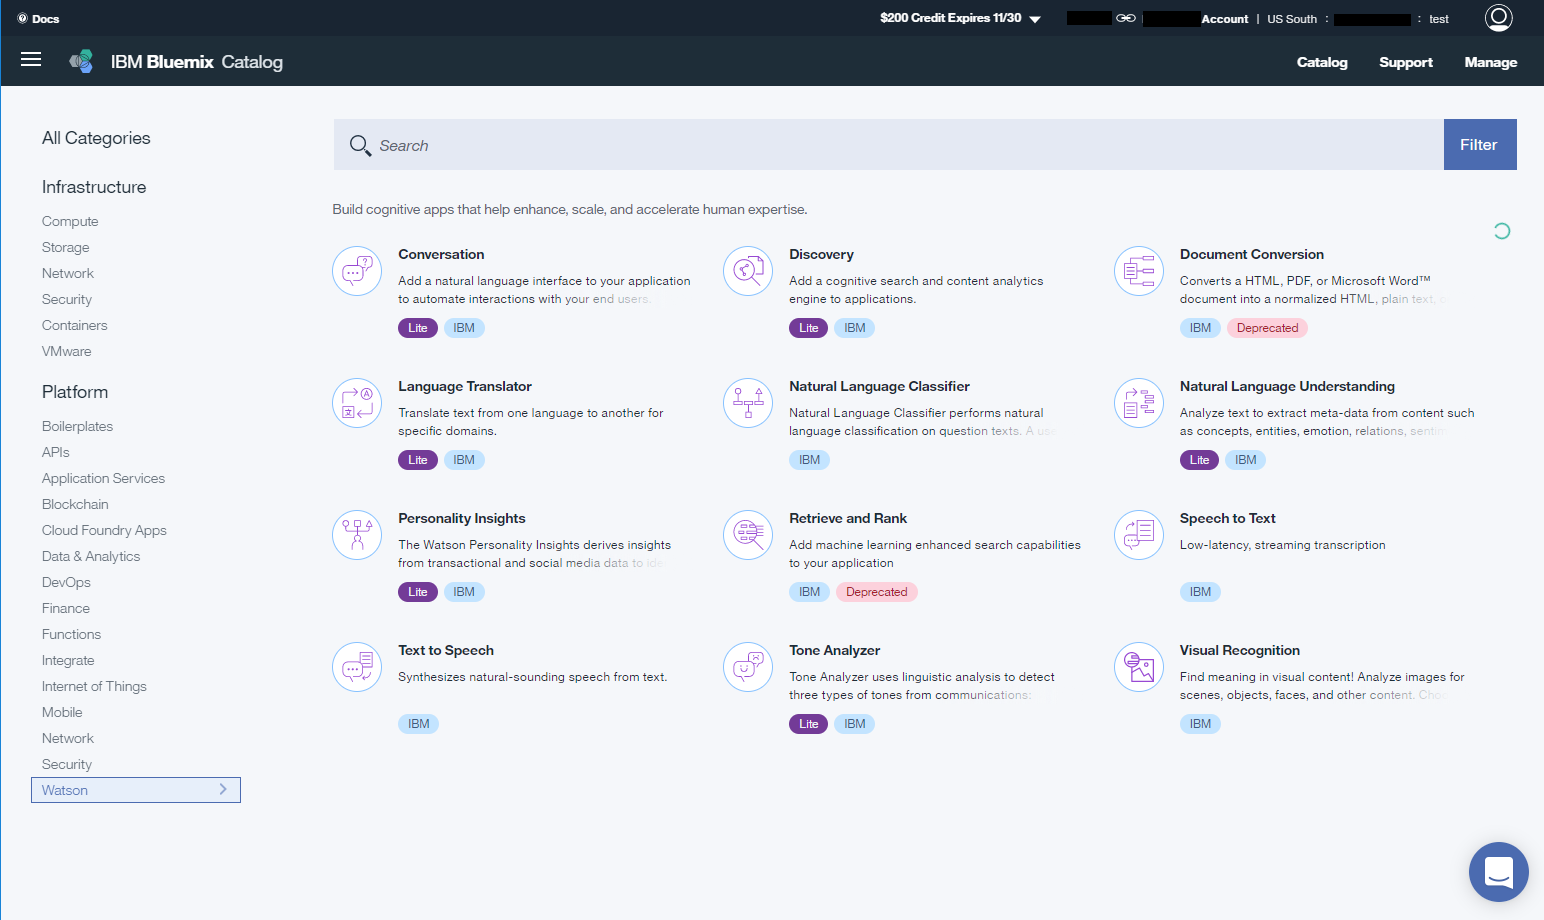
That will bring up this page, with a list of all available Watson services.
Click on the "Speech to Text" section to bring up this page of setup options.

All you need to do here is click the "Create" button and you're in business. The default values can be left in place.
You'll be brought to this page. We're going to need to fetch the credentials for our "Speech to Text" instance, so click "Service credentials" along the left edge of the page.
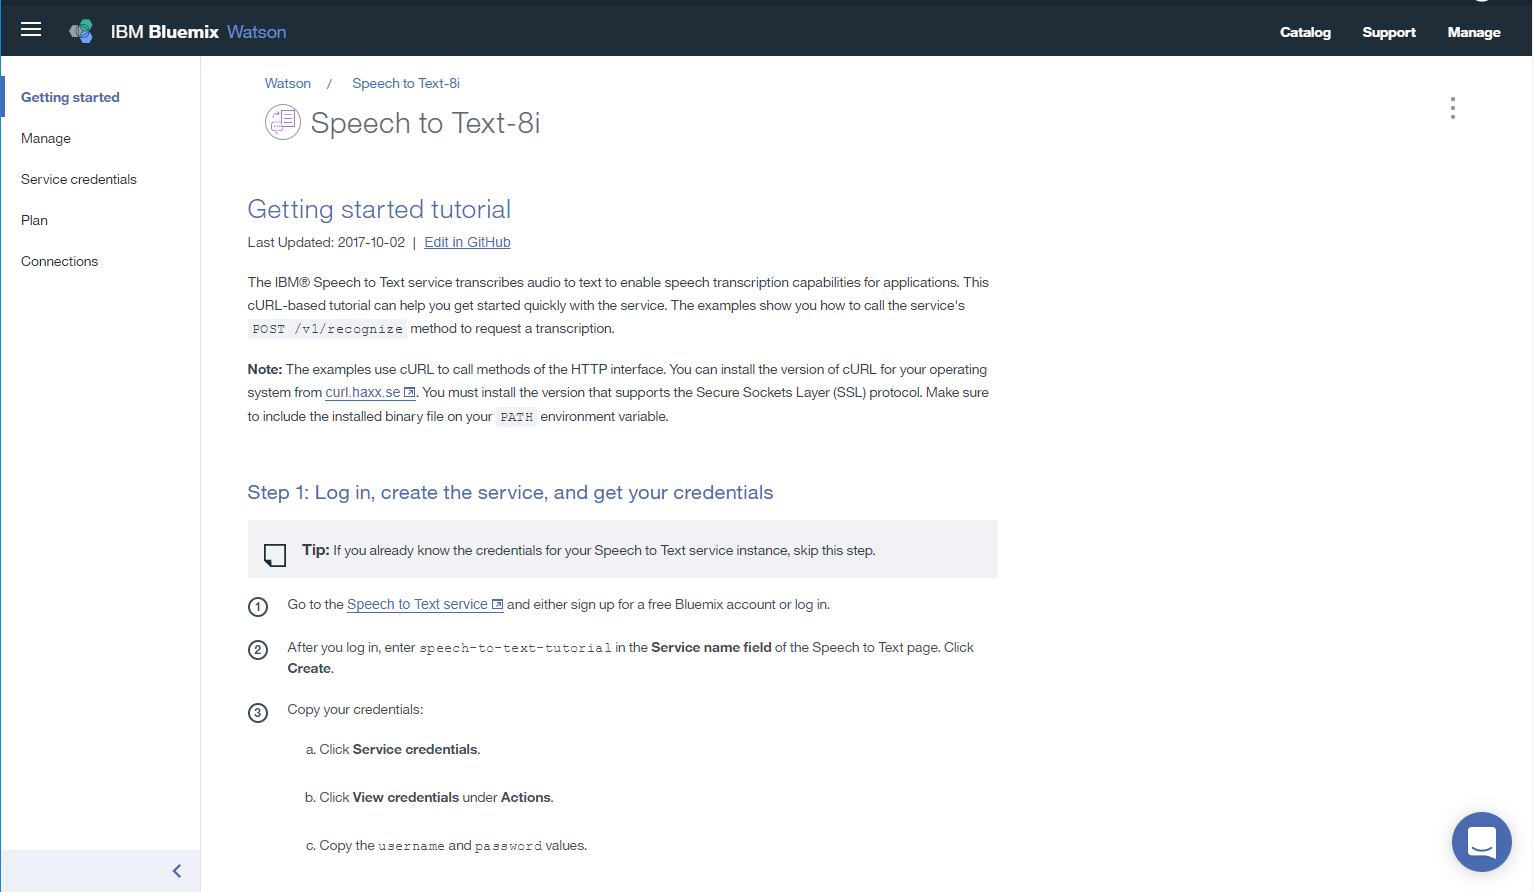
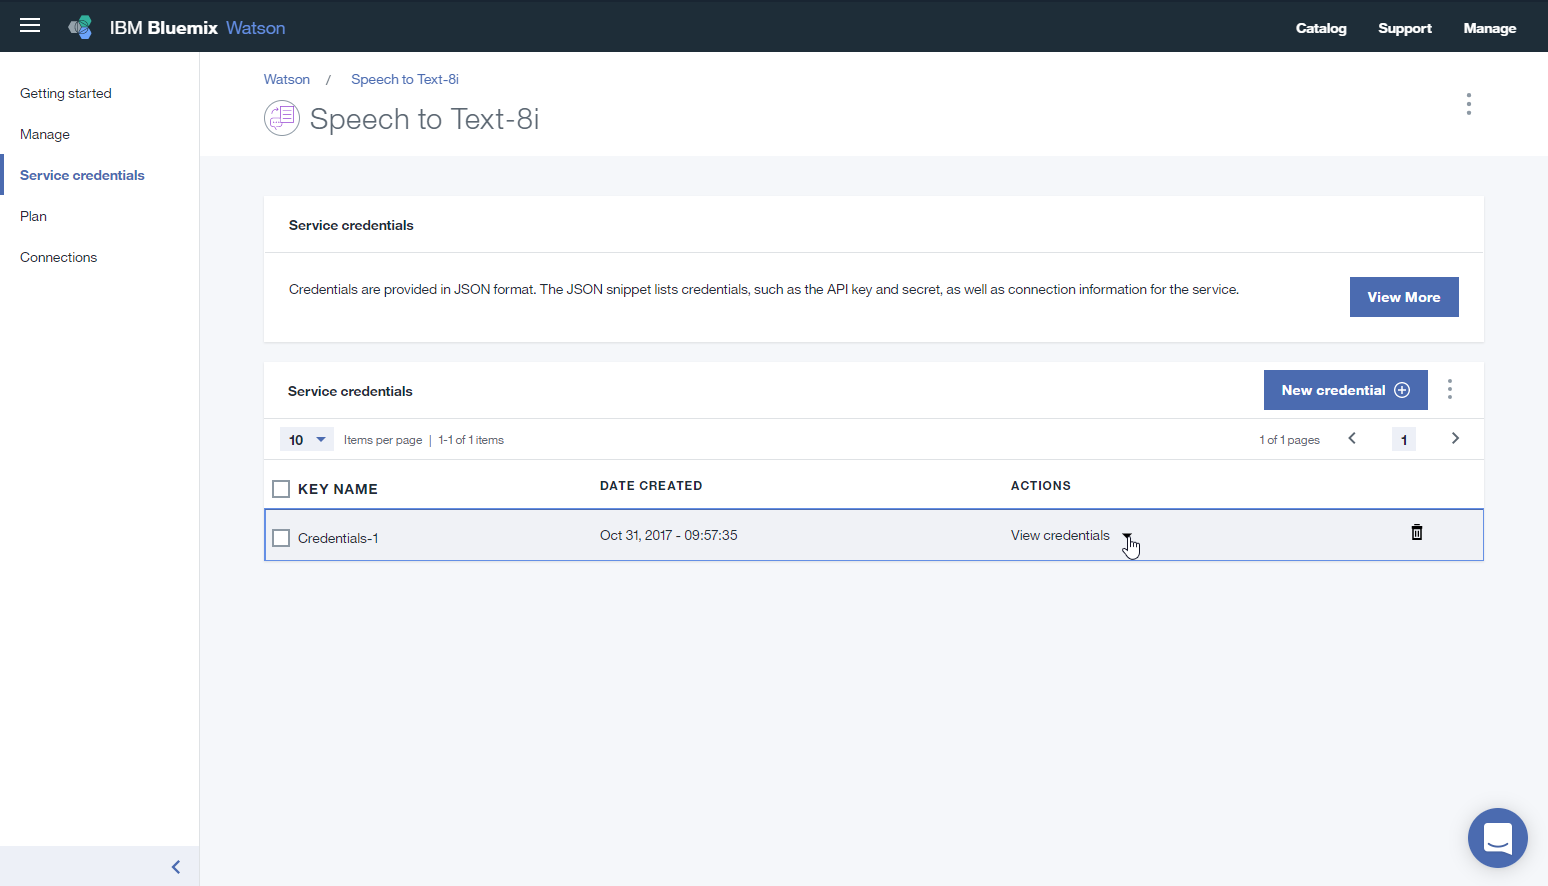
That will bring up this page. To see your credentials, click on the "View credentials" drop down in the middle of the page under the ACTIONS.
Copy the Credentials into the Raspberry Pi Config File
Now we need to copy those credentials into a file on the Raspberry Pi. If you haven't been working on the Raspberry Pi up to this point, it's probably easiest just to be logged in on the Pi and open the IBM Cloud website on the Pi's web browser.
The file you need to modify is located in "Desktop/tjbot/recipes/speech_to_text" and it's called "config.default.js". Double clicking the file will open it in the text editor. You can then copy and paste in the new information.
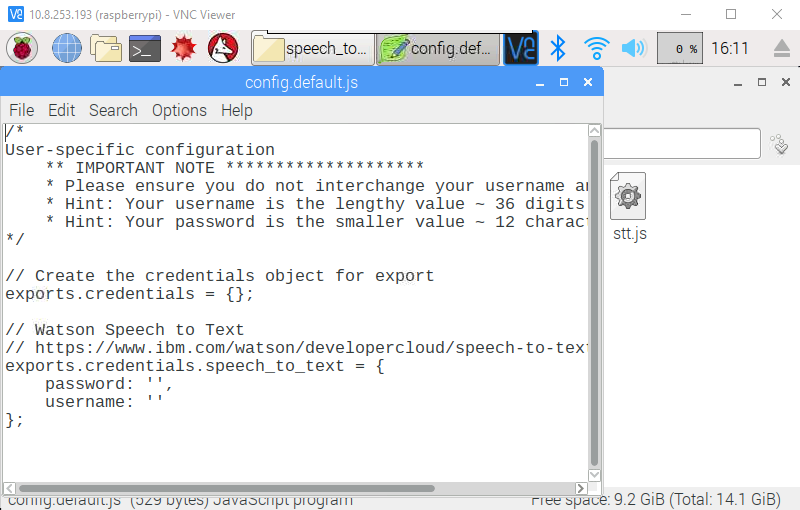
Copy and paste the "username" and "password" from the webpage into the text document. Note that the order of the two is swapped! On the webpage, username is above password, but in the text doc, it's password above username. Once you've entered the information, you need to "Save as..." the document to change its name. The new name is "config.js". You must do this or the recipe will fail.
The credentials on the IBM AI/Watson Speech-to-Text Services page have been changed to an API format:
{
  "apikey": "**XXXXXXXXXXXXXXXXXXXXXXXXXXXXXXXXXXXXXXXXXXXX**",
  "iam_apikey_description": "Auto generated apikey during resource-key operation for Instance - crn:v1:bluemix:public:speech-to-text:XXXXXXX:XXXXXXXXXXXXblah-blah-blahXXXXXXXXXXXXXXXX",
  "iam_apikey_name": "auto-generated-apikey-**XXXXXXXX-XXXX-XXXX-XXXX-XXXXXXXXXXXX**",
  "iam_role_crn": "XXXXXXXXXXblah-blah-blahXXXXXXXXXXX",
  "iam_serviceid_crn": "XXXXXXXXXblah-blah-blahXXXXXXXXXXX",
  "url": "https://stream.watsonplatform.net/speech-to-text/api"
}
Your username is contained in the iam_apikey_name entry, but only the XXXXXXXX-XXXX-XXXX-XXXX-XXXXXXXXXXXX section. Exclude the auto-generated-apikey- part of that entry.
"iam_apikey_name": "auto-generated-apikey-XXXXXXXX-XXXX-XXXX-XXXX-XXXXXXXXXXXX",
PASSWORD:
Your password/API key is contained in the apikey entry; it should be in this structure, XXXXXXXXXXXXXXXXXXXXXXXXXXXXXXXXXXXXXXXXXXXX. You will need to modify the input of the config.js file from password to apikey.
"apikey": "XXXXXXXXXXXXXXXXXXXXXXXXXXXXXXXXXXXXXXXXXXXX",Your config.js file should have the following format:
/*
 * User-specific configuration
 * IMPORTANT NOTES:
 *  Please ensure you do not interchange your username and password.
 *  Your username is the longer value: 36 digits, including hyphens
 *  Your password is the smaller value: 12 characters
*/

// Create the credentials object for export

exports.credentials = {};

// Watson Speech to Text
// https://www.ibm.com/watson/services/speech-to-text/
exports.credentials.speech_to_text = {
    apikey: 'XXXXXXXXXXXXXXXXXXXXXXXXXXXXXXXXXXXXXXXXXXXX',
    username: 'XXXXXXXX-XXXX-XXXX-XXXX-XXXXXXXXXXXX'
};
Install and Run the Speech to Text Example
Now, open a command line on the Pi and run the following commands:
cd Desktop/tjbot/recipes/speech_to_text
npm install
sudo node stt.js
The npm install step will take some time to complete. Once you issue the node stt.js command, you'll see this:

You can now issue commands to TJBot to change the color of the LED, such as "Turn the light red", "Turn the light blue", or "Turn the light off". Pretty nifty, huh? Try out the voice commands to change the color of the LED.
When you're done, just hit ctrl+C to quit the script.
Sense the Tone of Twitter
Our next project uses Watson's Tone Analyzer to analyze recent tweets and get a sense of the overall emotional tone of them.
Create a Tone Analyzer Instance
Repeat the steps used on the previous page to create a "Speech to Text" instance with the "Tone Analyzer" service. Again, leave the default values in place and hit "Create".
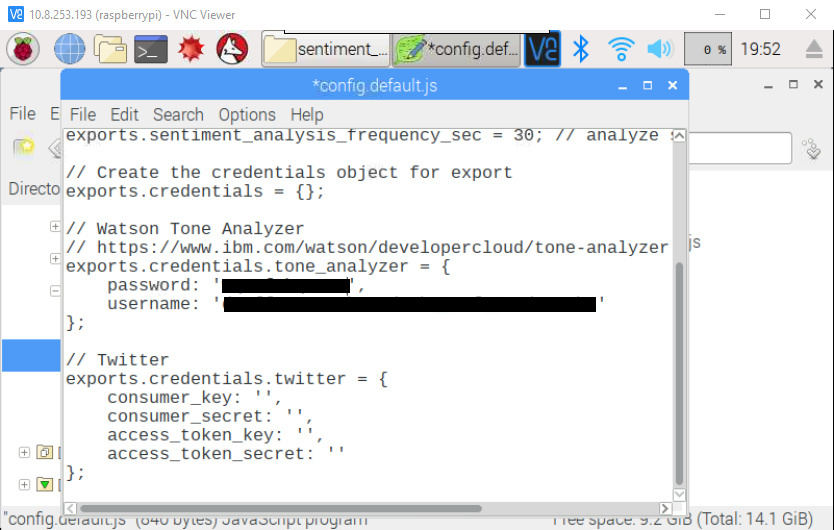
Next, repeat the steps used to fetch the credentials from the IBM Cloud website and insert them into the file on the Raspberry Pi. This time, you'll find the "config.default.js" file in "Desktop/tjbot/recipes/sentiment_analysis". However, don't close it when you're done with this step.
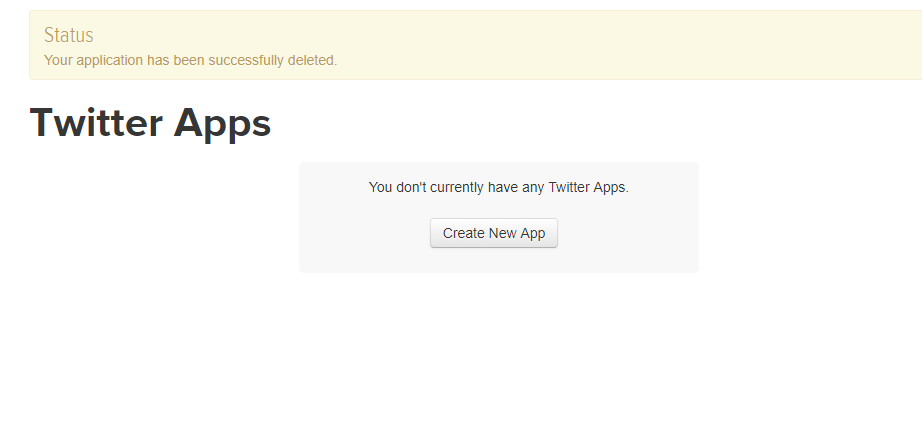
Create a Twitter App to Access Recent Tweets
You'll need a Twitter account for this step, so go to Twitter and sign up for one if you don't already have one.
Now go to the Twitter apps site and log in. You should end up on a page that looks like this:
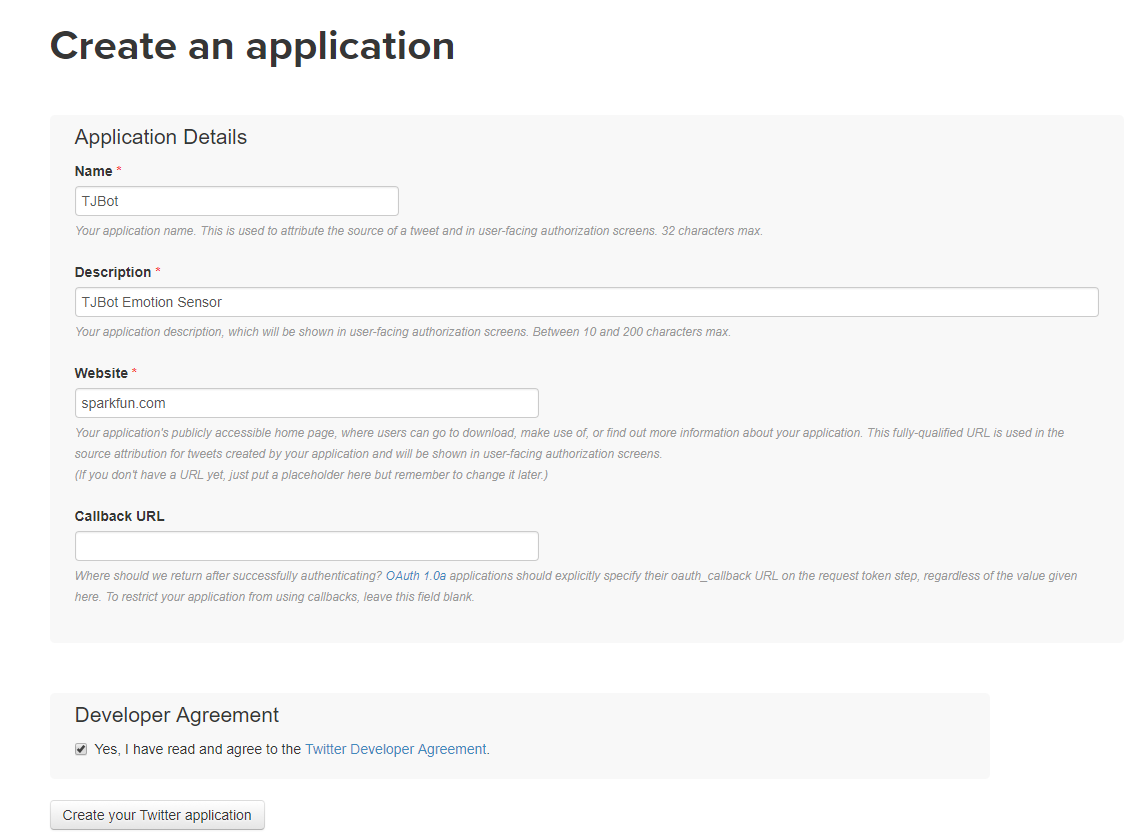
Click the "Create an app" button to be taken to the page seen below. Fill in the blanks as you see fit (note that the application name must be unique, so you can't reuse "TJBot"), click the checkbox, and then click the "Create your Twitter application" button.
You'll then be presented with this page, detailing some information from the creation process.

Right beneath the name of your app (in big bold letters at the top of the page) you'll see a tab titled "Keys and Access Tokens". Click on this to bring up this page:
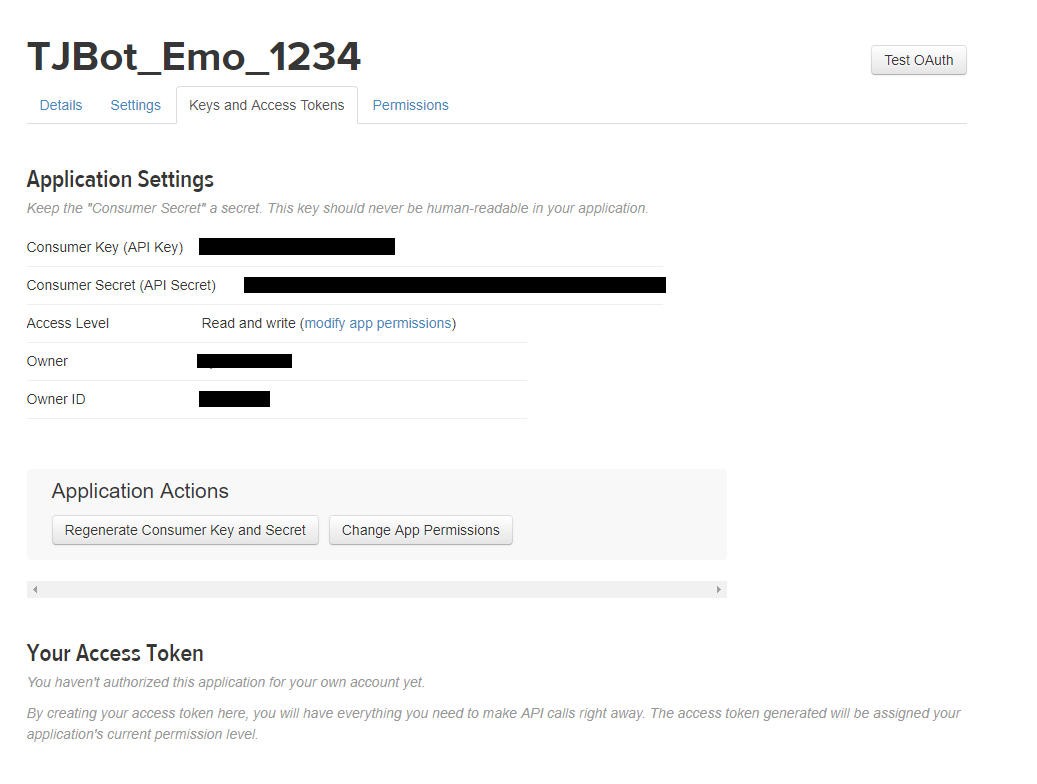
Now we need to grab a couple of pieces of information from this page for pasting into the config file we opened up above. As you can see below, there are four pieces of Twitter-related information that we need to collect. We'll start with the "consumer_key" and "consumer_secret". Both of these have the same name on the website as they do in the config file; copy and paste them from the website into the config file.
Next we'll need to get the "access_token_key" and "access_token_secret" fields. To do that, scroll down on the webpage until you see the "Create my access token" button. Click it and you'll get this screen:
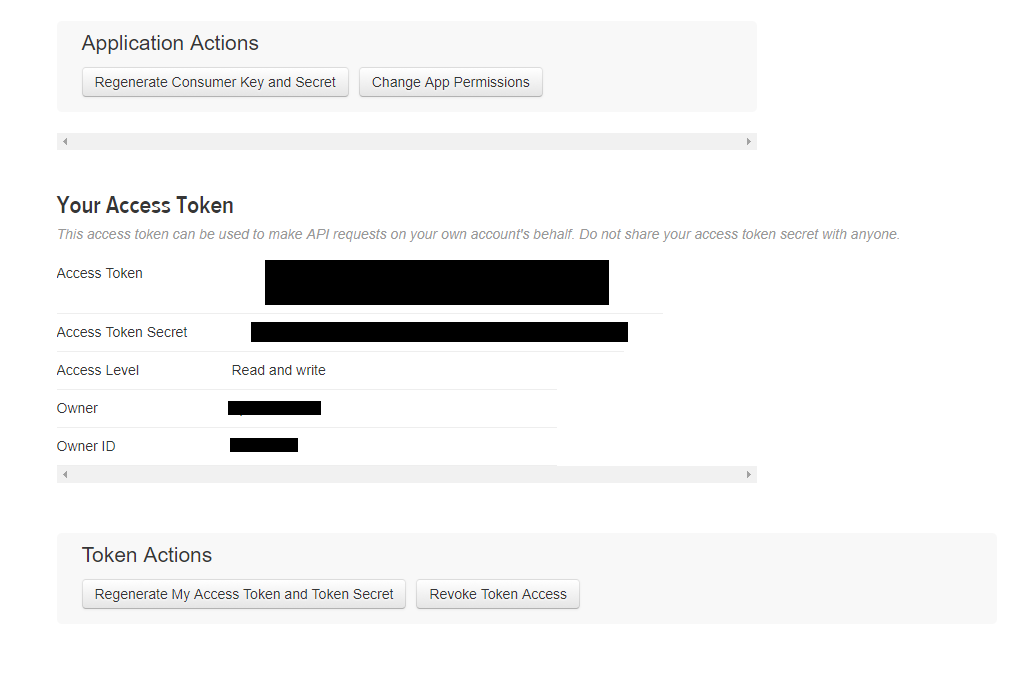
Copy and paste the "access_token_key" and "access_token_secret" into the config file. Then "Save As..." the file and name it "config.js". You're ready for the next step!
Launch the App!
It's time to check out the recipe in action! As before, open a terminal window on the Raspberry Pi and type out these commands:
cd Desktop/tjbot/recipes/sentiment_analysis
npm install
node sentiment.js
Remember, the npm install step will take some time to run, so be patient. After you run the node sentiment.js step, you should have a screen that looks like this:
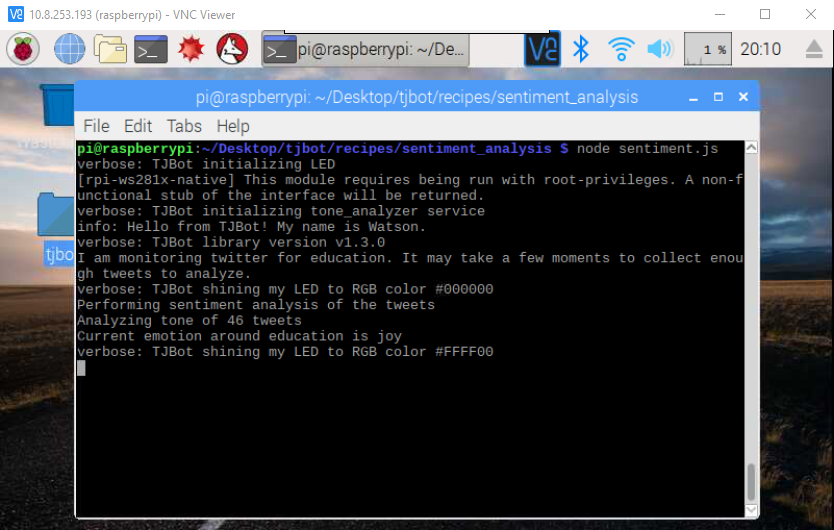
It'll take a few moments for the app to gather enough tweets (at least 100) for it to run the Tone Analyzer, but when it does, it will print out a line stating the current emotion surrounding the keyword it is searching for, as well as changing the LED color.
When you're done, just hit ctrl+c to quit the script.
Have a Conversation with TJBot
The last recipe we'll explore uses the "Conversation" service and "Text to Speech" service to make TJBot at least minimally able to talk to us.
Speaker Hookup
At this point, we'll want to connect our mini-speaker to the Raspberry Pi. As with the power supply, there's only one place that the speaker can be connected. You may, if you choose, connect the charge cable for the speaker to a USB port on the Raspberry Pi, to ensure that the speaker will operate and remains fully charged.
Create Watson Services
As in the last two recipes, we'll need to create an instance of the "Conversation" and "Text to Speech" services. We'll also use the "Speech to Text" service we created for the first recipe. We'll need to fetch credentials for these various services and put them into, you guessed it, a config file on the Raspberry Pi. This time, you'll find the "config.default.js" file under "Desktop/tjbot/recipes/conversation". Open it in the text editor.
Start with the "Speech to Text" service. You can either return to your dashboard and click on the name of the service to bring up the familiar page with "Service credentials" on the left edge, or you can copy the credentials from the config file created for the first recipe.
Now, create a "Text to Speech" instance, following the same method you used to create instances in the first two recipes. Once more, you can leave the default values in place and just hit "Create". Copy the credentials into the text document.
Finally, create a "Conversation" instance. This one is a little more complicated. For the first portion, it works the same as the three other services we created, so just follow those steps again and copy the credentials into the text document. Default settings will once again suffice.
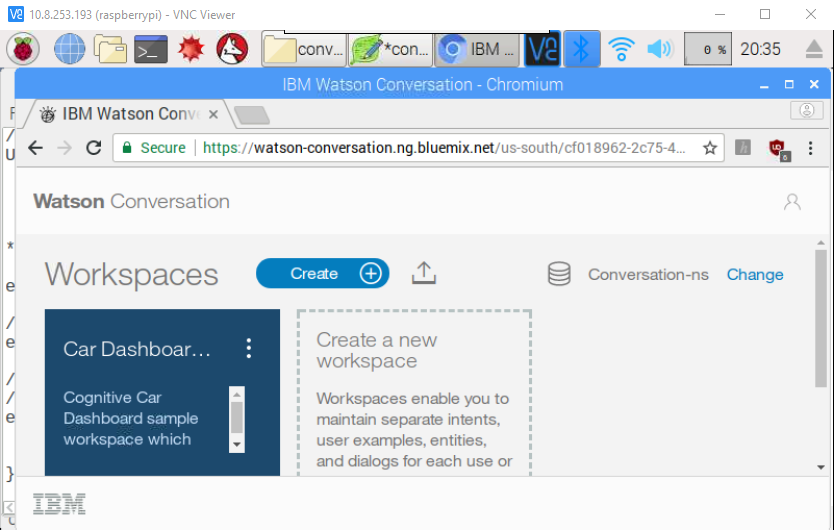
The last vital piece of information we need is the conversation workspace ID. Find the blank for this near the top of the text file, just above the credentials area for the Watson "Conversation" service. To acquire this, go to the IBM Watson Conversation website and log in with the same ID you used for the IBM Cloud website. Make sure you do this on the Pi's web browser. After logging in, you'll see this page:
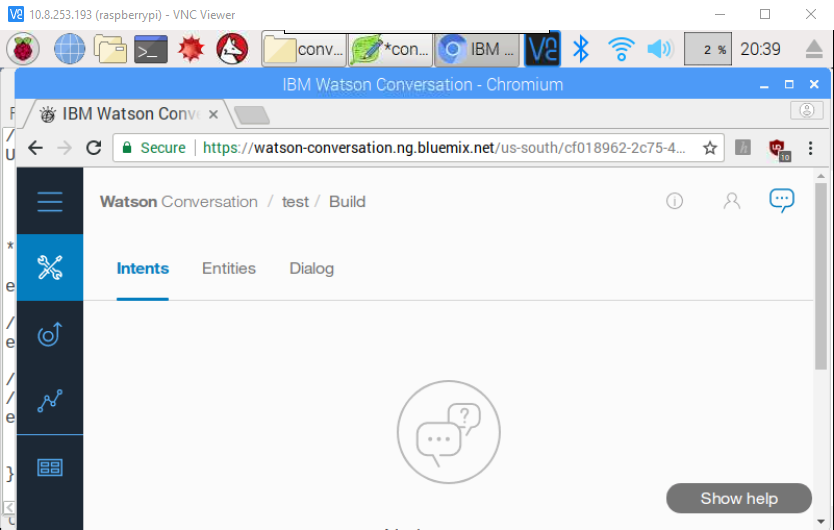
We need to upload a file, but first, we need to create a new workspace. Click on the "Create" button, then name your workspace (it doesn't matter what you call this one) and again click the "Create" button. That will take you to this page. Click on "Watson Conversation" at the top of the page to go back to the main Watson Conversation Workspace page.
You'll be back at the main page. Click on the little "Upload" button (the half rectangle with the arrow pointing up) next to the "Create" button. If you hover over the button with your mouse's pointer, a text box will pop up with the words "Import workspace" as shown below.

Clicking on that button will bring up this window. Click on the "Choose a file" frame and find the file "Desktop/tjbot/recipes/conversation/workspace-sample.json". Leave the "Everything" radio button highlighted, then click "Import". That will get you to this page:
Click on "Watson Conversation" at the top of the page to go back to the main Watson Conversation Workspace page again.
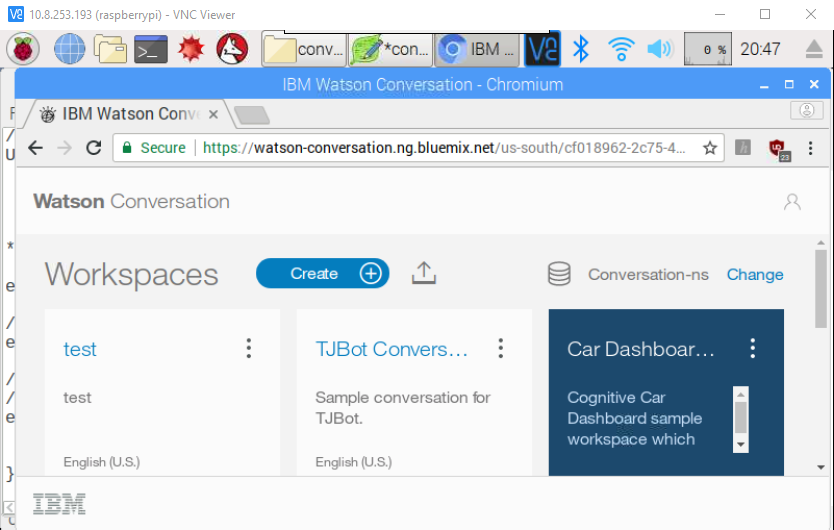
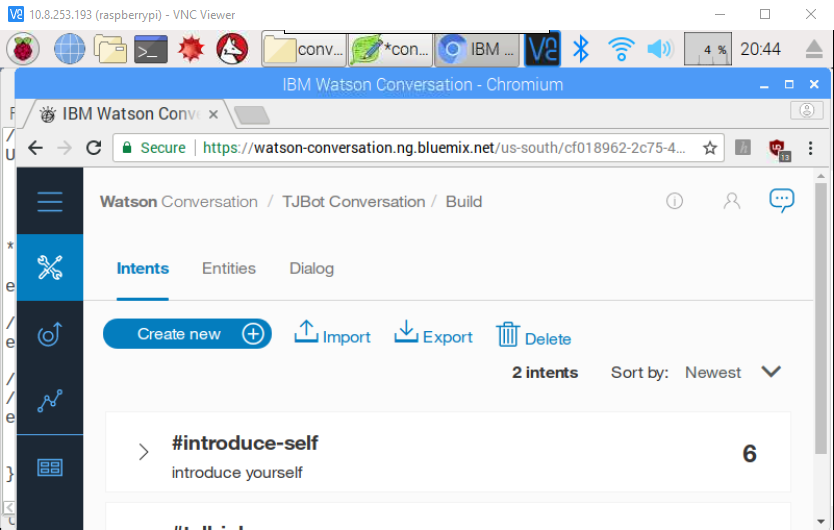
Click on the three vertically aligned dots in the "TJBot Conversation" frame and choose "View Details". The contents of the frame will change; scroll down in the frame to find the Workspace ID, which is the final piece of information we need to get this recipe working! Copy it from this webpage to the text document, "Save as..." the document to the name "config.js", and close it.
Launch the Application
This part should look very familiar. Open a terminal window on the Raspberry Pi and type in these three commands:
cd Desktop/tjbot/recipes/conversation
npm install
node conversation.js
Again, wait for npm install to complete. After you input the node conversation.js command, you'll see this:
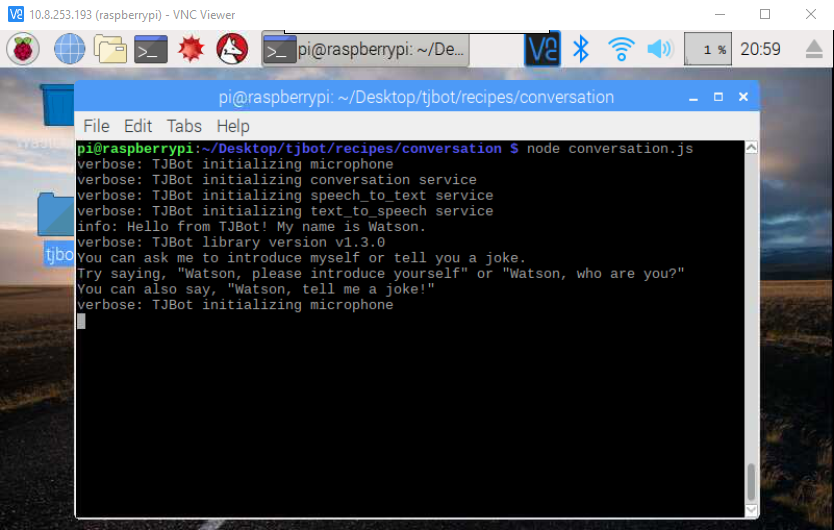
Try to start a conversation with the TJBot by using commands like "Watson, tell me a joke" or "Watson, who are you?" There aren't too many things you can ask for, but experiment with different ways of asking (for instance, "Watson, let's hear a joke" works just as well as "Watson, tell me a joke"). Explore the power of the language processing that Watson can do.
When you're done, hit ctrl-c to quit the script.
Resources and Going Further
Now that you've successfully got your TJBot up and running, it's time to incorporate it into your own project!
For more information, check out the resources below:
- Explore AI with TJBot
- GitHub Repositories
- Instructables: TJBot Tutorials - Visit the TJBot activities section on Instructables!
- TJBot Assembly - Follow the video to assemble the cardboard structure of TJBot!