CryptoCape Hookup Guide
This Tutorial is Retired!
This tutorial covers concepts or technologies that are no longer current. It's still here for you to read and enjoy, but may not be as useful as our newest tutorials.
 jbdatko,
  CaseyTheRobot
What is a CryptoCape?
The CryptoCape is a collaboration with Hacker In Residence alumni Josh Datko.
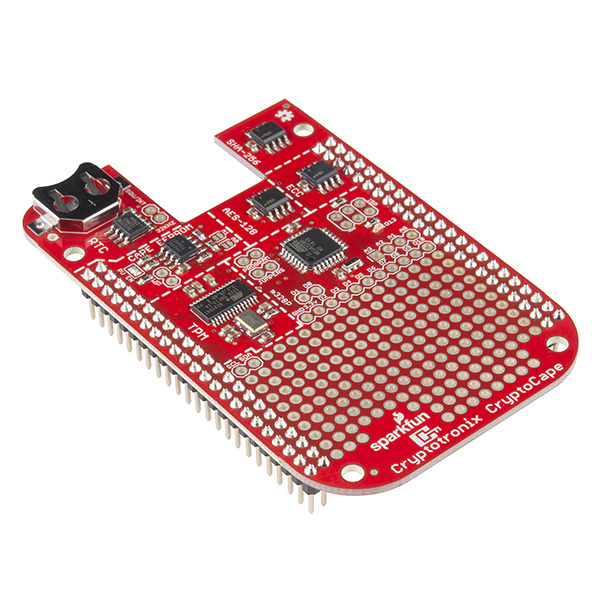
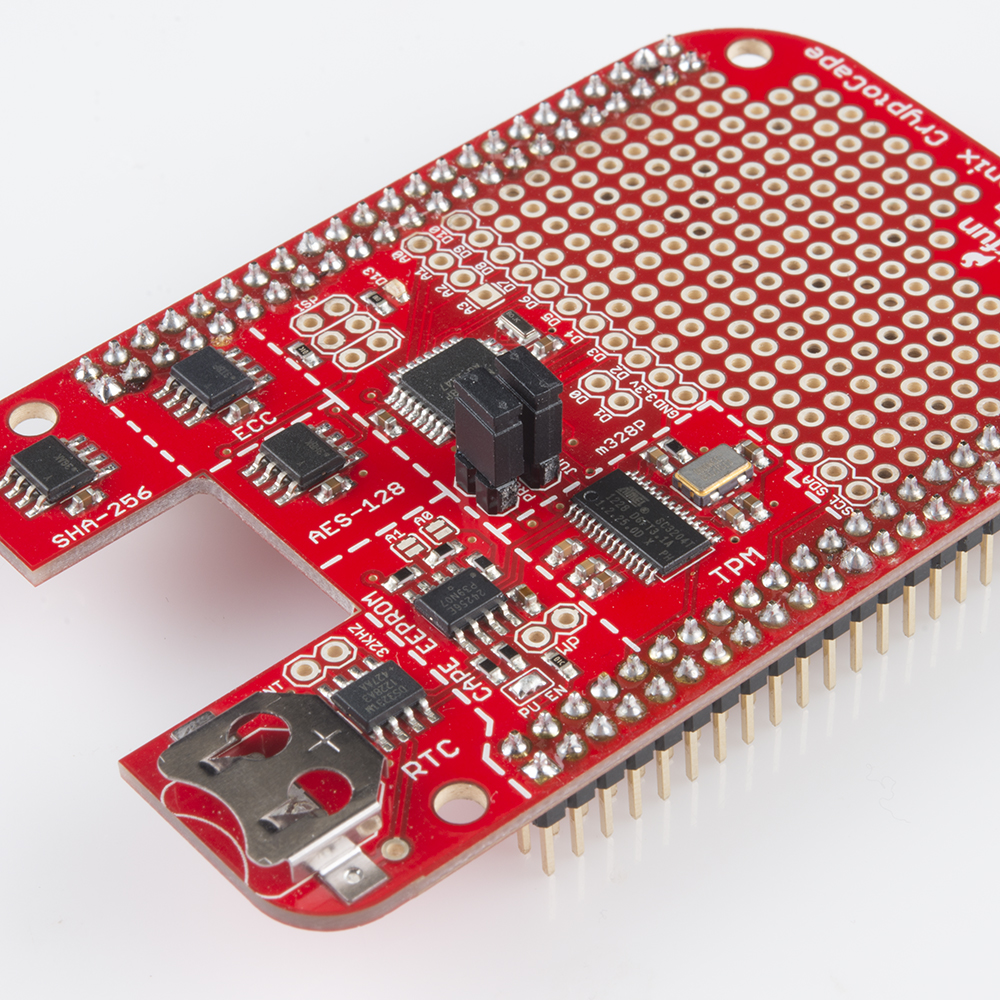
CryptoCape
DEV-12773The CryptoCape is the BeagleBone's first dedicated security daughterboard. Known as "shields" on other platforms, a BeagleBone cape attaches to the expansion headers of the BeagleBone Black. This cape adds specialized ICs that perform various cryptographic operations which will allow you to add a hardware security layer to your BeagleBone project. It also is a nice device for those performing embedded security research.
In this tutorial, we'll tour the features on the CryptoCape and show you the software resources available for you to start using the device.
Required Materials
Aside from the CryptoCape, you'll also need the following items:
Suggested Reading
Before getting into this tutorial, make sure you're familiar with the concepts below:
Installing the Cape Firmware
The CryptoCape is a registered BeagleBone cape whose firmware is included in the latest BeagleBone debian images. However, you may have to upgrade your image to retrieve the latest software. Perform the following command on your BeagleBone:
dmesg | grep CRYPTO
If you see something like this, then you have the firmware installed:
[    0.717065] bone-capemgr bone_capemgr.9: slot #3: 'BB-BONE-CRYPTO,00A0,SparkFun,BB-BONE-CRYPTO'
[    0.717766] bone-capemgr bone_capemgr.9: loader: before slot-3 BB-BONE-CRYPTO:00A0 (prio 0)
[    0.717783] bone-capemgr bone_capemgr.9: loader: check slot-3 BB-BONE-CRYPTO:00A0 (prio 0)
[    0.720127] bone-capemgr bone_capemgr.9: loader: after slot-3 BB-BONE-CRYPTO:00A0 (prio 0)
[    0.720149] bone-capemgr bone_capemgr.9: slot #3: Requesting part number/version based 'BB-BONE-CRYPTO-00A0.dtbo
[    0.720167] bone-capemgr bone_capemgr.9: slot #3: Requesting firmware 'BB-BONE-CRYPTO-00A0.dtbo' for board-name 'BB-BONE-CRYPTO', version '00A0'
[    0.720196] bone-capemgr bone_capemgr.9: slot #3: dtbo 'BB-BONE-CRYPTO-00A0.dtbo' loaded; converting to live tree
[    0.756311] bone-capemgr bone_capemgr.9: loader: done slot-3 BB-BONE-CRYPTO:00A0 (prio 0)
You still need to install tpm-tools to use the TPM.
If you don't see the CryptoCape in dmesg, perform the following:
sudo apt-get install tpm-tools
cd /opt/scripts/tools/
sudo ./update_kernel.sh
sudo reboot
If you don't have an /opt/scripts/tools directory, then you have a really old version of sofware on your Beagle and you need to upgrade. Download the latest image from the BeagleBoard.org site.
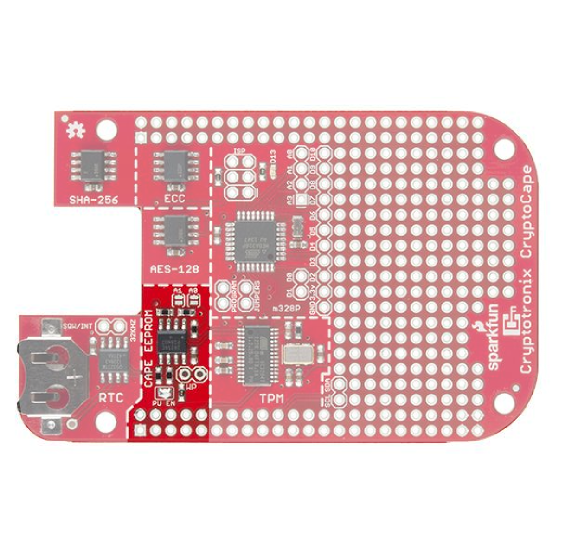
Cape EEPROM
The Cape's EEPROM is defaulted to an I2C address of 0x57. If you plan on stacking capes -- the BeagleBone can support up to four stacked capes -- you may need to change the addresses of the EEPROM. The table below contains the available addresses for the EEPROM. Close the appropriate jumpers to change the address. (0 - Closed, 1 - Open).
Address Table
| A2 | A1 | A0 | 7-bit address |
|---|---|---|---|
| 1 | 0 | 0 | |
| 1 | 0 | 1 | |
| 1 | 1 | 0 | |
| 1 | 1 | 1 |
If you want to prevent users from writing to the EEPROM, you'll need to solder 0.1" male headers to the write protect pads and place a jumper on these pins. The EEPROM contains the cape definition, which is written during manufacturing and testing. If you overwrite it, the cape may not load correctly. You can always read the EEPROM with the following command:
sudo cat /sys/bus/i2c/devices/1-0057/eeprom| hexdump -C
Real Time Clock
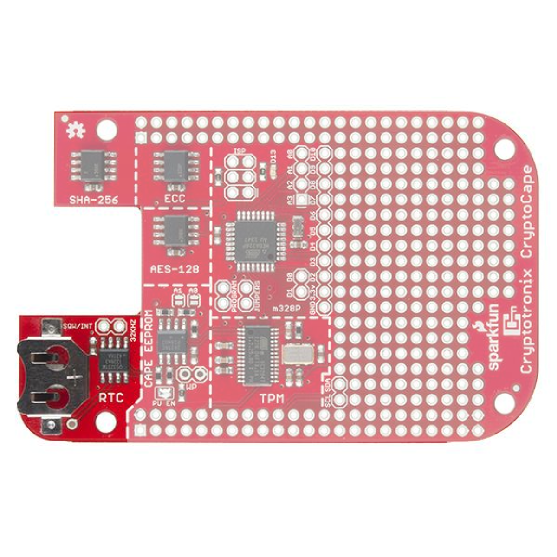
The Real-Time Clock is used to keep accurate time. The driver for the DS3231M RTC will be loaded automatically with the rest of the cape firmware. If you add a coin cell battery to the battery holder, the RTC will keep time even when power is removed from the BeagleBone.
For a closer look at how to use the RTC and how I2C works on the BeagleBone Black, checkout this tutorial.
Trusted Platform Module
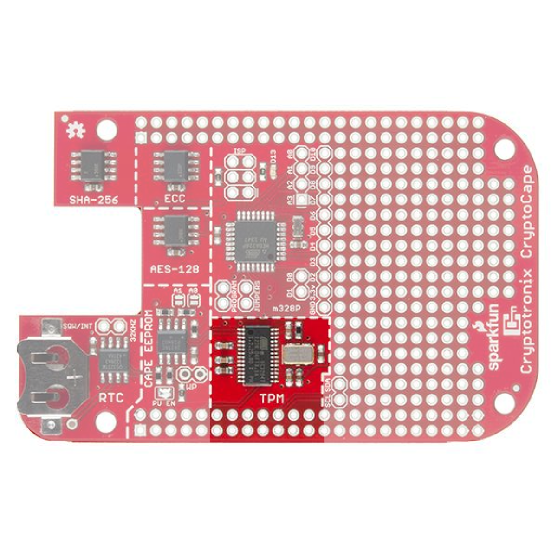
The Atmel Trusted Platform Module (TPM) is the AT97SC3205T, and only a summary datasheet is available with an NDA. However, the full datasheet is not required because there is existing software support. The TPM conforms to the Trusted Computer Group (TCG) Software Stack (TSS) Specification version 1.2, which is supported by the TrouSerS Linux software.
A very generic description of the TPM is that it performs RSA encryption, decryption, and signing in the hardware. It can perform much more than that, and there are entire books on how to use the TPM.
The kernel driver was backported to the 3.8 kernel by Robert Nelson of BeagleBoard.org and will be loaded automatically by the BeagleBone Cape Manager.
Using the TPM
Instructions for using the TPM are located on this page.
AES-128 EEPROM
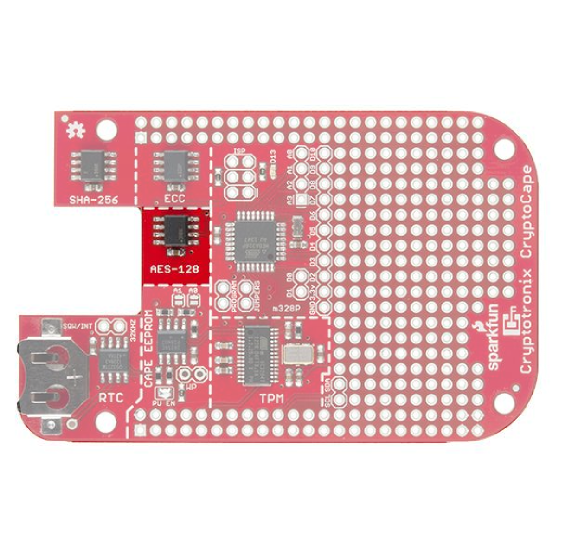
The Atmel AES132 is an AES encrypted EEPROM that can store up to 32Kb of data. Specifically, it uses AES with a 128 bit key in CCM mode.
There currently is not a linux driver that uses this hardware, however you can use the Atmel AES132 AVR software. As with the other crypto chips, once you run the lock command, this is an irreversible operation.
ATSHA204
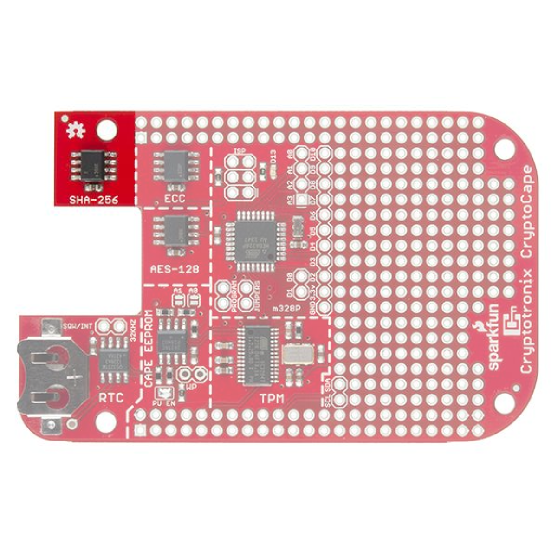
The Atmel ATSHA204 is an authentication chip that performs SHA-256 and HMAC-256. It can store up to 16 secret keys that can be used for shared-secret authentication between two devices with an ATSHA204 or between a ATSHA204 and a remote server. It also can produce random numbers with its on-chip random number generator. The ATSHA204 on the CryptoCape is the I2C version of our Breakout Board version. It's also on the Electric Imp.
This chip, like the other crypto chips, is one-time-programmable. This means that once you run certain commands on the chip, it can not be reversed. This is a security feature.
Software
There are two options for software, you can use either Atmel's AVR library and load that to the ATmega328p, or you can use the Cryptotronix linux driver.
Atmel's AVR Library
Atmel's ATSHA204 AVR Library page hash links to their software.
Cryptotronix Linux driver
The linux driver, called hashlet, can be download here or cloned from GitHub. See the GitHub page for examples.
Elliptical Curve Generator
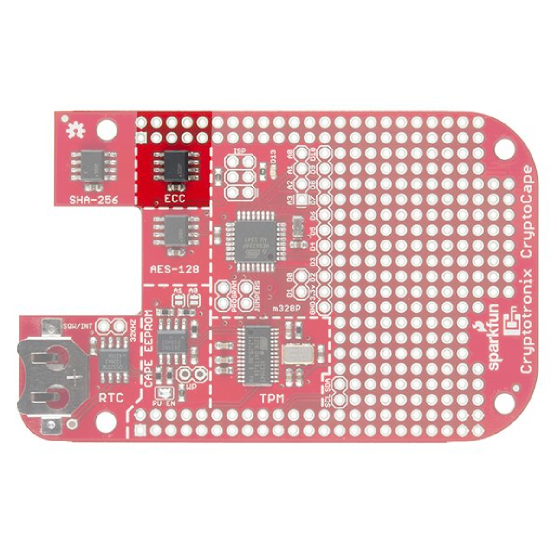
The ATECC108 performs the Elliptic Curve Digital Signature Algorithm (ECDSA) on the chip. This is an authentication chip, like the ATSHA204. The goal of an authentication device is to assert the integrity and identity of a communicating party. The ATECC108 uses asymmetric cryptography, which means there is a public and private key. In short, this allows you to distribute public keys and keep individual private keys secret. This is unlike the ATSHA204 where each device needs a copy of the same secret key.
Atmel AVR Library
While the datasheet is under a NDA, Atmel provides an AVR based library to interface with this chip.
Linux Driver
There is a Cryptotronix Linux driver, with examples, available on GitHub. This blog post walks through using the software and describes the current status.
Atmega 328
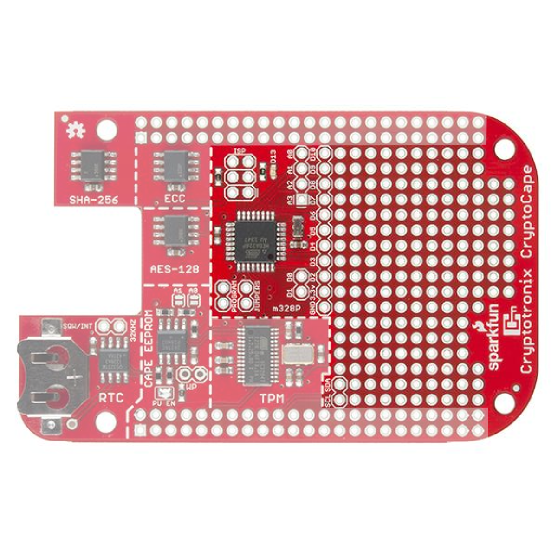
The ATmega328p operates at 3.3V and 8Mhz, just like the Arduino Pro Mini. It is loaded with the Arduino Pro Mini 3.3V bootloader and contains a basic test sketch from the factory. There are two ways to upload sketches to this chip: Using an ISP programmer or from the BeagleBone.
Using an external programmer
The Pocket AVR Programmer will work to program the ATmega. You'll need to populate the ISP headers with some 0.1" male headers. When you connect the Pocket Programmer, be sure to select "No Power" because the CryptoCape receives 3.3V power from the BeagleBone. While most of the chips on this board are 5V friendly, the oscillator for the TPM is not. You can then use the USBTiny programmer option from the Arduino IDE.
Using the BeagleBone
Since the ATmega is tied to the BeagleBone's UART4, the BeagleBone can flash sketches up to the ATmega. If you want a detailed description of how this works, check out the May 2014 cover article of Linux Journal. You'll not only see how to program the ATmega, you'll read how the device tree works in gory details.
For those that just want to upload sketches quickly, clone the following repository from your BeagleBone:
git clone https://github.com/jbdatko/BBB_ATmega328P_flasher.git
In that repository, there is an upload.sh script, which is invoked as follows:
sudo ./upload.sh Blink.cpp.hex
Replace Blink.cpp.hex with the hex file you want to flash. How do you get this hex file? In your Arduino IDE, go to "Preferences" then "Show verbose output during compilation." When you "verify" your sketch, the output window will tell you where the hex file lives. Download this to the BeagleBone with sftp or something similar.
Installing the Jumpers
To flash the ATmega from the Beagle, you must physically attach jumpers to the "Program Jumper" pads. You should solder 0.1" male headers to these pads. The spacing between these jumpers is purposely oddly spaced to prevent you from attaching the jumpers in the wrong direction. Without the jumpers, you can't upload sketches from the Beagle.
This is a security feature. We wouldn't want some malware changing the firmware on the ATmega, now would we?
Breakout Pads
The CryptoCape breaks out most of the ATmega signals to surrounding pads. There is even a green LED which is compatible with the typical "Blink" sketch, so you can upload that example to make sure everything is working. Not all the Arduino signals are broken out, but the ones that are available on the CryptoCape are listed here:
- GND
- 3.3V
- D0 - D10
- D13 with LED
- A0 - A13
The serial UART between the BeagleBone and the ATmega can be split. If you don't put the jumpers on, the serial line will not be connected, and the BeagleBone can use the "upstream" side of the serial lines while the ATmega can use the "downstream." This might be useful if you have two serial devices and you want the BeagleBone to talk to one of them and the ATmega to the other, without mixing the signals.
I2C
The ATmega is connected to the same I2C bus as all of the other chips. This means you can join the bus as an I2C slave with Wire.begin(address) and communicate with the Beagle over I2C. Just be sure to pick an address not already in use. We recommend 0x42, because it's the answer to life, the universe, and everything. But if you attached the HMC6352, you'll need a new address since that is also 0x42.
This blog post contains a detailed overview of using I2C on the BeagleBone Black.
Resources and Going Further
There is a dedicated CryptoCape Google Group if you have specific questions. Also, feel free to join the #cryptotronix channel on Freenode. While you are joining IRC channels, hang out in the SparkFun IRC channel as well!
Further reading: