CCS811/BME280 (Qwiic) Environmental Combo Breakout Hookup Guide
Example Code
For the following examples, which can be found here, we will use our libraries along with a few functions to view our data. Our code's preamble, setup(), and function definitions will all be the same. However, the void loop() will change between the examples. To get started, we first have to initialize our sensors with our preamble, setup(), and loop() as shown below.
language:c
#include <SparkFunBME280.h>
#include <SparkFunCCS811.h>

#define CCS811_ADDR 0x5B //Default I2C Address
//#define CCS811_ADDR 0x5A //Alternate I2C Address

//Global sensor objects
CCS811 myCCS811(CCS811_ADDR);
BME280 myBME280;

void setup()
{
  Serial.begin(9600);
  Serial.println();
  Serial.println("Apply BME280 data to CCS811 for compensation.");

  Wire.begin();//initialize I2C bus

  //This begins the CCS811 sensor and prints error status of .begin()
  CCS811Core::status returnCode = myCCS811.begin();
  if (returnCode != CCS811Core::SENSOR_SUCCESS)
  {
    Serial.println("Problem with CCS811");
    printDriverError(returnCode);
  }
  else
  {
    Serial.println("CCS811 online");
  }

  //Initialize BME280
  //For I2C, enable the following and disable the SPI section
  myBME280.settings.commInterface = I2C_MODE;
  myBME280.settings.I2CAddress = 0x77;
  myBME280.settings.runMode = 3; //Normal mode
  myBME280.settings.tStandby = 0;
  myBME280.settings.filter = 4;
  myBME280.settings.tempOverSample = 5;
  myBME280.settings.pressOverSample = 5;
  myBME280.settings.humidOverSample = 5;

  //Calling .begin() causes the settings to be loaded
  delay(10);  //Make sure sensor had enough time to turn on. BME280 requires 2ms to start up.
  byte id = myBME280.begin(); //Returns ID of 0x60 if successful
  if (id != 0x60)
  {
    Serial.println("Problem with BME280");
  }
  else
  {
    Serial.println("BME280 online");
  }
}
Our void loop will call a few functions that are not included in our libraries, so we must define them after our void loop. Don't worry about defining prototypes, the Arduino IDE does this for us. Paste the below code below your void loop to define the necessary functions to print data and errors.
language:c
void printData()
{
  Serial.print(" CO2[");
  Serial.print(myCCS811.getCO2());
  Serial.print("]ppm");

  Serial.print(" TVOC[");
  Serial.print(myCCS811.getTVOC());
  Serial.print("]ppb");

  Serial.print(" temp[");
  Serial.print(myBME280.readTempC(), 1);
  Serial.print("]C");

  //Serial.print(" temp[");
  //Serial.print(myBME280.readTempF(), 1);
  //Serial.print("]F");

  Serial.print(" pressure[");
  Serial.print(myBME280.readFloatPressure(), 2);
  Serial.print("]Pa");

  //Serial.print(" pressure[");
  //Serial.print((myBME280.readFloatPressure() * 0.0002953), 2);
  //Serial.print("]InHg");

  //Serial.print("altitude[");
  //Serial.print(myBME280.readFloatAltitudeMeters(), 2);
  //Serial.print("]m");

  //Serial.print("altitude[");
  //Serial.print(myBME280.readFloatAltitudeFeet(), 2);
  //Serial.print("]ft");

  Serial.print(" humidity[");
  Serial.print(myBME280.readFloatHumidity(), 0);
  Serial.print("]%");

  Serial.println();
}

void printDriverError( CCS811Core::status errorCode )
{
  switch ( errorCode )
  {
    case CCS811Core::SENSOR_SUCCESS:
      Serial.print("SUCCESS");
      break;
    case CCS811Core::SENSOR_ID_ERROR:
      Serial.print("ID_ERROR");
      break;
    case CCS811Core::SENSOR_I2C_ERROR:
      Serial.print("I2C_ERROR");
      break;
    case CCS811Core::SENSOR_INTERNAL_ERROR:
      Serial.print("INTERNAL_ERROR");
      break;
    case CCS811Core::SENSOR_GENERIC_ERROR:
      Serial.print("GENERIC_ERROR");
      break;
    default:
      Serial.print("Unspecified error.");
  }
}
Example 1 - Basic Readings
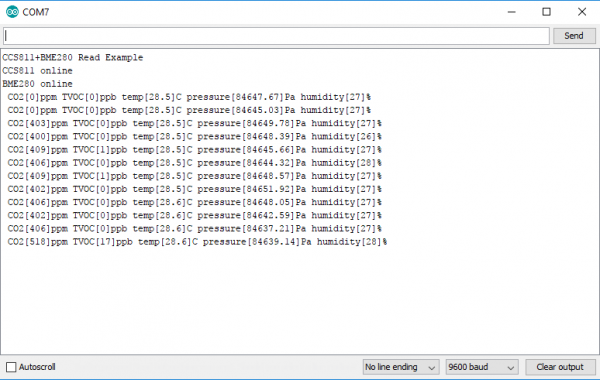
The void loop shown below will get you up and running taking readings of CO2, tVOC(total volatile organic compounds), temperature, pressure, and humidity. Once this sketch is uploaded, open the serial monitor with a baud rate of 9600 to display the air quality data from the sensor.
language:c
void loop()
{
  if (myCCS811.dataAvailable()) //Check to see if CCS811 has new data (it's the slowest sensor)
  {
    myCCS811.readAlgorithmResults(); //Read latest from CCS811 and update tVOC and CO2 variables
    //getWeather(); //Get latest humidity/pressure/temp data from BME280
    printData(); //Pretty print all the data
  }
  else if (myCCS811.checkForStatusError()) //Check to see if CCS811 has thrown an error
  {
    Serial.println(myCCS811.getErrorRegister()); //Prints whatever CSS811 error flags are detected
  }

  delay(2000); //Wait for next reading
}
The output of this example should look something like the photo below.
Example 2 - Calibrated Readings
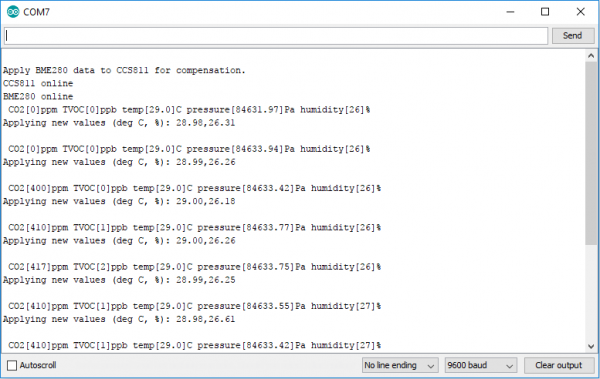
The void loop shown below will get you started taking calibrated readings from the CCS811. When humidity and temperature are known by the CCS811, it is able to refine it's tVOC and CO2 readings. This sketch feeds the temperature and humidity from the BME280 to the CCS811 in order to attain greater accuracy.
language:c
void loop()
{
  //Check to see if data is available
  if (myCCS811.dataAvailable())
  {
    //Calling this function updates the global tVOC and eCO2 variables
    myCCS811.readAlgorithmResults();
    //printData fetches the values of tVOC and eCO2
    printData();

    float BMEtempC = myBME280.readTempC();
    float BMEhumid = myBME280.readFloatHumidity();

    Serial.print("Applying new values (deg C, %): ");
    Serial.print(BMEtempC);
    Serial.print(",");
    Serial.println(BMEhumid);
    Serial.println();

    //This sends the temperature data to the CCS811
    myCCS811.setEnvironmentalData(BMEhumid, BMEtempC);
  }
  else if (myCCS811.checkForStatusError())
  {
    Serial.println(myCCS811.getErrorRegister()); //Prints whatever CSS811 error flags are detected
  }

  delay(2000); //Wait for next reading
}
The output for this example is shown below.

