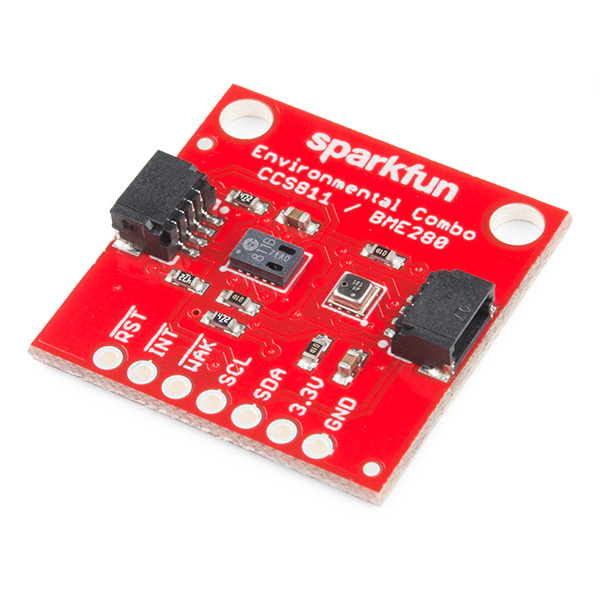
The CCS811/BME280 (Qwiic) Environmental Combo Breakout work together to take care of all of your atmospheric quality sensing needs with the CCS811 and BME280 ICs. The CCS811 is an exceedingly popular sensor, providing readings for equivalent CO2 (or eCO2) in the parts per million (PPM) and total volatile organic compounds in the parts per billion (PPB). The CCS811 also has a feature that allows it to fine tune its readings if it has access to the current humidity and temperature. Luckily for us, the BME280 provides humidity, temperature, and barometric pressure! This allows the sensors to work together to give us more accurate readings than they'd be able to provide on their own. We also made it easy to interface with them via I2C.
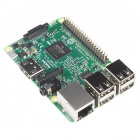
To get started, you'll need a microcontroller or single board computer to control everything.

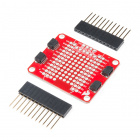
Now to get into the Qwiic ecosystem, the key will be one of the following stackable Qwiic boards to match your preference of microcontroller or single board computer:

You will also need a Qwiic cable to connect the shield to your CCS811/BME280, choose a length that suits your needs.


If you aren't familiar with the Qwiic system, we recommend reading here for an overview.
| Qwiic Connect System |
We would also recommend taking a look at the following tutorials if you aren't familiar with them.
For more information on TVOC and eCO2 readings, check out the following blog post.
If the concepts of pressure are weighing on you, check out these links.
Together the sensors can consume 13 mA of current. It takes 12 mA to power the CCS811 while 1 mA to power the BME280.
| Characteristic | Range |
|---|---|
| Operating Voltage | 3.3V: Regulated to 1.8V - 3.6V |
| tVOC | 0 - 1187 PPB |
| eCO2 | 400 - 8192 PPM |
| Temperature | -40°C - 85°C |
| Humidity | 0 - 100% RH, ±3% from 20 - 80% |
| Pressure | 30 - 110 kPa, relative accuracy of 12 Pa, absolute accuracy of 100 Pa |
| Altitude | 0 - 30,000ft (9.2km), relative accuracy of 3.3ft (1M) at sea level, 6.6ft (2M) at 30,000ft. |
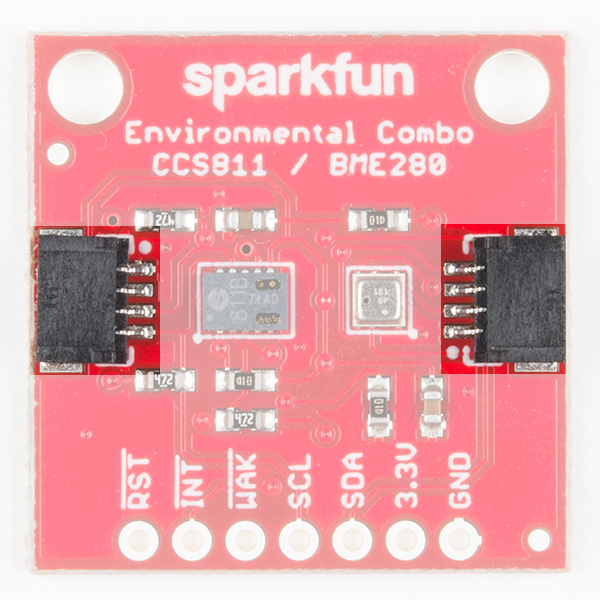
The CCS811+BME280 communicates exclusively via I2C, utilizing our handy Qwiic system. The Qwiic System utilizes the 4-pin polarized Qwiic connectors highlighted below.
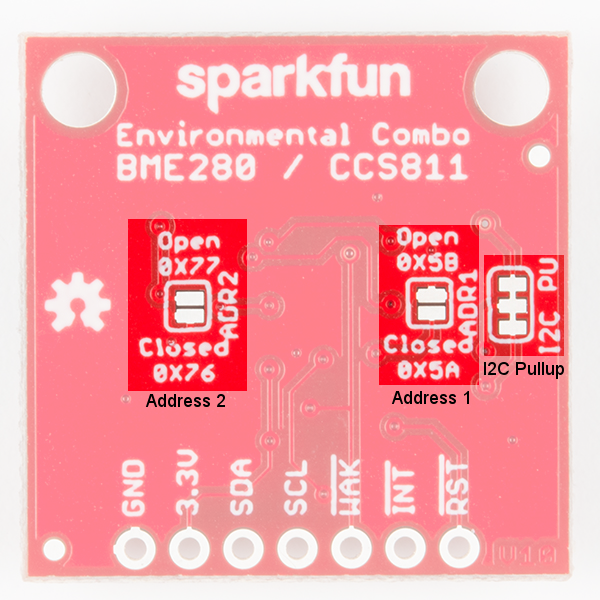
The I2C address can also be changed using the jumpers on the back of the board if you are using another device with the same I2C address. ADR1 can be used to change the I2C address of the CCS811 from 0x5B to 0x5A by adding solder to close the jumper. The ADR2 jumper can be used to change the I2C address of the BME280 from 0x77 to 0x76. The I2C bus has pull-up resistors enabled by default. If not desired, these can be removed by separating the "I2C PU" triple jumper on the bottom side with a hobby knife. The locations of these jumpers are shown in the picture below.
Below is a list of pins made available for the CCS811 and BME280 environmental combo breakout.
| Pin | Description | Direction |
|---|---|---|
| RST | Reset (active low, CCS811) | In |
| INT | Interrupt (active low, CCS811) | Out |
| WAK | Wake (active low, CCS811) | In |
| SCL | Clock | In |
| SDA | Data | In |
| 3.3V | Power | In |
| GND | Ground | In |
Additionally, the three control lines RST, INT, and WAK can be used to further the degree of control over the CCS811.
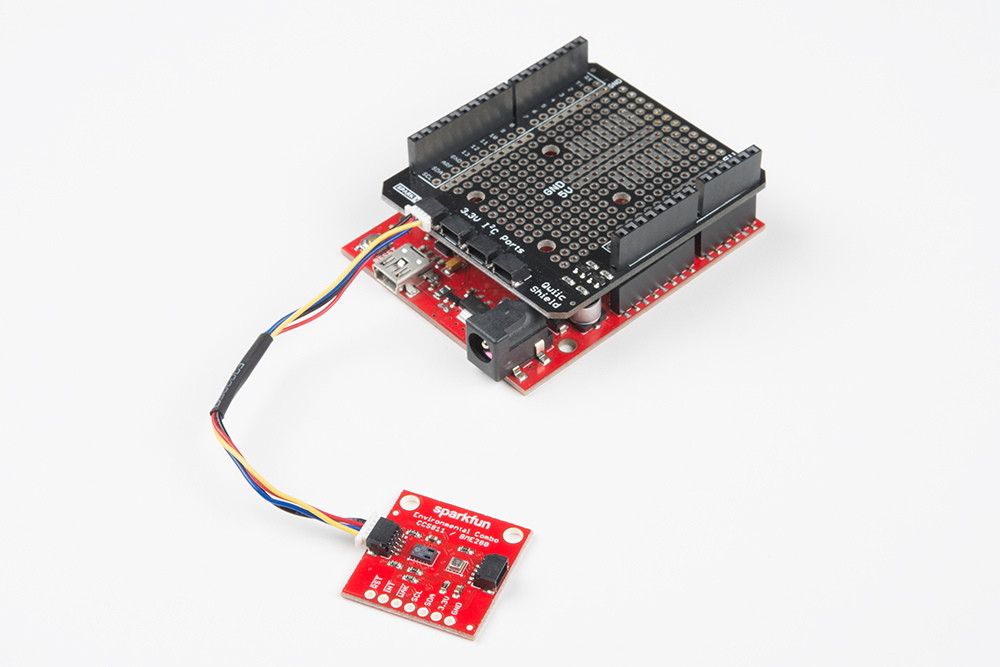
If you haven't yet assembled your Qwiic Shield, now would be the time solder the headers to the shield. With the shield assembled, Sparkfun's new Qwiic environment means that connecting the sensor could not be easier. Just plug one end of the Qwiic cable into the CCS811+BME280 breakout (either I2C connector will do) and the other into the Qwiic Shield. You'll be ready to upload a sketch and start taking air quality measurements once connected. It seems too easy, but thats why we made it this way! We show the SparkX version of the Qwiic shield below, but the shield is now sold in SparkFun Red!
Note: This example assumes you are using the latest version of the Arduino IDE on your desktop. If this is your first time using Arduino, please review our tutorial on installing the Arduino IDE. If you have not previously installed an Arduino library, please check out our installation guide.
Use the Arduino Library Manager! SparkFun has written libraries to control both the CCS811 and the BME280. You can obtain these libraries through the Arduino Library Manager. Search for SparkFun CCS811 and SparkFun BME280 and you should be able to install the latest version. Never installed a library before? That's ok! Checkout our tutorial on installing Arduino Libraries. If you prefer downloading the libraries you can grab them here to manually install:
Before we get started on a sketch, lets take a look at the libraries used.
In the global scope, construct your sensor object (such as mySensor or pressureSensorA) without arguments.
Example:
BME280 mySensor;
Rather that passing a bunch of data to the constructor, configuration is accomplished by setting the values of the BME280 type in the setup() function. They are exposed by being public: so use the myName.aVariable = someValue; syntax.
Settable variables of the class BME280:
An example configuration of the BME280 type in setup():
language:c
#include <stdint.h>
#include "SparkFunBME280.h"

#include "Wire.h"
#include "SPI.h"

//Global sensor object
BME280 mySensor;

void setup()
{
    //***Driver settings********************************//
    //commInterface can be I2C_MODE
    //specify I2C address.  Can be 0x77(default) or 0x76

    //For I2C, enable the following
    mySensor.settings.commInterface = I2C_MODE;
    mySensor.settings.I2CAddress = 0x77;

    //***Operation settings*****************************//

    //runMode can be:
    //  0, Sleep mode
    //  1 or 2, Forced mode
    //  3, Normal mode
    mySensor.settings.runMode = 3; //Forced mode

    //tStandby can be:
    //  0, 0.5ms
    //  1, 62.5ms
    //  2, 125ms
    //  3, 250ms
    //  4, 500ms
    //  5, 1000ms
    //  6, 10ms
    //  7, 20ms
    mySensor.settings.tStandby = 0;

    //filter can be off or number of FIR coefficients to use:
    //  0, filter off
    //  1, coefficients = 2
    //  2, coefficients = 4
    //  3, coefficients = 8
    //  4, coefficients = 16
    mySensor.settings.filter = 0;

    //tempOverSample can be:
    //  0, skipped
    //  1 through 5, oversampling *1, *2, *4, *8, *16 respectively
    mySensor.settings.tempOverSample = 1;

    //pressOverSample can be:
    //  0, skipped
    //  1 through 5, oversampling *1, *2, *4, *8, *16 respectively
    mySensor.settings.pressOverSample = 1;

    //humidOverSample can be:
    //  0, skipped
    //  1 through 5, oversampling *1, *2, *4, *8, *16 respectively
    mySensor.settings.humidOverSample = 1;
    delay(10);  //Make sure sensor had enough time to turn on. BME280 requires 2ms to start up.         Serial.begin(57600);

    Serial.print("Starting BME280... result of .begin(): 0x");
    //Calling .begin() causes the settings to be loaded
    Serial.println(mySensor.begin(), HEX);

}
uint8_t begin( void ) --- In the above example, begin is used to start the sensor. The basic routine it follows is like this:
#include "Wire.h" may be needed in your sketch.To use it, call mySensor.begin(); or assign the output to something like uint8_t myReturnedValue = mySensor.begin();
void reset( void ) --- Send the reset word to the BME280. Afterwards, you'll have to run begin() again.
float readTempC( void ) --- Use to get the temperature in Celsius, as a float.
float readTempF( void ) --- Use to get the temperature in Fahrenheit, as a float. Takes no arguments.
float readFloatPressure( void ) --- Use to get pressure in units of kiloPascals, as a float.
float readFloatAltitudeMeters( void ) --- Use to get altitude in units of meters, as a float.
float readFloatAltitudeFeet( void ) --- Use to get altitude in units of feet, as a float. This function calculates based off the measured pressure.
float readFloatHumidity( void ) --- Use to get humidity in % relative, as a float.
The library is fairly normal to use compared with our other sensors. You'll have to include the library, create a sensor object in the global space, and then use functions of that object to begin and control the sensor. With this one, you must pass the I2C address to the object during construction.
To include the library and to take care of all the gritty compiler stuff, place the following at the beginning of the sketch before void setup() function.
language:c
#include <SparkFunCCS811.h>

#define CCS811_ADDR 0x5B //Default I2C Address
//#define CCS811_ADDR 0x5A //Alternate I2C Address

CCS811 myCCS811(CCS811_ADDR);
Now functions of the object named myCCS811 can be called to set up and get data, while all the I2C stuff is kept under the hood.
To get the sensor ready during program boot, myCCS811.begin() must be called. Here's an example of the minimal usage of begin.
language:c
void setup()
{
    myCCS811.begin();
}
Then in the main loop() of the program, calls to the sensor functions such as mySensor.readAlgorithmResults() are needed to read the sensor. The following snippet shows a simple check for data by calling the sensor to calculate values, output data, and save the data in variables. However, it doesn't do anything with the data! Check out the examples for fully functional code to make use of the sensor data.
language:c
void loop()
{
  if (myCCS811.dataAvailable())
  {
    myCCS811.readAlgorithmResults();
    int tempCO2 = myCCS811.getCO2();
    int tempVOC = myCCS811.gettVOC();
  }
  else if (myCCS811.checkForStatusError())
  {
    while(1);
  }

  delay(1000); //Wait for next reading
}
The following functions exist for the CCS811 object. Functions with scoped return type CCS811Core::status report an error state as defined in the literals section below. It is optional and can be used to determine success or failure of call.
CCS811Core::status begin( void ) --- This starts wire, checks the ID register, checks for valid app data, starts the app, and establishes a drive mode.
CCS811Core::status readAlgorithmResults( void ) --- Call to cause the sensor to read its hardware and calculate TVOC and eCO2 levels.
bool checkForStatusError( void ) --- Returns true if there is an error pending. This checks the status register.
bool dataAvailable( void ) --- Returns true if a new sample is ready and hasn't been read.
bool appValid( void ) --- Returns true if there is a valid application within the internal CCS811 memory.
uint8_t getErrorRegister( void ) --- Returns the state of the ERROR_ID register.
uint16_t getBaseline( void ) --- Returns the baseline value.
CCS811Core::status setBaseline( uint16_t ) --- Apply a saved baseline to the CCS811.
CCS811Core::status enableInterrupts( void ) --- Enables the interrupt pin for data ready.
CCS811Core::status disableInterrupts( void ) --- Disables the interrupt pin.
CCS811Core::status setDriveMode( uint8_t mode ) --- Sets the drive mode where mode can be 0 through 4:
CCS811Core::status setEnvironmentalData( float relativeHumidity, float temperature ) --- Sets the environmental conditions for compensation.
void setRefResistance( float ) --- If you've changed the thermistor pull-up, call this to give the sensor the new resistor value. Otherwise, it will be 10000.
uint16_t getTVOC( void ) --- Collect the last calculated TVOC value, in parts per billion (ppb).
uint16_t getCO2( void ) --- Collect the last calculated eC02 value, in parts per million (ppm).
float getResistance( void ) --- Collect the last calculated resistance value of the NTC terminals.
float getTemperature( void ) --- Collect the last calculated temperature.
The CCS811 library defines a special data type to deal with error states of functions. In most places, the library can be used without paying attention to the function return types, but here are the values the data type status can hold if they are needed:
language:c
// Return values
typedef enum
{
    SENSOR_SUCCESS,
    SENSOR_ID_ERROR,
    SENSOR_I2C_ERROR,
    SENSOR_INTERNAL_ERROR
    //...
} status;
To avoid the possibility of multiple libraries using the same status name, the enum is actually inside the scope of the CCS811 object, buried in the CCS811Core, which is the base class. Phew, don't worry about that too much; just place CCSCore:: before the status name when you want to use it, and use it like a regular enum (e.g., CCS811Core::status myLocalReturnStatus;). This just tells the compiler that the variable name is in a specific place. You'll also have to add the scope operator to the enum names.
Here's an example that shows how the status enum can be used:
language:c
CCS811Core::status returnCode = mySensor.beginCore();
Serial.print("beginCore exited with: ");
switch ( returnCode )
{
case CCS811Core::SENSOR_SUCCESS:
  Serial.print("SUCCESS");
  break;
case CCS811Core::SENSOR_ID_ERROR:
  Serial.print("ID_ERROR");
  break;
case CCS811Core::SENSOR_I2C_ERROR:
  Serial.print("I2C_ERROR");
  break;
case CCS811Core::SENSOR_INTERNAL_ERROR:
  Serial.print("INTERNAL_ERROR");
  break;
case CCS811Core::SENSOR_GENERIC_ERROR:
  Serial.print("GENERIC_ERROR");
  break;
default:
  Serial.print("Unspecified error.");
}
The library also defines names for CCS811 registers, if you're using direct read and write functions. These are globally scoped and can be used anywhere.
language:c
//Register addresses
#define CSS811_STATUS 0x00
#define CSS811_MEAS_MODE 0x01
#define CSS811_ALG_RESULT_DATA 0x02
#define CSS811_RAW_DATA 0x03
#define CSS811_ENV_DATA 0x05
#define CSS811_NTC 0x06
#define CSS811_THRESHOLDS 0x10
#define CSS811_BASELINE 0x11
#define CSS811_HW_ID 0x20
#define CSS811_HW_VERSION 0x21
#define CSS811_FW_BOOT_VERSION 0x23
#define CSS811_FW_APP_VERSION 0x24
#define CSS811_ERROR_ID 0xE0
#define CSS811_APP_START 0xF4
#define CSS811_SW_RESET 0xFF
For the following examples, which can be found here, we will use our libraries along with a few functions to view our data. Our code's preamble, setup(), and function definitions will all be the same. However, the void loop() will change between the examples. To get started, we first have to initialize our sensors with our preamble, setup(), and loop() as shown below.
language:c
#include <SparkFunBME280.h>
#include <SparkFunCCS811.h>

#define CCS811_ADDR 0x5B //Default I2C Address
//#define CCS811_ADDR 0x5A //Alternate I2C Address

//Global sensor objects
CCS811 myCCS811(CCS811_ADDR);
BME280 myBME280;

void setup()
{
  Serial.begin(9600);
  Serial.println();
  Serial.println("Apply BME280 data to CCS811 for compensation.");

  Wire.begin();//initialize I2C bus

  //This begins the CCS811 sensor and prints error status of .begin()
  CCS811Core::status returnCode = myCCS811.begin();
  if (returnCode != CCS811Core::SENSOR_SUCCESS)
  {
    Serial.println("Problem with CCS811");
    printDriverError(returnCode);
  }
  else
  {
    Serial.println("CCS811 online");
  }

  //Initialize BME280
  //For I2C, enable the following and disable the SPI section
  myBME280.settings.commInterface = I2C_MODE;
  myBME280.settings.I2CAddress = 0x77;
  myBME280.settings.runMode = 3; //Normal mode
  myBME280.settings.tStandby = 0;
  myBME280.settings.filter = 4;
  myBME280.settings.tempOverSample = 5;
  myBME280.settings.pressOverSample = 5;
  myBME280.settings.humidOverSample = 5;

  //Calling .begin() causes the settings to be loaded
  delay(10);  //Make sure sensor had enough time to turn on. BME280 requires 2ms to start up.
  byte id = myBME280.begin(); //Returns ID of 0x60 if successful
  if (id != 0x60)
  {
    Serial.println("Problem with BME280");
  }
  else
  {
    Serial.println("BME280 online");
  }
}
Our void loop will call a few functions that are not included in our libraries, so we must define them after our void loop. Don't worry about defining prototypes, the Arduino IDE does this for us. Paste the below code below your void loop to define the necessary functions to print data and errors.
language:c
void printData()
{
  Serial.print(" CO2[");
  Serial.print(myCCS811.getCO2());
  Serial.print("]ppm");

  Serial.print(" TVOC[");
  Serial.print(myCCS811.getTVOC());
  Serial.print("]ppb");

  Serial.print(" temp[");
  Serial.print(myBME280.readTempC(), 1);
  Serial.print("]C");

  //Serial.print(" temp[");
  //Serial.print(myBME280.readTempF(), 1);
  //Serial.print("]F");

  Serial.print(" pressure[");
  Serial.print(myBME280.readFloatPressure(), 2);
  Serial.print("]Pa");

  //Serial.print(" pressure[");
  //Serial.print((myBME280.readFloatPressure() * 0.0002953), 2);
  //Serial.print("]InHg");

  //Serial.print("altitude[");
  //Serial.print(myBME280.readFloatAltitudeMeters(), 2);
  //Serial.print("]m");

  //Serial.print("altitude[");
  //Serial.print(myBME280.readFloatAltitudeFeet(), 2);
  //Serial.print("]ft");

  Serial.print(" humidity[");
  Serial.print(myBME280.readFloatHumidity(), 0);
  Serial.print("]%");

  Serial.println();
}

void printDriverError( CCS811Core::status errorCode )
{
  switch ( errorCode )
  {
    case CCS811Core::SENSOR_SUCCESS:
      Serial.print("SUCCESS");
      break;
    case CCS811Core::SENSOR_ID_ERROR:
      Serial.print("ID_ERROR");
      break;
    case CCS811Core::SENSOR_I2C_ERROR:
      Serial.print("I2C_ERROR");
      break;
    case CCS811Core::SENSOR_INTERNAL_ERROR:
      Serial.print("INTERNAL_ERROR");
      break;
    case CCS811Core::SENSOR_GENERIC_ERROR:
      Serial.print("GENERIC_ERROR");
      break;
    default:
      Serial.print("Unspecified error.");
  }
}
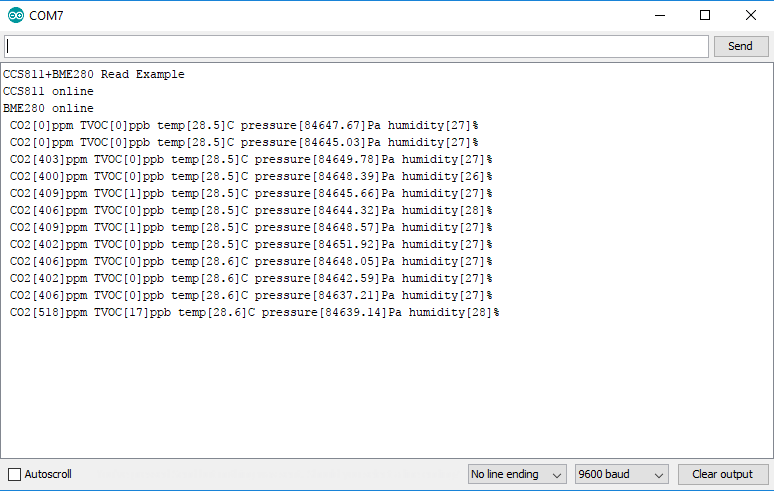
The void loop shown below will get you up and running taking readings of CO2, tVOC(total volatile organic compounds), temperature, pressure, and humidity. Once this sketch is uploaded, open the serial monitor with a baud rate of 9600 to display the air quality data from the sensor.
language:c
void loop()
{
  if (myCCS811.dataAvailable()) //Check to see if CCS811 has new data (it's the slowest sensor)
  {
    myCCS811.readAlgorithmResults(); //Read latest from CCS811 and update tVOC and CO2 variables
    //getWeather(); //Get latest humidity/pressure/temp data from BME280
    printData(); //Pretty print all the data
  }
  else if (myCCS811.checkForStatusError()) //Check to see if CCS811 has thrown an error
  {
    Serial.println(myCCS811.getErrorRegister()); //Prints whatever CSS811 error flags are detected
  }

  delay(2000); //Wait for next reading
}
The output of this example should look something like the photo below.
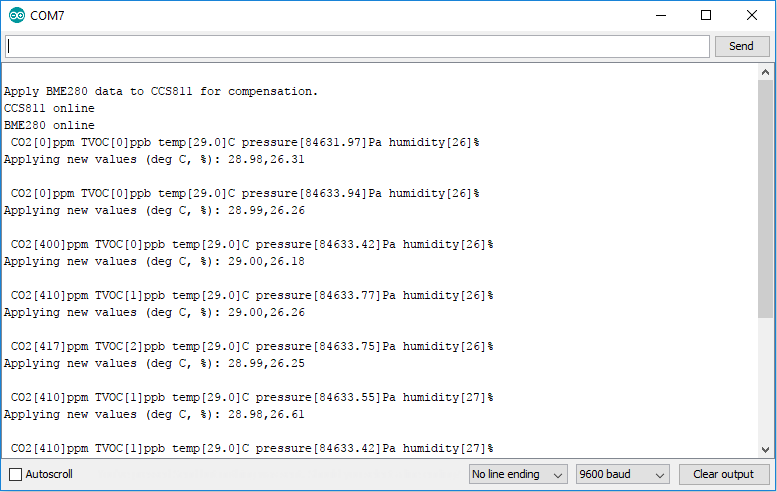
The void loop shown below will get you started taking calibrated readings from the CCS811. When humidity and temperature are known by the CCS811, it is able to refine it's tVOC and CO2 readings. This sketch feeds the temperature and humidity from the BME280 to the CCS811 in order to attain greater accuracy.
language:c
void loop()
{
  //Check to see if data is available
  if (myCCS811.dataAvailable())
  {
    //Calling this function updates the global tVOC and eCO2 variables
    myCCS811.readAlgorithmResults();
    //printData fetches the values of tVOC and eCO2
    printData();

    float BMEtempC = myBME280.readTempC();
    float BMEhumid = myBME280.readFloatHumidity();

    Serial.print("Applying new values (deg C, %): ");
    Serial.print(BMEtempC);
    Serial.print(",");
    Serial.println(BMEhumid);
    Serial.println();

    //This sends the temperature data to the CCS811
    myCCS811.setEnvironmentalData(BMEhumid, BMEtempC);
  }
  else if (myCCS811.checkForStatusError())
  {
    Serial.println(myCCS811.getErrorRegister()); //Prints whatever CSS811 error flags are detected
  }

  delay(2000); //Wait for next reading
}
The output for this example is shown below.
Now that you've successfully got your CCS811+BME280 combo board working and taking air quality readings, it's time to incorporate it into your own project!
For more information on the CCS811 or BME280, check out the resources below:
Need some inspiration for your next project? Check out some of these related tutorials:
Let us know how you use your air quality sensor!
learn.sparkfun.com | CC BY-SA 3.0 | SparkFun Electronics | Niwot, Colorado