AS726X NIR/VIS Spectral Sensor Hookup Guide
 Englandsaurus
Example Code
Example 1 --- Basic Readings
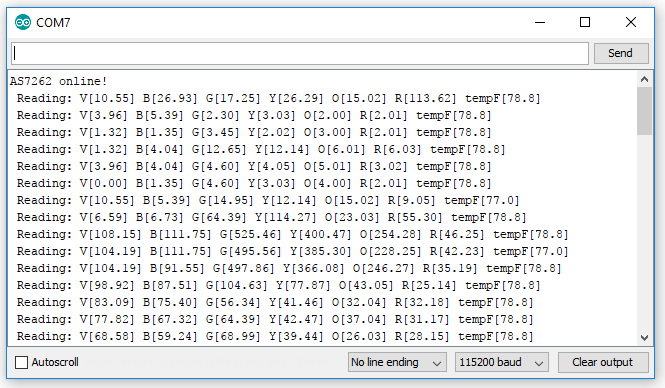
The below sketch will get you up and running taking calibrated spectral readings on all 6 channels. Once this sketch is uploaded, open the serial monitor with a baud rate of 115200 to display the spectral data from the sensor.
language:c
#include "AS726X.h"

AS726X sensor;

void setup() {
  Wire.begin();
  Serial.begin(115200);

  sensor.begin();
}

void loop() {
  sensor.takeMeasurements();
  //Prints all measurements
  if (sensor.getVersion() == SENSORTYPE_AS7262)
  {
    //Visible readings
    Serial.print(" Reading: V[");
    Serial.print(sensor.getCalibratedViolet(), 2);
    Serial.print("] B[");
    Serial.print(sensor.getCalibratedBlue(), 2);
    Serial.print("] G[");
    Serial.print(sensor.getCalibratedGreen(), 2);
    Serial.print("] Y[");
    Serial.print(sensor.getCalibratedYellow(), 2);
    Serial.print("] O[");
    Serial.print(sensor.getCalibratedOrange(), 2);
    Serial.print("] R[");
    Serial.print(sensor.getCalibratedRed(), 2);
  }
  else if (sensor.getVersion() == SENSORTYPE_AS7263)
  {
    //Near IR readings
    Serial.print(" Reading: R[");
    Serial.print(sensor.getCalibratedR(), 2);
    Serial.print("] S[");
    Serial.print(sensor.getCalibratedS(), 2);
    Serial.print("] T[");
    Serial.print(sensor.getCalibratedT(), 2);
    Serial.print("] U[");
    Serial.print(sensor.getCalibratedU(), 2);
    Serial.print("] V[");
    Serial.print(sensor.getCalibratedV(), 2);
    Serial.print("] W[");
    Serial.print(sensor.getCalibratedW(), 2);
   }

  Serial.print("] tempF[");
  Serial.print(sensor.getTemperatureF(), 1);
  Serial.print("]");

  Serial.println();
}
If we want, we can change the gain, measurement mode, and Wire that I2C uses by calling the begin() function with a few arguments. First, let's look at what values we can assign to which characteristic.
Example 2 --- Sensor Settings
The below example code will initialize our sensor with a gain of 16x, measurement mode of 0, and our regular I2C port (you can run the sensor on a different I2C port if you have the right hardware, a Teensy perhaps?).
language:c
#include "AS726X.h"
AS726X sensor;//Creates the sensor object
byte GAIN = 0;
byte MEASUREMENT_MODE = 0;

void setup() {
  Wire.begin();
  Serial.begin(115200);

  sensor.begin(Wire, GAIN, MEASUREMENT_MODE);//Initializes the sensor with non default values
}

void loop() {
  sensor.takeMeasurements();

  if (sensor.getVersion() == SENSORTYPE_AS7262)
   {
    //Visible readings
    Serial.print(" Reading: V[");
    Serial.print(sensor.getCalibratedViolet(), 2);
    Serial.print("] B[");
    Serial.print(sensor.getCalibratedBlue(), 2);
    Serial.print("] G[");
    Serial.print(sensor.getCalibratedGreen(), 2);
    Serial.print("] Y[");
    Serial.print(sensor.getCalibratedYellow(), 2);
    Serial.print("] O[");
    Serial.print(sensor.getCalibratedOrange(), 2);
    Serial.print("] R[");
    Serial.print(sensor.getCalibratedRed(), 2);
  }
  else if (sensor.getVersion() == SENSORTYPE_AS7263)
  {
    //Near IR readings
    Serial.print(" Reading: R[");
    Serial.print(sensor.getCalibratedR(), 2);
    Serial.print("] S[");
    Serial.print(sensor.getCalibratedS(), 2);
    Serial.print("] T[");
    Serial.print(sensor.getCalibratedT(), 2);
    Serial.print("] U[");
    Serial.print(sensor.getCalibratedU(), 2);
    Serial.print("] V[");
    Serial.print(sensor.getCalibratedV(), 2);
    Serial.print("] W[");
    Serial.print(sensor.getCalibratedW(), 2);
  }

  Serial.print("] tempF[");
  Serial.print(sensor.getTemperatureF(), 1);
  Serial.print("]");

  Serial.println();
}
Expected Output
Here is a picture of what to expect when bringing your AS726X online for either of the above sketches. (The program will print "AS7263 online!" instead if you have that sensor)