Spectacle Light and Sound Kit Hookup Guide
 SFUptownMaker
Introduction
The Spectacle Light and Sound Kit allows you to add button-activated sound and light effects to your projects with ease.
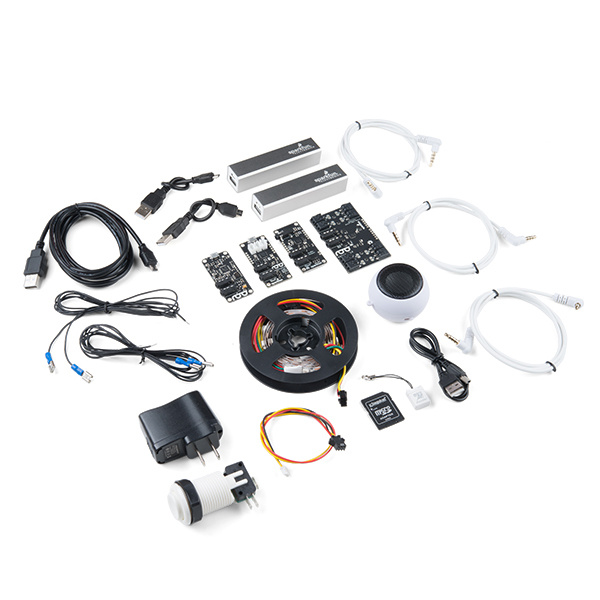
Spectacle Light and Sound Kit
KIT-14486Suggested Reading
Before proceeding, you should read through the Spectacle User's Guide. It will give you the basics you'll need to know about how Spectacle works to follow the rest of this tutorial.
Spectacle Audio Board
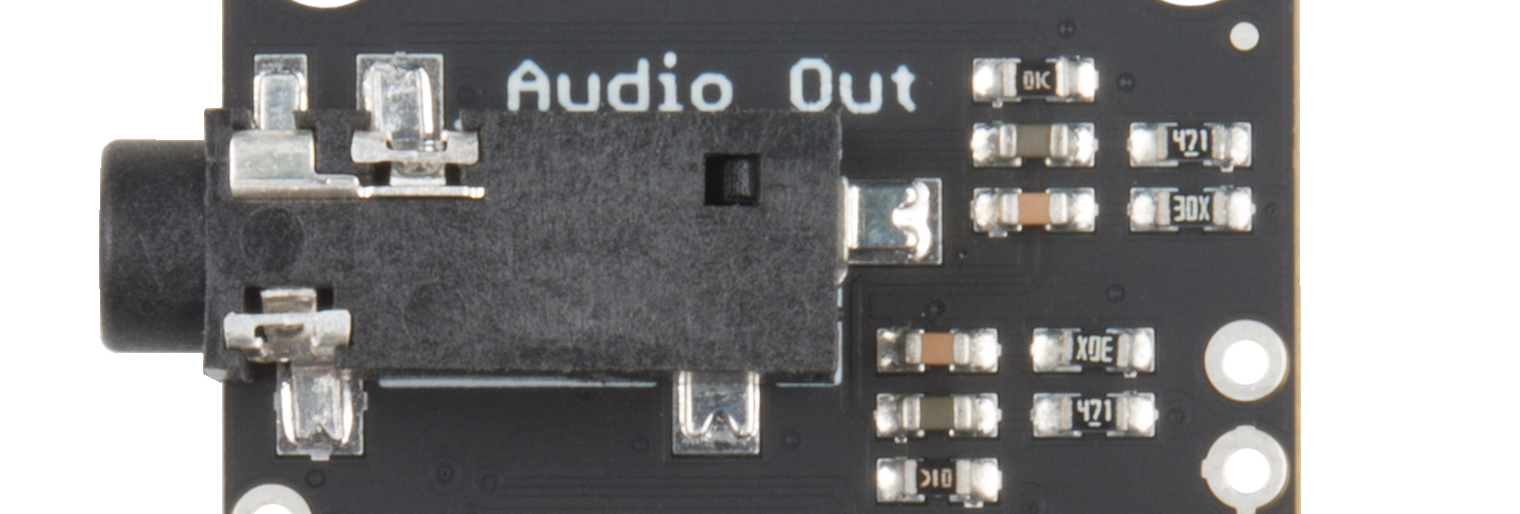
The Spectacle Audio Board allows you to add sound to your Spectacle projects. It accepts a microSD card with sounds in .ogg format (more on this later), and has a 1/8" (3.5mm) audio jack to connect to external amplifiers.
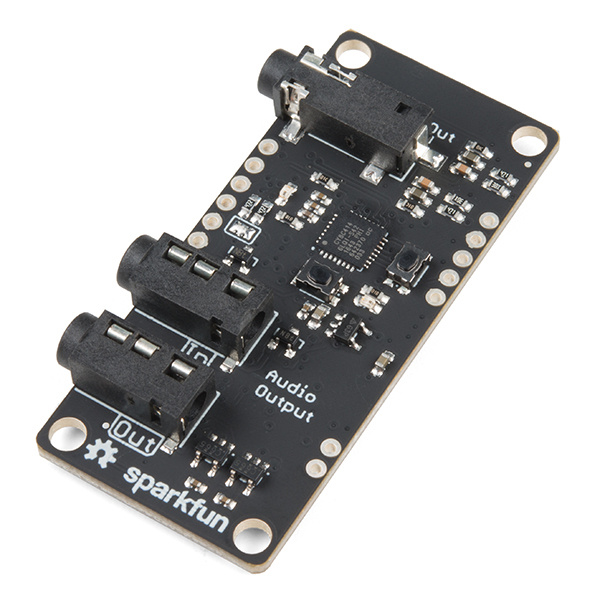
Spectacle Audio Board
DEV-14034tl;dr (essentials)
- Audio files for Spectacle should be formatted as .ogg files.
- Audio files should have names 00.ogg, 01.ogg, 02.ogg, etc.
- The audio jack on the Audio Board produces output suitable for amplification only. It is not suited to headphones or unpowered speakers.
Meet the Spectacle Audio Board
Designed to be a low-cost and easy to use method of adding sound to projects, the Spectacle Audio Board integrates with the rest of the Spectacle ecosystem to provide sound effects on demand.
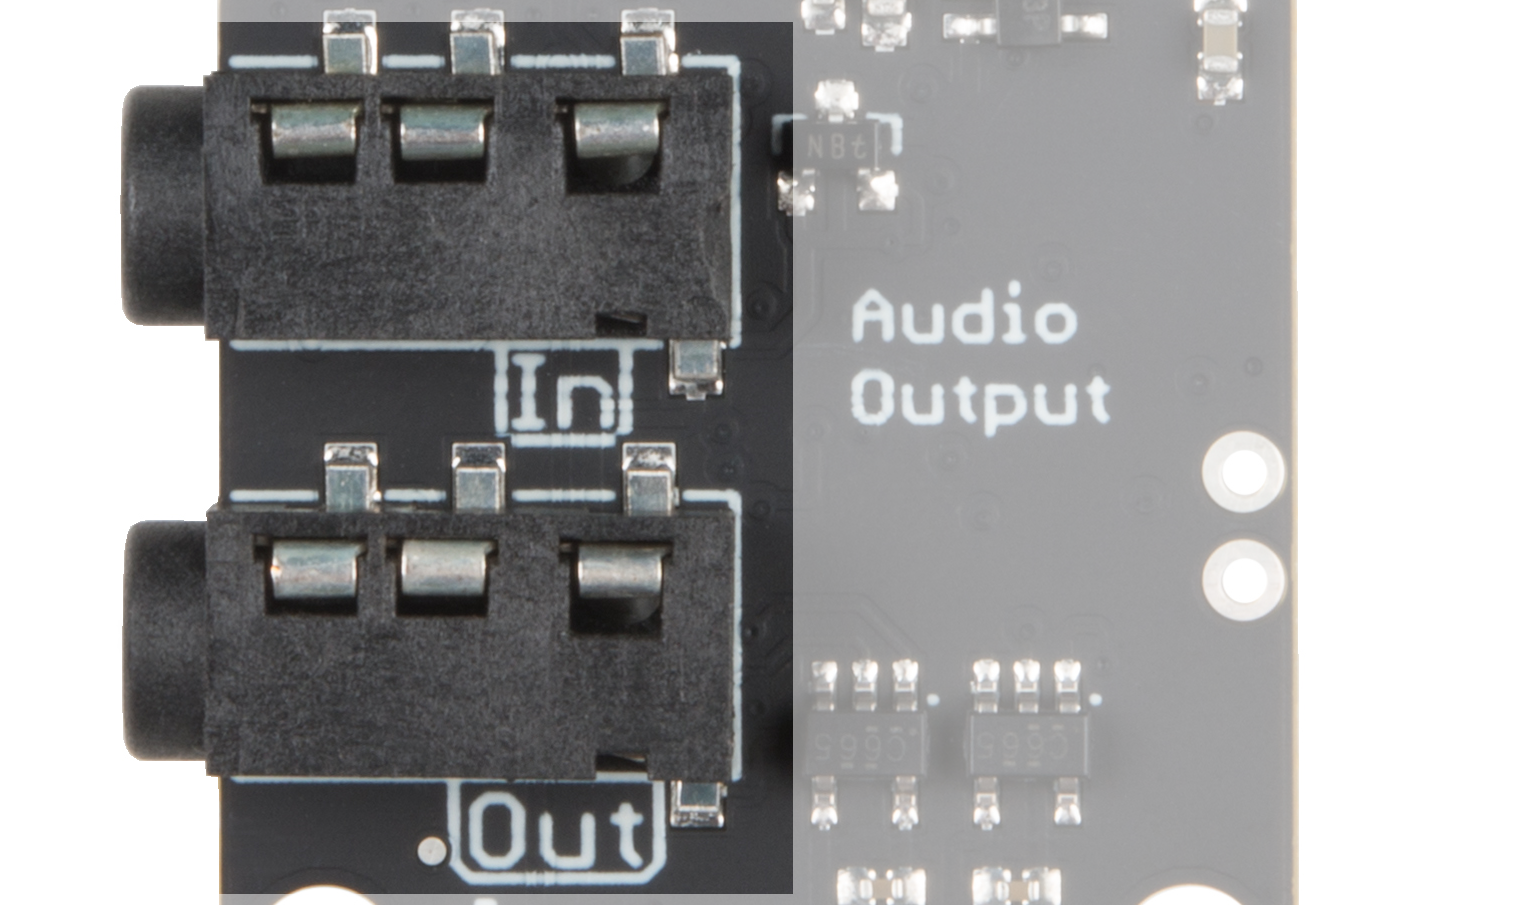
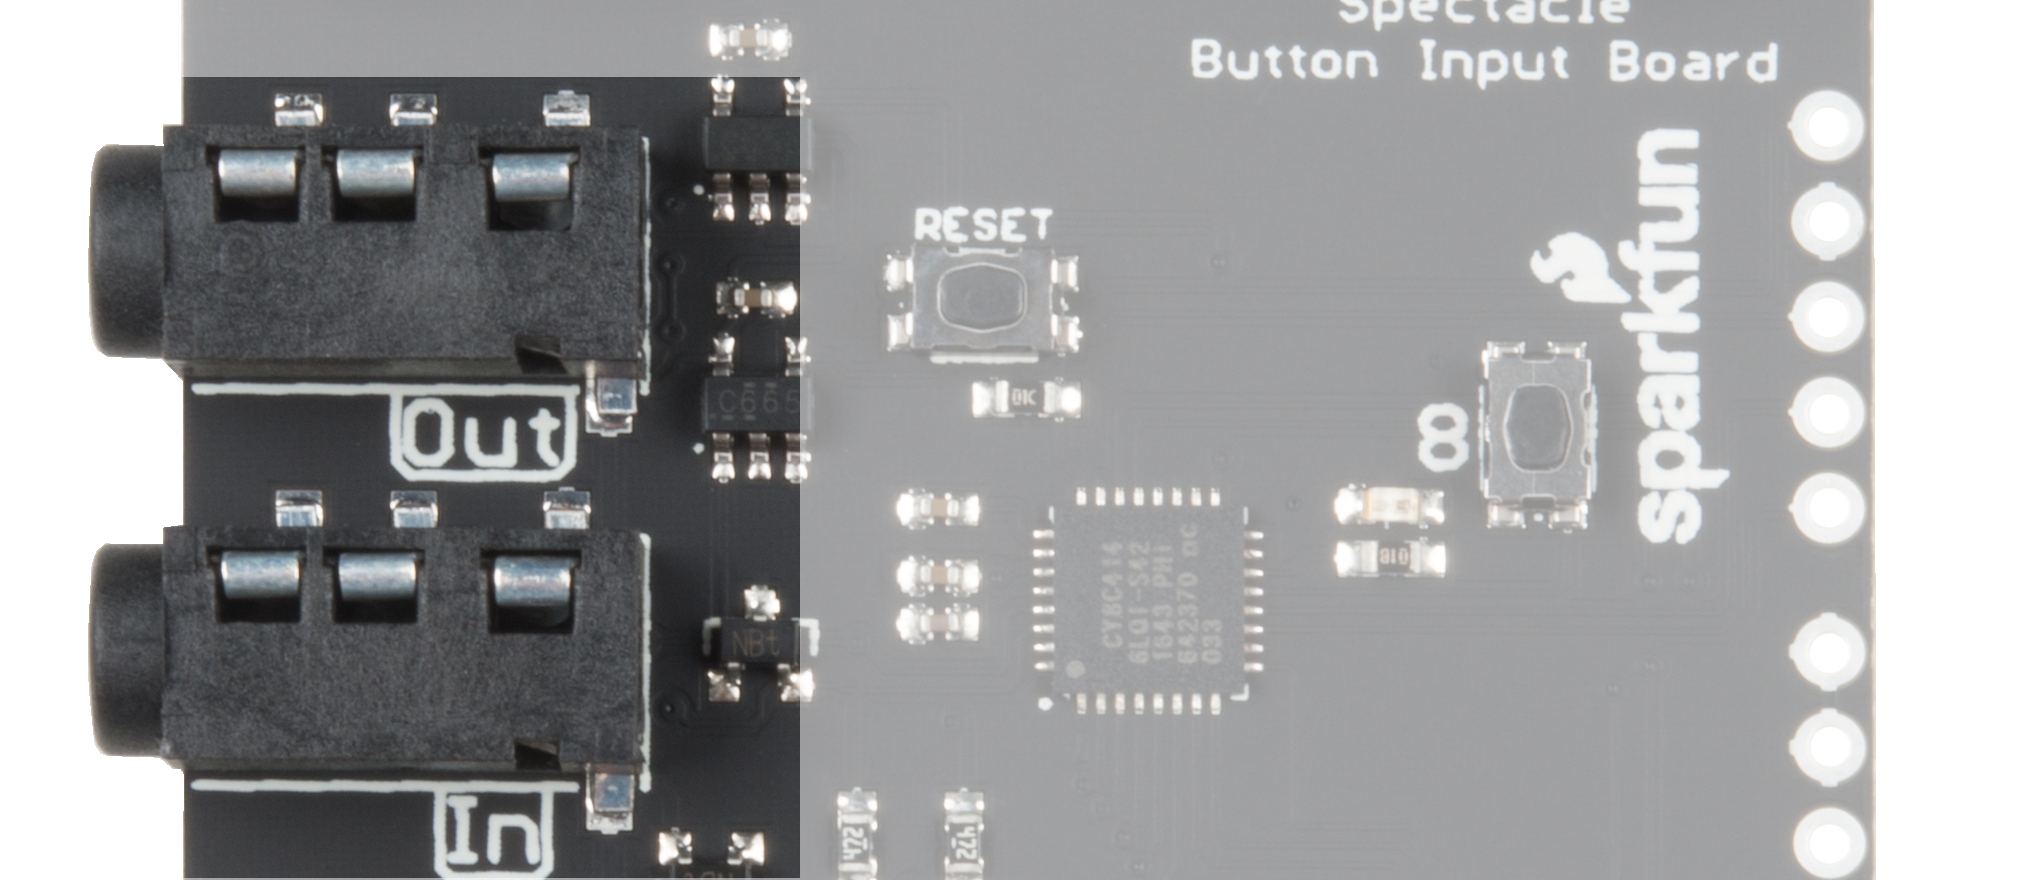
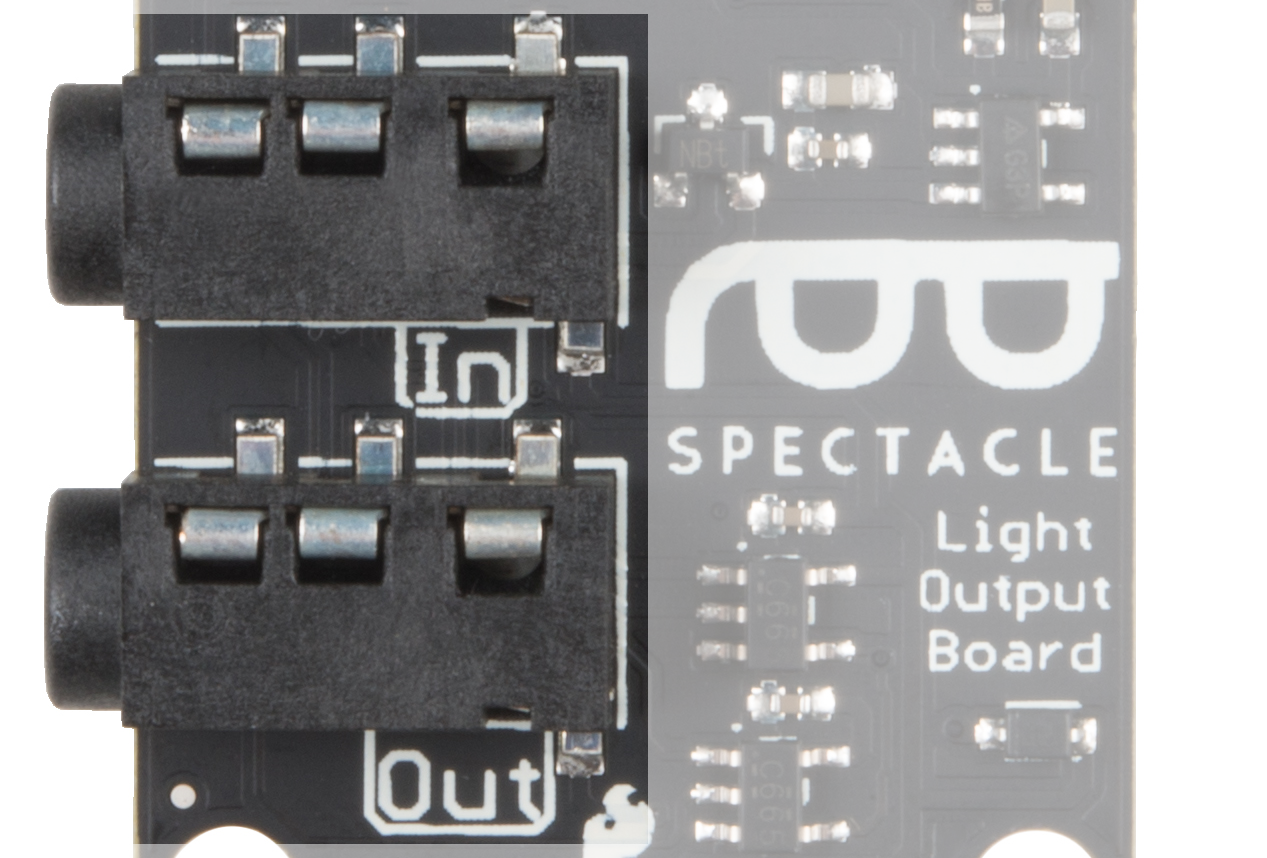
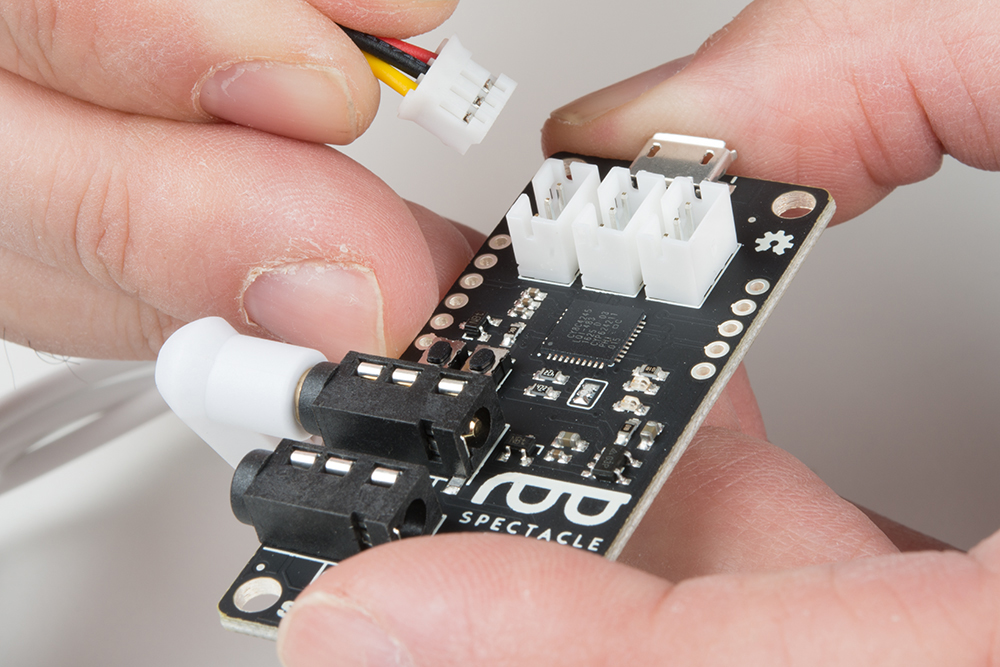
It has three 1/8" (3.5mm) jacks: two for Spectacle control signals and one for the audio output. Be certain you are plugging cables into the right jacks! Plugging an audio device into one of the Spectacle jacks could cause damage to the audio device. Note that the Spectacle data jacks are directional: the one marked "In" should be plugged into the "upstream" board (i.e., closer to the Director Board than this one) and the one marked "Out" connects to the next downstream board. The "Out" jack is not for audio signals.
The audio output is designed for amplified devices only. This means that any attempt to use the Spectacle Audio Board with headphones or unamplified speakers will fail to produce audible output. SparkFun sells a small, amplified, rechargeable speaker which is specifically intended for use with the Spectacle Audio Board.
The Spectacle Audio Board uses a microSD card to store the audio files to be played. The files should be stored as .ogg Vorbis encoded files. This free audio file format can be played and created on any type of computer. Later in the tutorial we'll show you how to convert from MP3, WAV, or other file formats to the .ogg format.
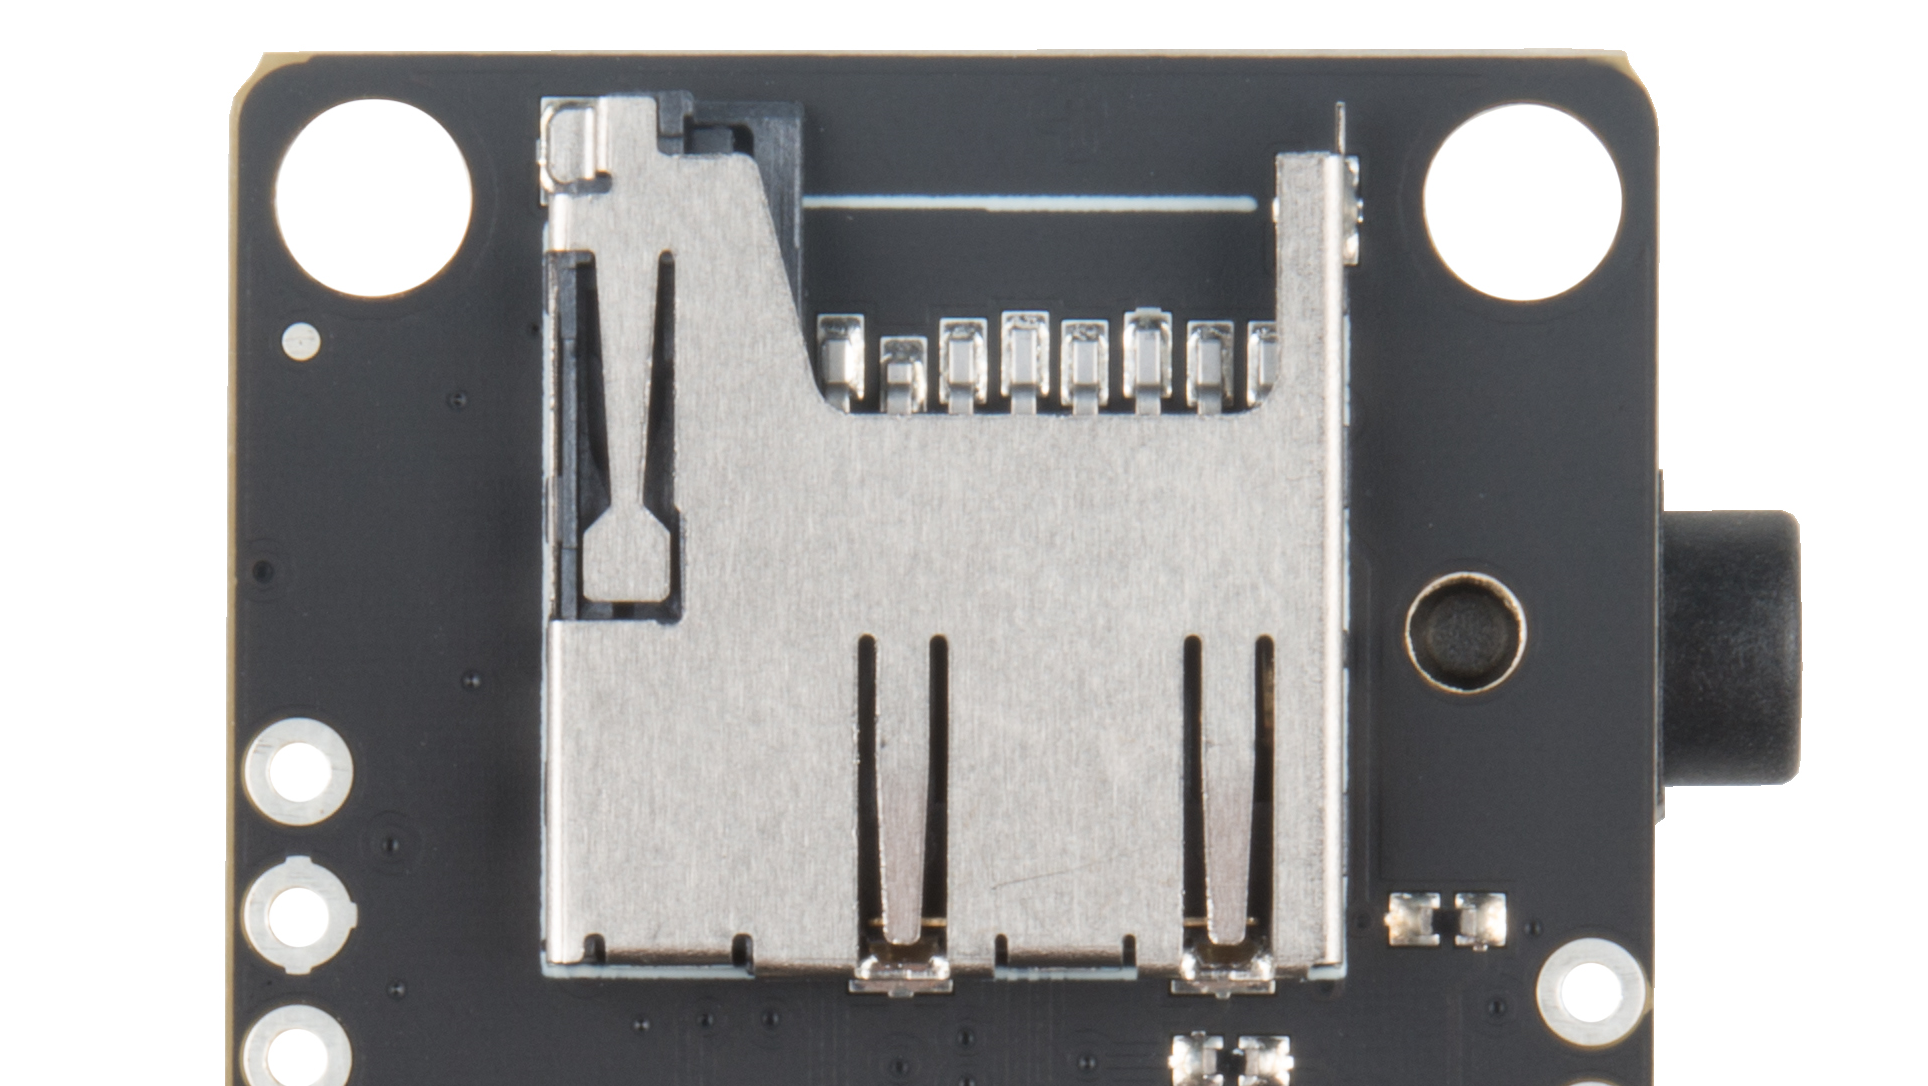
The files must be named by number, which is how they will be referred to from within the configuration application. Filename examples are 00.ogg, 01.ogg, 02.ogg, and so forth.
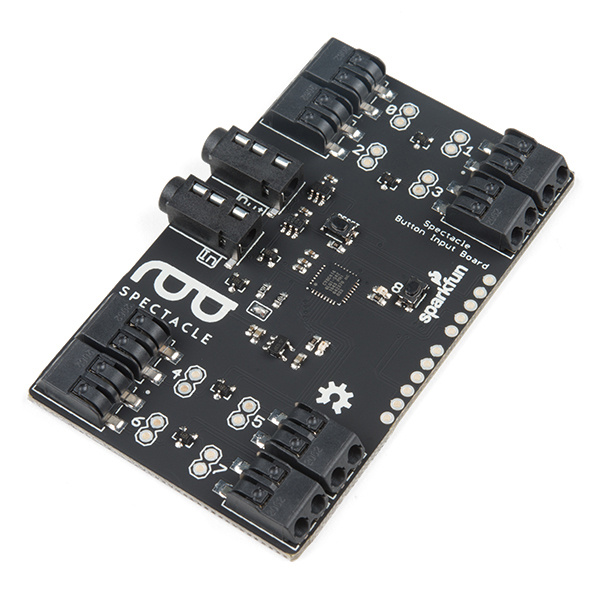
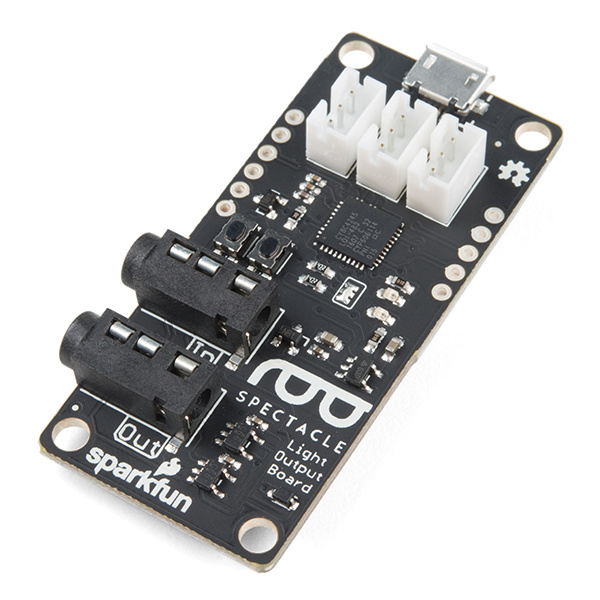
Spectacle Button Board
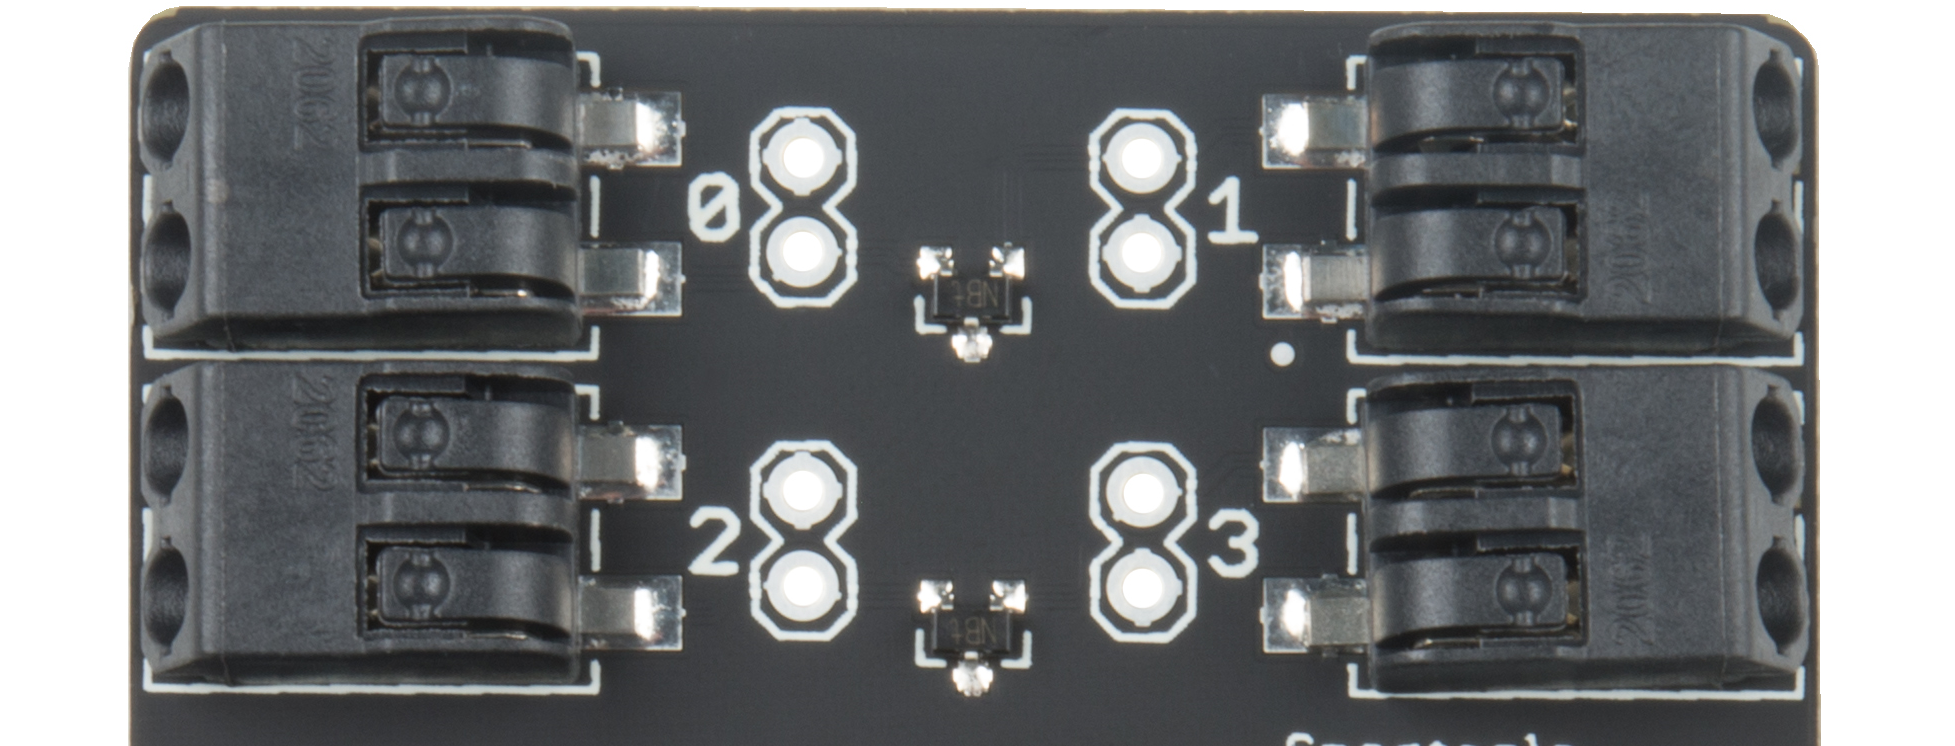
The Spectacle Button Board allows you to add input from buttons or switches to your Spectacle projects. It has a total of 9 signal inputs, eight of which can come from external buttons and one button directly on the board.
Spectacle Button Board
DEV-14044tl;dr
- Buttons or switches can be connected to the board by pushing wires into the "poke home" type connectors on the board.
- Up to nine signals are available.
- Button signals can be either momentary or continuous.
Meet the Spectacle Button Board
Designed to bring simple signals from the world into your Spectacle projects, the Spectacle Button Board provides input for any of your Spectacle projects.
It has two 1/8" (3.5mm) jacks for connecting to other boards in a Spectacle system. Note that the Spectacle data jacks are directional: the one marked "In" should be plugged into the "upstream" board (i.e., closer to the Director Board than this one) and the one marked "Out" connects to the next downstream board.
There are 8 "poke home" connectors on the Button Board. Each one can be connected to one (or more) buttons. To add a connection, simply push the stripped end of a wire into the hole on the connector. The connector will automatically grab on and hold the wire in place. If you need to remove the wire later, an small object (bobby pin, ballpoint pen, etc.) can be used to depress the release button, allowing the wire to be extracted without damage.
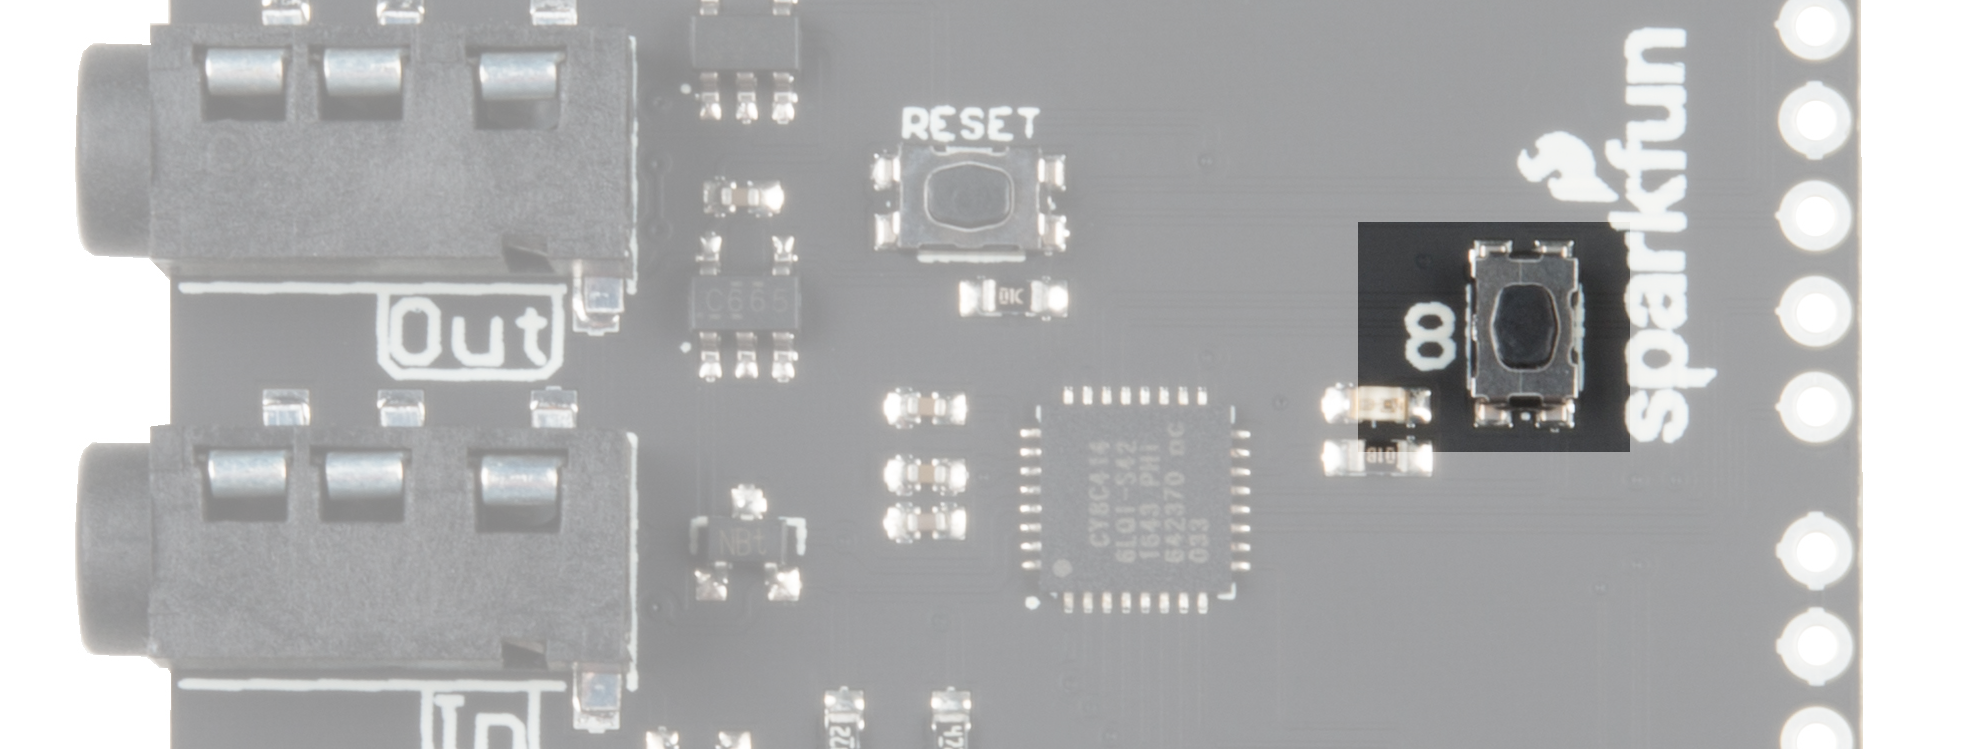
There is an input button on the button board itself which can be used to provide an input signal if no other buttons are available. It functions like any other normal button that might be attached. Be certain you're pressing the button labeled '8' and not the one labeled 'Reset'! Pressing the reset button will reset your button board, probably causing your entire system to stop working properly until you reset your Director Board!
Spectacle Light Board
The Spectacle Light Board allows you to add some fairly complex lighting effects to your Spectacle projects. It has connections for up to three strands of addressable LEDs and a connector for external power.
Spectacle Light Board
DEV-14052tl;dr
- If more than approximately 10 pixels will be on at once, we recommend powering the Light Board through the onboard micro-B USB port.
- For smaller numbers of pixels, it is possible to power them directly over the Spectacle control cable.
- Most of the LED effects want a continuous type signal, such as the Button board "Latch On/Latch Off" function.
- Only WS2812 (NeoPixel) type addressable LED strips will work with the Spectacle Light Board.
Meet the Spectacle Light Board
Designed to make it easy to add relatively complex lighting effects to your Spectacle projects, the Spectacle Light Board integrates with the rest of the Spectacle ecosystem to allow you to control lighting effects relatively effortlessly.
It has two 1/8" (3.5mm) jacks for Spectacle control signals. Pay attention to the directionality of the jacks! The one labeled "In" should be plugged into a board that is closer to the Director Board than the Light Board is, or into the Director Board itself.
The Light Board supports up to three strands of addressable LEDs. Each strand can have up to 60 individual pixels. Not all types of addressable LEDs are compatible with the Spectacle Light Board. If you have questions about whether or not a particular type of LED strip is compatible with the Light Board, contact SparkFun technical support.

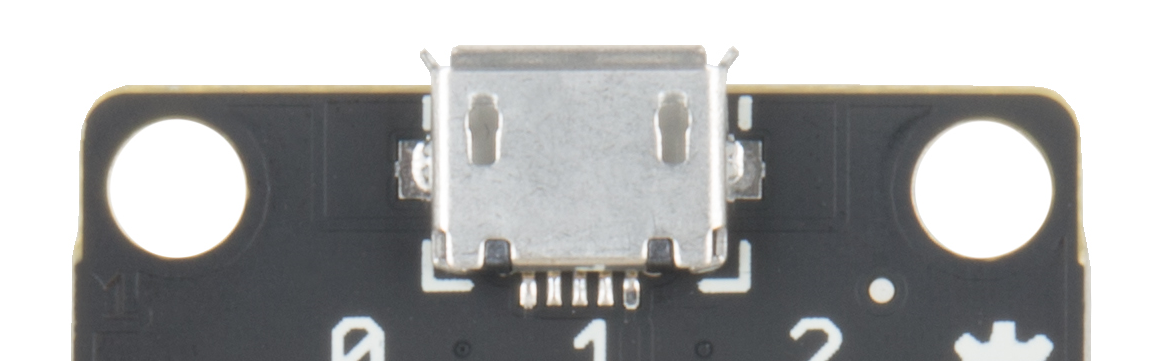
The Light Board has a Micro B USB connector to allow it to be directly powered by an external power supply. The relatively slender cables the Spectacle data travels over are not adequate for the large amount of current drawn by more than a few pixels.
The Configuration Utility
Spectacle Audio Board
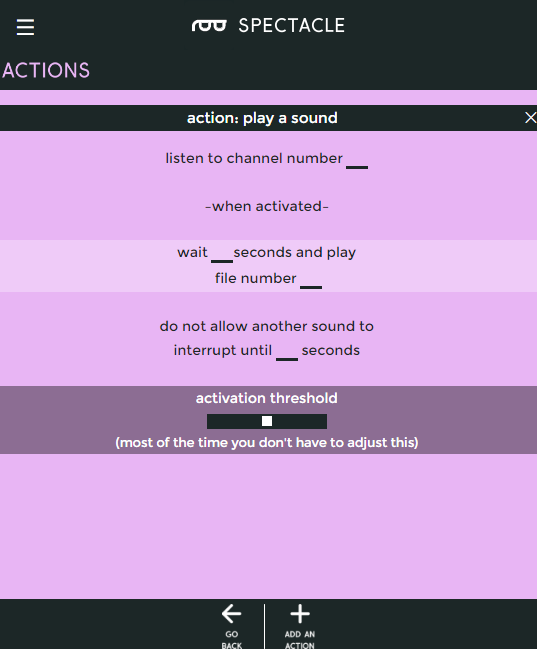
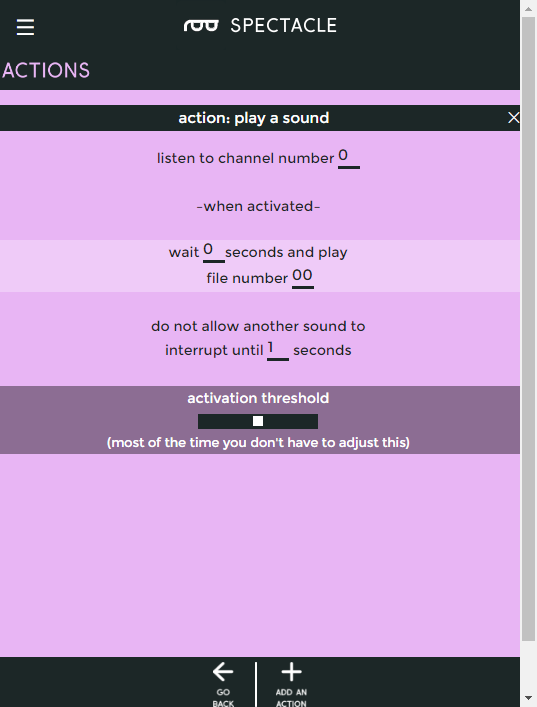
The Spectacle Audio Board only supports one action: Play Sound. As you can see above, there are a number of settings associated with this action.
- "listen to channel number __" - This is the channel number which triggers the audio to start playing. As long as this channel's value is above the threshold level (see below), the sound will repeat playing at a rate determined by the two time intervals specified lower down.
- "wait __ seconds and play" - This is the first delay in the system. You can sequence events however you see fit by delaying when a sound plays.
- "file number __" - This is where you tell the board which file to play. Remember, when copying the audio files to the microSD card, they should be named as 00.ogg, 01.ogg, 02.ogg, etc. The number in this field corresponds to the number in the name of the audio file. If there is no audio file with the corresponding number, no sound will play.
- "do not allow another sound to interrupt until __ seconds" - The number in this field should correspond to the length of the audio file. If this value is less than the length of the sound file, another trigger sent to the audio board will interrupt the sound before it finishes. If it is longer than the sound, there will be a period of silence after playback before another playback can be initiated.
- "activation threshold" - As it says in the app, most of the time you don't need to adjust this. Adjusting the slider can set the angle at which the Spectacle Accelerometer Board triggers a sound, or the frequency with which a Random Trigger Virtual Board causes a sound to play.
Spectacle Button Board
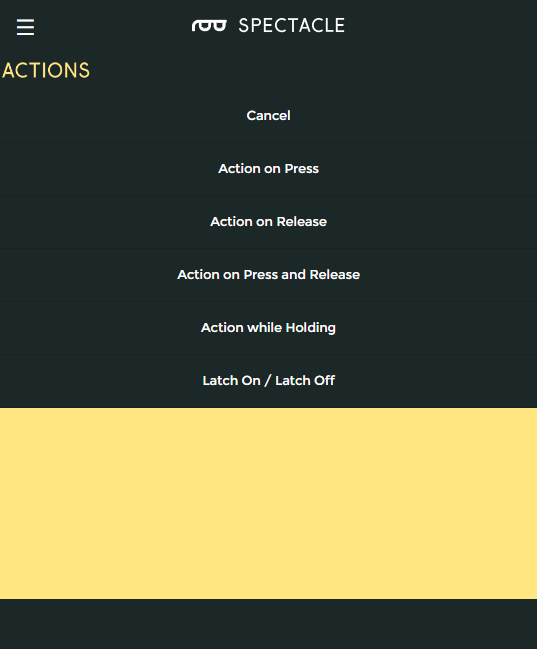
For the Button board, there are five options: three which produce a momentary pulse type output and two that produce a continuous switch type output.
Action on press
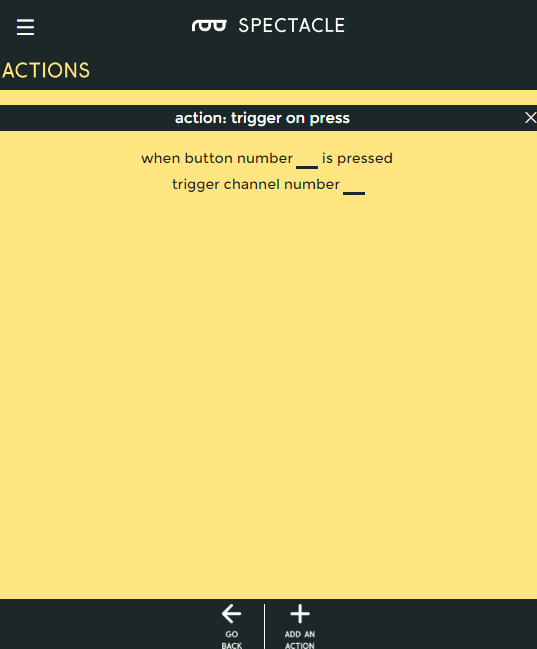
Trigger an action when a button is first pressed, regardless of how long it is subsequently held down.
- "When button number __ is pressed" - This is the number of the button we wish to assign to this action. The button numbers are printed on the board, and run from 0 through 8.
- "trigger channel number __" - A single, momentary pulse will be sent out on this channel. It is suitable for starting a sound, initiating a motion, or setting the color of a light strip. This feature is not intended for continuous sound playback or for turning on a light strip effect.
Action on release
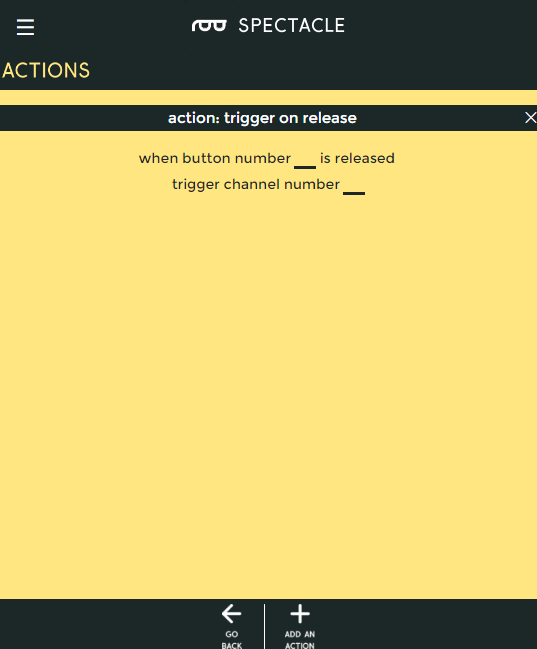
Trigger an action when a button is released, regardless of how long it has been held down prior to being released.
- "When button number __ is released" - This is the number of the button we wish to assign to this action. The button numbers are printed on the board, and run from 0 through 8.
- "trigger channel number __" - A single, momentary pulse will be sent out on this channel. It is suitable for starting a sound, initiating a motion, or setting the color of a light strip, but not for continuous sound playback or for turning on a light strip effect, for instance.
Action on press or release

Trigger an action when a button is pressed, then trigger the same action again when the button is released.
- "When button number __ is either pressed or released" - This is the number of the button we wish to assign to this action. The button numbers are printed on the board, and run from 0 through 8.
- "trigger channel number __" - A single, momentary pulse will be sent out on this channel both at the time the button is pressed and at the time it is released. It is suitable for starting a sound, initiating a motion, or setting the color of a light strip, but not for continuous sound playback or for turning on a light strip effect, for instance.
Action while holding
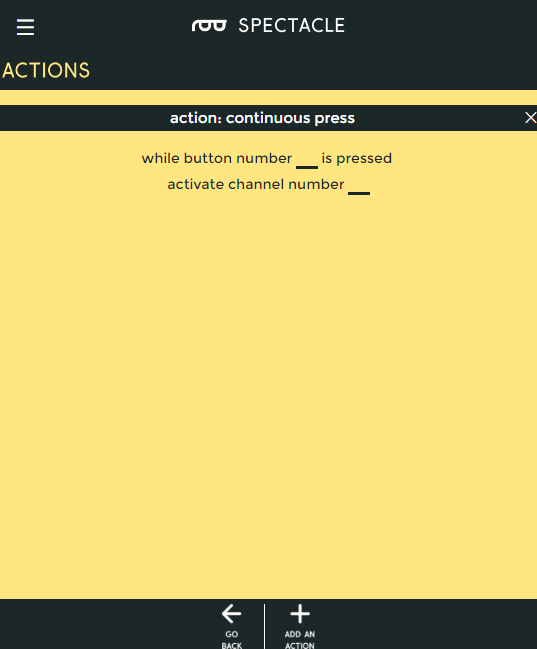
Trigger an event as soon as a button is pressed, then continue to trigger that event as long as the button is held down.
- "While button number __ is pressed" - This is the number of the button we wish to assign to this action. The button numbers are printed on the board, and run from 0 through 8.
- "activate channel number __" - A continuous will be sent out on this channel. It is suitable for triggering and repeating a sound, or for turning on and keeping on (at least, while the button is held) a lighting effect.
Latch On/Latch Off
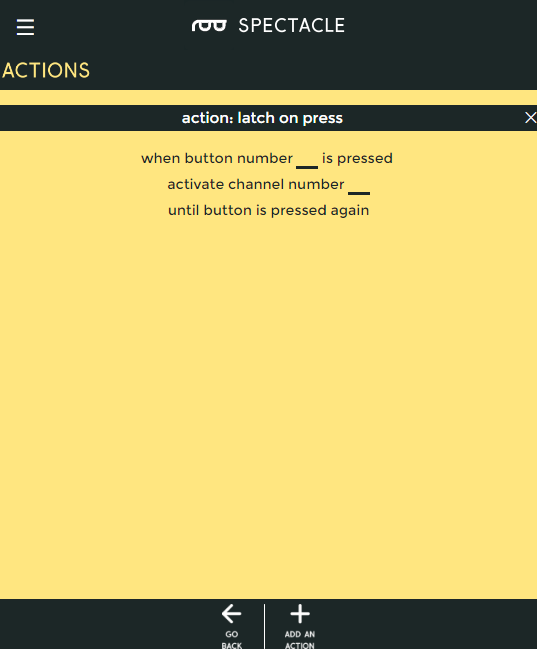
This action is like a latching power switch. One press turns the signal on, another later press turns the signal off.
- "While button number __ is pressed" - This is the number of the button we wish to assign to this action. The button numbers are printed on the board, and run from 0 through 8.
- "activate channel number __ until button is pressed again" - A continuous will be sent out on this channel. It is suitable for triggering and repeating a sound, or for turning on and keeping on a lighting effect.
Spectacle Light Board
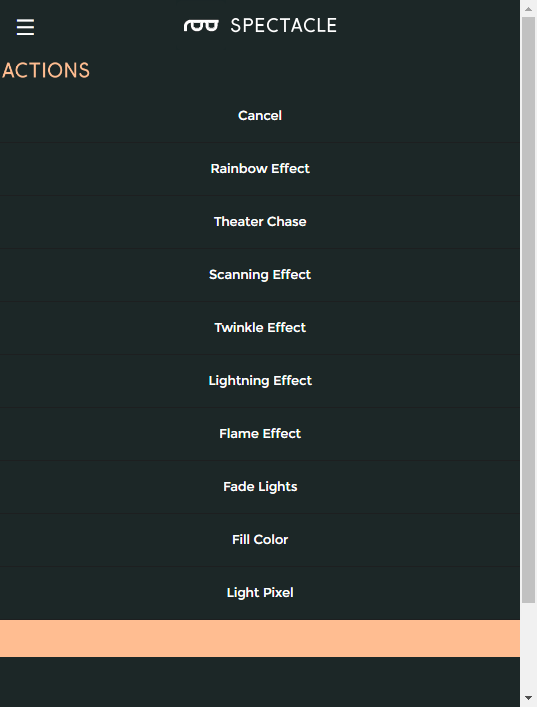
The Light Board supports 9 different actions. Most of them want a continuous-type signal input, although a couple of them can be used with momentary input signals. We'll cover the difference under each action. Each action will have a field for the number of pixels the lightstrip that action is being applied to has, and we won't mention it again.
Rainbow Effect
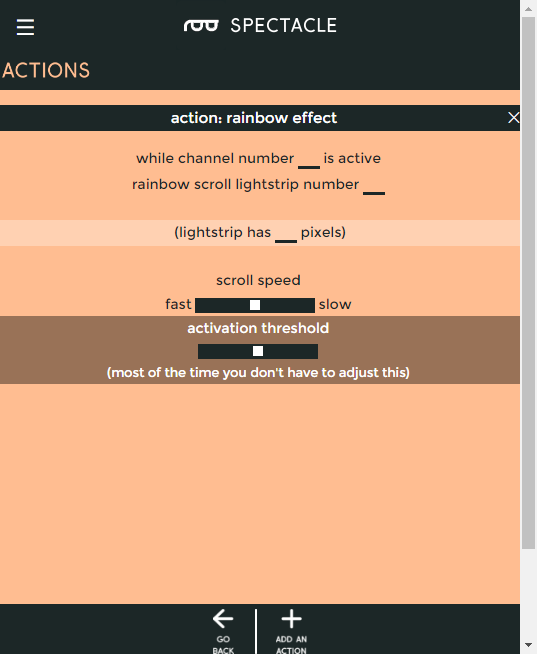
The rainbow effect displays a rainbow of colors across the strip, changing the color of each pixel indvidually to make it appear as though the rainbow is scrolling along the lightstrip.
- "While channel number __ is active" - The rainbow effect persists only while the channel is active, so a continuous input signal is needed.
- "rainbow scroll lightstrip number __" - Select which lightstrip you wish the rainbow effect to operate on. To have the same effect on multiple lightstrips, you must create multiple actions.
- scroll speed slider - controls how fast the pattern moves as it scrolls past.
Theater chase
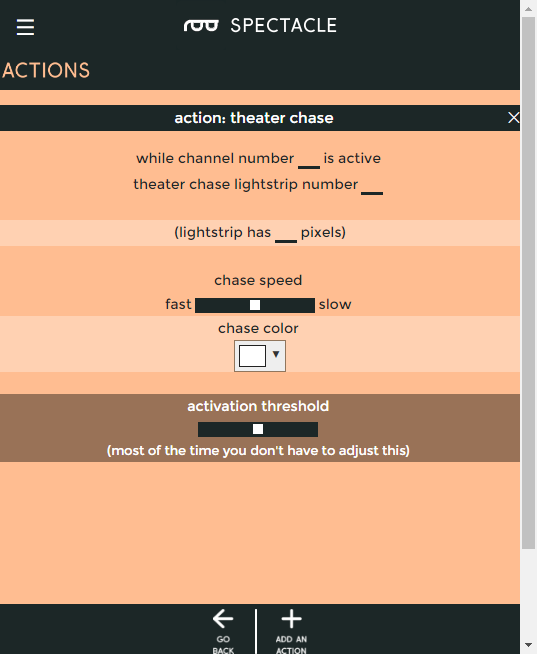
Theater chase mode behaves like a marquee light border. The lights will march along making it appear as though the lightstrip is moving in steps.
- "While channel number __ is active" - The theater chase effect persists only while the channel is active, so a continuous input signal is needed.
- "theater chase lightstrip number __" - Select which lightstrip you wish the theater chase effect to operate on. To have the same effect on multiple lightstrips, you must create multiple actions.
- chase speed slider - controls how fast the pattern moves as it scrolls past.
- color picker input - allows you to select the color of the lights.
Scanning effect
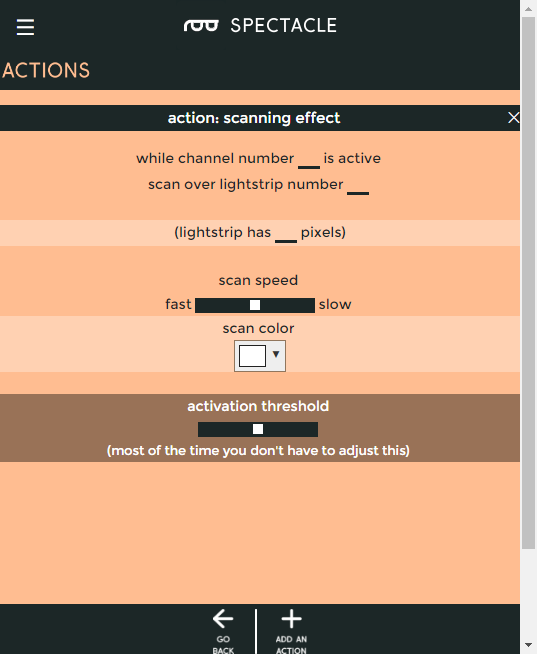
Scanning mode sees a small group of lights bouncing back and forth along the length of the lightstrip, reminiscent of Cylons from Battlestar Galactica.
- "While channel number __ is active" - The scanning effect persists only while the channel is active, so a continuous input signal is needed.
- "scan lightstrip number __" - Select which lightstrip you wish the scanning effect to operate on. To have the same effect on multiple lightstrips, you must create multiple actions.
- scan speed slider - controls how fast the pattern moves as it scrolls past.
- color picker input - allows you to select the color of the lights.
Twinkle effect

Causes individual lights on the selected strip to perform a twinkling action.
- "While channel number __ is active" - The twinkle effect persists only while the channel is active, so a continuous input signal is needed.
- "twinkle lightstrip number __" - Select which lightstrip you wish the twinkle effect to operate on. To have the same effect on multiple lightstrips, you must create multiple actions.
- color picker input - allows you to select the color of the lights.
- speed slider - controls how fast the twinkles are moves as it scrolls past.
- magic slider - controls how magical the twinkles are. Play with it!
Lightning effect
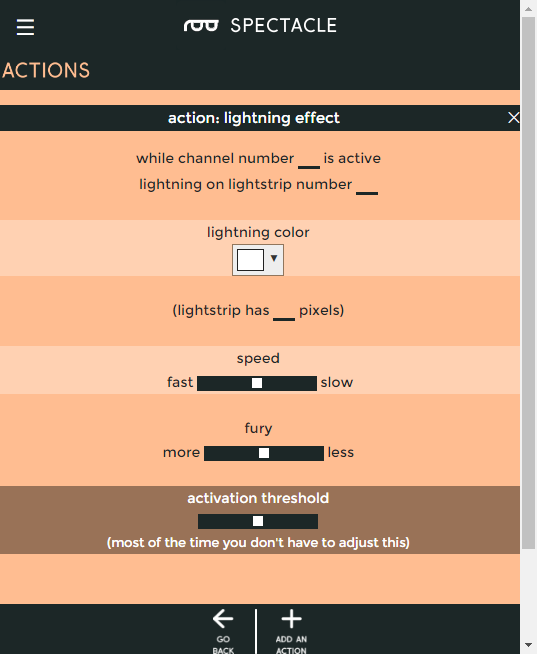
Causes the entire strip to strobe in a manner that looks a lot like a lightning flash.
- "While channel number __ is active" - The lightning effect persists only while the channel is active, so a continuous input signal is needed.
- "lightning on lightstrip number __" - Select which lightstrip you wish the lightning effect to operate on. To have the same effect on multiple lightstrips, you must create multiple actions.
- color picker input - allows you to select the color of the lights.
- speed slider - controls how often the lightning strike occur moves as it scrolls past.
- fury slider - controls how furious the lightning is. Play with it!
Flame effect
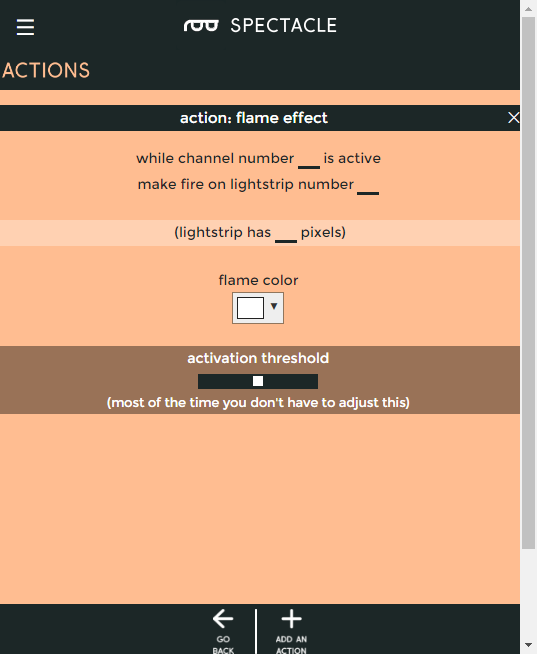
Causes the entire strip to crackle like a fire.
- "While channel number __ is active" - The flame effect persists only while the channel is active, so a continuous input signal is needed.
- "make fire on lightstrip number __" - Select which lightstrip you wish the flame effect to operate on. To have the same effect on multiple lightstrips, you must create multiple actions.
- color picker input - allows you to select the color of the lights. Experiment with different colors!
Fade effect
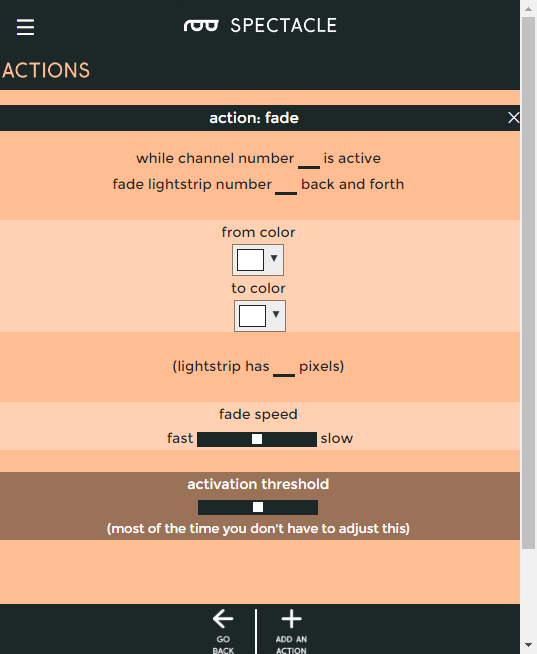
The lightstrip will change from one color to another over time, then back to the first.
- "While channel number __ is active" - The fade effect persists only while the channel is active, so a continuous input signal is needed.
- "fade lightstrip number __ back and forth" - Select which lightstrip you wish the fade effect to operate on. To have the same effect on multiple lightstrips, you must create multiple actions.
- "from color" color picker - This is the initial color that the lightstrip will power up with.
- "to color" color picker - The other color, which the strip fades to and from periodically.
- "fade speed" slider - Controls how fast the fading action occurs.
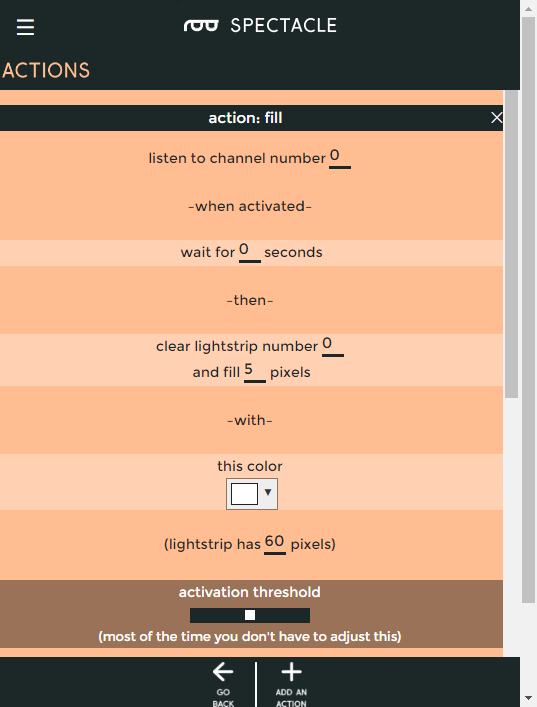
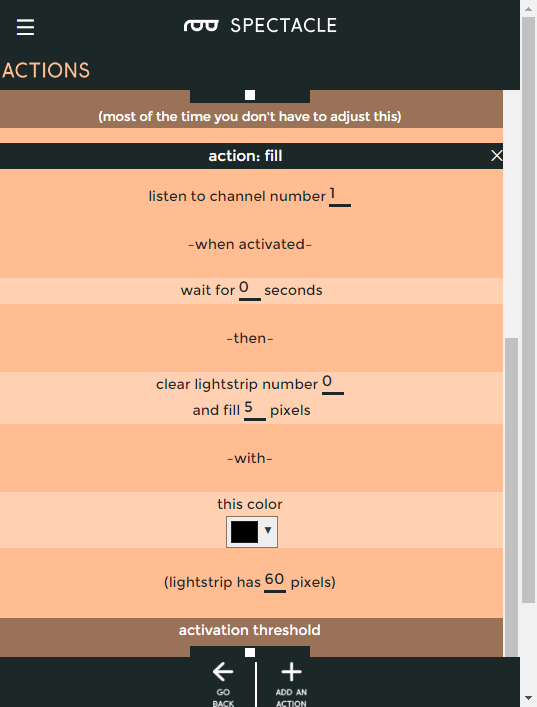
Fill
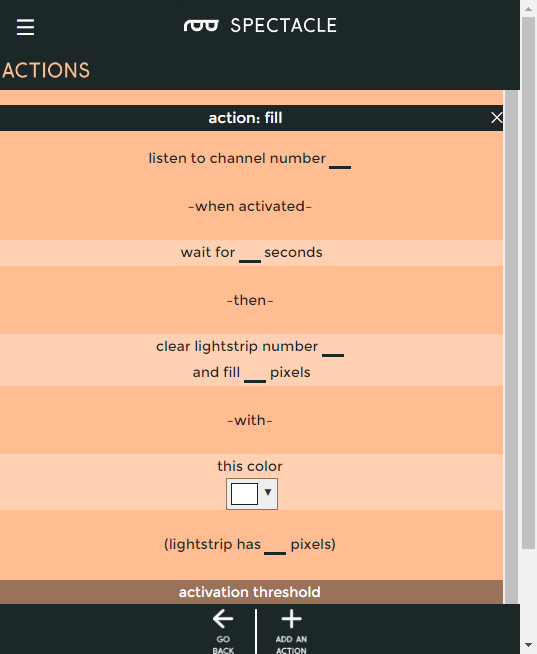
Fills some number of lights on the light strip with a single color. Blanks the other lights to off.
- "listen to channel number __" - A momentary signal on this channel is all that is needed to trigger a fill operation, and the fill will persist until another effect starts.
- "wait for __ seconds" - This delay allows for sequencing effects. Most often you'll probably set it to 0.
- "clear lightstrip number __" - Select the lightstrip to operate upon.
- "and fill __ pixels" - The number of pixels, from closest to the Light board out, to turn on.
Light pixel
Turns on one light and blanks the rest of the lights to off.
- "listen to channel number __" - A momentary signal on this channel is all that is needed to trigger a light pixel operation, and the lit pixel will persist until another effect starts.
- "wait for __ seconds" - This delay allows for sequencing effects. Most often you'll probably set it to 0.
- "clear lightstrip number __" - Select the lightstrip to operate upon.
- "and light pixel number __ " - The number of the pixel, from closest to the Light board out, to turn on.
Converting Sounds to OGG Vorbis Format
The files used by the Spectacle Audio Board must be in OGG Vorbis format. This free, lossy codec has a higher compression ratio than MP3, and, more importantly, can be used without paying a licensing fee to any third part organization.
Download and Install Audacity
We'll be using the free, open source program "Audacity" to convert from whatever your file's current format is to OGG Vorbis.
Audacity is available across all three major operating systems, so you shouldn't have any trouble getting it installed.
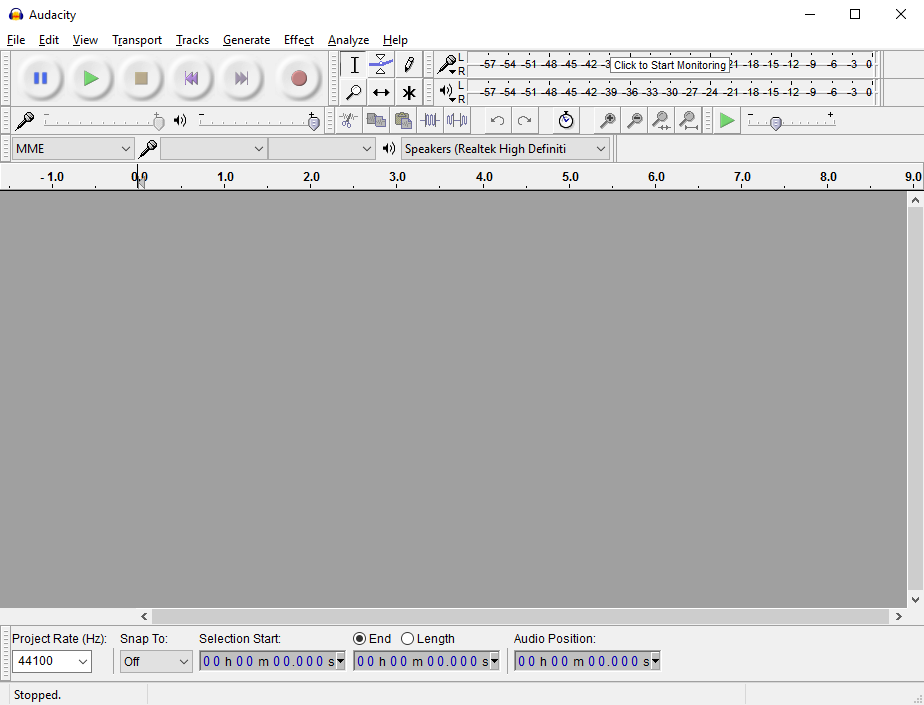
When you start Audacity, you'll see this screen, or one very like it. While at first blush it seems extremely complex, none of this crap is important to us, so don't panic.
Load a file
Like most programs, "loading a file" just means selecting "Open" from the File menu and choosing which file you wish to convert. Audacity is capable of editing most types of audio files: WAV, AIFF, FLAC, MP3, and others.
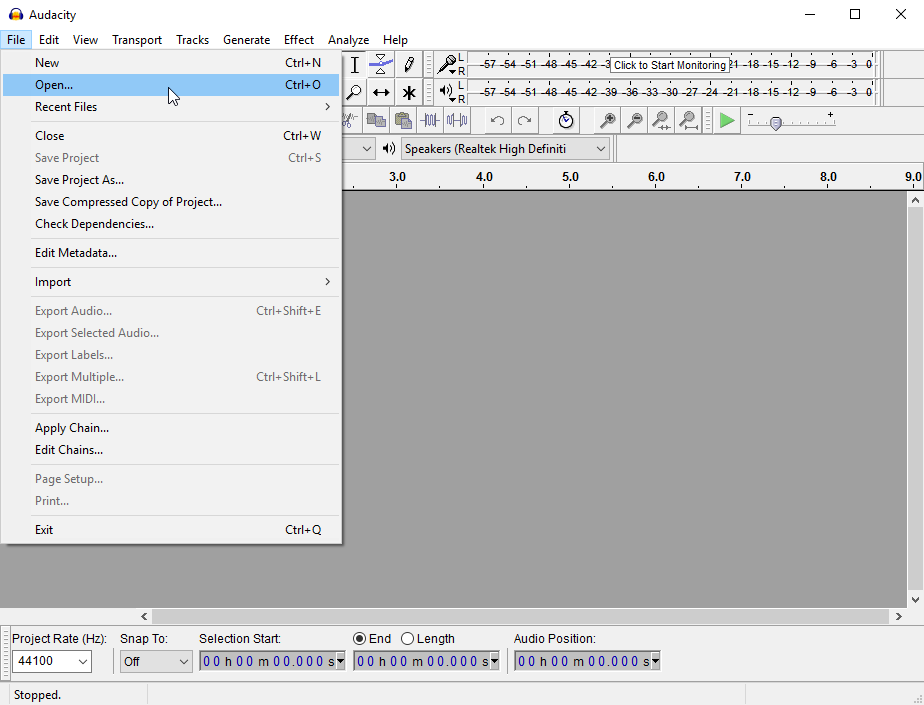
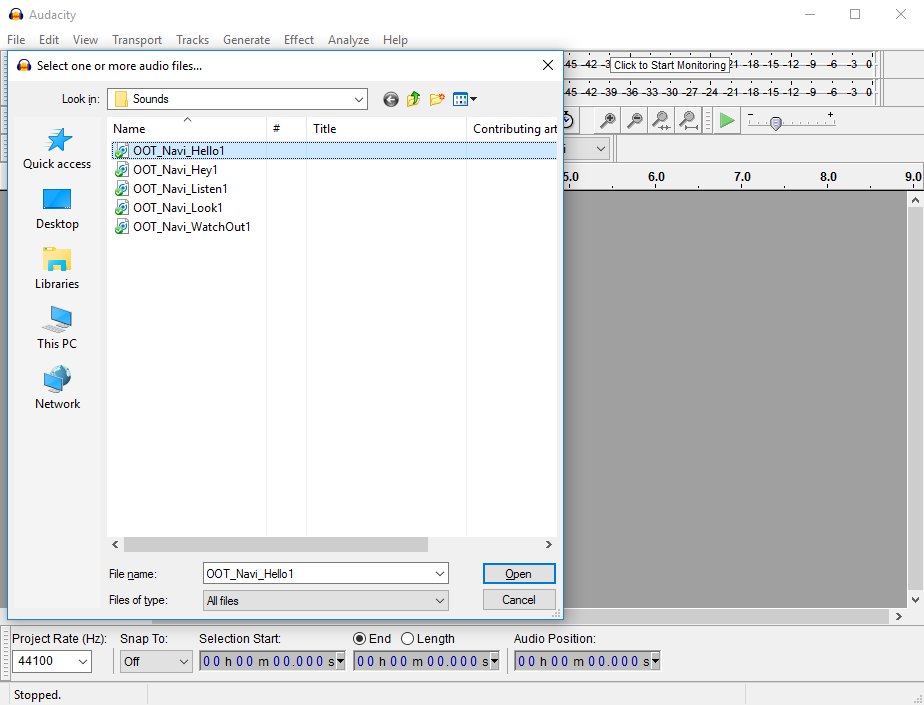
By default, Audacity shows all files, not just compatible audio files, when you bring up the open dialog. There's a dropdown menu that allows you to change that so it shows only compatible audio files along the bottom edge of the window.
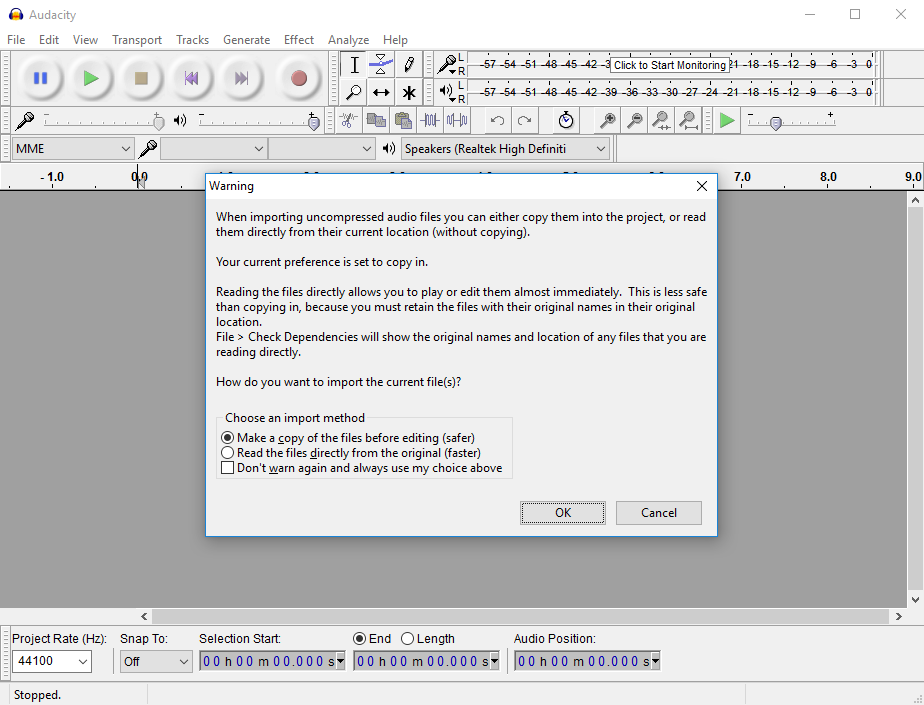
Once you select which file you wish to edit, a rather alarmist message may pop up warning you about editing files without making a copy of them. Just click "OK".
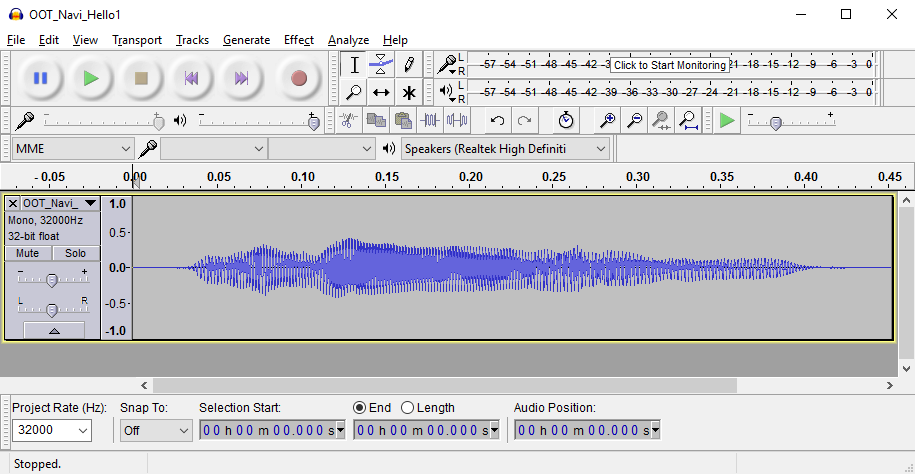
You'll see, then, something like this show up. This is what your audio file looks like, to the computer. Again, don't panic! Unless you want to edit the sound in some way (which we don't), none of the settings or pieces of information that have popped up here matter to us.
Convert to OGG
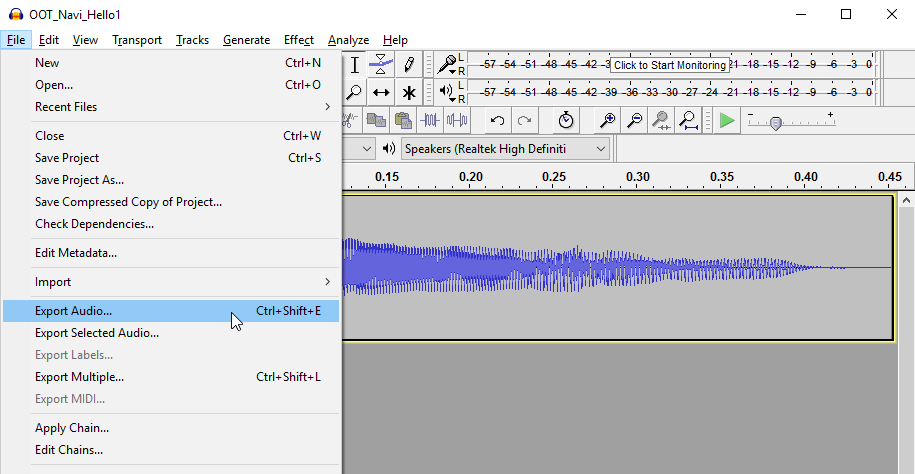
Now that you have the file loaded, you need to convert it to OGG Vorbis format. To do so, open the "File" menu and select the "Export Audio..." menu item about halfway down. A familiar looking save window should pop up.
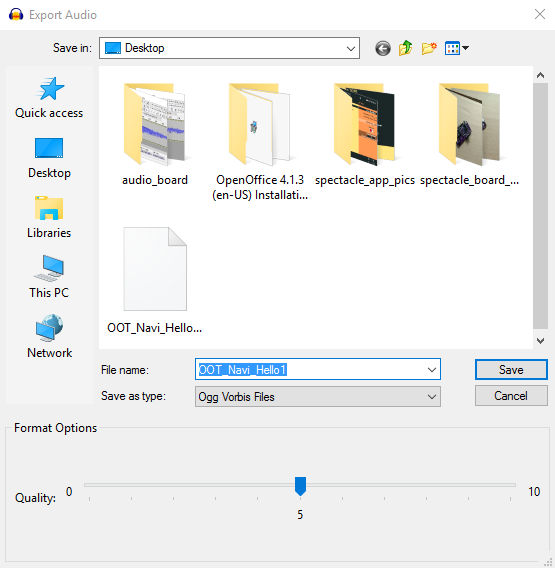
Right below the "File name:" field you'll see a drop-down menus labeled "Save as type:". Select "Ogg Vorbis Files" in that drop down.
A slider will appear at the bottom of the window. The default value of '5' is probably good enough for most purposes. Click "Save" and another window will pop up.
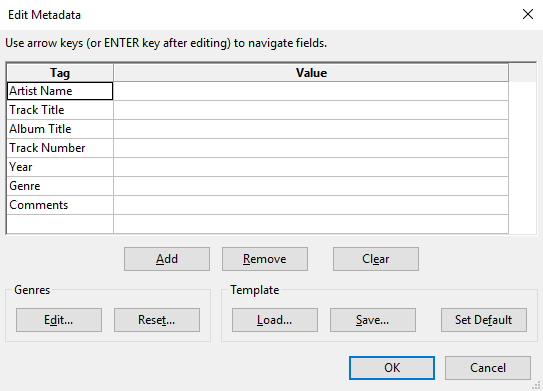
This one allows you to set metadata about the file. You can ignore everything and just click "OK" to skip past this.
Congratulations! You've successfully converted a file to OGG Vorbis format. You may now copy that file to the Micro SD card (don't forget to rename it to a number!) for use with the Spectacle Audio Board.
Extra credit- trimming the fat and making the sound louder
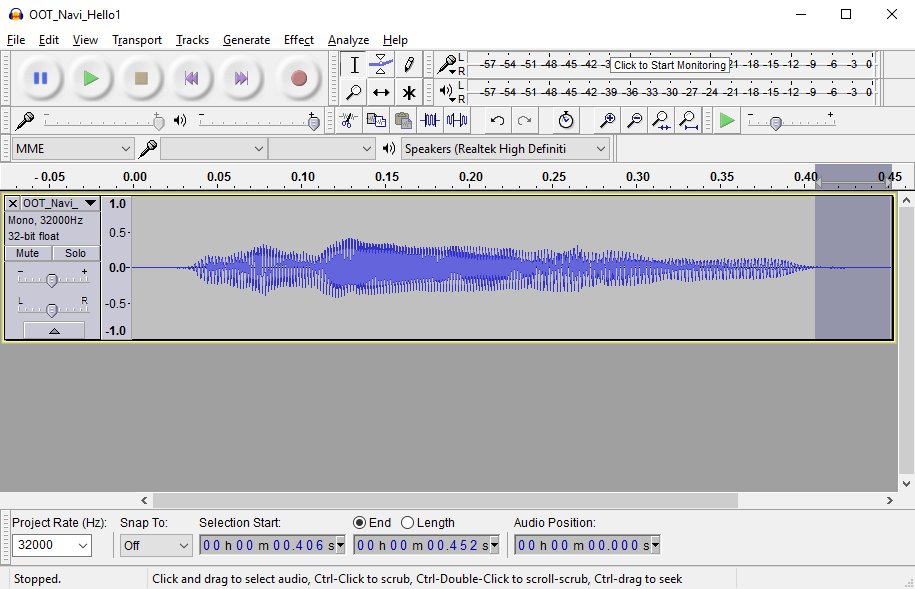
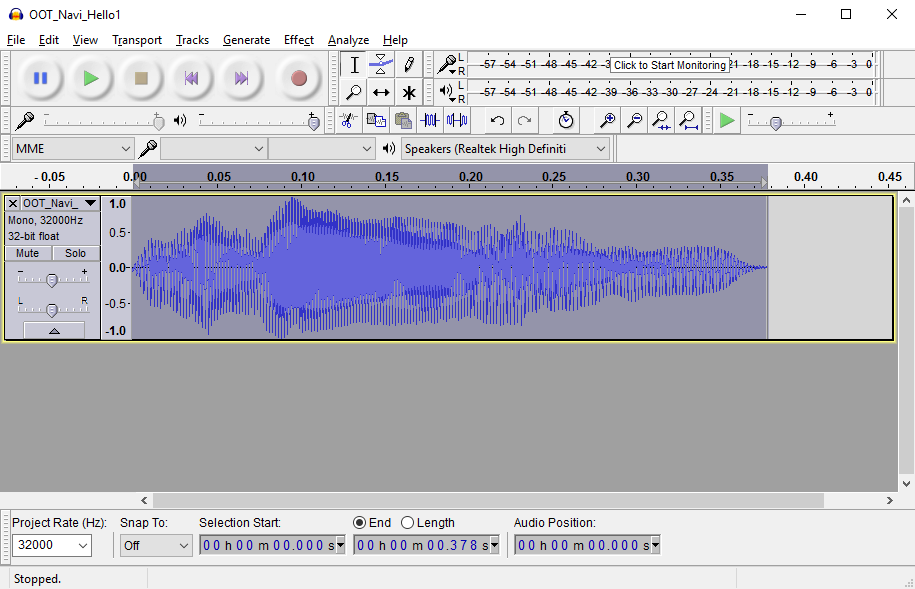
As you can see in my file above, there's a great deal of room between the extents of the sound and the extents of the window. In the time (horizontal) axis, this manifests as flat lines before and after the content of the sound file. In the "loudness" (vertical) axis, this manifests as space between the top and bottom of the waveform file and the top and bottom of the playback position window.
Let's eliminate some of that dead time before and after the sound plays. To do so, simply click inside the playback position window and drag, as though you are trying to select a section of text. The part you've selected will be highlighted, as above. Now, just hit the "Delete" key on your keyboard, and that section will be removed. Repeat the process at the other end of the sound.
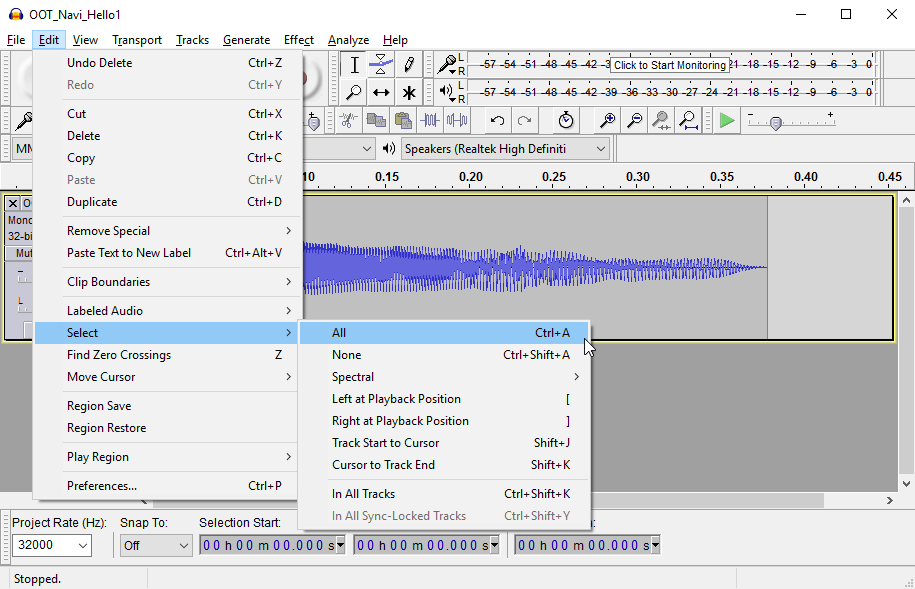
Now, let's see what we can do about volume. Under the "Edit" menu, look for the "Select" submenu, and choose "All" to select the entire sound. You can also just use the drag-and-highlight method from above.
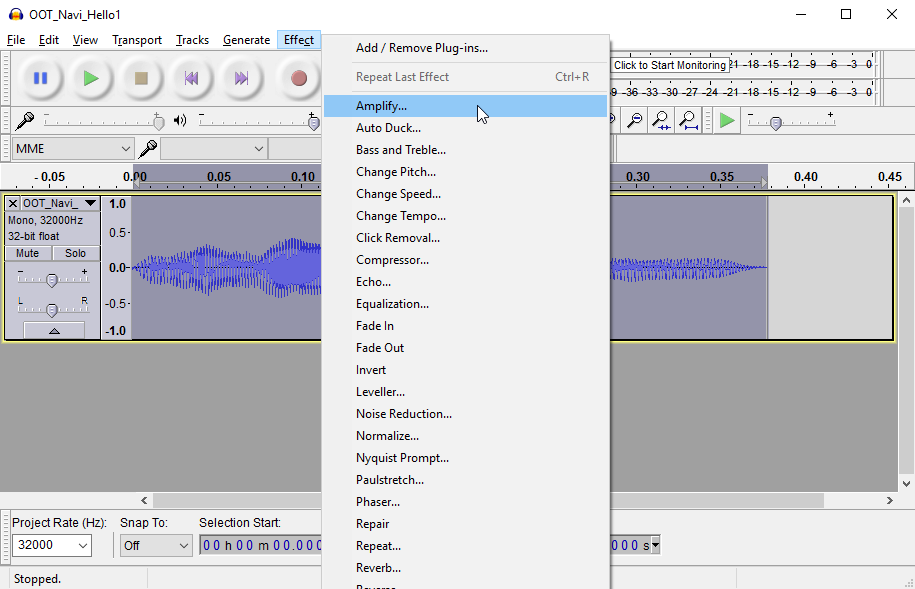
Now that you've got the entire sound selected, click on the "Effect" menu and select the "Amplify..." option.
A new window will pop up with a slider, a couple of text boxes, and one checkbox. The slider will be pre-positioned to amplify the sound as much as possible without "clipping" it. "Clipping" occurs when you try to amplify a sound more than the system you're playing it through can stand, and it results in a sort of grating buzzing noise during playback.
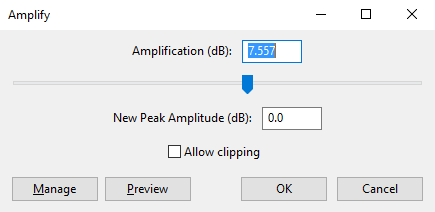
You have a choice, now: you can either accept the system's suggested level, or you can click on the "Allow Clipping" check box and increase the amplification more with the slider. I've chosen to accept the clipping limitation for the image above; comparing it to the image of the file higher up, you can see how I've trimmed the dead time at the ends and increased the amplitude vertically.
Why would you want to allow your sound to clip? Well, first of all, the preset amplification only takes into account the peak value of your sound, so if one small section of the audio is allowed to clip, it may allow the vast majority of the sound to be substantially louder. Secondly, if you're playback device is of relatively poor quality, or the sound file itself is, allowing clipping may increase volume significantly without making the sound quality too much worse than it already is. Thirdly, volume intensity may be far more important than sound quality, and allowing clipping lets you push the volume as high as you can.
Now that you've successfully edited the sound, export it to OGG Vorbis as we covered above.
Example Project
Let's use the contents of the Spectacle Light and Sound Kit to put together a working project! We're going to set up a laser gun type setting, where a light comes on and a sound plays when a button is pressed, then the light goes off when the button is released.
Connect the boards
Start by connecting up the boards. All of the required hardware is included with the kit.
First, plug one end of one of the TRRS cables into the "Direct" jack on the Director Board.
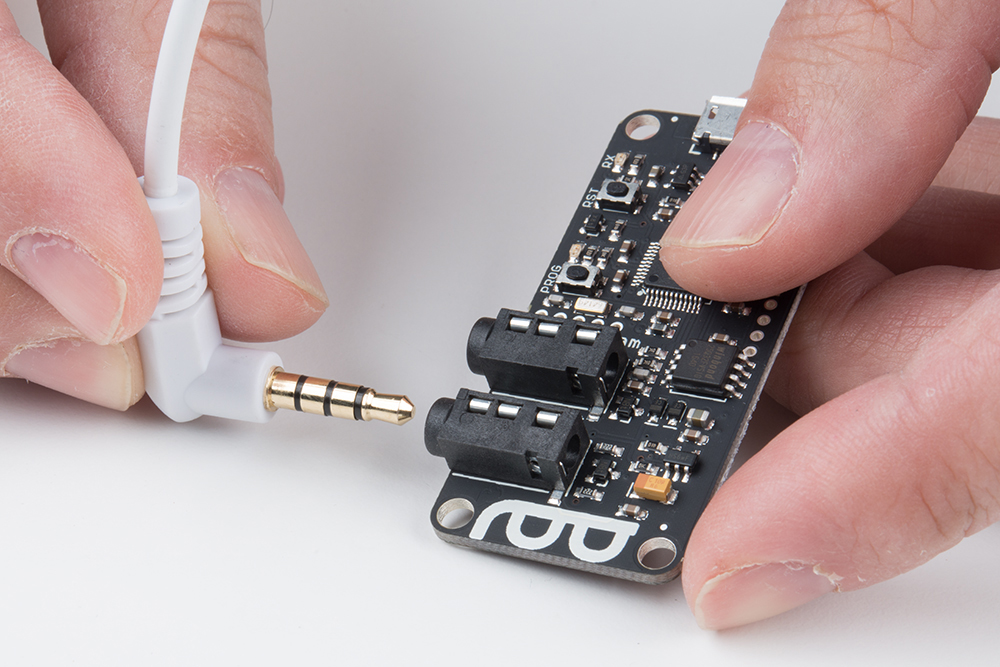
Next, take the other TRRS cable and plug it into the "Program" jack on the Director Board.
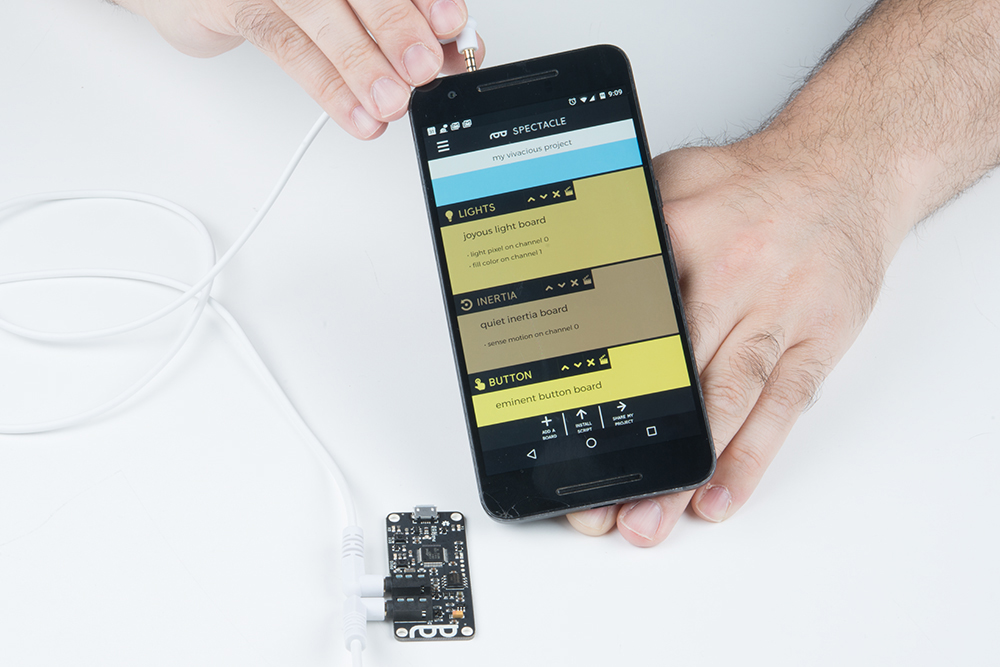
Take the other end of this cable and plug it into the audio jack of the phone, tablet, or computer that you'll be using to program the system.
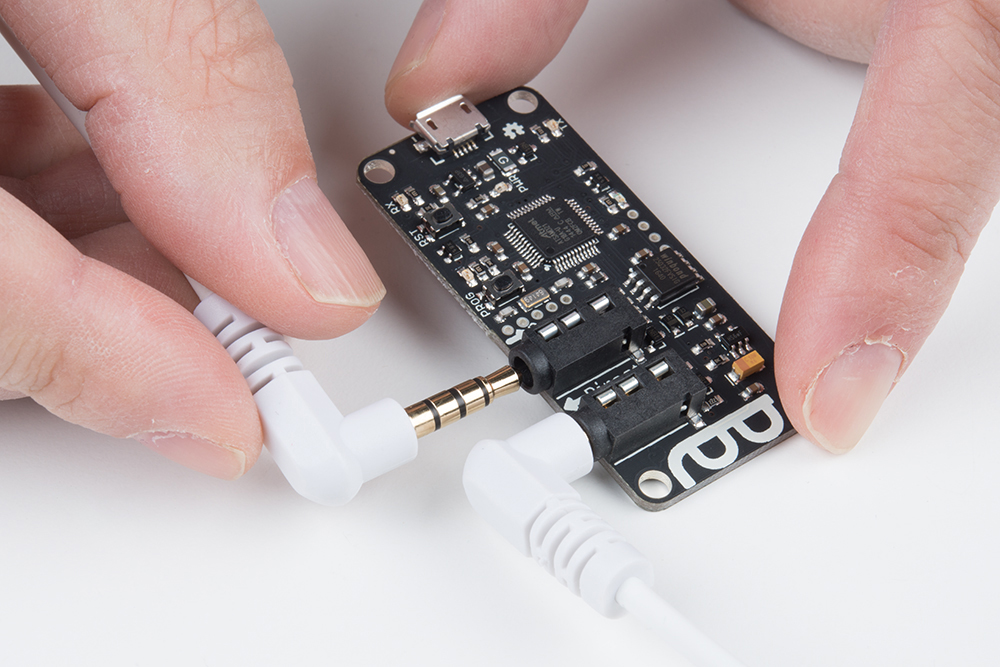
Then take the other end of the first TRRS cable (the one plugged into the "Direct" jack on the Director Board) and plug it into the "In" jack on the Button Board.
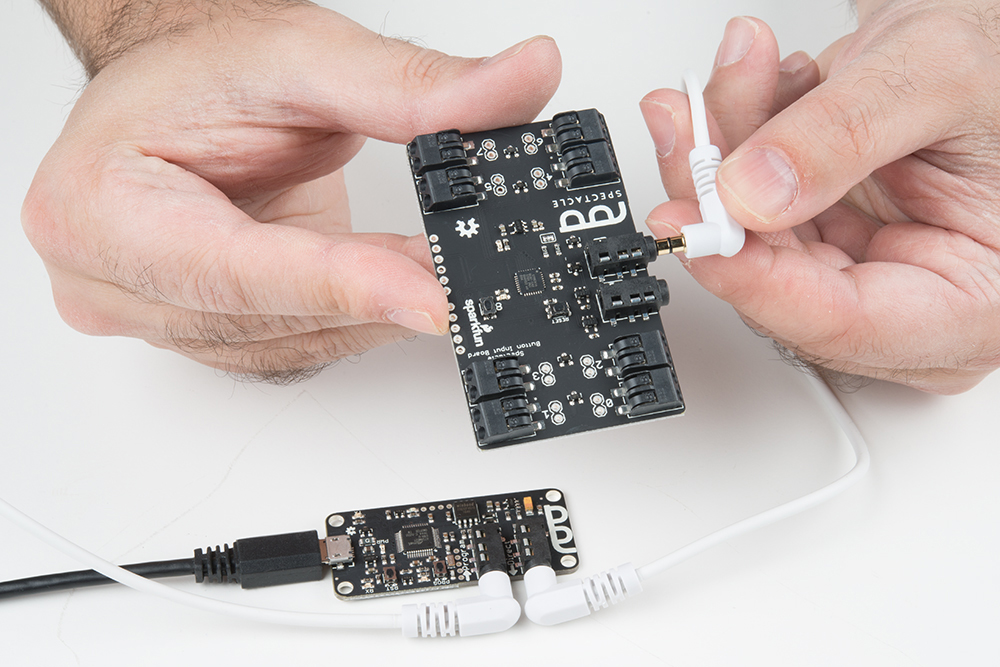
Grab another of the TRRS cables and plug it into the "Out" jack on the Button Board.
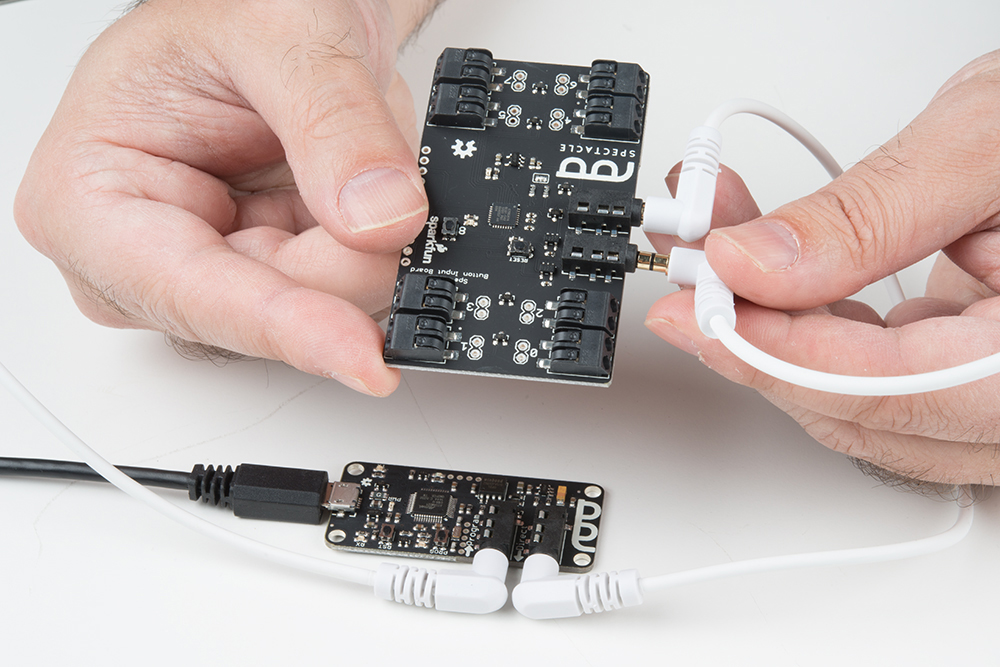
Plug the other end of that cable into the "In" jack on your Audio Board.
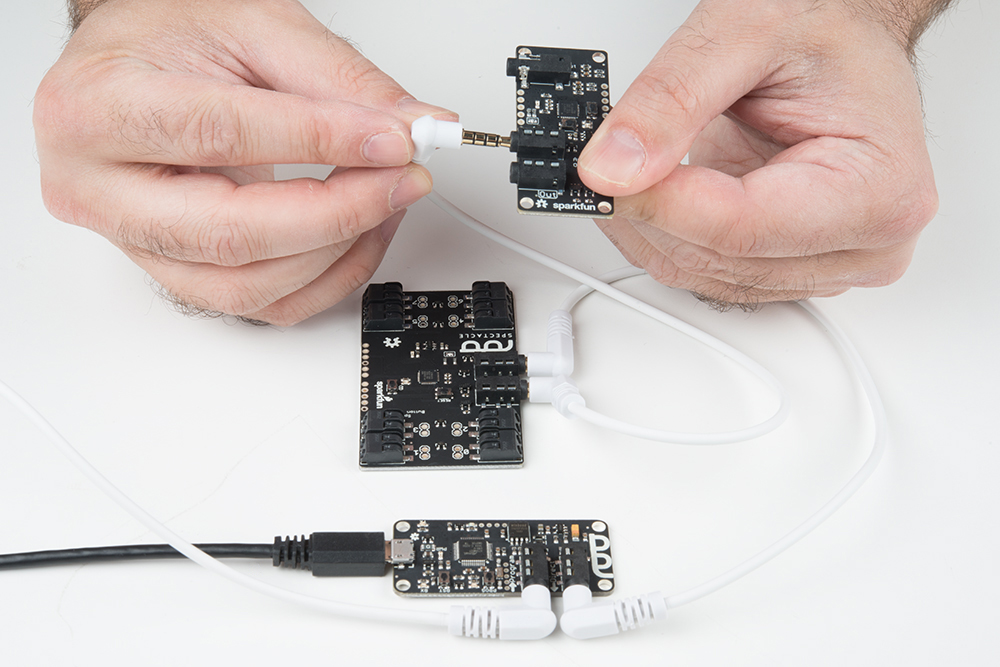
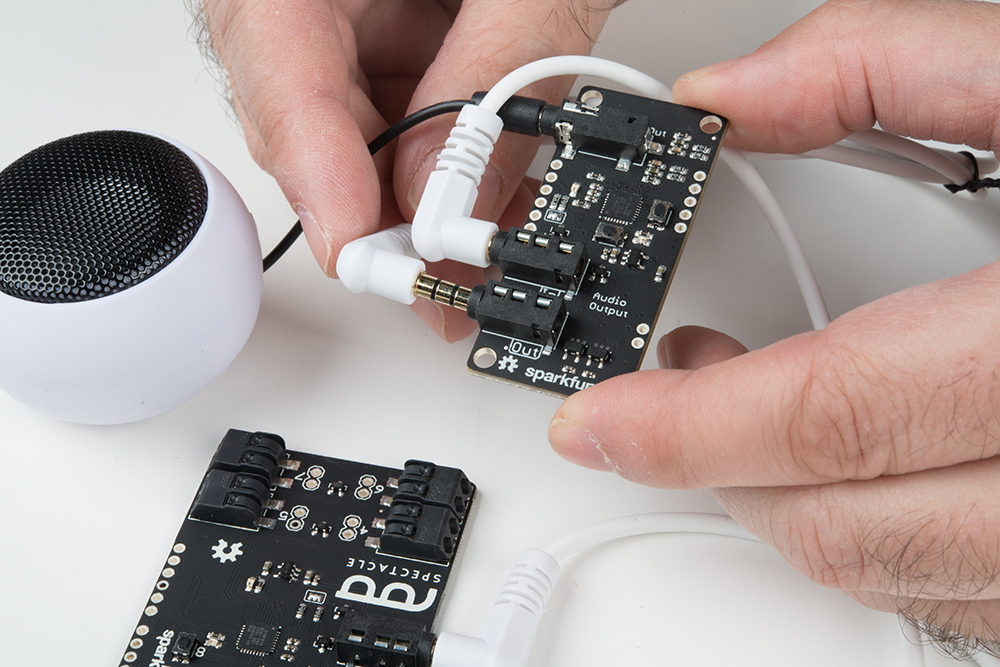
Now plug the speaker into the "Audio Out" jack on the Audio Board.
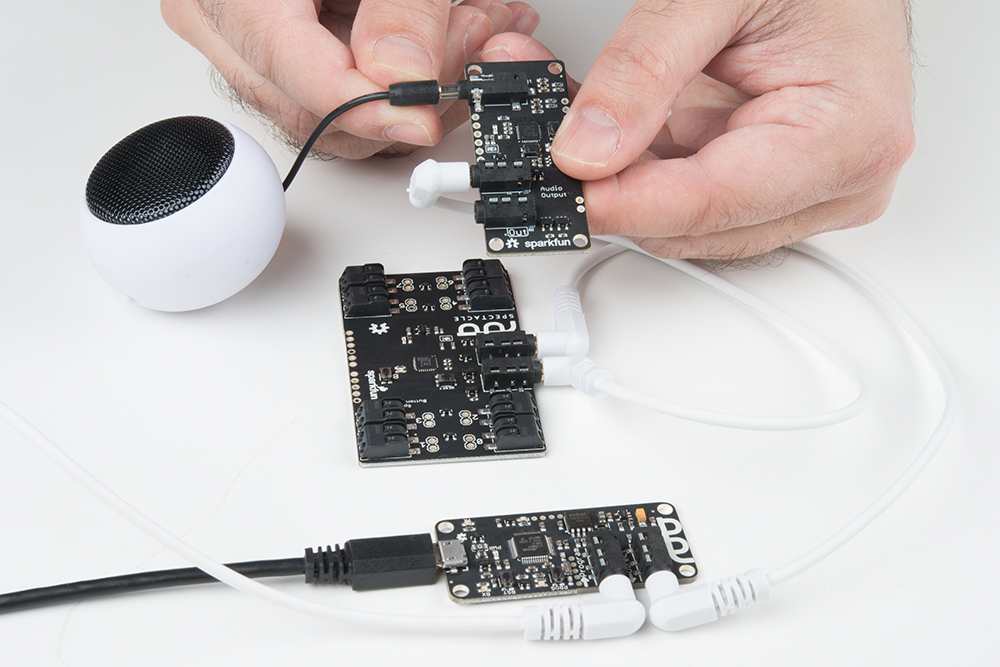
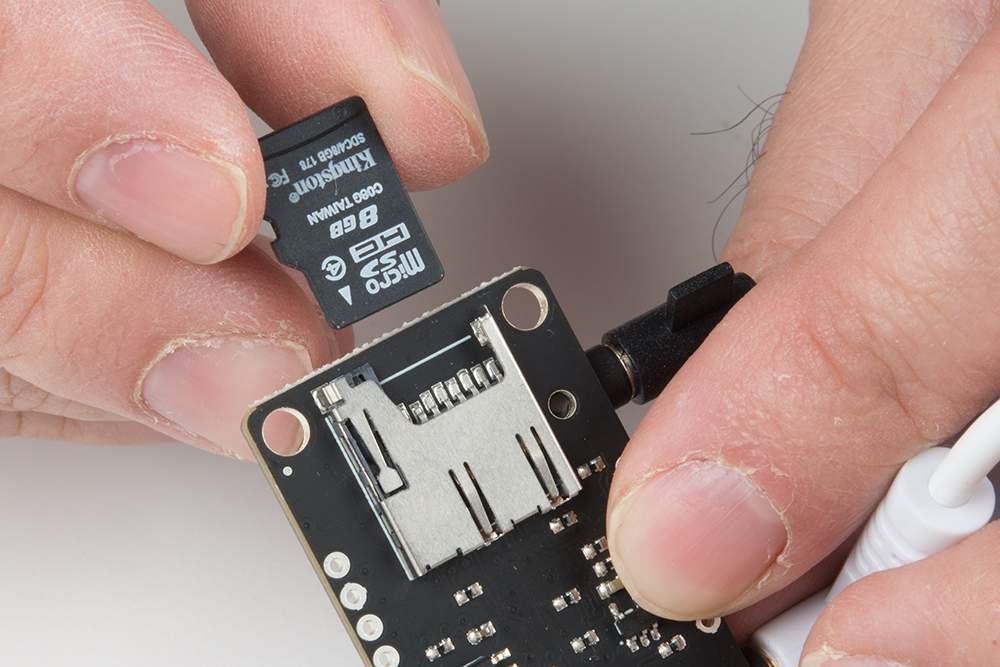
Insert the micro SD card into the Audio Board.
Plug another of the TRRS cables into the "Out" jack on your Audio Board.
Plug the other end of that cable into the "In" jack on your Light Board.

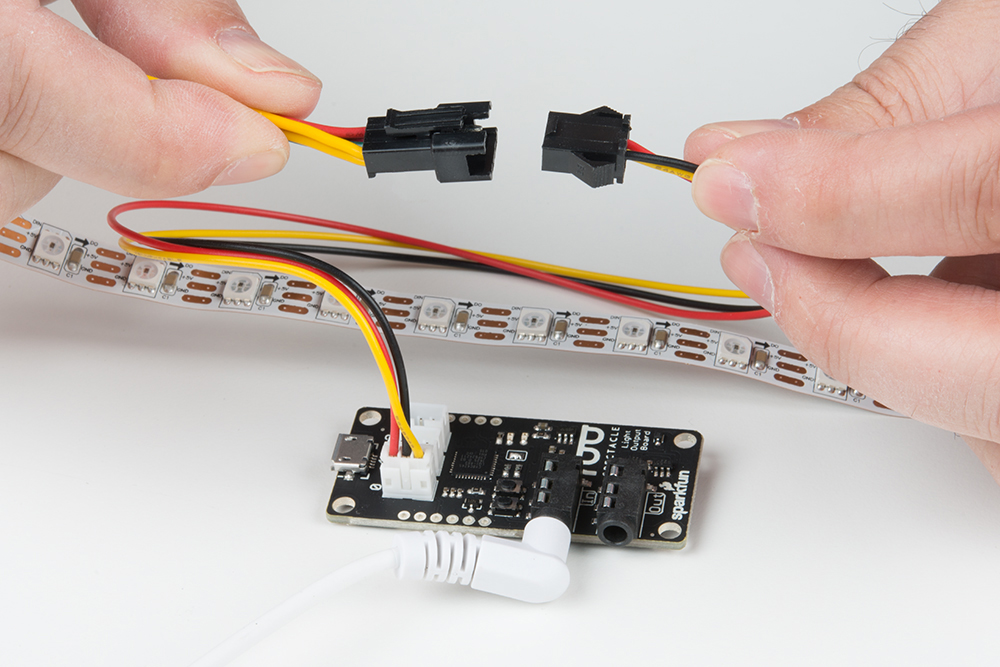
Connect the light strip adapter cable to the Light Board.
Connect the other end of the adapter cable to the light strip.
Finally, plug the Micro B end of the USB cable into the Director Board and the other end into the power adapter. Plug the power adapter into the wall. You should see one solid light and one blinking light on the Light Board, the Audio Board, and the Button Board. On the Director Board, you'll see one solid light and one light which blinks one time, then pauses, then repeats. This shows that power is present and the boards are up and running.
Setting up the board configuration
We're going to assume that you followed the instructions on the previous page about converting sounds to OGG Vorbis format, and that there is a sound on the Micro SD card inserted into the Sound board named "00.ogg". If this is not the case, take a few minutes to go back to that page and prepare a sound.
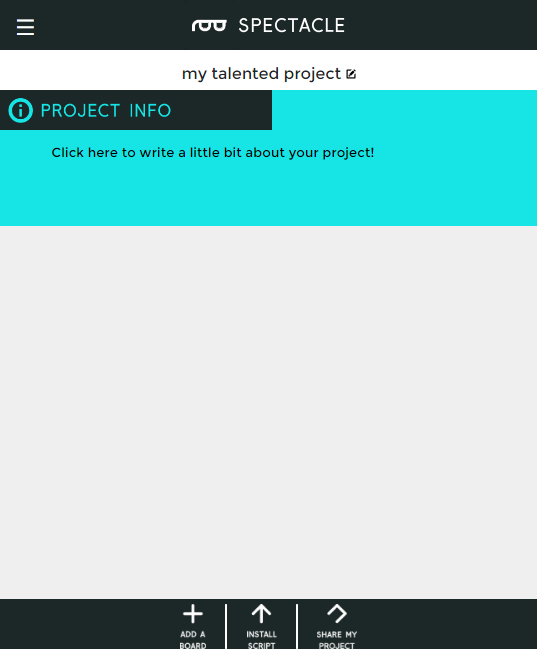
When you first open the Spectacle app webpage, this is what you'll see. Your project name will differ from mine, as Spectacle assigns a random name to each project.
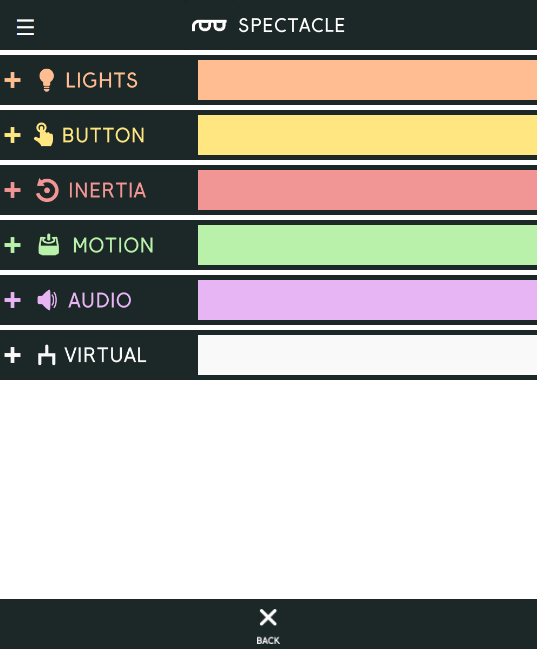
To continue, we must tell the project which boards we wish to use. Start by clicking the "Add a board" button at the bottom of the page.

This will bring up a list of the available boards. We're going to add our Button Board first of all, so click anywhere in the "Button" box to add it.
Now, repeat this process two more times, adding an Audio Board and a Light Board.
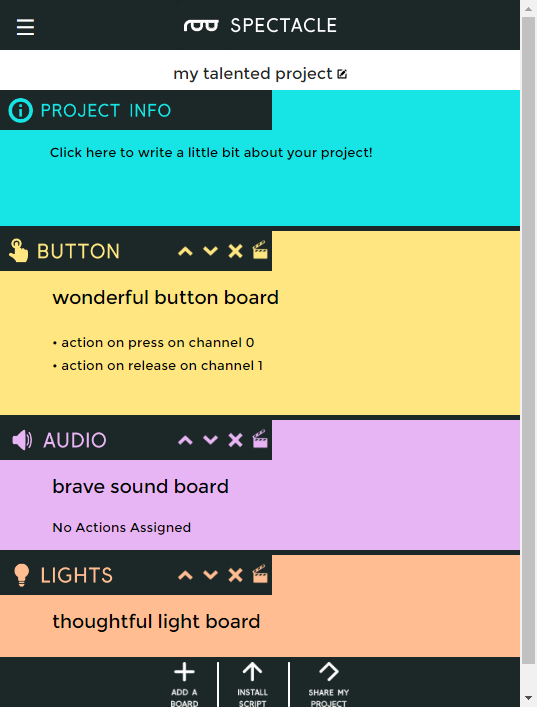
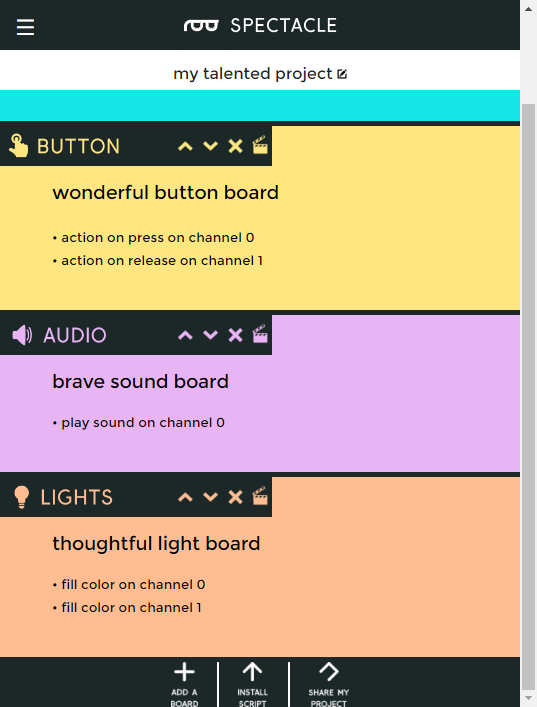
You should now have a list that looks like this, showing all three of the boards we're going to use in this project. Pay attention to the order of the boards in the list! They must match the order of the boards in hardware! If the order of your boards differs from that in the image above, you can use the up and down carets (in the board name bar) to change the order of the boards.
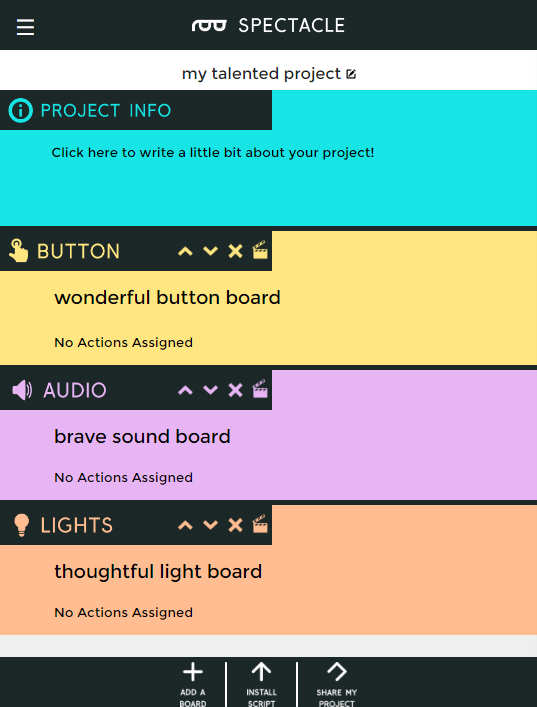
Now you'll need to add actions to each board, to tell the Spectacle system what sort of behavior you want. Click on the clapboard icon (highlighted above) for the Button Board to pull up the "Edit actions" frame.

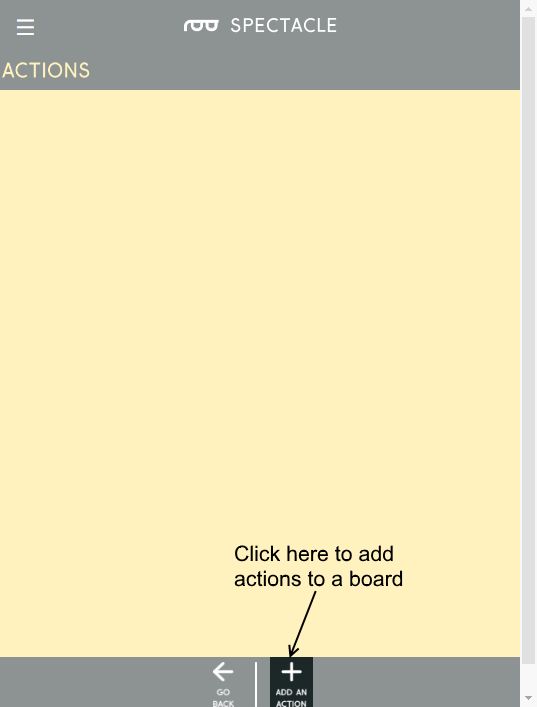
This will pull up a window that looks like the above. I've highlighted the "Add an action" button. Click it to pull up a list of actions for the Button Board.
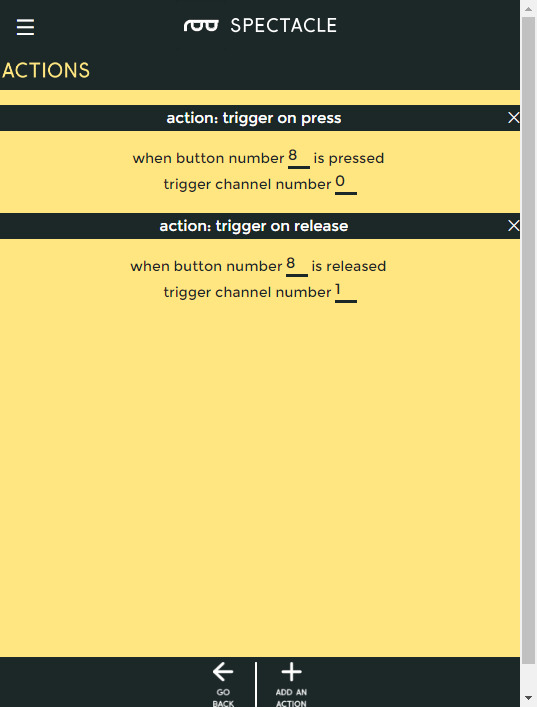
This list will pop up after you click the "Add an action" button. We're going to add two actions: "Action on Press" and "Action on Release". Click the "Action on Press" list item, then click "Add an action" again to pull the list back up, then click the "Action on Release" list item to add that action to the list.

Here you can see that we've added the two actions we want for our project. Note that, when added, the inputs default to being blank. You need to put a value in every field for the design to be valid.

Here are the settings you'll want to put into place for this project. You can see that the "Action on Press" is tied to channel 0, and we're using button 8 (the onboard button) as the input signal. "Action on Release" is tied to channel 1, and also to button 8.
Once you've filled in the fields for both actions, click the "Go Back" button to return to your list of boards. This will automatically save the changes you've made.

You can see here that the actions we added for the Button Board appear in the main board list, as a reminder of what each board has been configured to do.
Now, add a "Play Sound" action to the Audio Board. It's the only action the Audio Board supports. Fill in the blanks on the play sound page as shown above.
Back in the main frame, you'll see that the play sound action has been added to the Audio Board's section of the list.

Finally, we'll configure the Light Board. The picture above shows the full list of actions that the Light Board supports. We're going to use the "Fill Color" option, twice, for our project.
Below are the settings for the first "Fill Color" effect to be added. This turns the pixels on when the button is depressed.
Here are the settings for the second fill effect. This turns the pixels off when the button is released.
You can now click the "Go Back" button to return to the main page.
Congratulations! You've completed configuration of your first Spectacle project! Now let's cover loading the configuration onto your Director Board.
Uploading
Now that you've created your Spectacle program it's time to upload it to the Director Board. If you followed the instructions above, your uploading device is connected to the board and ready to go, so all you need to do is touch the "Install Script" button at the bottom of the page. That will bring up the page seen below.
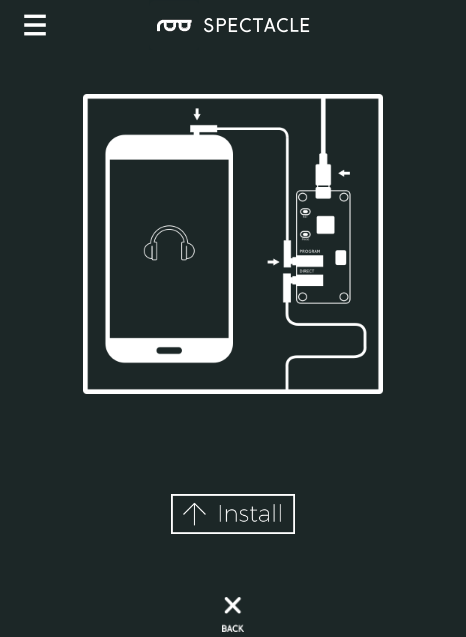
Make sure the volume on your device is turned all the way up, and that no other audio source (music, video, etc) is playing in the background. Then press and hold the "RST" button on the Director Board, press and hold the "PROG" button, then release the "RST" button.
This will put the Director Board into program mode. You'll see the light on the board blink three times, pause, then repeat. This is your visual indicator that the board is in program mode. Once you've established that the board is in program mode, you can begin programming by touching the "Install" button on the Spectacle app screen. The button will gray out during the programming process, which should only last for a few seconds. Once programming is done, you'll see the light on the Director Board blink 10 times, pause, then repeat. That's your cue that the program was uploaded successfully.
Press the "RST" button again to reset the system and begin the program!
If you have any troubles, visit the troubleshooting page for help resolving your issues.
Resources and Going Further
For general Spectacle information, please check out the user guide:
Spectacle User's Guide
For more Spectacle fun, check out the additional tutorials below:
Spectacle Sound Kit Hookup Guide
Spectacle User's Guide
Spectacle Audio Board Hookup Guide
Spectacle Button Board Hookup Guide
Spectacle Light Board Hookup Guide
Spectacle Motion Kit Hookup Guide
Spectacle Motion Board Hookup Guide
Spectacle Example: Super Mario Bros. Diorama
Or check out the blog project post that used the Spectacle Light Board: