Spectacle Motion Kit Hookup Guide
 SFUptownMaker
Introduction
The Spectacle Motion Kit contains all the parts you'll need to make a button-controlled motion project.
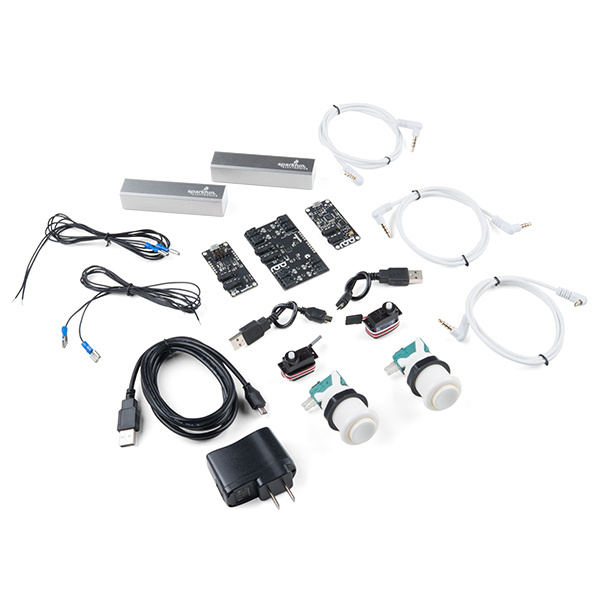
Spectacle Motion Kit
KIT-14488Suggested Reading
Before proceeding, you should read through the Spectacle User's Guide. It will give you the basics you'll need to know about how Spectacle works to follow the rest of this tutorial.
Spectacle Button Board
The Spectacle Button Board allows you to add input from buttons or switches to your Spectacle projects. It has a total of 9 signal inputs, eight of which can come from external buttons and one button directly on the board.
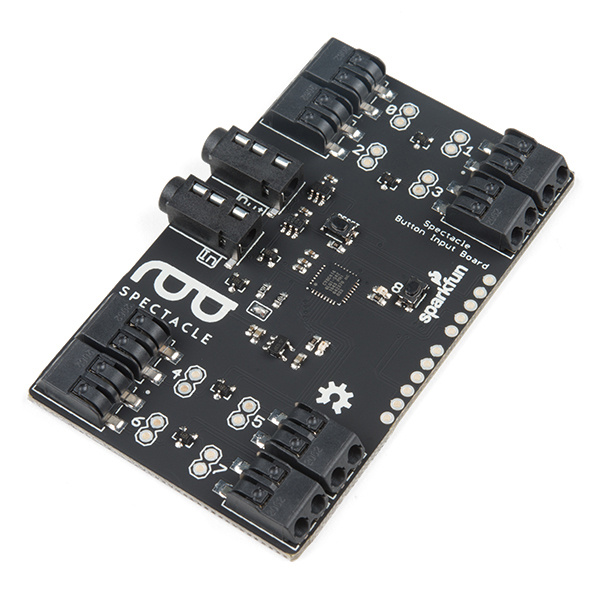
Spectacle Button Board
DEV-14044tl;dr (essentials)
- Buttons or switches can be connected to the board by pushing wires into the "poke home" type connectors on the board.
- Up to nine signals are available.
- Button signals can be either momentary or continuous.
Meet the Spectacle Button Board
Designed to bring simple signals from the world into your Spectacle projects, the Spectacle Button Board provides input for any of your Spectacle projects.
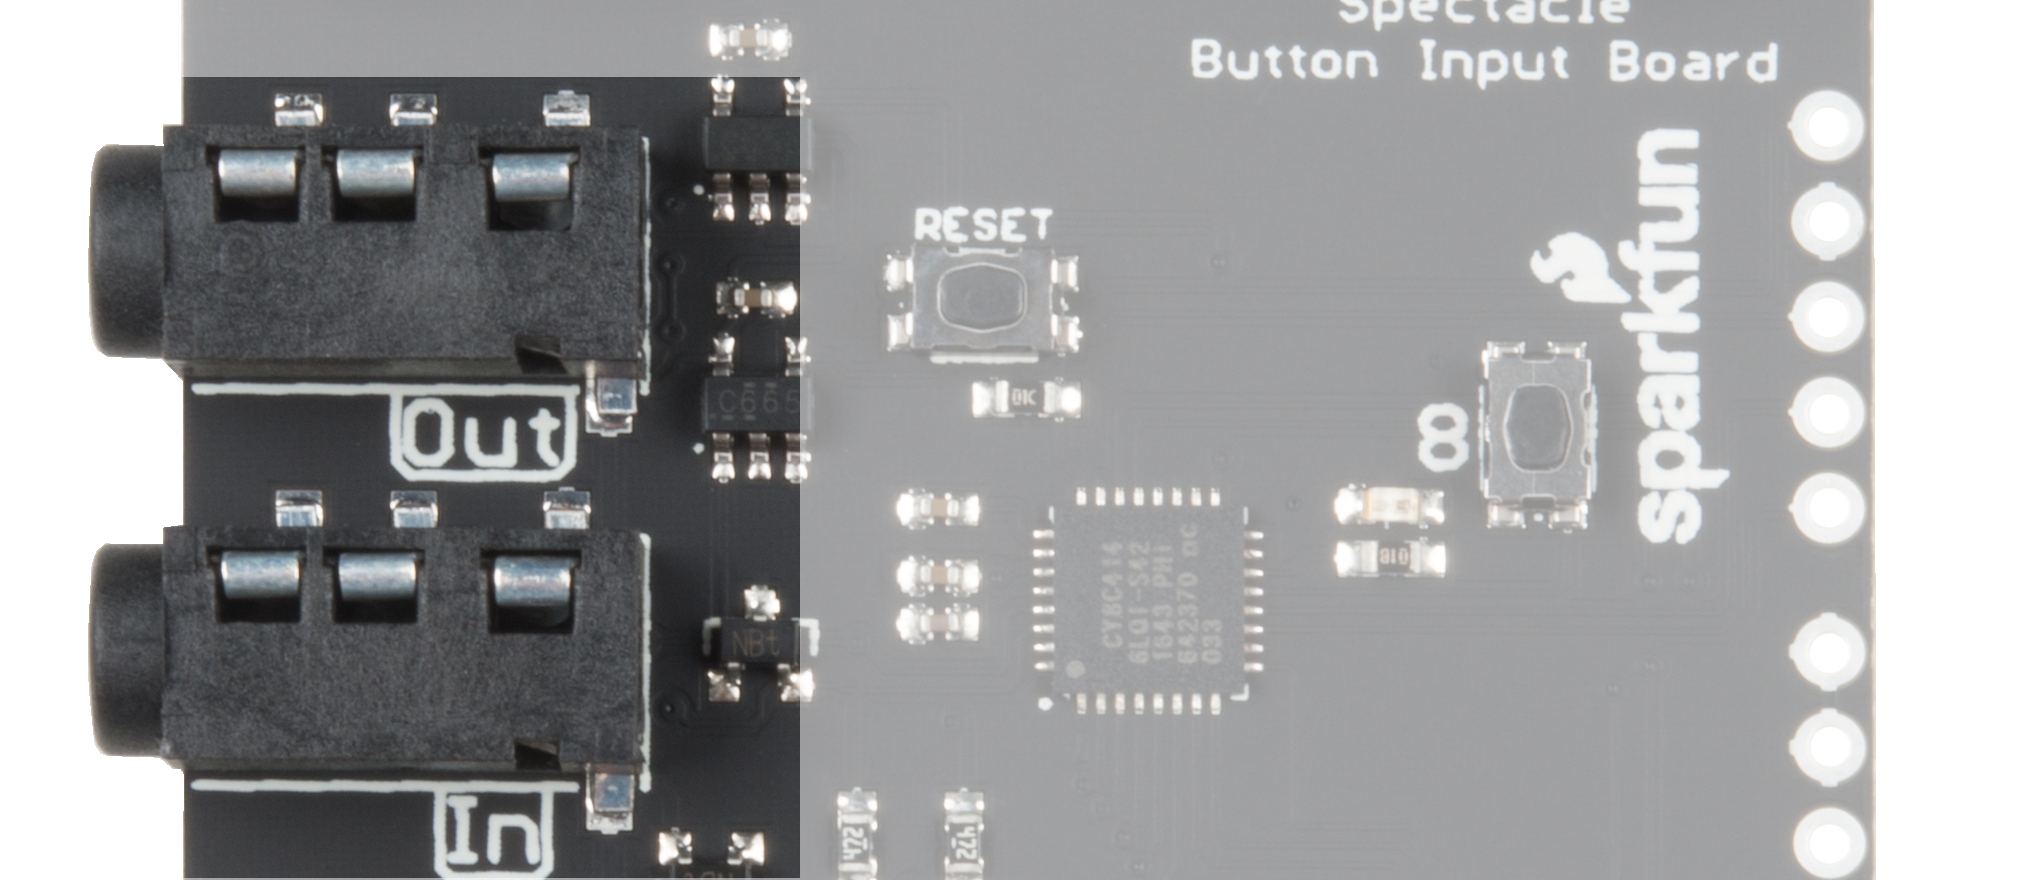
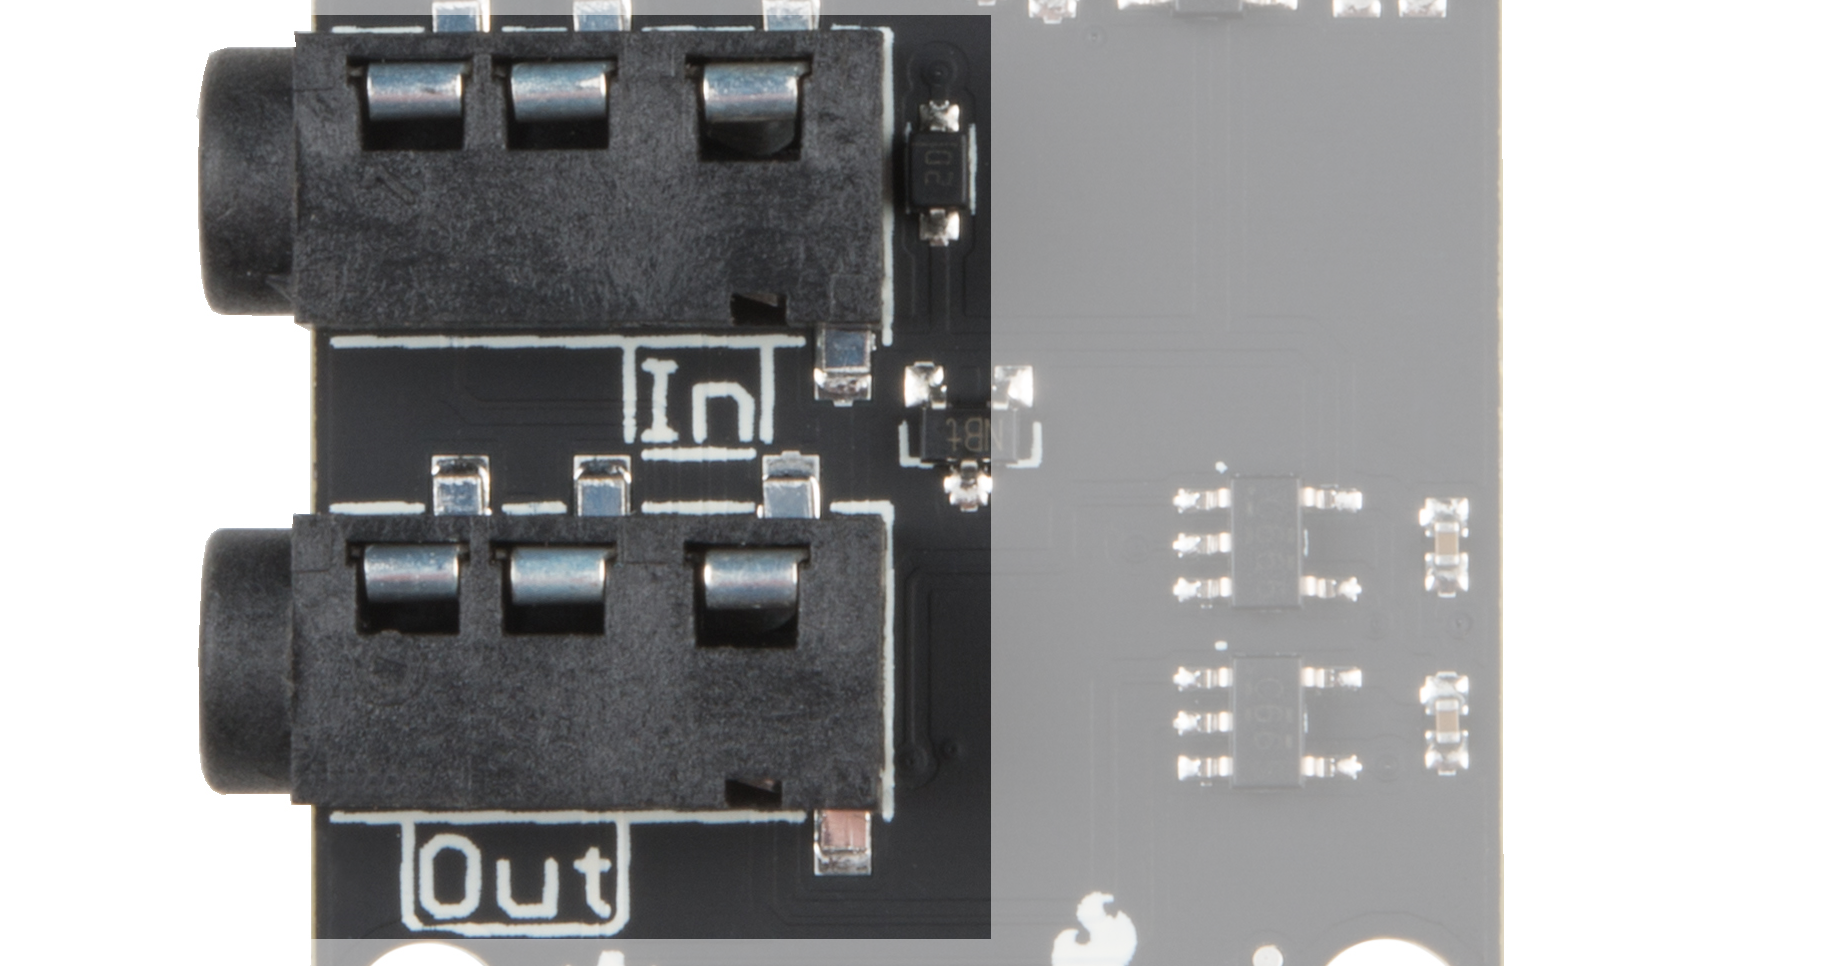
It has two 1/8" (3.5mm) jacks for connecting to other boards in a Spectacle system. Note that the Spectacle data jacks are directional: the one marked "In" should be plugged into the "upstream" board (i.e., closer to the Director Board than this one) and the one marked "Out" connects to the next downstream board.
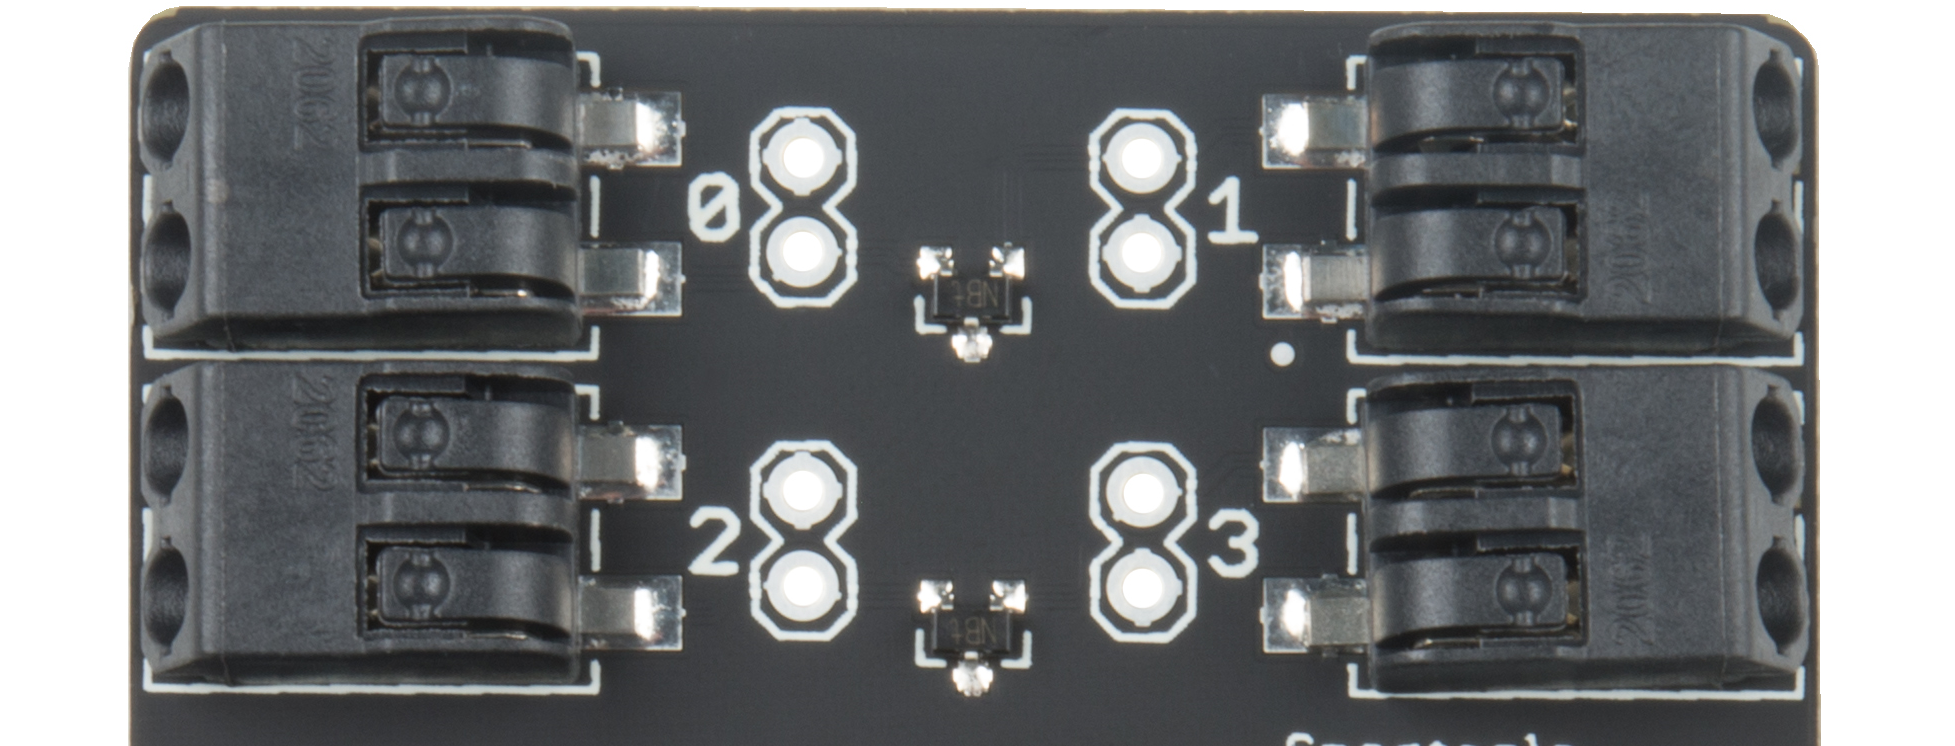
There are 8 "poke home" connectors on the Button Board. Each one can be connected to one (or more) buttons. To add a connection, simply push the stripped end of a wire into the hole on the connector. The connector will automatically grab on and hold the wire in place. If you need to remove the wire later, an small object (bobby pin, ballpoint pen, etc.) can be used to depress the release button, allowing the wire to be extracted without damage.
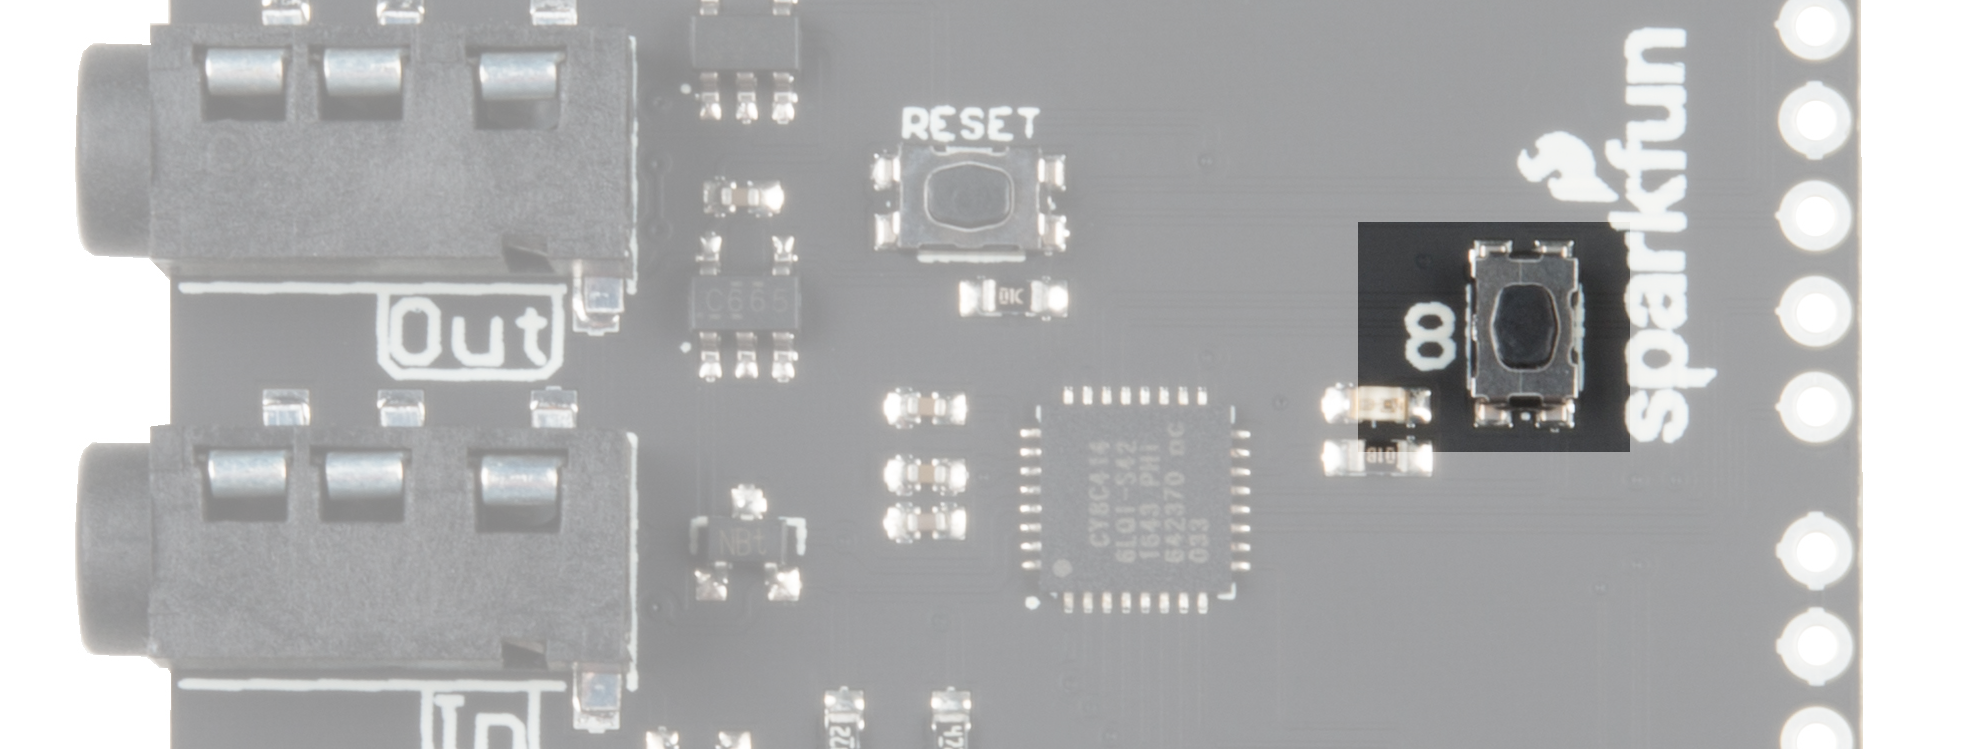
There is an input button on the button board itself which can be used to provide an input signal if no other buttons are available. It functions like any other normal button that might be attached. Be certain you're pressing the button labeled '8' and not the one labeled 'Reset'! Pressing the reset button will reset your button board, probably causing your entire system to stop working properly until you reset your Director Board!
Spectacle Motion Board
The Spectacle Motion Board makes it easy to add movement to your Spectacle projects. It can control up to 5 servo motors, either of standard or continuous rotation type.
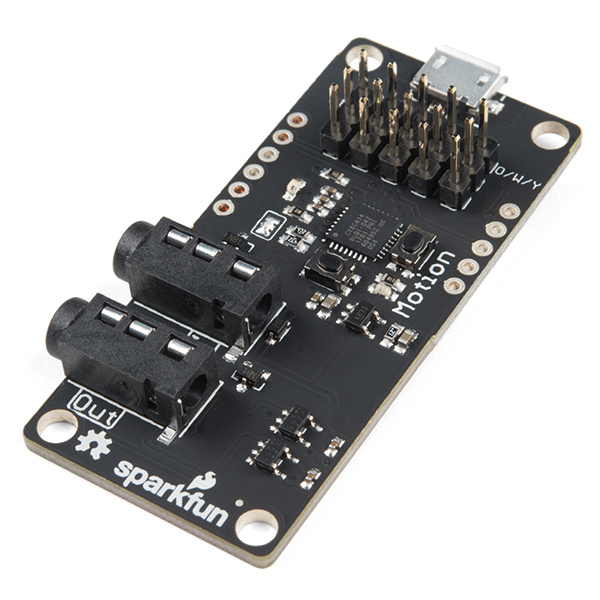
Spectacle Motion Board
DEV-13993tl;dr
- The USB Micro B port on the servo board is only for providing power to the attached motors.
- A single servo, or a couple of small servos, can be powered over the Spectacle control cable.
- Servo motors can be of the standard or continuous rotation type.
Meet the Spectacle Motion Board
Designed to make it easy to add simple motions to your Spectacle projects, the Spectacle Motion Board integrates with the rest of the Spectacle ecosystem to allow you to control motion effects relatively effortlessly.
It has two 1/8" (3.5mm) jacks for Spectacle control signals. Pay attention to the directionality of the jacks! The one labeled "In" should be plugged into a board that is closer to the Director Board than the Motion Board is, or into the director board itself.
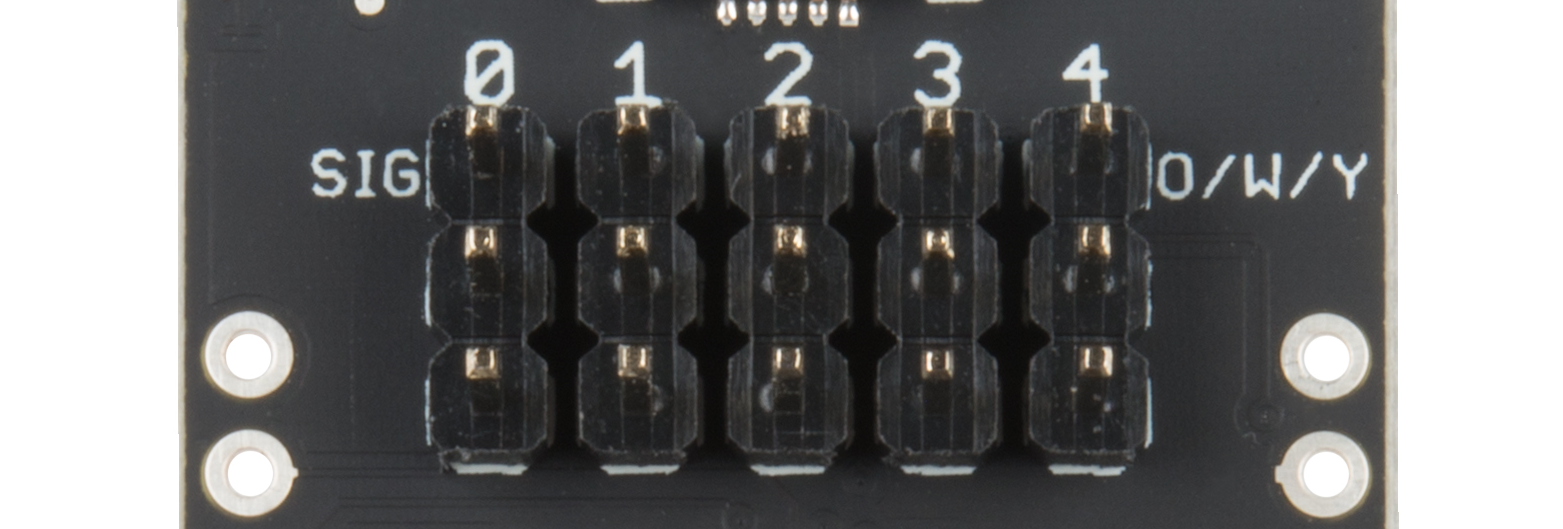
The Motion Board supports up to 5 servo motors. The servo motors can be either standard motion or continuous rotation servos. There's a note on the board ("O/W/Y") for the color which should be on the top row of the header: orange, white, or yellow. Most servo motors will have one wire which is one of these colors, and that wire should line up with this note.
The Motion Board has a Micro B USB connector to allow it to be directly powered by an external power supply. The relatively slender cables the Spectacle data travels over are not adequate for the large amount of current drawn by larger servo motors or by multiple motors.
The Configuration Utility
Spectacle Button Board
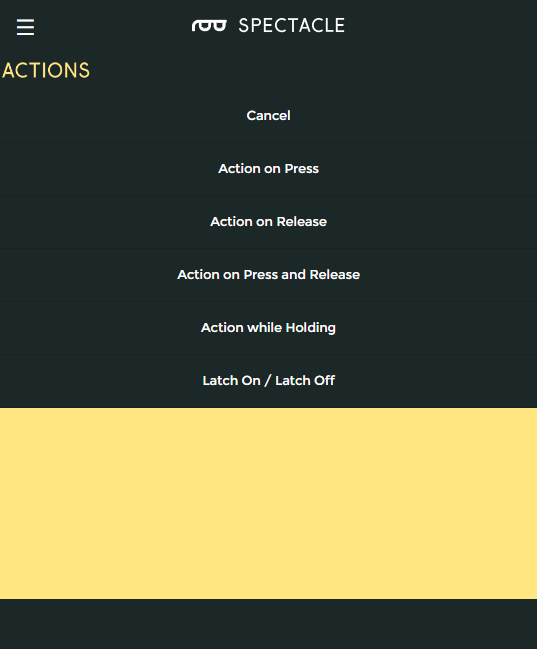
For the Button board, there are five options: three which produce a momentary pulse type output and two that produce a continuous switch type output.
Action on press
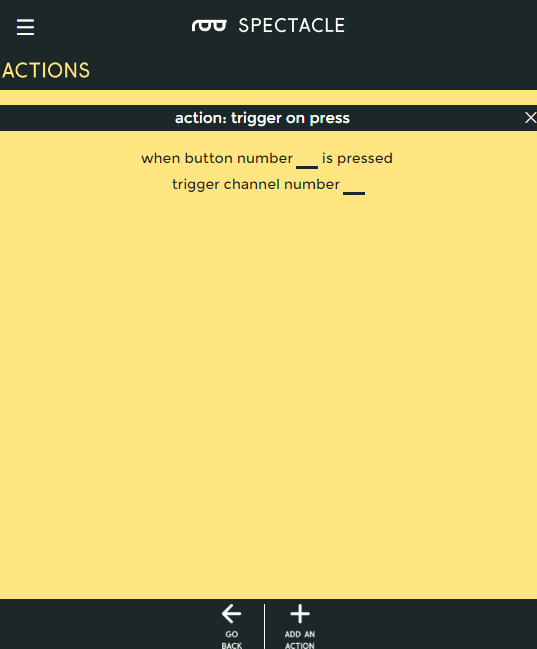
Trigger an action when a button is first pressed, regardless of how long it is subsequently held down.
- "When button number ... is pressed" - This is the number of the button we wish to assign to this action. The button numbers are printed on the board, and run from 0 through 8.
- "trigger channel number ..." - A single, momentary pulse will be sent out on this channel. It is suitable for starting a sound, initiating a motion, or setting the color of a light strip, but not for continuous sound playback or for turning on a light strip effect, for instance.
Action on release
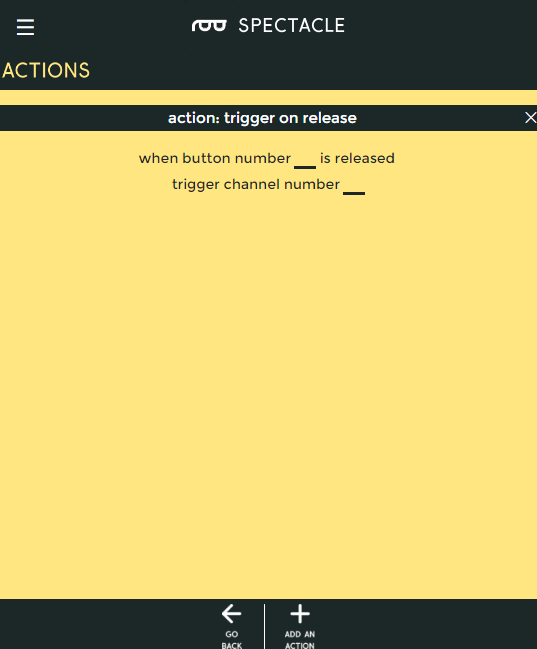
Trigger an action when a button is released, regardless of how long it has been held down prior to being released.
- "When button number ... is released" - This is the number of the button we wish to assign to this action. The button numbers are printed on the board, and run from 0 through 8.
- "trigger channel number ..." - A single, momentary pulse will be sent out on this channel. It is suitable for starting a sound, initiating a motion, or setting the color of a light strip, but not for continuous sound playback or for turning on a light strip effect, for instance.
Action on press or release

Trigger an action when a button is pressed, then trigger the same action again when the button is released.
- "When button number ... is either pressed or released" - This is the number of the button we wish to assign to this action. The button numbers are printed on the board, and run from 0 through 8.
- "trigger channel number ..." - A single, momentary pulse will be sent out on this channel both at the time the button is pressed and at the time it is released. It is suitable for starting a sound, initiating a motion, or setting the color of a light strip, but not for continuous sound playback or for turning on a light strip effect, for instance.
Action while holding
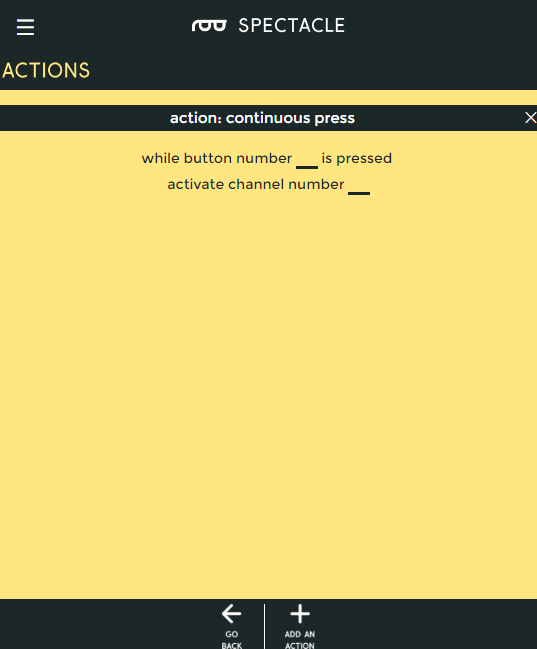
Trigger an event as soon as a button is pressed, then continue to trigger that event as long as the button is held down.
- "While button number ... is pressed" - This is the number of the button we wish to assign to this action. The button numbers are printed on the board, and run from 0 through 8.
- "activate channel number ..." - A continuous will be sent out on this channel. It is suitable for triggering and repeating a sound, or for turning on and keeping on (at least, while the button is held) a lighting effect.
Latch On/Latch Off
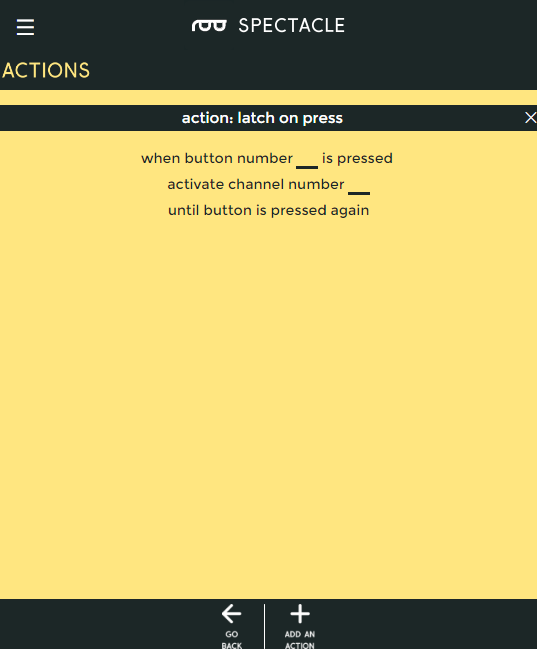
This action is like a latching power switch. One press turns the signal on, another later press turns the signal off.
- "While button number ... is pressed" - This is the number of the button we wish to assign to this action. The button numbers are printed on the board, and run from 0 through 8.
- "activate channel number ... until button is pressed again" - A continuous will be sent out on this channel. It is suitable for triggering and repeating a sound, or for turning on and keeping on a lighting effect.
Spectacle Motion Board
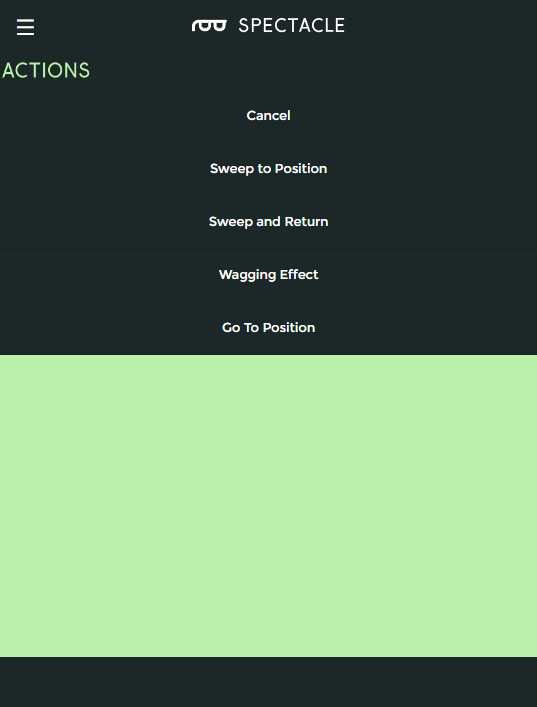
There are four actions associated with the motion board. Three of them are suitable for a momentary trigger and one for a continuous signal.
Sweep to Position
This action moves the motor between two positions, one motion on each trigger event.
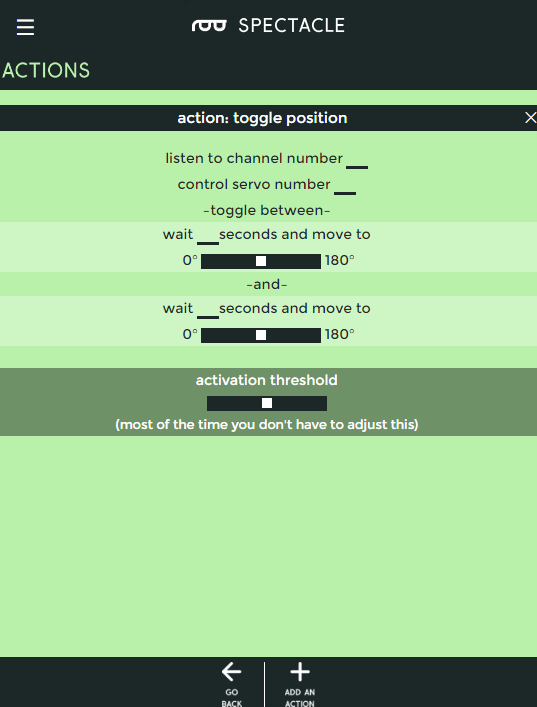
- "listen to channel number ..." - This is the channel which triggers the action.
- "control servo number ..." - The servo to be controlled, numbered from 0-4.
- "wait ... seconds and move to" - Delay before motion for the first position.
- slider control - Choose the position for the first motion. The servo starts at 90° and can be rotated to 0° in one direction or to 180° in the other direction. This is equivalent to starting at 12 o'clock and turning to either 9 o'clock or 3 o'clock.
- "wait ... seconds and move to" - Delay before motion for the second position.
- slider control - Choose the position for the second motion. The servo starts at 90° and can be rotated to 0° in one direction or to 180° in the other direction. This is equivalent to starting at 12 o'clock and turning to either 9 o'clock or 3 o'clock.
Sweep and Return

This action waits for a moment, moves the servo to a position, then waits for a moment at the new position, then moves back to the first position.
- "listen to channel number ..." - Which channel controls this action.
- "control servo number ..." - The servo to be controlled, numbered from 0-4.
- "wait ... seconds and move to" - Delay before motion for the first position.
- slider control - Choose the position for the first motion. The servo starts at 90° and can be rotated to 0° in one direction or to 180° in the other direction. This is equivalent to starting at 12 o'clock and turning to either 9 o'clock or 3 o'clock.
- "wait ... seconds and move to" - Delay before motion for the second position.
- slider control - Choose the position for the second motion. The servo starts at 90° and can be rotated to 0° in one direction or to 180° in the other direction. This is equivalent to starting at 12 o'clock and turning to either 9 o'clock or 3 o'clock.
Wagging Effect
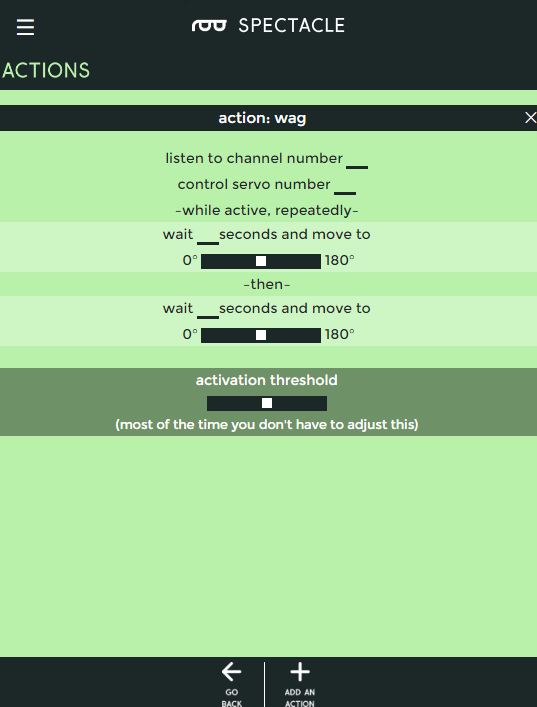
This action behaves much like sweep and return, but runs continuously until turned off by receipt of another signal pulse on the designated channel.
- "listen to channel number ..." - Which channel controls this action.
- "control servo number ..." - The servo to be controlled, numbered from 0-4.
- "wait ... seconds and move to" - Delay before motion for the first position.
- slider control - Choose the position for the first motion. The servo starts at 90° and can be rotated to 0° in one direction or to 180° in the other direction. This is equivalent to starting at 12 o'clock and turning to either 9 o'clock or 3 o'clock.
- "wait ... seconds and move to" - Delay before motion for the second position.
- slider control - Choose the position for the second motion. The servo starts at 90° and can be rotated to 0° in one direction or to 180° in the other direction. This is equivalent to starting at 12 o'clock and turning to either 9 o'clock or 3 o'clock.
Go to Position
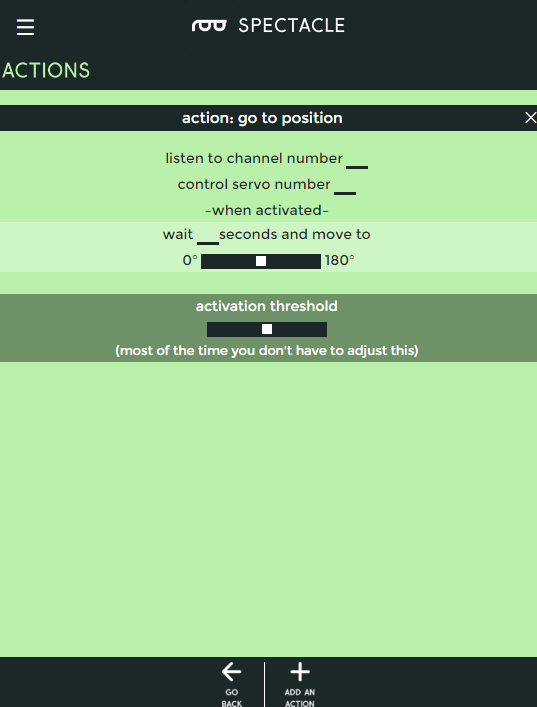
Move the servo motor from where ever it currently is to this new location after some delay.
- "listen to channel number ..." - Which channel controls this action.
- "control servo number ..." - The servo to be controlled, numbered from 0-4.
- "wait ... seconds and move to" - Delay before motion for the first position.
- slider control - Choose the position for the first motion. The servo starts at 90° and can be rotated to 0° in one direction or to 180° in the other direction. This is equivalent to starting at 12 o'clock and turning to either 9 o'clock or 3 o'clock.
Example Project
Let's use the Spectacle Motion Board Kit to make a project! We're going to hook up the Button Board and the Motion Board to make a simple project where the motor moves from one position to another and then back when the button on the Button Board is pressed.
Connect the boards
All of the hardware you need for this tutorial is included in the kit.
First, plug one end of one of the TRRS cables into the "Direct" jack on the Director Board.
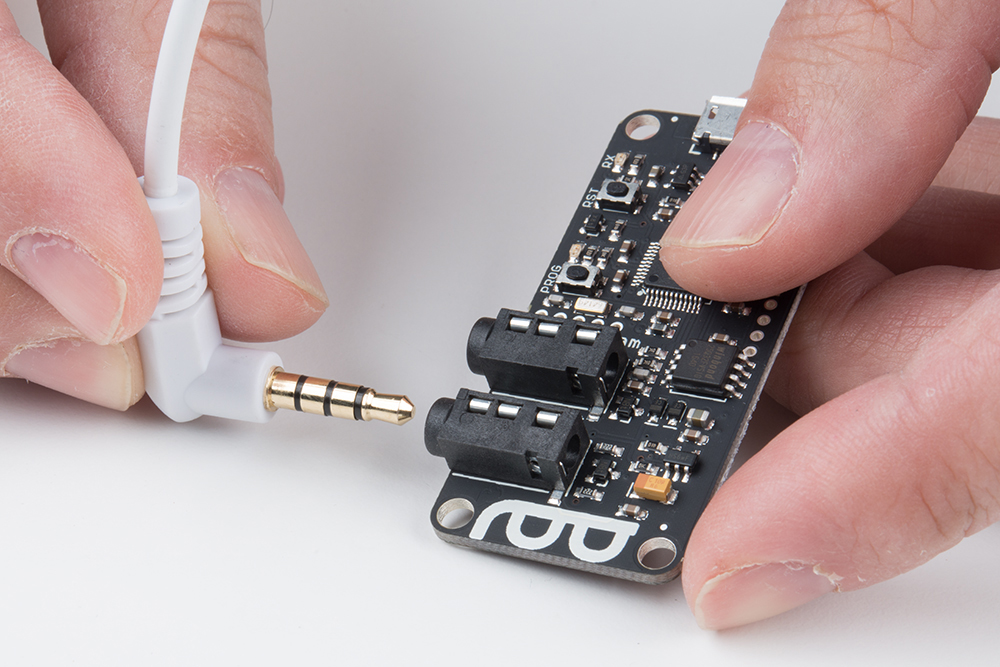
Next, take the other TRRS cable and plug it into the "Program" jack on the Director Board.
Take the other end of this cable and plug it into the audio jack of the phone, tablet, or computer that you'll be using to program the system.
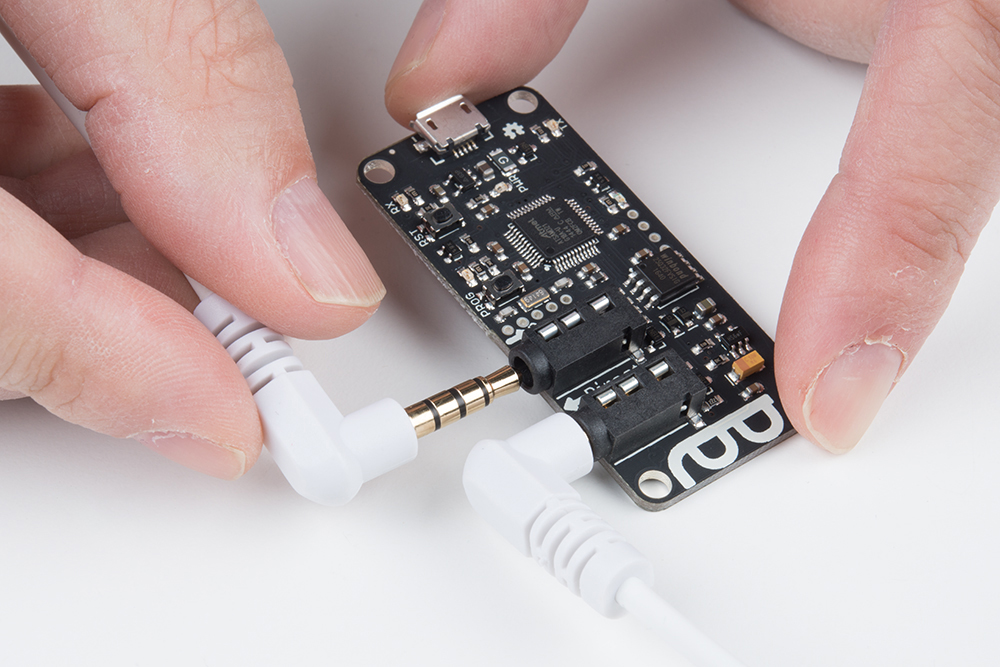
Then take the other end of that TRRS cable and plug it into the "In" jack on the Button Board.
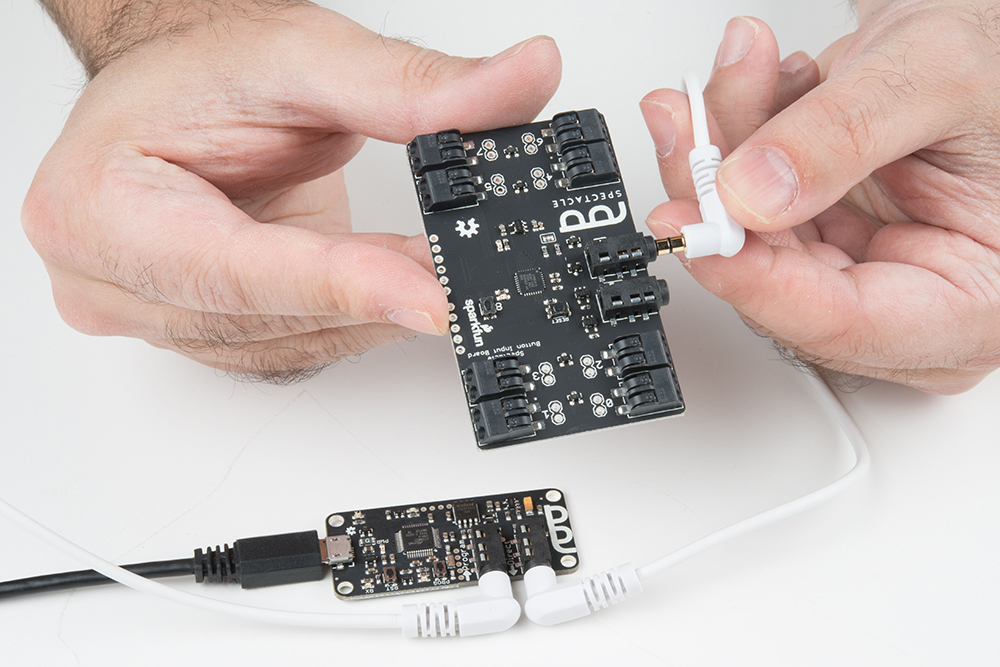
Grab another of the TRRS cables and plug it into the "Out" jack on the Button Board.
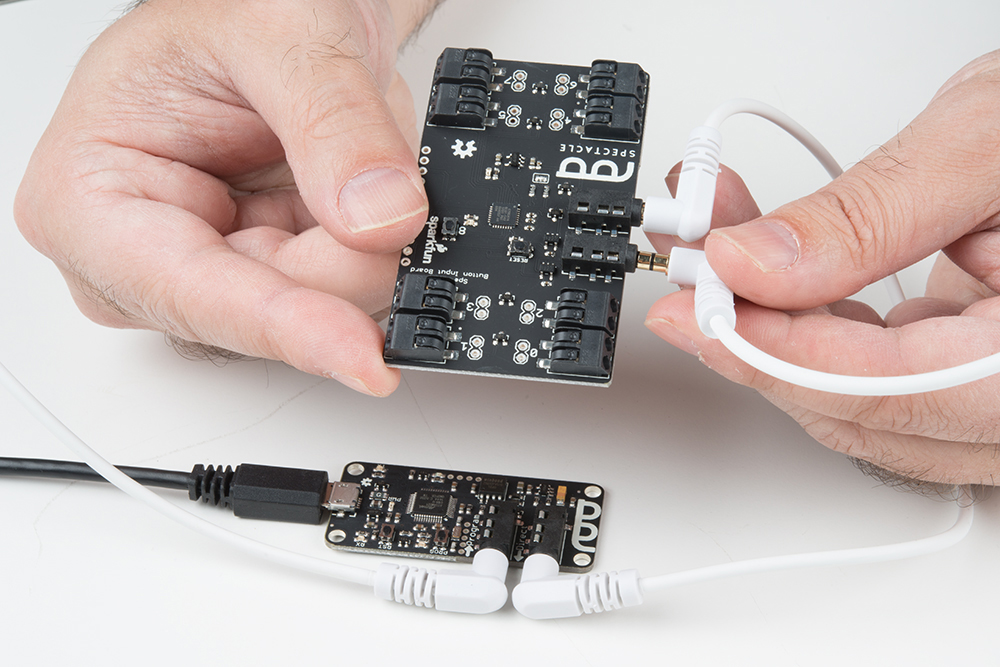
Plug the other end of that cable into the "In" jack on your Motion Board.

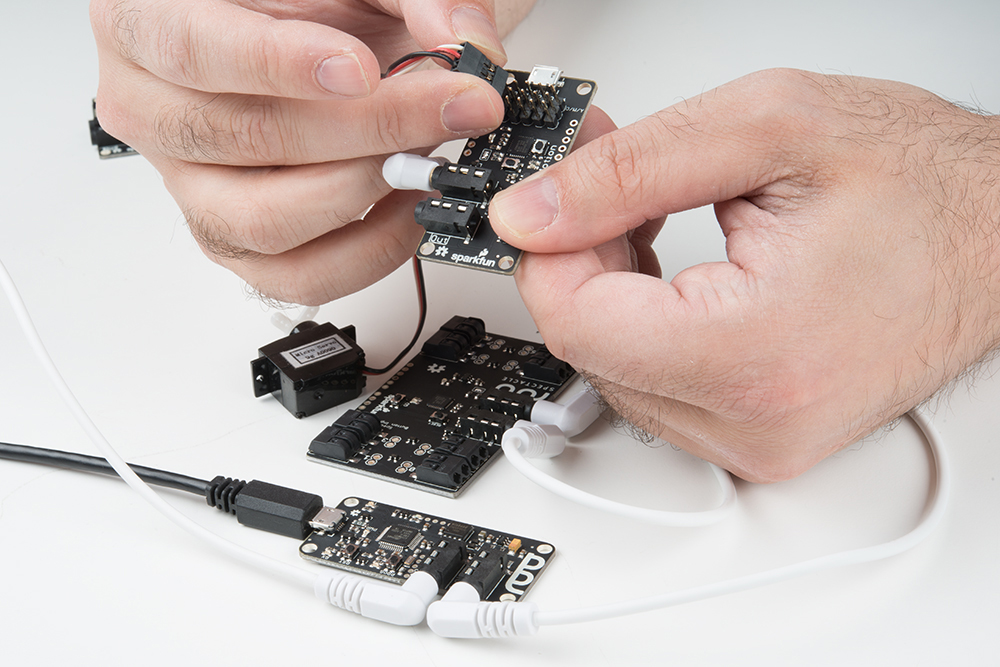
Now, plug the servo connector onto the Motion Board.
Finally, plug the Micro B end of the power adapter into the Director board, and the other end into the wall. You should see one solid light and one blinking light on the Motion Board and the Button board. On the Director Board, you'll see one solid light and one light which blinks one time, then pauses, then repeats. This shows that power is present and the boards are up and running.
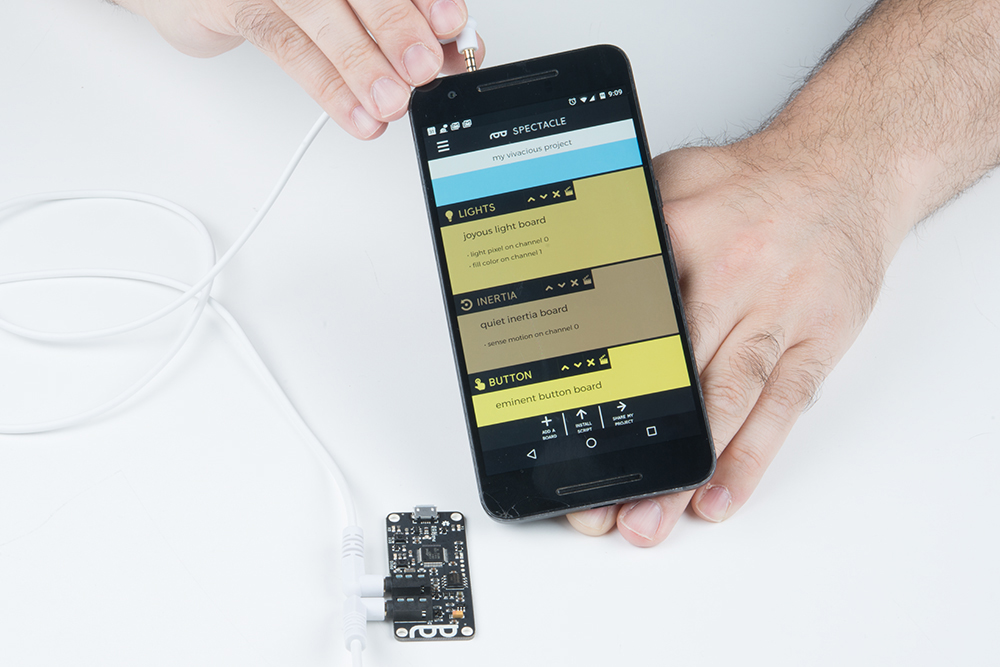
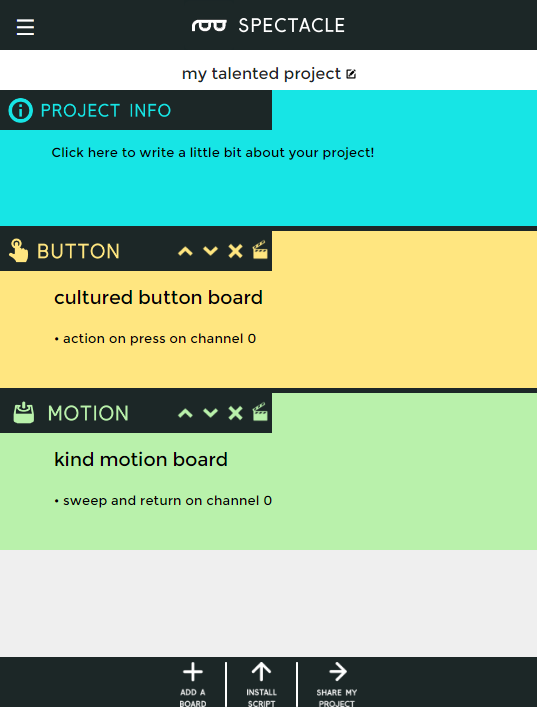
Setting up the board configuration
When you first open the Spectacle app webpage, this is what you'll see. Your project name will differ from mine, as Spectacle assigns a random name to each project.
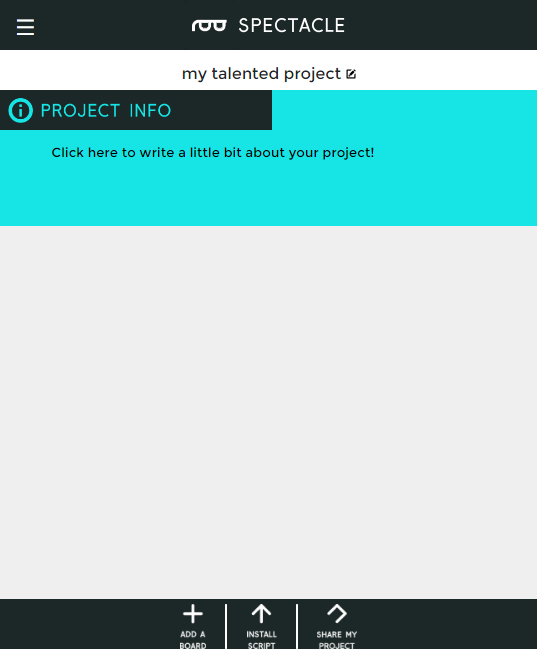
To continue, we must tell the project which boards we wish to use. Start by clicking the "Add a Board" button at the bottom of the page.

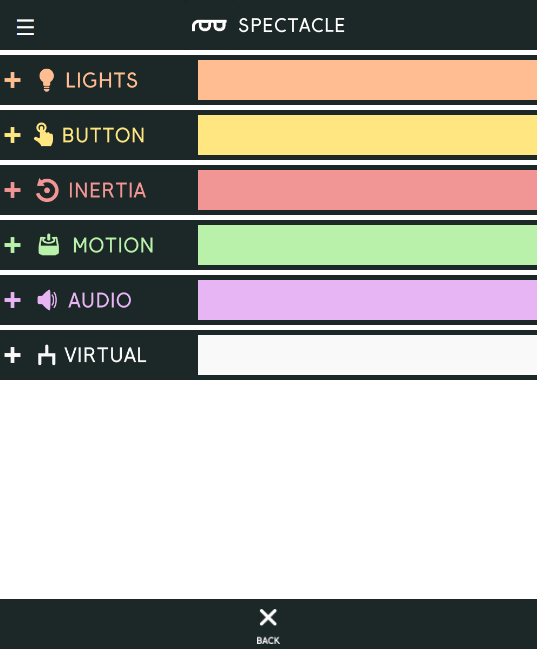
This will bring up a list of the available boards. We're going to add our Button Board first of all, so click anywhere in the "Button" box to add it.
Now repeat these two steps, but add a Motion Board this time instead of another Button Board.
You'll now have a screen that looks like this. To continue, we need to add some actions to the boards that tell the Spectacle system what we want the boards to do.
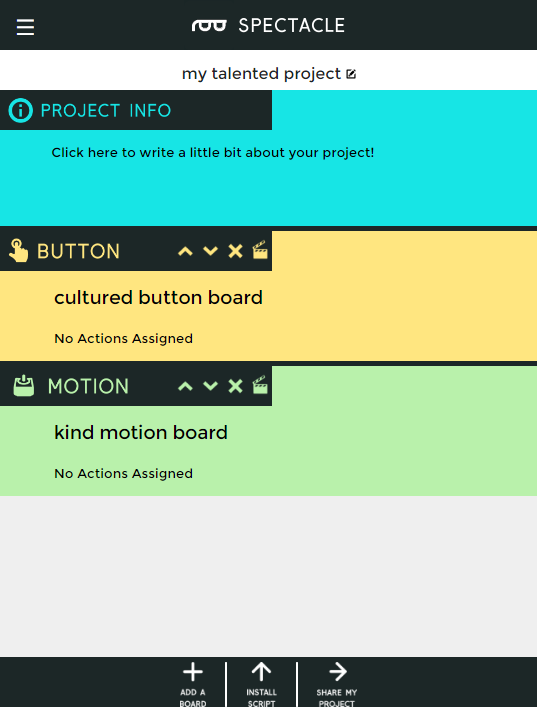
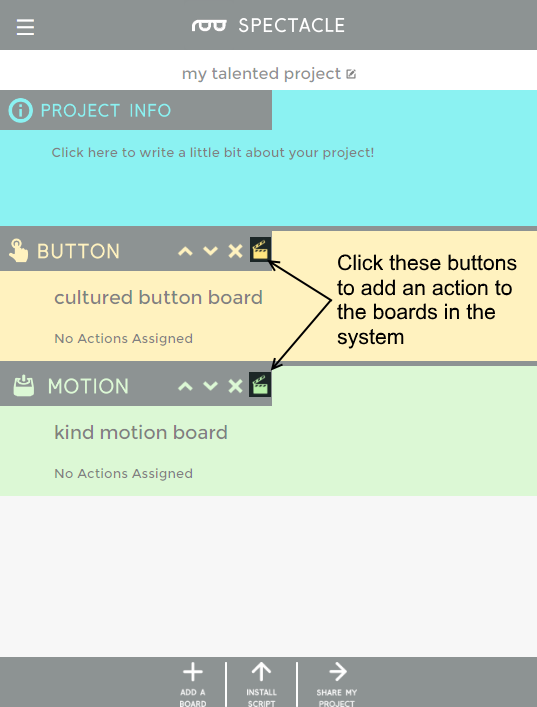
To add actions, click on the clapboard icons as highlighted above. We're going to do the Button Board first.
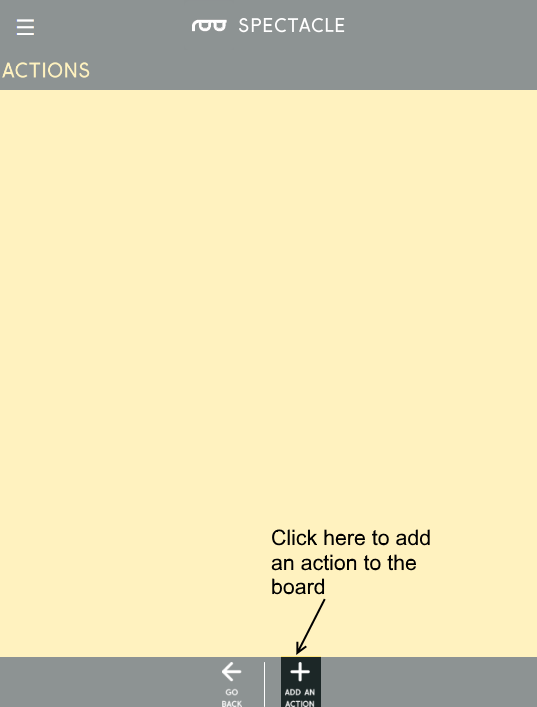
You'll then see a list of actions assigned to the board which will, of course, be empty. To add an action, click the "Add an Action" button at the bottom of the page as highlighted below.
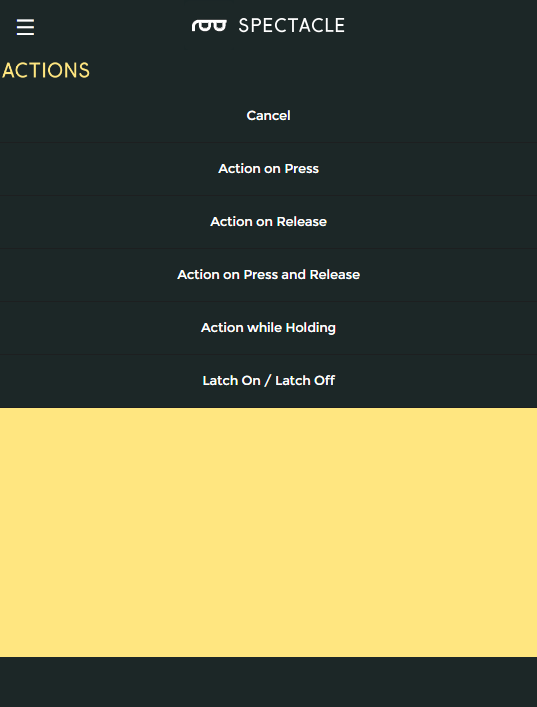
Here we see the available actions for the Button Board. We're going to select the first one, "Action on Press". Click that entry to select it.
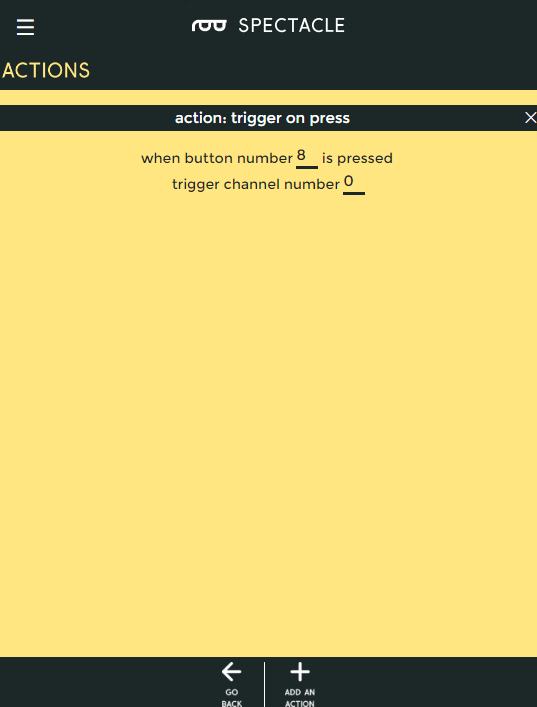
This is the "Trigger on Press" action options screen. I've already entered the data in the fields: button 8 to channel 0. Button 8 is the Button Board's built-in button. Now click the "Go Back" button at the bottom of the page to go back to the main page, so we can add an action to the Motion Board.
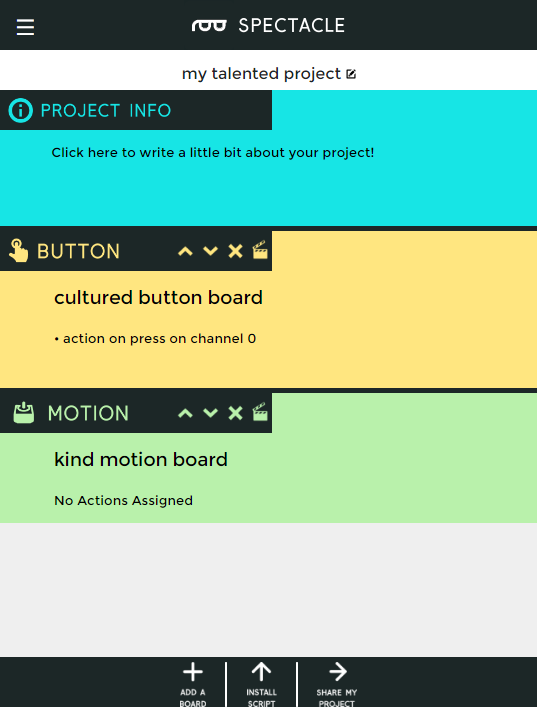
Back at the main page, you can see that the action we just added to the Button Board shows up listed under that board in the boards list. Click on the Motion Board clapboard icon to bring up the action list for it.
Here is the list of possible actions for the Motion Board. We're going to add a "Sweep and Return" action.
I've put the settings we want into the "Sweep and Return" page settings. Click "Go Back" to save the changes and return to the main board list.

Congratulations! You've finished the configuration step of the process. Now it's time to move on to loading the project onto your Director Board.
Uploading
Now that you've created your Spectacle program it's time to upload it to the Director Board. If you followed the instructions above, your uploading device is connected to the board and ready to go, so all you need to do is touch the "Install Script" button at the bottom of the page. That will bring up the page seen below.
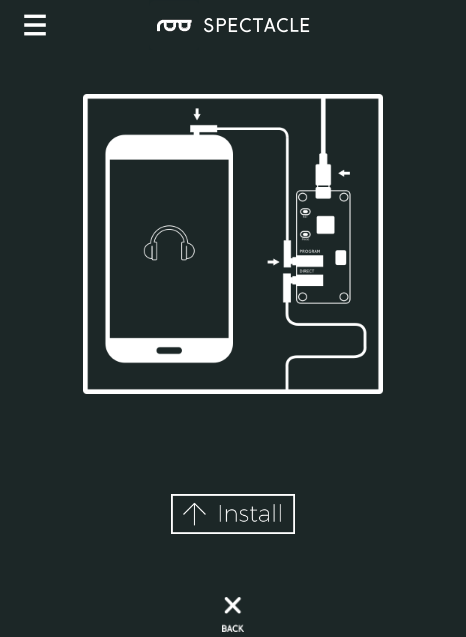
Make sure the volume on your device is turned all the way up, and that no other audio source (music, video, etc) is playing in the background. Then press and hold the "RST" button on the Director Board, press and hold the "PROG" button, then release the "RST" button.
This will put the Director Board into program mode. You'll see the light on the board blink three times, pause, then repeat. This is your visual indicator that the board is in program mode. Once you've established that the board is in program mode, you can begin programming by touching the "Install" button on the Spectacle app screen. The button will gray out during the programming process, which should only last for a few seconds. Once programming is done, you'll see the light on the Director Board blink 10 times, pause, then repeat. That's your cue that the program was uploaded successfully.
Press the "RST" button again to reset the system and begin the program!
If you have any troubles, visit the troubleshooting page for help resolving your issues.
Resources and Going Further
For general Spectacle information, please check out the user guide:
Spectacle User's Guide
For more Spectacle fun, check out the additional tutorials below:
Spectacle Sound Kit Hookup Guide
Spectacle User's Guide
Spectacle Audio Board Hookup Guide
Spectacle Light Board Hookup Guide
Spectacle Motion Board Hookup Guide
Spectacle Inertia Board Hookup Guide
Or check out the blog project posts that used the Spectacle Motion Board: