Ready to make some interactive art?
Yes? Well, let's get started!
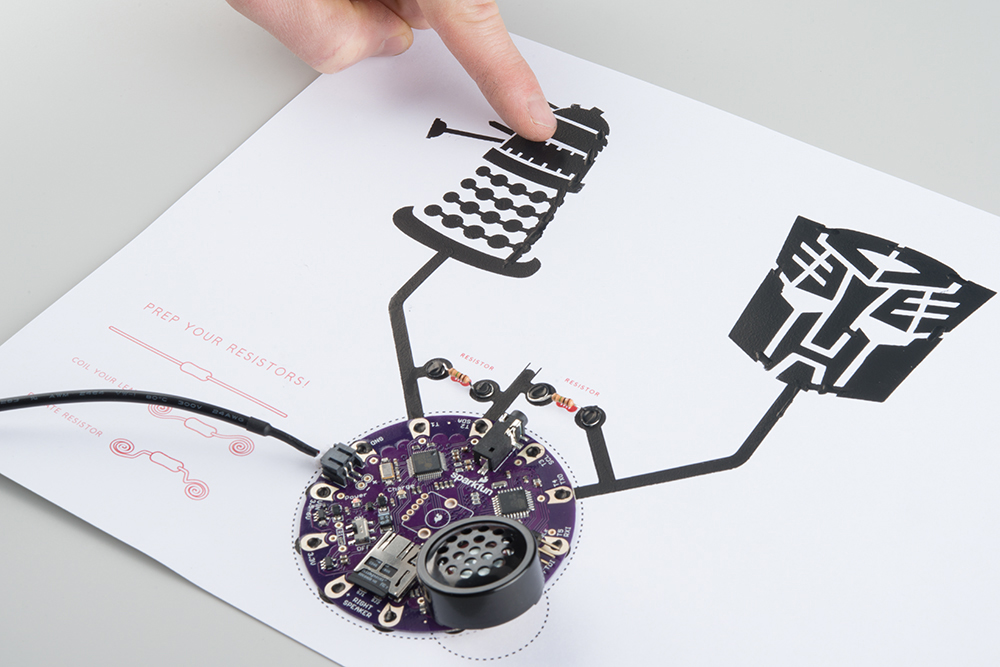
We will be using a tube of Bare Conductive Paint that you will use to make shapes, silhouette, and patterns. As long as you connect the ink back to the LilyPad MP3 board you can interact with the piece. When you touch one of the silhouettes, a sound will play from the speaker. While the paint does conduct electricity, don't worry, it's very little electricity. It won't shock you.
This tutorial is based on the Bare Conductive Paint Wall featured in ElectriCute!
ReplaceMeOpen
ReplaceMeClose
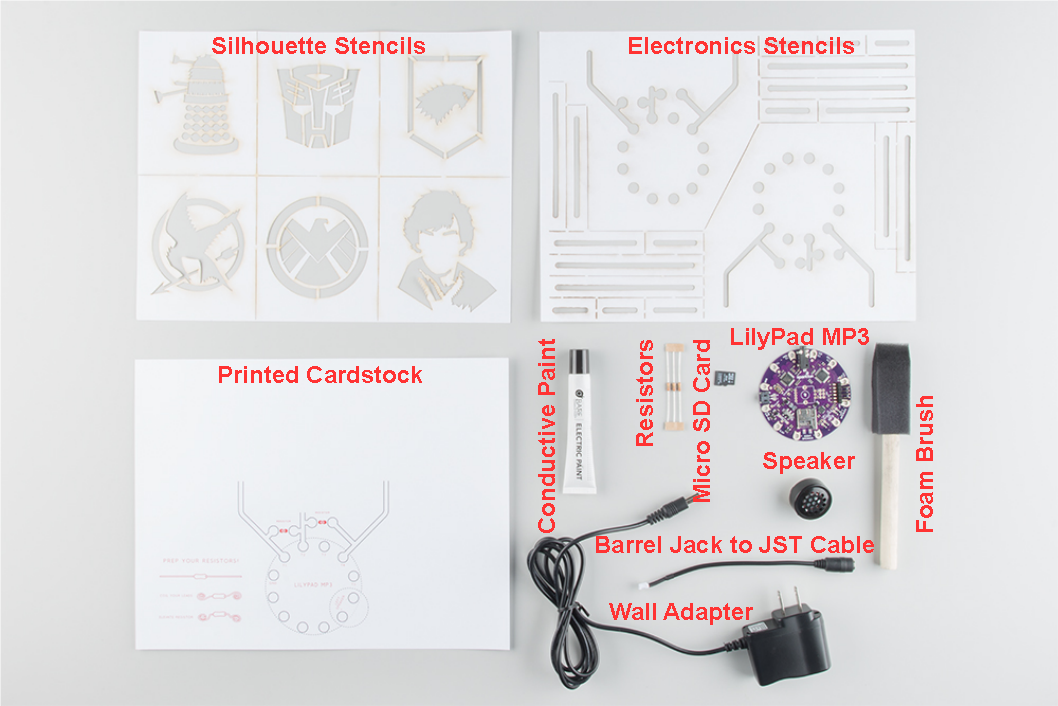
You will need a few components to follow along with this tutorial. Here is what you will need:
Additionally, you will need:
We have labeled the materials in this picture, so you know what we are talking about in the rest of the guide.
Before getting started with the Sound Page Kit, you might want to read about the technology that goes into it:
IMPORTANT: Read all of the directions in this section before doing anything first! You will need to perform them relatively quickly so that the paint does not completely dry while you attach the electronics. If some of the paint does dry, simply add more paint when you want to attach the electronics.

If you do not have the printed cardstock, you can download the artwork here. Just download the file and print it on cardstock or paper!
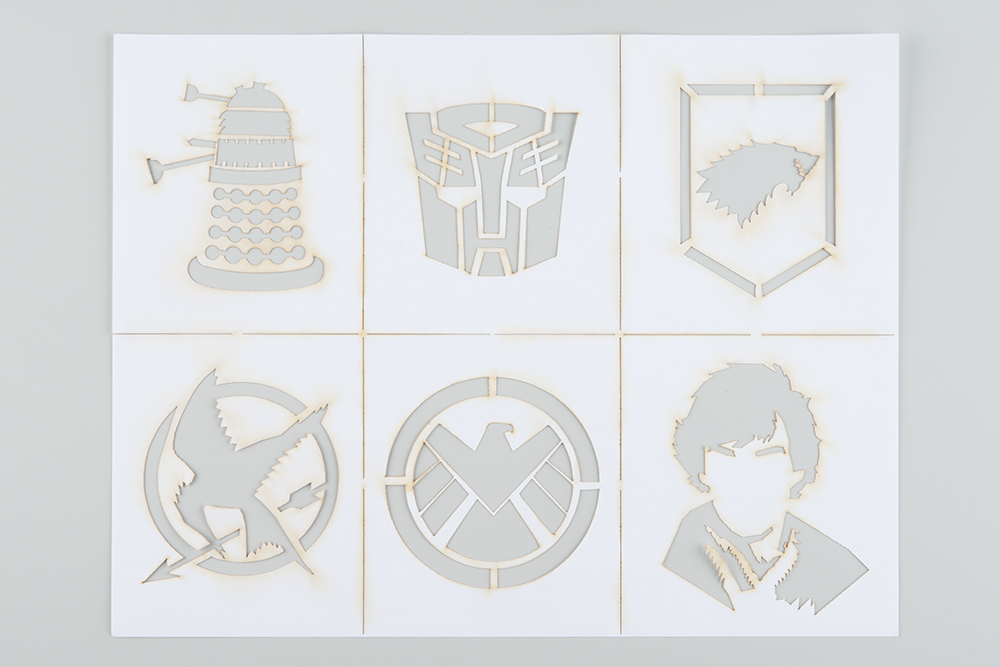
If you want to create stencils the same way we did, you will need to buy some sticky-but-not-too-sticky label paper. We used this stuff from onlinelabels.com. You will also need to download the stencils we made, and print them out on the label sheet. You can use an X-Acto knife to cut the stencil (we did ours with a laser engraver so we could make lots of them).

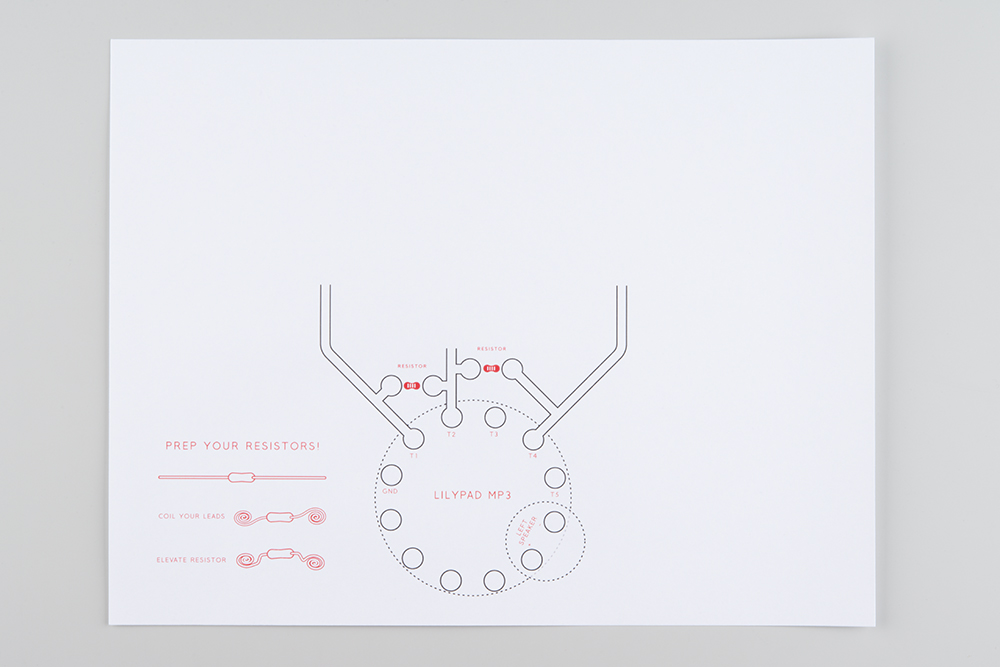
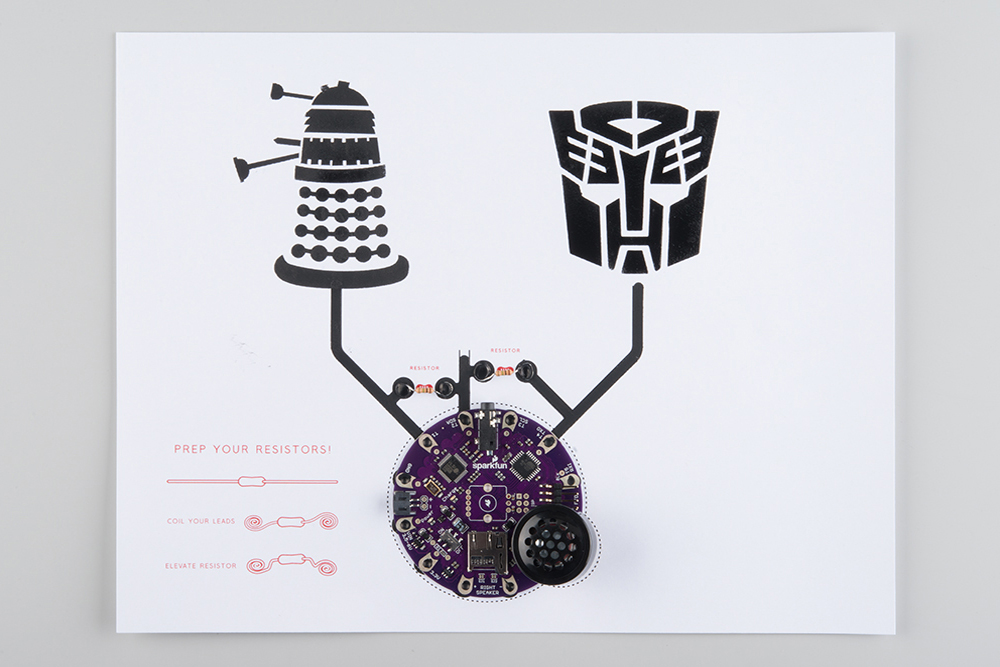
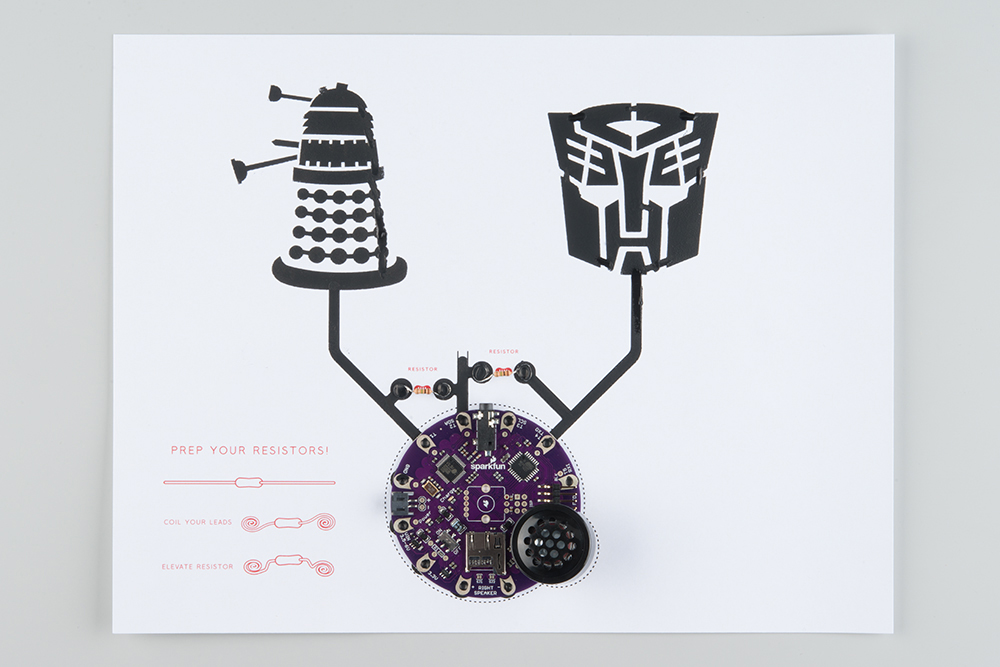
The first thing we need to do is create the LilyPad board footprint in conductive ink so that we have a place to stick the electronics.
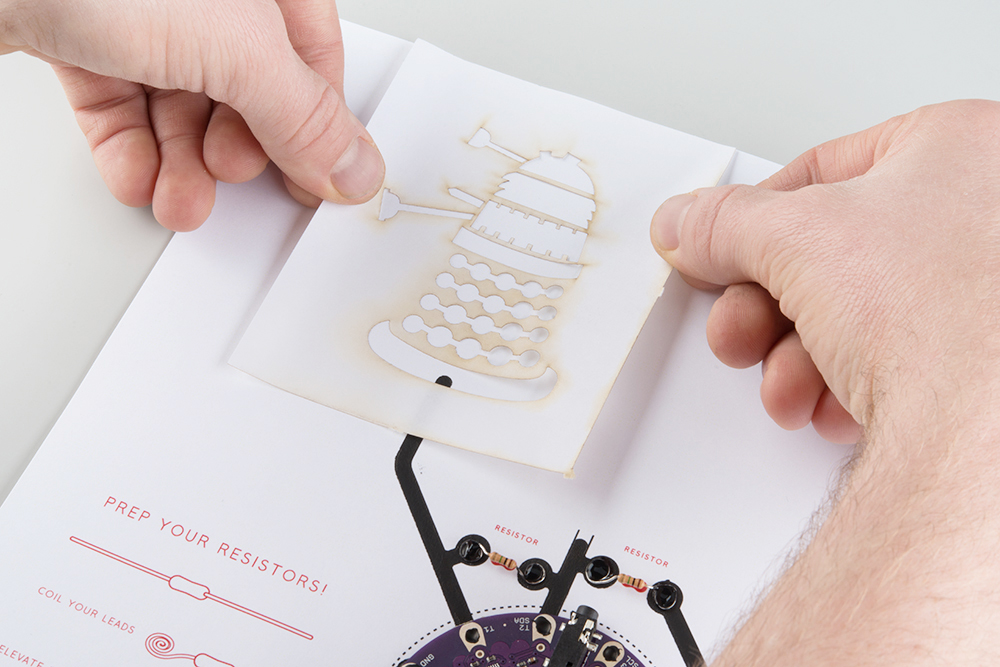
Separate the LilyPad MP3 footprint stencil from the rest of the stencils. Peel off the backing of the footprint stencil, and place it over the outlines. Make sure that the traces are facing toward the top of the page. They will be connected to our silhouettes!

Squeeze some conductive ink on the stencil, and use the foam brush to fill in the stencil with the ink. Make sure the spaces in the stencil get covered in ink completely! You don't want it to be splotchy, otherwise it won't conduct electricity very well.
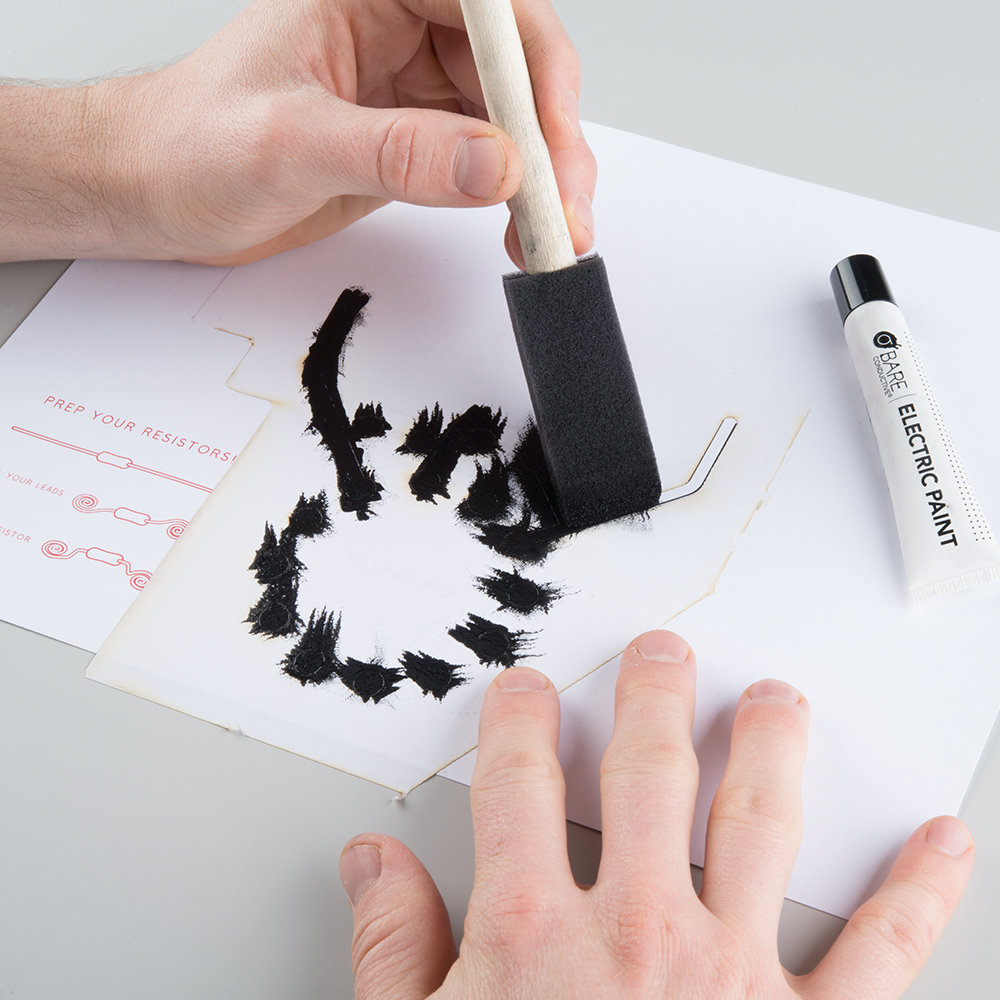
While the paint is still wet, carefully peel the stencil off the page.

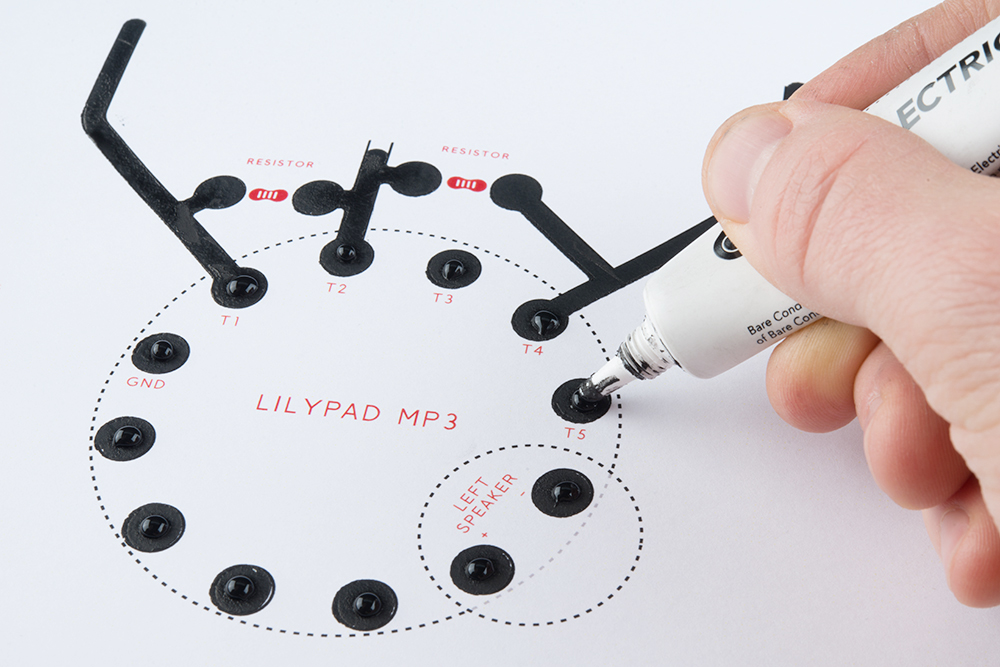
If any of the paint has dried, we recommend you add a drop of conductive paint to each of the circles where the LilyPad MP3 board will go.
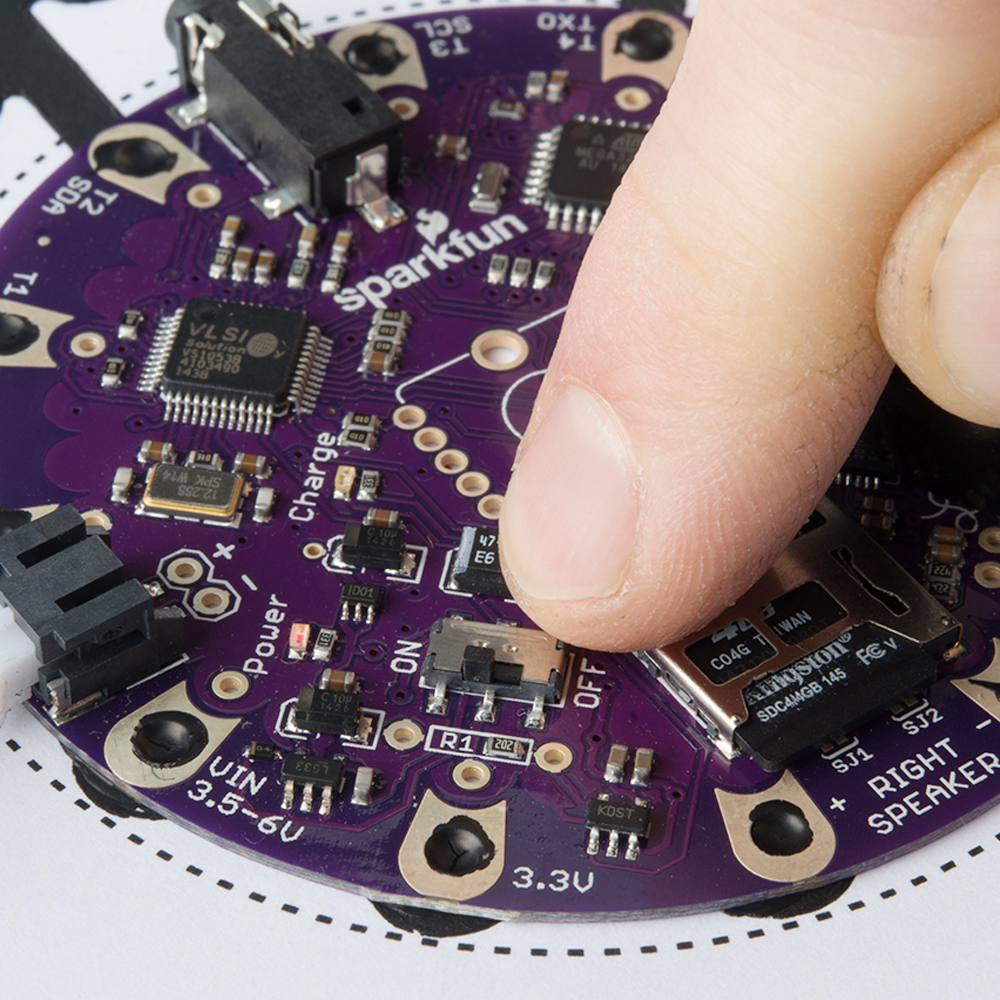
Carefully place the LilyPad MP3 board so that the holes on the edge line up with the circles of paint that we just made with the stencils.
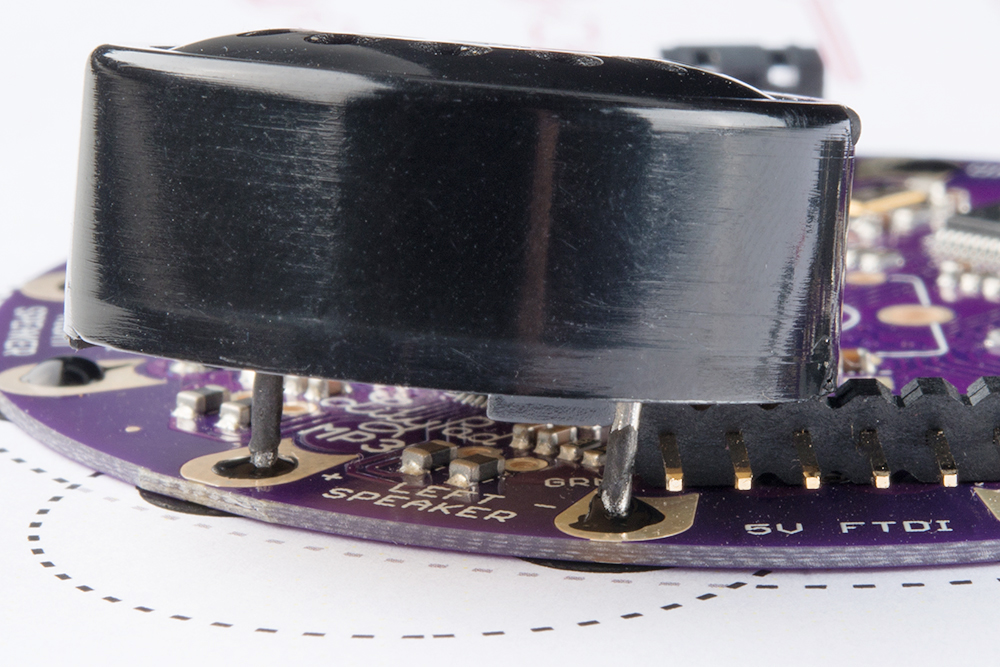
IMPORTANT: Make sure that the SD card slot (the one by the holes labeled "RIGHT SPEAKER") is facing down and the headphone jack is facing up. The label "LEFT SPEAKER" should be facing the "LEFT SPEAKER" text on the cardstock.
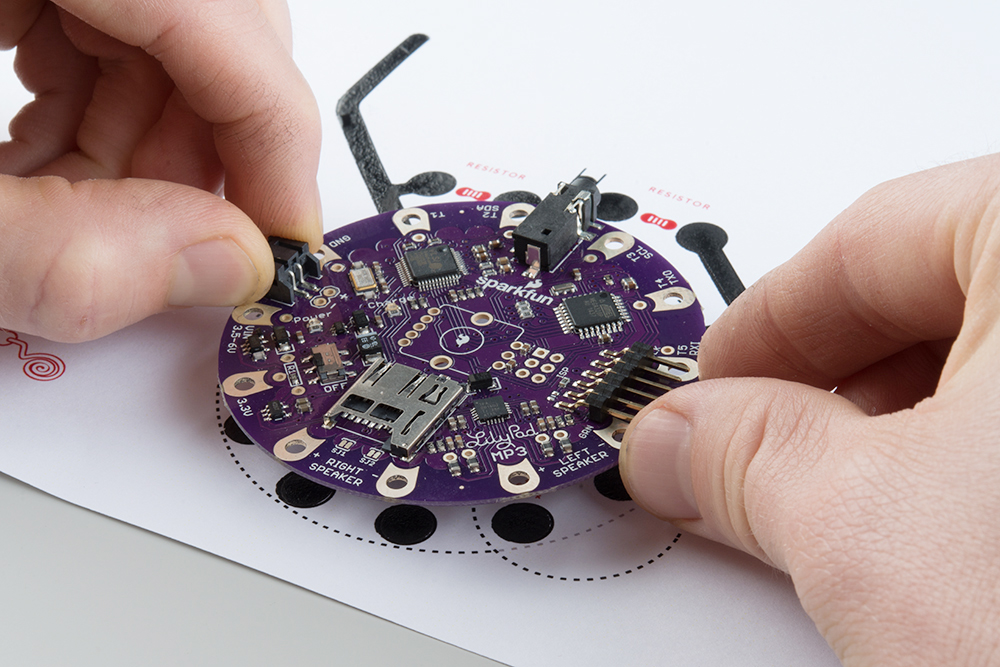
You will want the paint on to squish up into the holes a bit. This is how we make sure electricity can flow from the board to the touchable artwork!
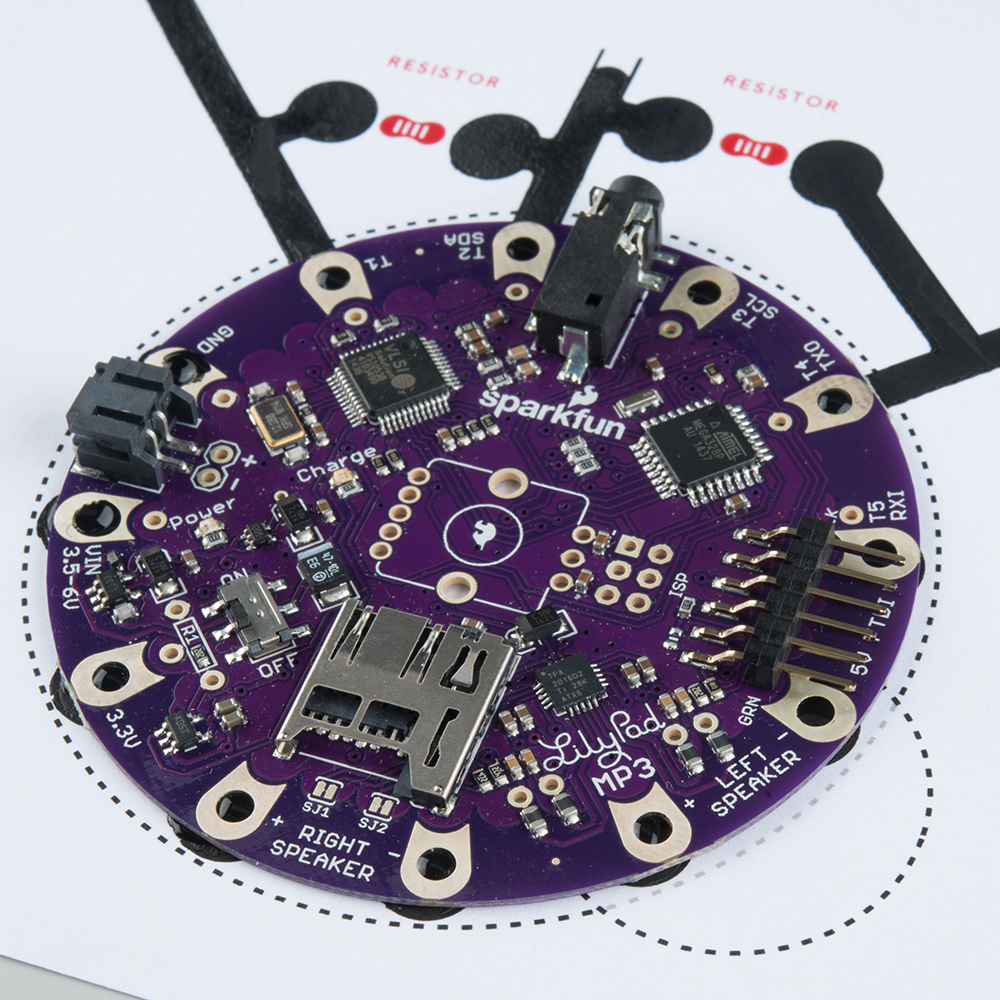
We want the board to make a good electrical connection to the traces we just made with the conductive ink. So, add a drop of conductive paint to each of the 12 holes around the edge of the LilyPad board.

You can use the headphones jack at the top of the LilyPad board to connect to a large set of speakers if you want to pump out some real sound (feel free to skip this step if you are doing that!). We can also add a small speaker to the LilyPad MP3 board to get sound out.
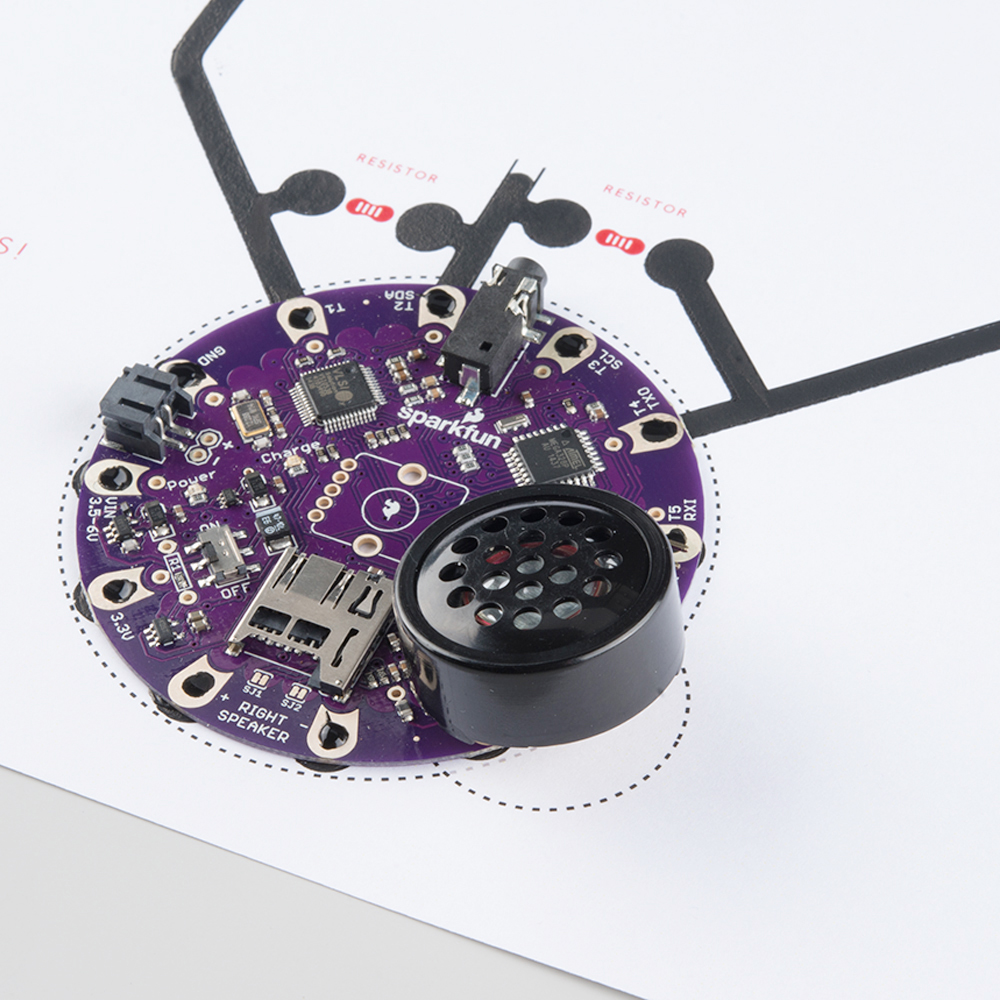
If you want to add the small speaker, add a drop of conductive paint to each of the "LEFT SPEAKER" holes.

With the paint in the LilyPad holes still wet, insert the pins of the speaker into the holes labeled "Left Speaker." It doesn't matter if the + and - of the speaker lines up with the + and - of the holes.
NOTE: IF you want to hold the speaker in place, you can add a drop of hot glue underneath the speaker. Don't worry, it won't hurt the electronics.

NOTE: The speaker will be a bit wobbly in the holes. Let the paint dry completely (a few hours) before touching the speaker again. You can complete the rest of the tutorial, but just be careful around the speaker!
IMPORTANT: Make sure that the pins from the speaker do not touch any of the pins labeled "5V FTDI" on the LilyPad board!
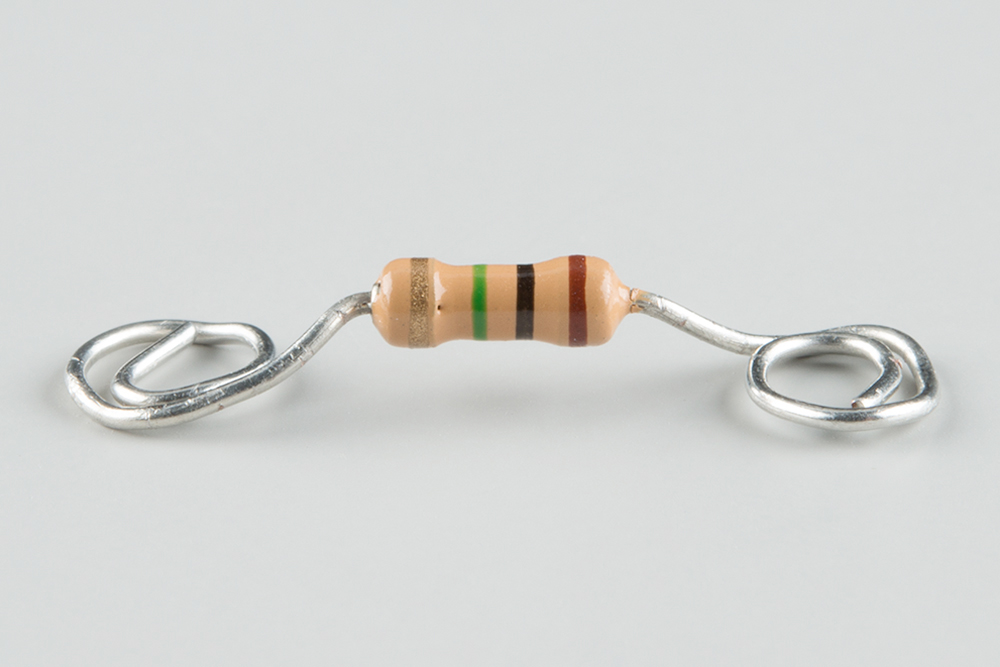
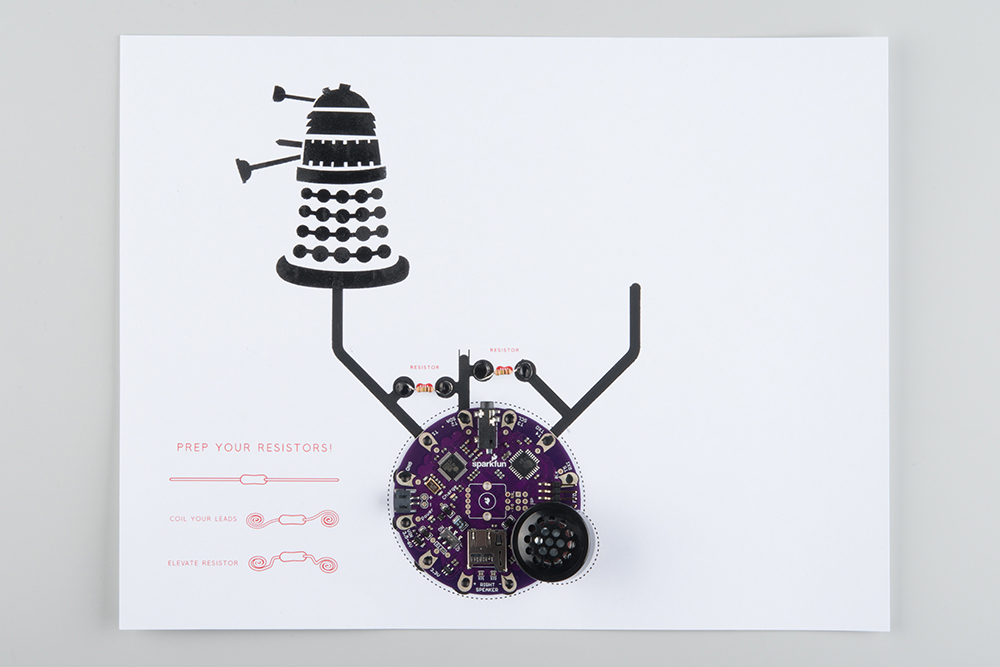
Using a set of pliers, tweezers, or your fingers, carefully roll the ends of two resistors to make little spirals.
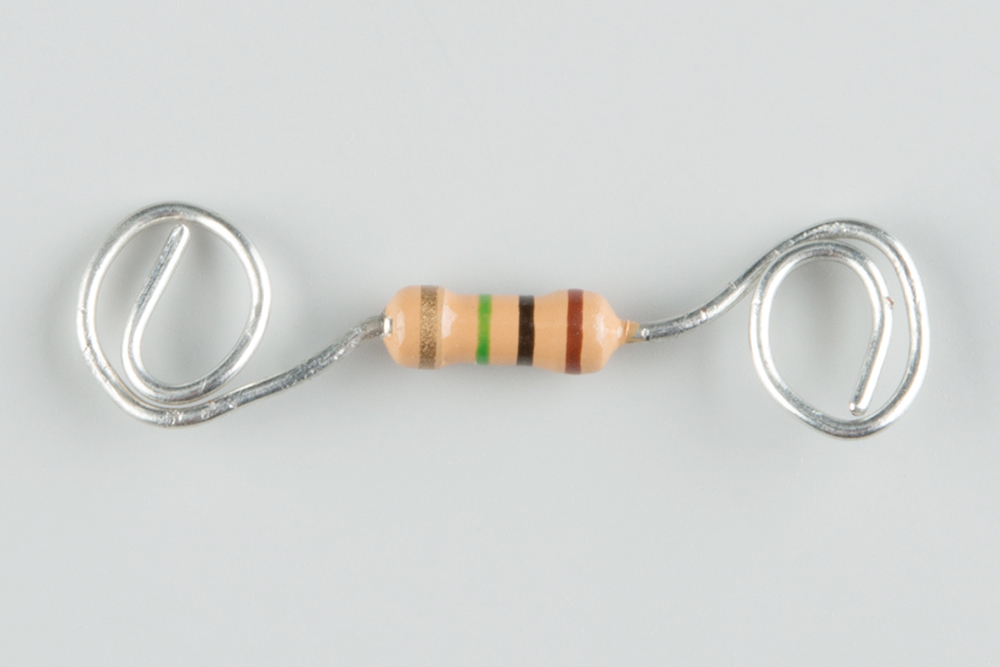
Bend the curled ends down, and then flatten them so that the resistor is elevated.
Find the resistor locations, which are marked in red on the printed cardstock. Add a drop of paint on each of the circular pads around the resistor locations.
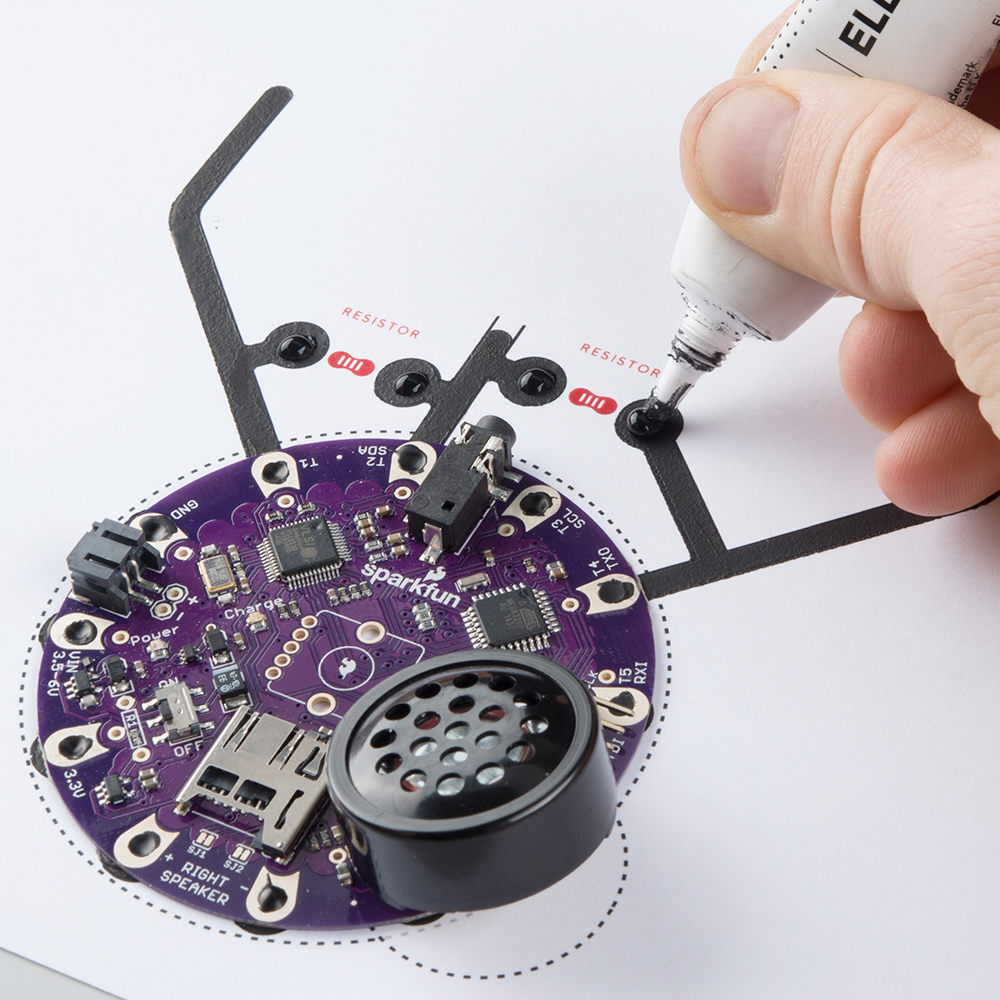
Place one resistor so that it connects the trace from T1 to the trace from T2 (these labels can be found on the LilyPad MP3 board). If you are using the printed cardstock, the location of the resistors are marked in red. Place the second resistor so that it connects the trace from T2 to the trace from T4.

Just like we did with the LilyPad board, we will want to add a drop of paint to each of the curled resistor leads so that they stay in place.

WAIT: at least 15 minutes for the paint to dry before moving on to the next step.
The next thing we need to do is choose which two of the stencils we want to put on our Sound Page. You are also welcome to print your own stencil or just create whatever are you want! This is art, after all. Just make sure that:
Just like with the stencil for the electronics, we used label sheets to create stencils for the silhouettes. You are welcome to print out the ones we made or make your own stencils:
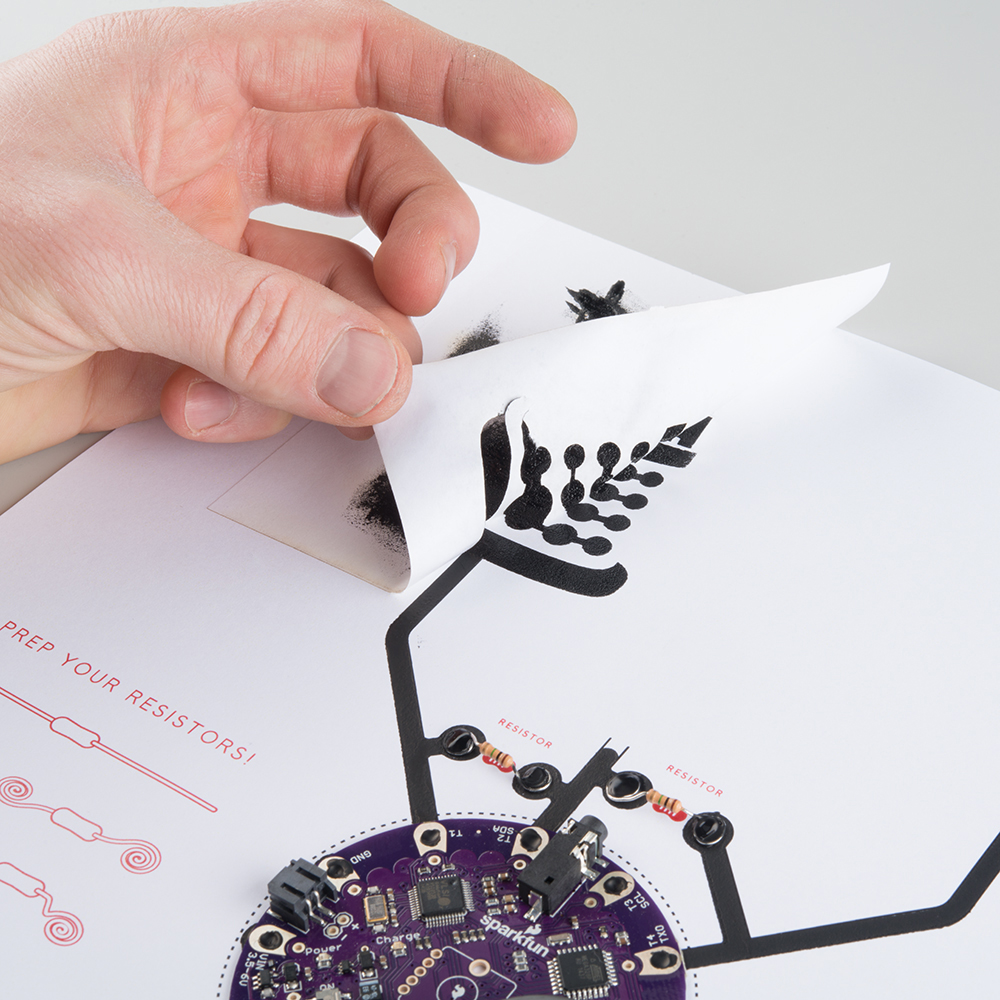
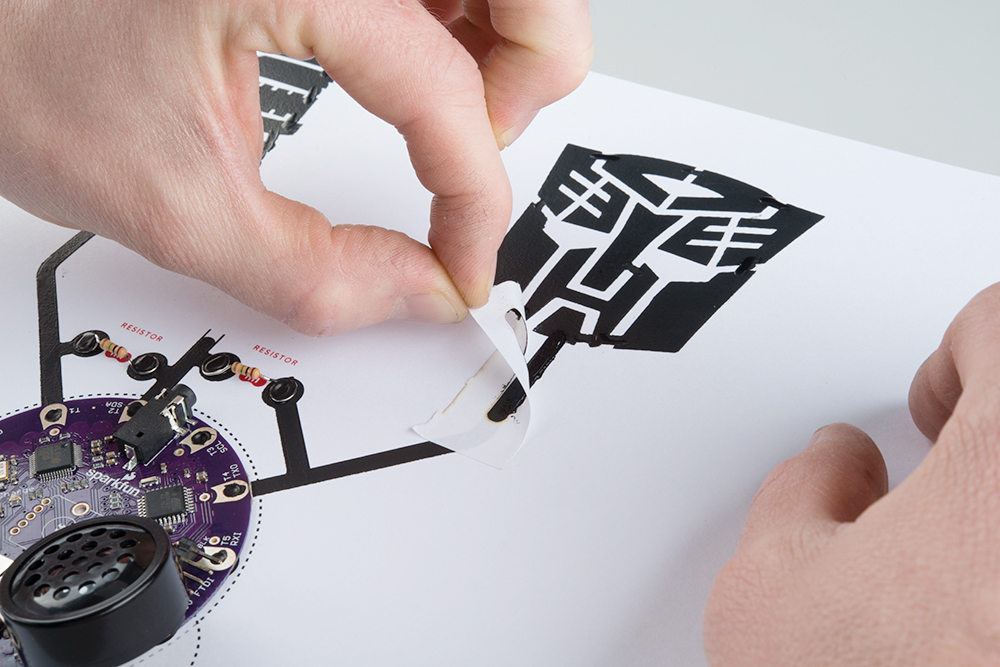
Pick one of the stencils, detach it from the sheet, and peel off the backing. Stick it on the page in the desired location (we suggest you make it fairly close to one of the traces coming from the LilyPad footprint).
Just like the footprint stencil, dab ink with the foam brush so that it completely fills your stencil.

Immediately (but carefully!) peel the stencil off the page while the paint is still wet. If some of the stencil breaks off, you can carefully remove the stuck pieces with tweezers.
Admire your stencil art!
Repeat the process to add a second silhouette.
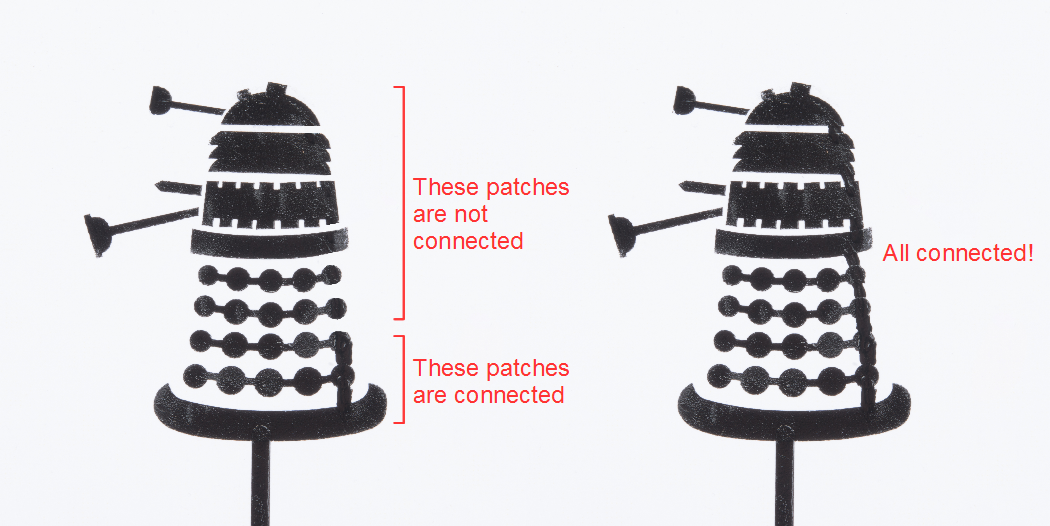
If a patch of conductive paint is not connected to the LilyPad MP3 board, you won't be able to touch it to make sounds!
Using a brush or the squeeze tube of conductive paint, carefully connect all of the black areas in the silhouettes (or at least the patches you want to be able to touch).
WAIT: At least 15 minutes before moving on the next step to allow the paint to dry.
Make sure that the silhouettes are connected to the traces that lead to the LilyPad MP3 board (with conductive paint, of course). For example, in the silhouette below, the paint around the face has been connected with conductive paint (except for the part above the eyes; you will not be able to touch those unless you connect them with paint!). However, the entire silhouette is not connected to the trace!
If you need to create lines with conductive paint to connect the traces to the silhouettes, use the straight line stencils.
WAIT: Once again, wait at least 15 minutes for the paint to dry before moving on. In the meantime, admire your work!
You can use a sealer, like clear spray paint to protect your work. Just be careful not to spray too much on the electronics! If you coat the connections for the SD card, for example, the LilyPad MP3 board might not be able to read it. Don't worry, you will still be able to activate the sounds through the clear coat.
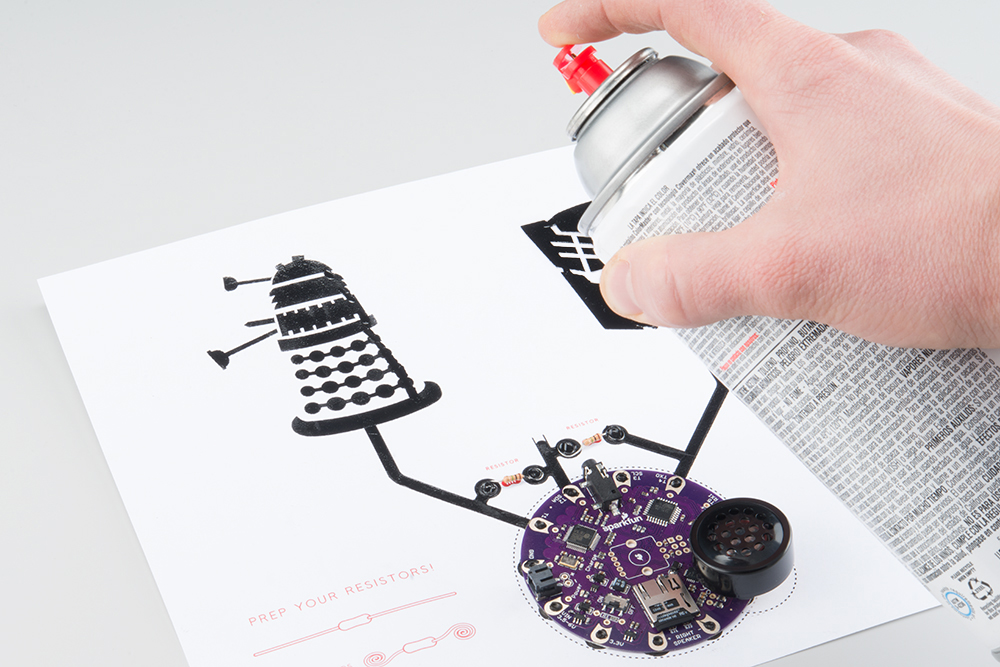
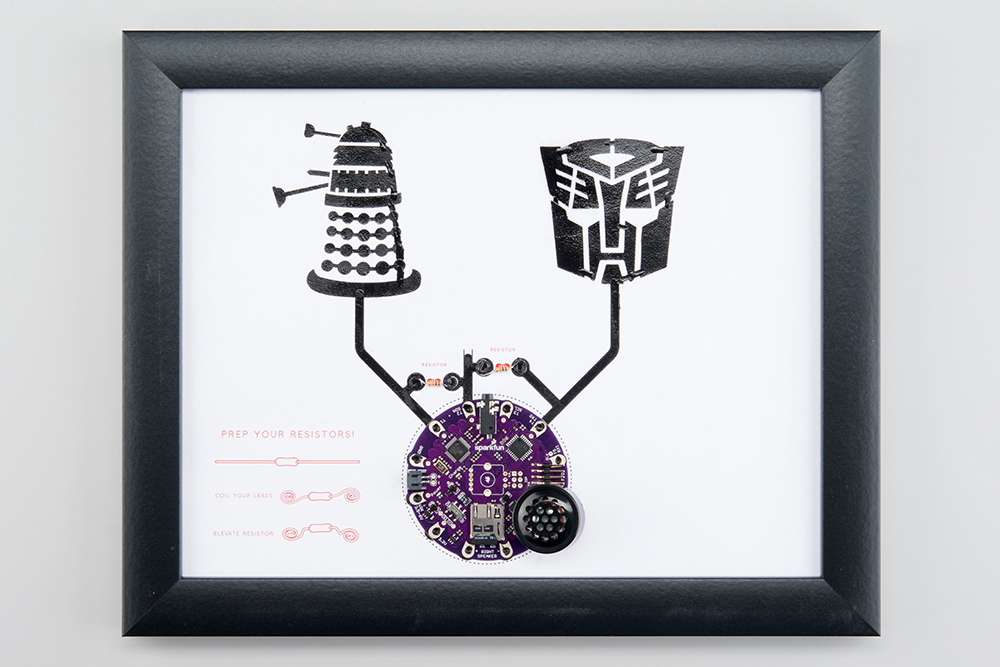
Additionally, you can frame your work to protect the edges and display it nicely!
We put together a selection of sound clips that correspond to the silhouette stencils that we made. If you would like to learn how to create your own sound clips, see the Hacking Your Kit section.
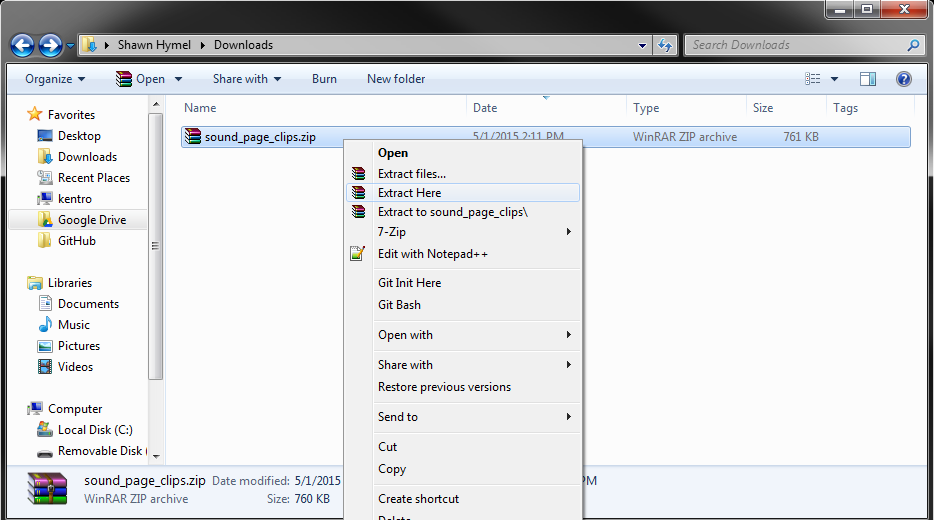
Download the sound clips file:
Extract the files.
Double-click on each of the sound clips to listen to them. The names were kept short (4 characters) to help the LilyPad MP3 board read them. For reference:
| File Name | Description |
|---|---|
| _bots.wav | Autobots |
| _dlel.wav | Dalek |
| _mkjy.wav | Mockingjay |
| _shld.wav | S.H.I.E.L.D |
| _shlk.wav | Sherlock |
| _wntr.wav | Winter is coming |
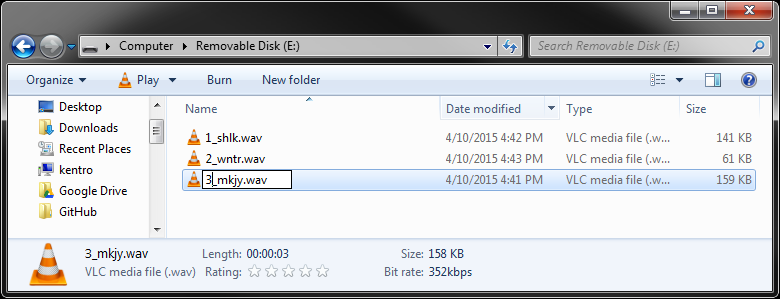
Using a micro SD card reader, insert the card into your computer. Choose the 2 sound clips you want to have played and copy them to the SD card.

This part is important! You need to rename the two sound clips and add a number in front of them. For the silhouette connected to the T1 on the LilyPad MP3 board, add a '1' in front of the name of the clip you want associated with it. For the silhouette connected to T4, add a '2' in front of the filename.
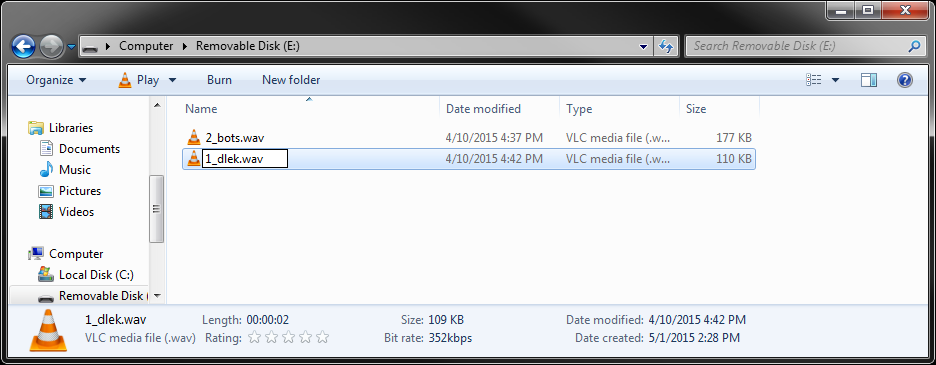
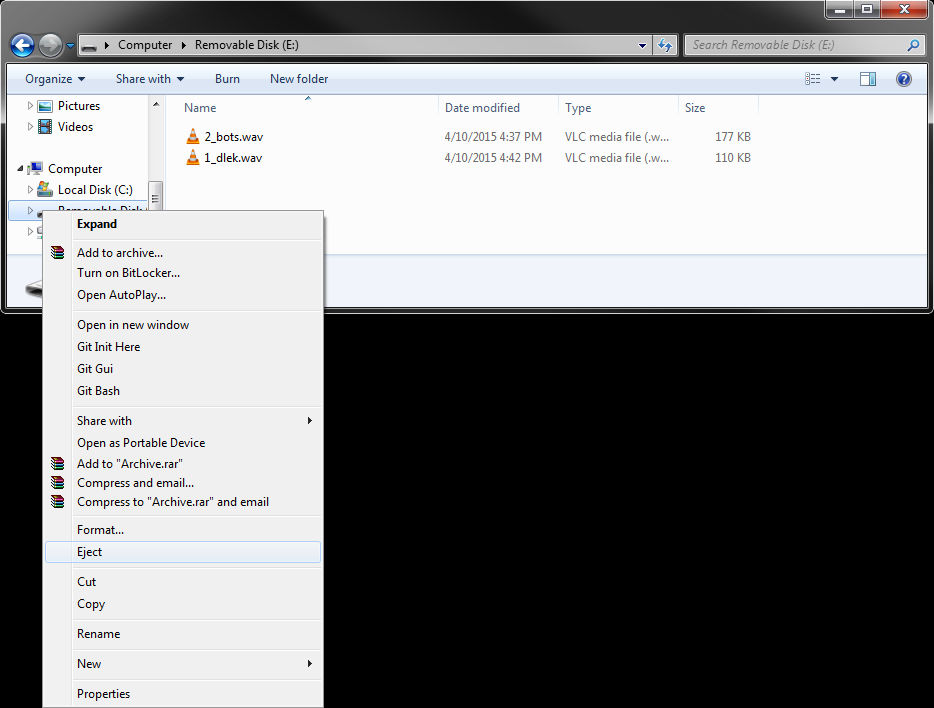
Eject the SD card from your computer.
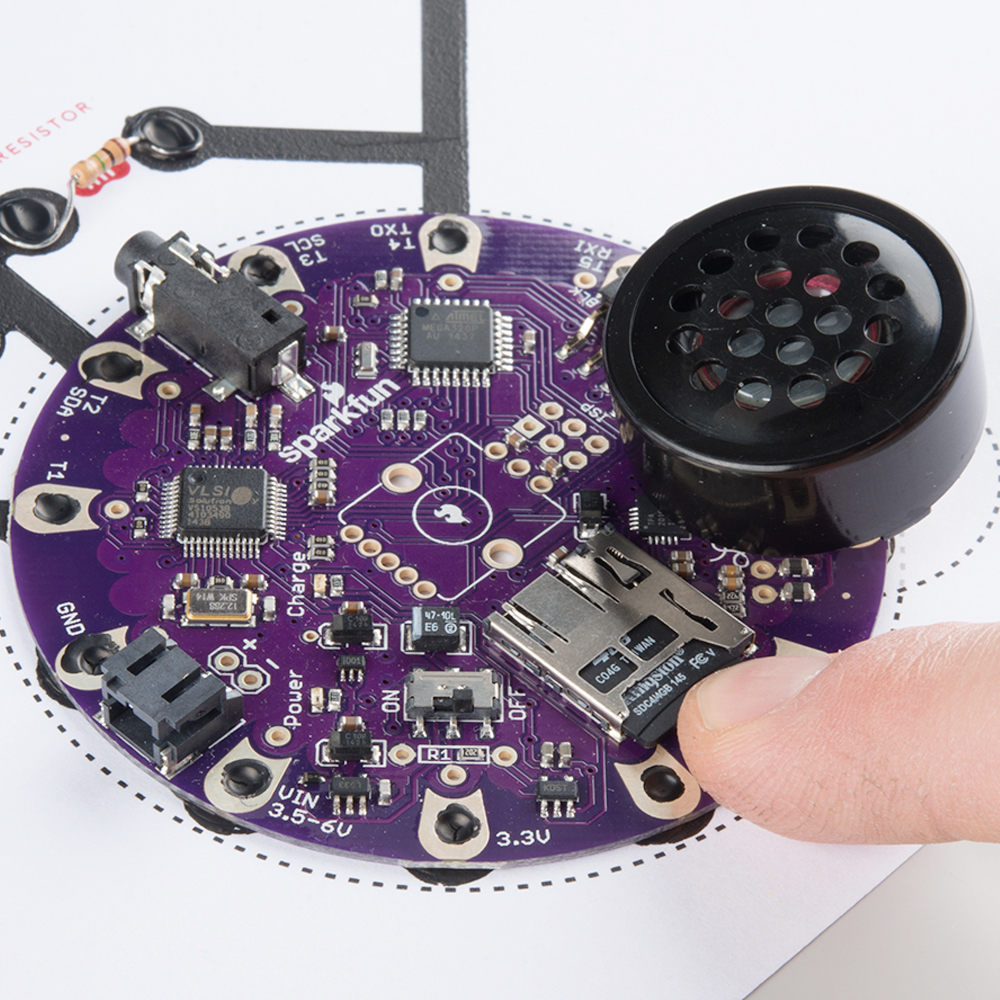
Remove the SD card from your computer and insert it into the LilyPad MP3 board.
Attach the barrel jack to JST cable to the LilyPad MP3 board's JST connector.
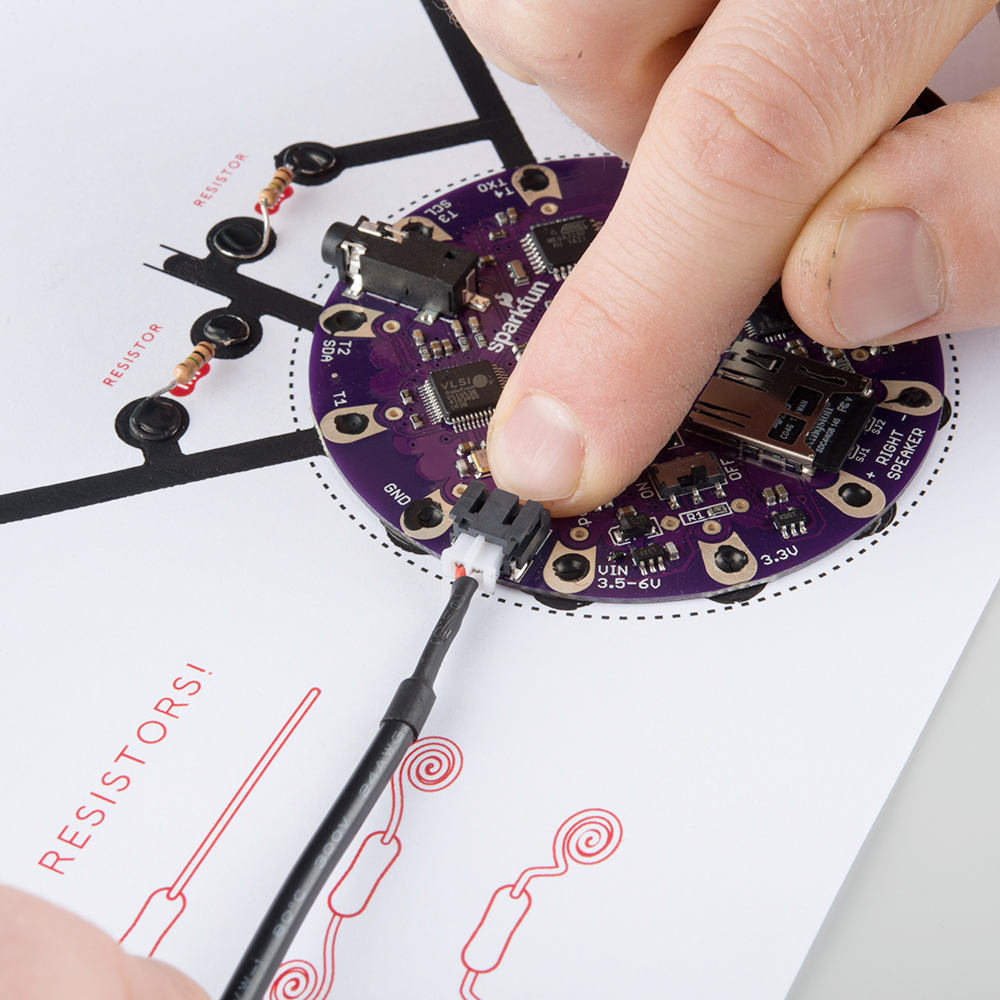
Connect the wall adapter to the barrel jack of the JST cable and plug it into the wall.

Find the power switch on the LilyPad MP3 board and flip it to ON.
Touch one of the silhouettes. As soon as you remove your finger, you should hear glorious sounds coming out of the little speaker!
This might happen. If you don't hear any sounds coming out of the little speaker when you touch and remove your finger from one of the silhouettes, check a few things:
Have you had enough of just two silhouettes making sound? Well, read on! We will briefly cover how you can hack the kit to get more out of it.
If you find that the small speaker is too small, too flimsy, or just not loud enough, you can provide your own speakers! The 1/8" audio jack at the top of the LilyPad MP3 board can accept any standard headphones or speaker audio plug.

As it so happens, the LilyPad MP3 board will support a third silhouette. This tutorial was kept simple with only 2 silhouettes, but you can add a third. The problem is that you have to connect the third silhouette with conductive paint traces to T5 and across a resistor to T2. You can either punch a hole through the paper and go behind the other traces, or you can go around the second silhouette, as in the picture below.
NOTE: You will need a third 1 MΩ resistor.

Additionally, you will need to copy a third sound clip to the SD card and rename the file so that a "3" is the first character.
So, you want to make your own sounds, eh? Well, here's how it's done.
First, find, make, or record some sound. It can be in any format, but for this example, we will download a WAV file.
Download and install Audacity. If you want to learn how to use Audacity, check out these tutorials.
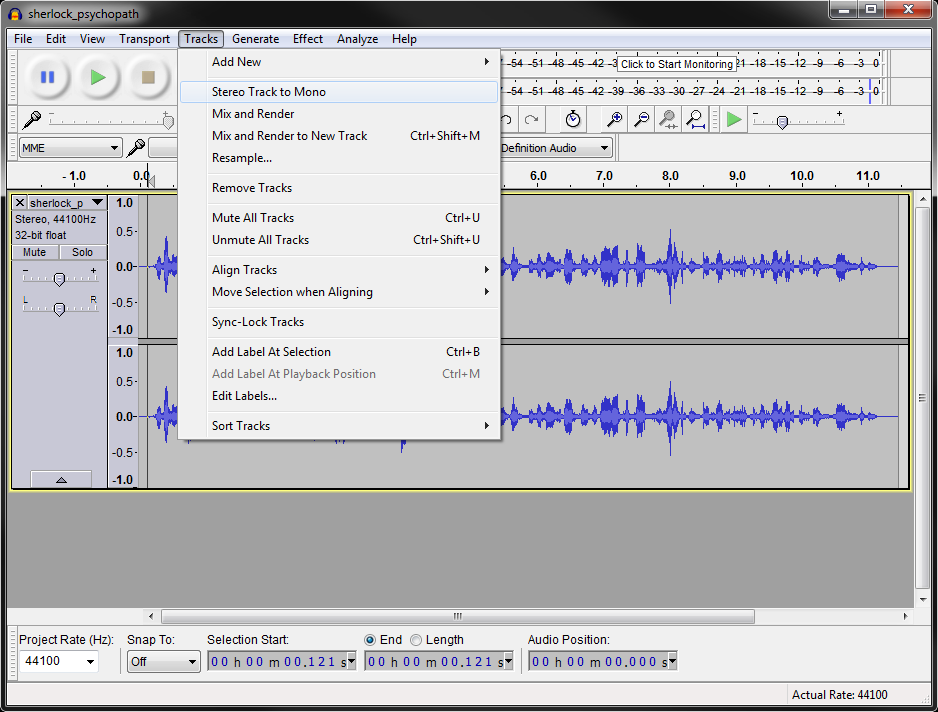
We advice making the audio mono, especially if you are using 1 speaker. This can be found under Tracks → Stereo Track to Mono.
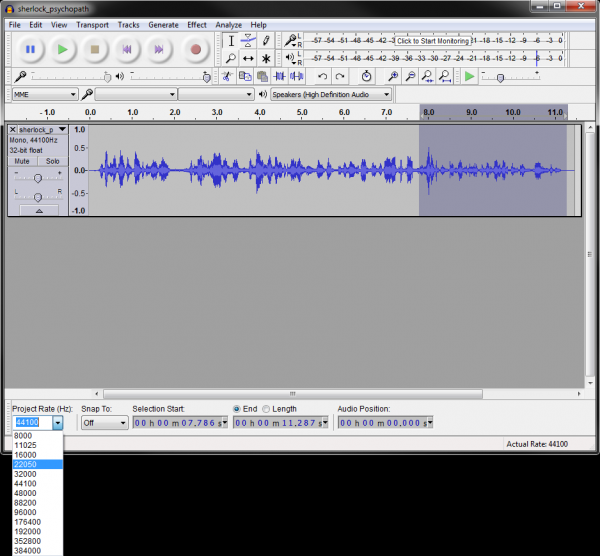
If you want to keep the file size small, you can choose a different sampling rate. In the bottom left corner of the Audacity window, select a new sampling rate from "Project Rate". As long as the sampling rate is equal to or less than 48000 Hz, the clip should work with the LilyPad MP3.
You can also use Audacity to adjust the volume, add filtering, or crop any piece of the audio clip you want.
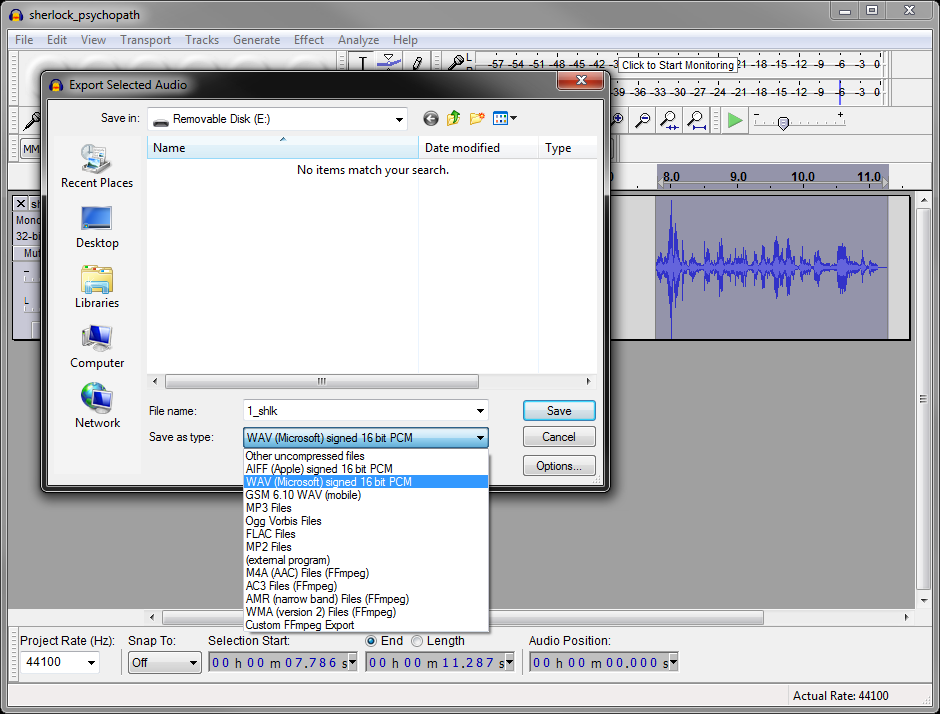
Once you are finished, select File → Export Audio or Export Selected Audio. In the Export window, select "WAV (Microsoft) Signed 16 bit PCM". The LilyPad MP3 board will play a variety of file formats. Read more about the supported formats here. Make sure that the new file name begins with a number (1-3, corresponding to the number of the silhouette) and is 6 characters or less.
Once you click "Save," you might be presented with another window asking for file information. Feel free to fill it out or just click "OK" to save the file. Copy the file to your micro SD card, and plug it into your LilyPad MP3 board. Your custom sound is ready to be played!
You will need a 5V FTDI Breakout Board to reprogram the LilyPad MP3 board.
Download and install the Arduino IDE. Read this tutorial to learn how to do that.
Download the Sound Page Kit source code.
Unzip the file, install the 3 libraries that are in Sound_Page_Kit/Libraries (CapacitiveSensor, SdFat, and SFEMP3Shield). Read this tutorial to learn how to install Arduino libraries.
The code that shipped with the Sound Page Kit can be found in Sound_Page_Kit/Firmware/Sound_Page_Kit/Sound_Page_Kit.ino. Open the Sound_Page_Kit.ino file in the Arduino IDE and hack away!
If you would like to learn more about the LilyPad MP3 board, read this tutorial.
NOTE: You must unplug the FTDI board from the LilyPad MP3 board in order to use the T4 and T5 pads.
If this was your first foray into the world of interactive art, know that it only gets better:
What other interactive art pieces will you make? For some inspiration, check out these tutorials:
learn.sparkfun.com | CC BY-SA 3.0 | SparkFun Electronics | Niwot, Colorado