Data Types in Arduino
 b_e_n
b_e_n 
Testing Data Types (Addition)
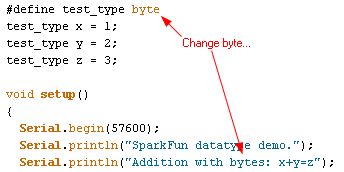
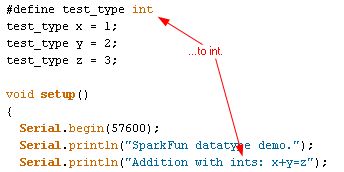
Okay, let's move on to test some more data types. If you're following along at home, you'll want to change your code, as seen below:
Now, load the code onto your Arduino board. Check the compile size: 2488 bytes for int versus 2458 bytes for byte. Not a lot bigger, but it IS bigger. Again, this is because using data types which require more than 8 bits of storage (like int, long, or float also requires the compiler to generate more actual machine code for the addition to be realized - the processor itself simply doesn't have the capability of supporting larger data natively. Now, open the serial console and you should see something like this:
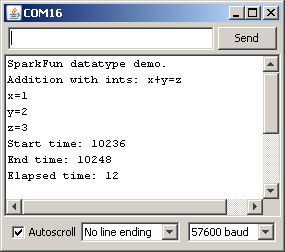
Next observation: this time the values printed correctly. That's because the new datatype we've introduced, the int, is correctly interpreted by the compiler as a numeric datatype, and Serial.print() correctly formats the output data to reflect that in the console. So, second lesson of Arduino datatype finesse: if you WANT to send the binary equivalent of a numeric datatype, say, as a means of sharing data with another computing device rather than a user looking at a console, use the Serial.write() function.
Next, let's check out "Elapsed time" again. We're up to 12 microseconds now - about 3 times as long! Still pretty short, but this is due to the previously mentioned fact that this is an 8-bit processor, so it needs to jump through some hoops to do 16-bit math, which is what's required when adding int variables together.
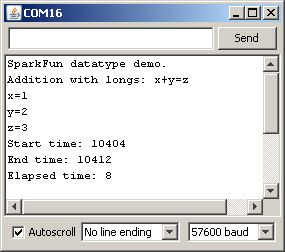
Onward and upward! Now let's check out the long datatype. Repeat the last code change, except this time replace the two incidents of int with long. Load the code and open your serial console and see what's happened.
Before we dive into the serial capture, let's revisit the compile size. I got 2516 bytes, this time- 28 bytes more than using int and 58 more than using byte. Still a pretty small difference but a difference nonetheless, and a difference which could add up if you do a lot of math with long instead of int or byte.
Okay, now on to the serial results. Again, notice that the elapsed time changed. This time, however, it DECREASED from 12 microseconds to 8! How does that work? This is your third lesson in Arduino datatype finesse: what you think is happening may not be what is actually happening. I'm not sure why this occurs - it may be due to some compiler optimization, or due to some run-time optimization which saves time on small value additions which is not present in the int code. Regardless, long is faster than int is not necessarily a safe takeaway here, as we'll see when we get into multiplication and division.
Okay, last stop, floating point math. Floating point math on the Arduino is tricky because the Arduino lacks a floating point unit, which is fancy-talk for a dedicated section of the processor which handles math with an arbitrary number of digits after a decimal point. Floating point math is also a sticky concept, because while humans can deal well with arbitrary numbers of zeros after the decimal point, computers can't. This is the origin of the infamous 1 is not 1 bug that some early generation Pentium processors suffered from.
Alter the code as above again, but replace long with float in the two pertinent locations. Load the code and check out the compile size: 3864 bytes! What happened is that by including the floating point data type, you forced the compiler to include the floating point handling code. Clearly, that's a pretty big chunk of code - it increased the size by a fair margin. Datatype finesse lesson four: don't use floating point math unless you really, really have to. Most times, that's going to be limited to giving users feedback about something which is fairly meaningless as an arbitrary integer value: the ADC will return a value like 536, which is cryptic, but converted into floating point it would be something like 2.62V, which is much more useful.
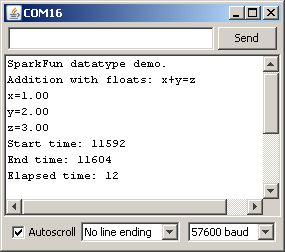
Now look at the run time on this code - back up to 12 microseconds. Also, note that the printed value now includes two zeros after the decimal place. If you want more (or fewer) digits after the decimal, you can add a number of digits into your print command:
Serial.print(x, 3); // print floating point number x with three digits after the decimal.