Crypto Shield Hookup Guide
This Tutorial is Retired!
This tutorial covers concepts or technologies that are no longer current. It's still here for you to read and enjoy, but may not be as useful as our newest tutorials.
 jbdatko,
  CaseyTheRobot
Maxim Integrated DS3231M Real Time Clock
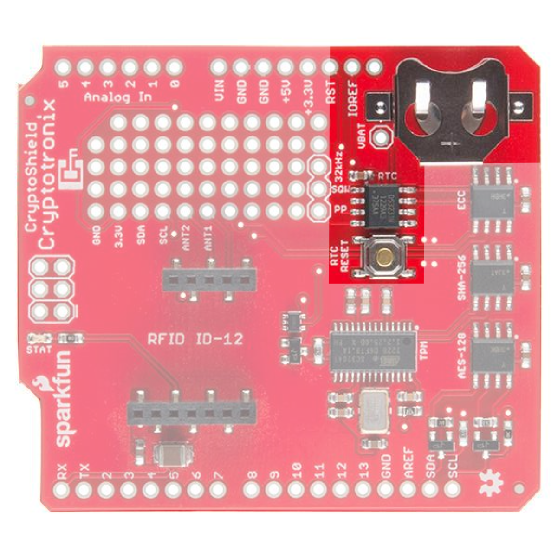
The Real-Time Clock is used to keep accurate time, which is often
useful in security protocols. The clock on the CryptoShield is the
DS3231M. It's
attached to the I2C bus with an address of 0x68.
PP Button
On the CryptoShield, we added a small SMD button that attached to the RST pin of the RTC and is connected to the pad labeled RTC Reset next to the RTC. PP stands for Physical Presence, as in, pressing the button confirms physical presence. The neat thing about this button is that the RTC will perform hardware debouncing on it. Bouncing electrical noise that results from the springy mechanical contact of a button or switch. It's best shown in a picture. Below is a picture of a switch that exhibits this bouncing effect.

The DS3231M monitors the RST pin, which is connected to the pushbutton, and when it detects a low-going edge, will hold the line low for 250ms. It then waits for a rising edge and once that it detected, it holds the line low for another 250ms. These are the characteristics you want when you are designing a reset button for your microcontroller. However, you can use the pushbutton for anything you want and enjoy the stable behavior. Notice in the following picture how the DS3231M keeps the line low when you push the PP button:
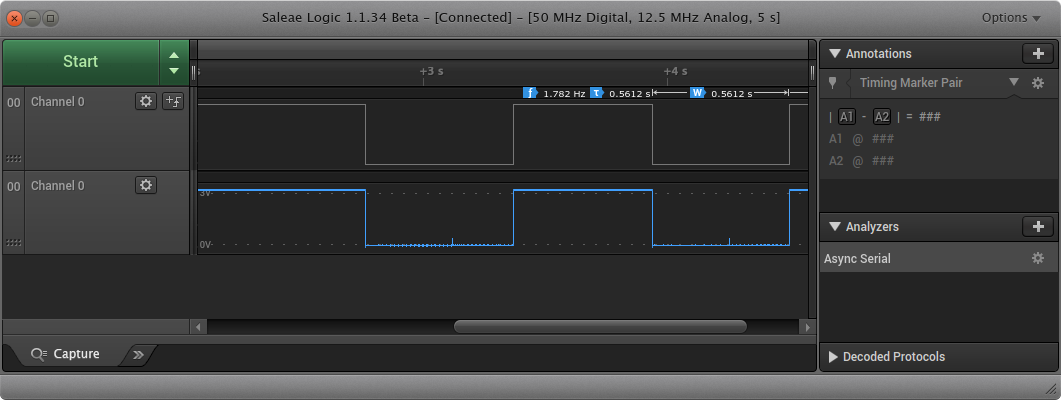
This figure is a screenshot from the Salea Pro 16 (see here for the Pro 8). Channel 0, the button, appears twice in this figure. On the top is the digital representation from the logic analyzer and the bottom is the sampled analog representation.
Keeping Time
While the hardware-debounce button is fun, you probably will use the RTC for its primary purpose: keeping time. Be aware, you must set the clock. It comes with a default time that won't be accurate unless you have a time machine. You also need a coin cell battery if you want the RTC to keep its time when you remove power from the board.
Keeping time under Linux
There Kernel module that supports this chip is the ds1307
module. You'll need to manually insert and probe this module as there
is no automatic detection of RTC. To do that, you need to perform
something like this:
echo ds1307 0x68 | sudo tee /sys/class/i2c-adapter/i2c-2/new_device
You'll need to change the i2c-2 bit for the i2c bus on your
board. Once that's complete, you should now see your RTC show up when
you perform ls /dev/rtc*. The hwclock utility can be used to set
the time on the device, assuming your system clock is correct. While
this tutorial
was written from the perspective of the CryptoCape for the BeagleBone,
the directions on setting the time are applicable for any Linux
platform.
Keeping time with Arduino
The device appears to be mostly compatible with DS1307 drivers, so you can use something like RTClib to communicate with the chip over I2C.