Configuring the PATH System Variable
Introduction
A path is the name of a file's directory, which specifies a unique location in a file system. Whereas, the PATH system variable ($PATH), specifies a set of directories where executable programs are located. This allows software applications to access commonly executed programs.
There are different methods for modifying the ($)PATH variable on various operating systems. The directions below are based on the most common methods for each operating system. For more information, just use your favorite search engine with the keywords: path system variable along with <the name of the OS you are working on>.
Windows 10
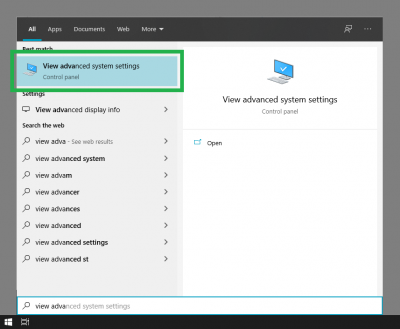
In Windows 10, the PATH system variable is configured through the System Properties window. There are various methods for users to access the System Properties window; for example, users can search view advanced system settings from the taskbar ⊞ Start menu.
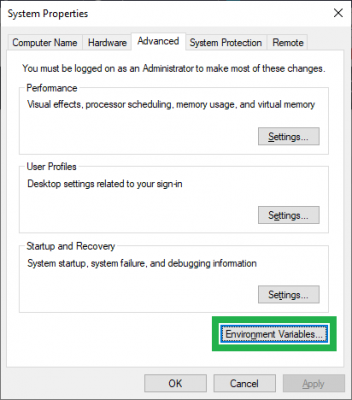
view adva from the taskbar ⊞ Start menu, to access the the System Properties window. (Click to enlarge) Once the System Properties window has been pulled up, select the Environment Variables... button from the Advanced tab.
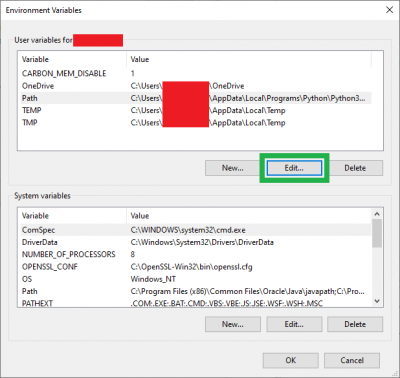
Within the Environment Variables window, select the Path variable from the User variables for <username> section. Then, select the Edit... button to configure the PATH system variable.
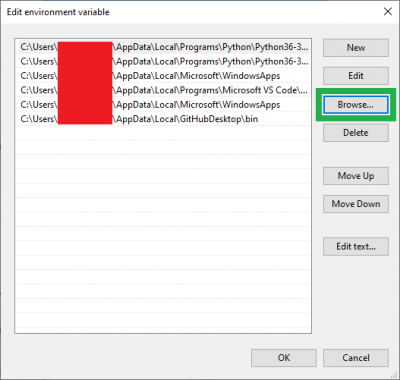
PATH system variable window. (Click to enlarge) From the PATH Edit environment variable window, select the Browse... button. Once the pop-up dialog box appears, navigate to the folder containing the executable file to be included in the PATH system variable.
PATH system variable. (Click to enlarge) Mac OSX and Linux Based Systems
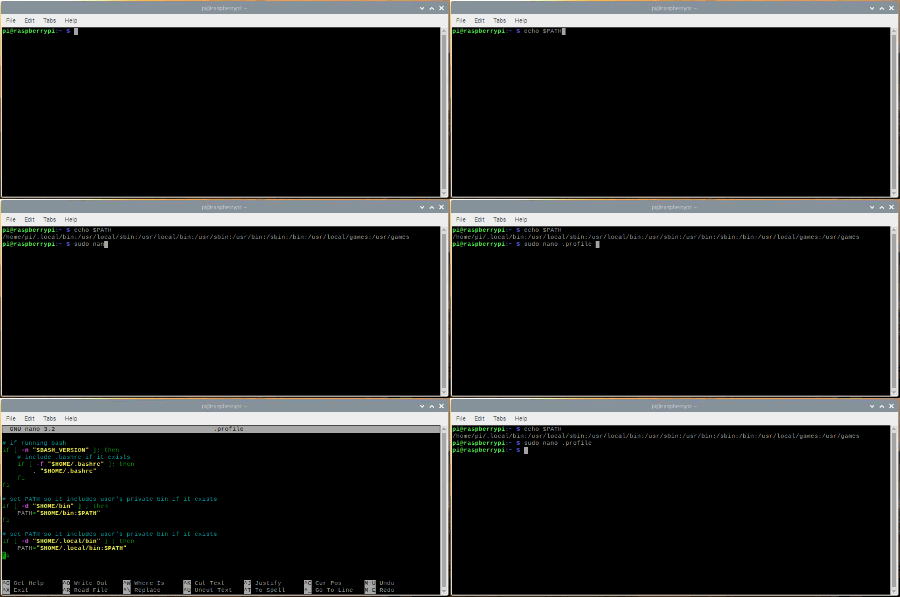
On Mac OSX and linux based systems, users can display the paths for the $PATH system variable by entering echo $PATH into the terminal.
vi for Vim).To modify the variable:
- Open up Terminal and run the following command to edit the paths file:
sudo nano <file path location>- There are several locations where users might be able to modify the
$PATHsystem variable:/etc/paths(Mac OSX - Mountain Lion)/usr/bin/usr/local/bin/usr/local/sbin/usr/sbin~/.bash_profile~/.bashrc~/.profile
- There are several locations where users might be able to modify the
- Enter the super user (administrative) password, if prompted.
- Enter the modifications for the path you wish to add.
- The entry field is usually near the bottom of the file.
- Hit Ctrl+X to quit.
- At the input prompt, send Y and hit Enter or Return to save the modified buffer.
$PATH variable and accessing the ~/.profile file for modifications. (Click to enlarge) That’s it! To verify the changes, in a terminal window, type: echo $PATH
Note: Another common method is to use the export command in the terminal.
Example: export PATH=$PATH:<file path to be added>
Resources and Going Further
Looking for some additional programming related tutorials? Check out the guides below:
