Are you an nRF52840 user ready to take a leap away from the comforts of the Arduino IDE? Feeling limited by CircuitPython's support? Maybe it's time to set up an armgcc-based development environment of your own and dive into Nordic's nRF5 Software Development Kit (SDK).
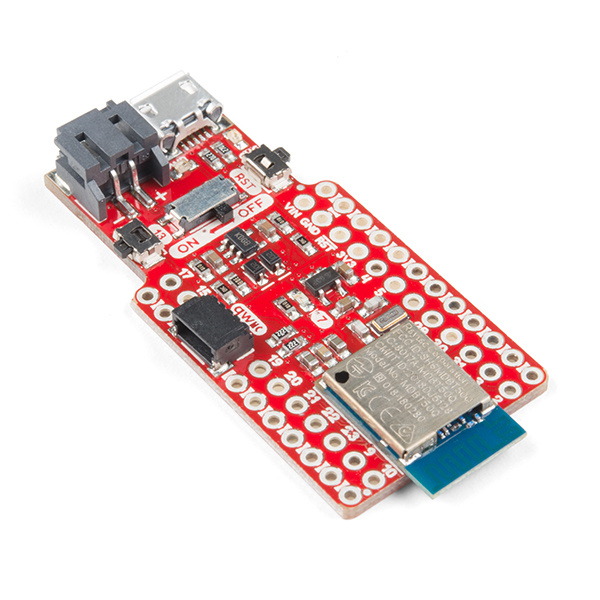
This tutorial will cover download and setup of every software tool -- armgcc, nrfutil, and the nRF5 SDK -- you need for nRF52 development. It focuses on developing for the SparkFun Pro nRF52840 Mini Breakout.
SparkFun's nRF52840 ships with a USB-Serial DFU bootloader. So this tutorial will put extra focus on modifying the SDK to seamlessly bootload code via USB.
As with any development approach, there are benefits and disadvantages to building a homebrew programming environment.
This tutorial is primarily designed to support the SparkFun Pro nRF52840 Mini Breakout -- especially the section covering SDK modifications to enable programming-via-bootloader.
That said, the general setup parts of this tutorial can be made applicable to any nRF52840 -- or even nRF58232 or nRF51 -- board. Nordic's nRF52840 Development Kit (DK) or the nRF52840 Dongle are great boards that should work with most of this tutorial. Beyond an nRF52840 board, you shouldn't need anything else besides a micro-B USB cable to attach between the device and your computer.
If you haven't read through it already, we recommend following along with our SparkFun Pro nRF52840 Mini Hookup Guide before continuing on. This tutorial will familiarize you with the hardware features of the board as well as the intricacies of the DFU/UF2 bootloader.
All of the nRF5 SDK's examples, components, and libraries are written in C. To compile those source files you'll need a C compiler for the ARM architecture. There are a handful of ARM C compilers out there, but we'll be focusing on the open-source ARM GCC toolchain in this tutorial.
In addition to the compiler, you'll need software that can take that compiled code and upload it to a Nordic nRF5 chip via either the bootloader or the SWD interface. Nordic's nRF5x Command Line Tools include nrfjprog, which can be used to upload via the SWD debug interface. adafruit-nrfutil -- a modified version of Nordic's nrfutil is used to upload via DFU bootloader.
The GNU Arm Embedded Toolchain is a collection of open-source compilers, build, and debug-tools for ARM microcontrollers -- including the ARM Cortex-M4 that make up a major chunk of the nRF52840 SoC. These tools include:
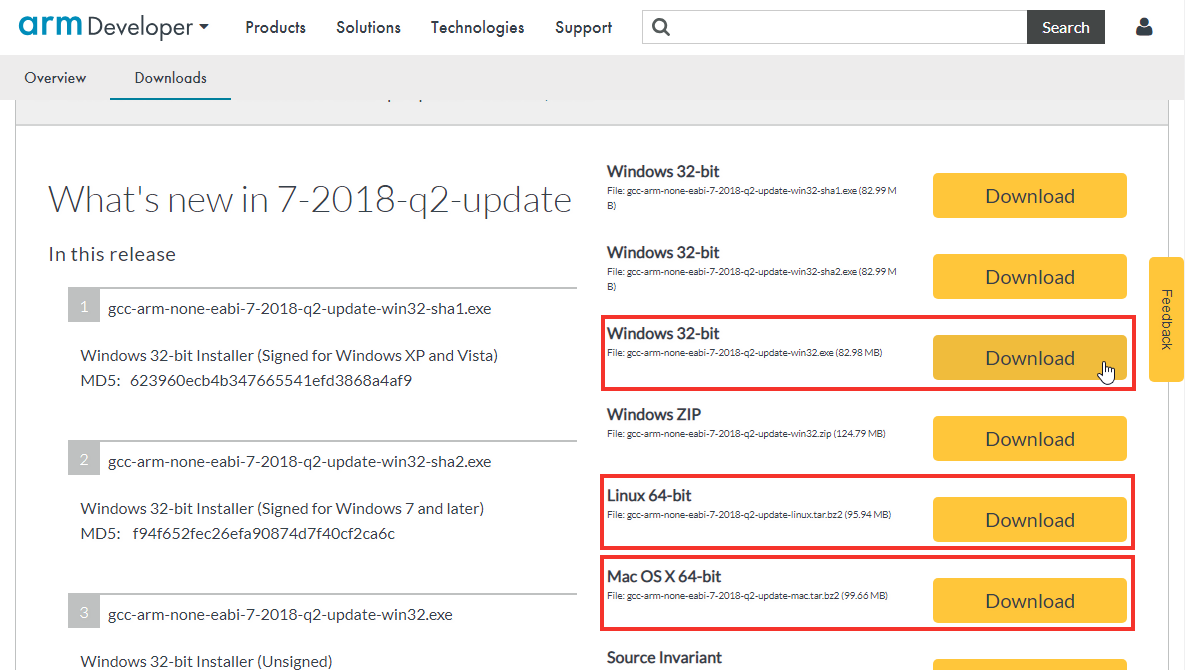
The ARM GNU tools are free to download and use. To get the latest version, visit the Arm GNU download's page.
On Windows, for example, click the "Download" link next to "Windows 32-bit\File: gcc-arm-none-eabi-7-2018-q2-update-win32.exe (82.98 MB)".
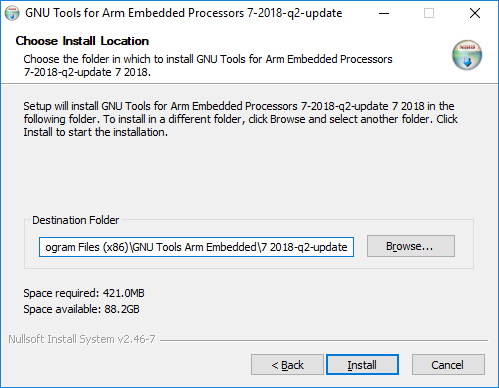
Windows users can run through the install wizard. By default, the ARM GNU tools will be installed in a directory like "C:\Program Files (x86)\GNU Tools ARM Embedded\7 2018-q2-update" (the last bit will vary by version of the tools).
Mac and Linux users will need to download and extract the ARM GNU tools to a preferred location on your computer, for example ${HOME}/opt.
It appears that the Nordic links have changed. For additional assistance locating the resources on the Nordic website, users can try checking out the Nordic DevZone.
In order to upload new, compiled applications to your nRF52840 you'll need to install a handful of Nordic command-line tools, including nrfjprog.
To download these tools, visit the Installing the nRF5x Command Line Tools page of Nordic's information center.
The software is available for Windows, Linux 32-bit, Linux 64-bit, and macOS. Select your appropriate flavor from the pulldown towards the bottom of the page.
On Windows, run the installer and follow the instructions in the wizard. On Linux and Mac, extract the .tar file somewhere on your computer -- you may need to add the Nordic tools directory to your $PATH environment variable.
Nordic's nrftuil is a Python-based tool for packaging device firmware updates (DFU) and updating an nRF chip with that package over either serial or Bluetooth. adafruit-nrfutil is derived from Nordic's original version of the software. It updates nrfutil to be Python 3-based, and provides DFU support for a variety of boards equipped with their nRF52 bootloader.
adafruit-nrfutil is used to update code on your nRF52840 with the serial bootloader.
To install adafruit-nrfutil, you'll first need to download and install Python 3. (If you have Python 2.7 installed, you'll still need Python 3 to install adafruit-nrfutil.)
Once you have Python 3 installed, the easiest way to install adafruit-nrfutil is with PyPI:
language:python
pip3 install --user adafruit-nrfutil
If you use a different method to install adafruit-nrfutil, don't forget to add adafruit-nrfutil too your PATH environment variable!
Nordic's nRF5 SDK is a thorough collection of the component drivers, libraries, and tools that are required to build applications for the nRF52840. The files included in this package provide the foundation for most nRF5 projects and products.
Download the latest nRF5 SDK from Nordic's nRF5 SDK product page. As of this tutorial's writing, the latest version is 15.2.
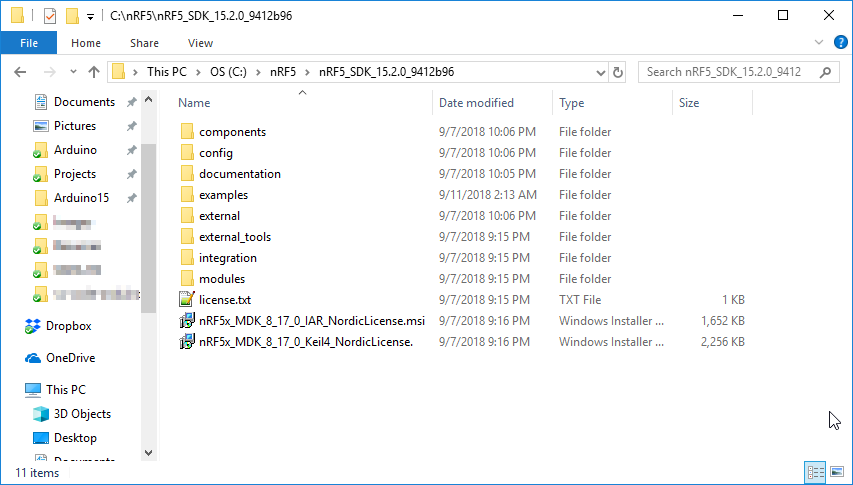
The SDK is bundled as a ZIP file. Extract the contents of the ZIP to a desired location on your computer. As a Windows example, we'll use C:\nRF5. Your extracted directory should look something like this:
Once you've extracted the SDK, you'll need to configure it to point to the gcc toolchain you've just installed.
Navigate to the Nordic SDK, then components/toolchain/gcc. In this directory you'll find three Makefiles, one of which will need to be modified to point to your GNU build tools. The file you modify depends on your operating system:
Both of these files look pretty similar. They're both looking for directory locations for the GNU tools installation, version, and prefix. Modify the values of GNU_INSTALL_ROOT and GNU_VERSION to match that of the ARM GNU tool directory and versions you just installed.
As an example, here's what I've modified the file to look like on my Windows machine:
GNU_INSTALL_ROOT := C:/Program Files (x86)/GNU Tools ARM Embedded/7 2018-q2-update/bin/
GNU_VERSION := 7.3.1
GNU_PREFIX := arm-none-eabi
To get the version you can use your terminal or CMD to navigate to the "bin" folder of your GNU ARM tools install, and type: arm-none-eabi-gcc --version.
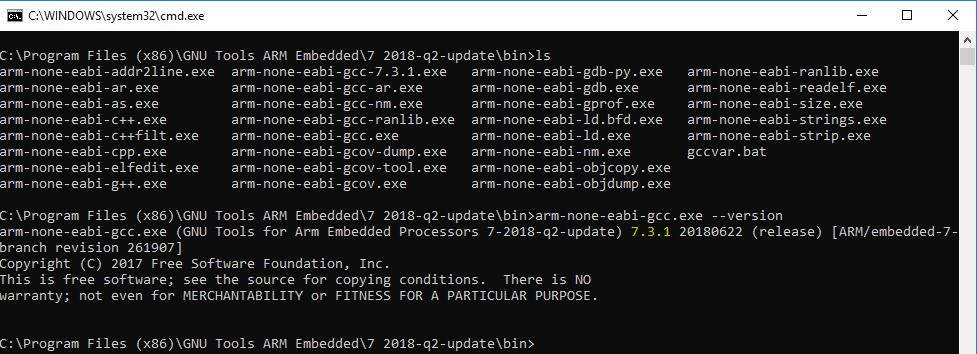
In the picture above, for example, our version is 7.3.1.
The Nordic SDK includes support for a variety of Nordic development boards, but not the SparkFun nRF52840 Mini Breakout. To add support, we'll need to begin by adding a board definition file to the components/boards directory of the nRF5 SDK.
The board-support files include definitions for buttons, LEDs, and common serial pins (UART, SPI, and I2C). Our board definition file can be found in the nRF52840 GitHub Repository. Download that file (click the "Raw" link, and Save As..), or click the link below:
Place that file in the components/boards directory.
You'll also need to modify components/boards/boards.h, adding the following before #elif defined(BOARD_CUSTOM):
language:c
#elif defined (BOARD_SPARKFUN_NRF52840_MINI)
  #include "sparkfun_nrf52840_mini.h"
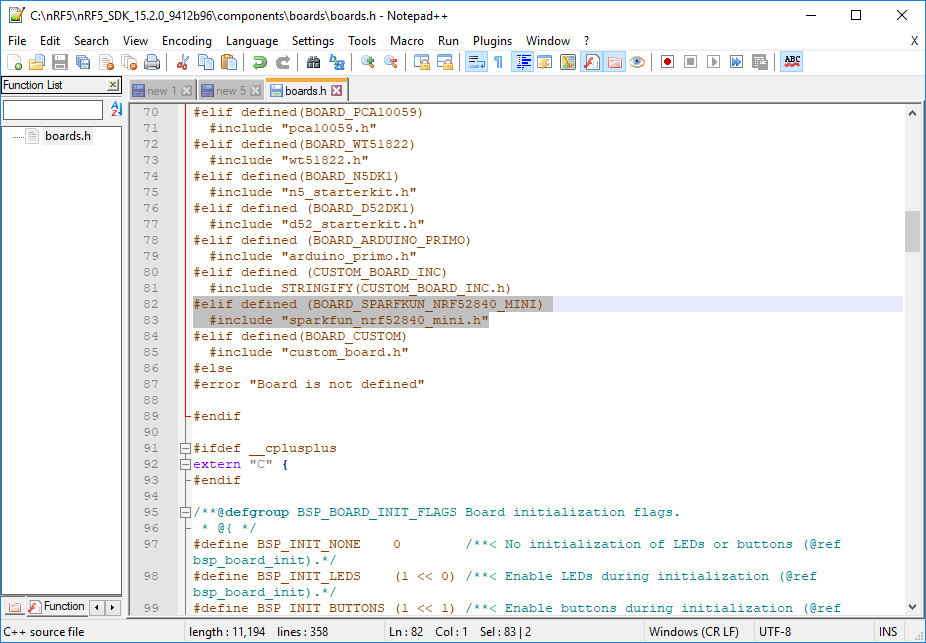
This will allow us to add a BOARD_SPARKFUN_NRF52840_MINI define when compiling example code to pull in sparkfun_nrf52840_mini.h when compiling.
Before you get too deep into building examples and applications for the nRF52840, it may be a good idea to set up a development environment around the nRF5 SDK. An IDE can help you navigate the codebase and easily interact with it via a console.
This tutorial will explain how to set up a Visual Studio (VS) Code environment. A lot of this content should be portable to setting up similar environments in IDE's or editor's like Eclipse, Notepad++, or Sublime if you prefer other tools, though.
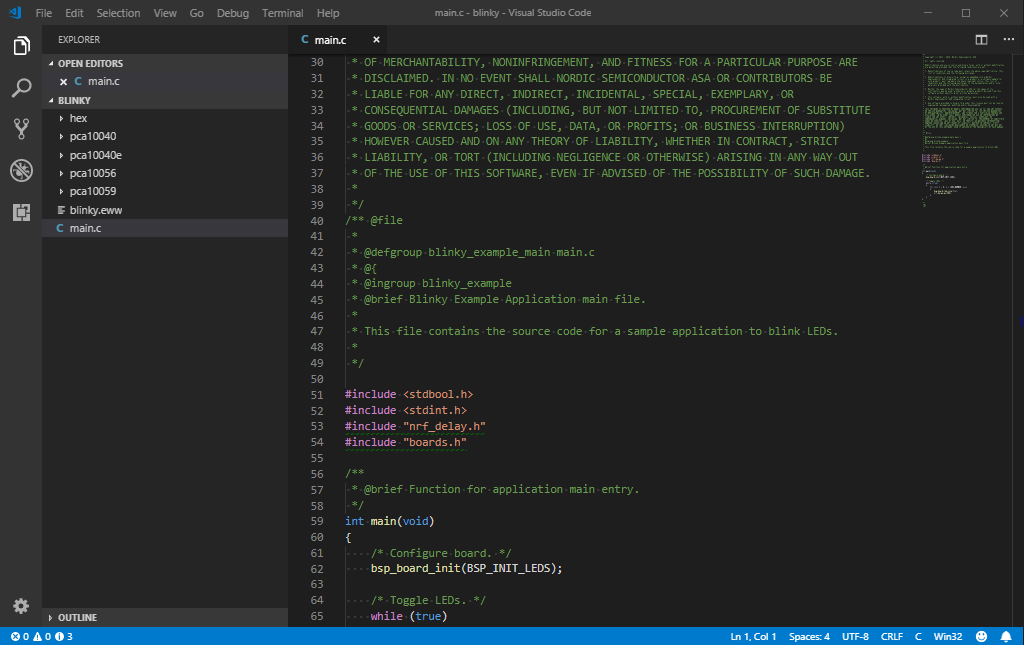
Open up a new VS Code window, then navigate to File > Open Folder.... In the explorer-prompt that opens, navigate to your nRF5 SDK, then find examples/peripheral/blinky.

The "blinky" example simply blinks an LED on your development board -- it's a great way to verify that your toolchain is correctly set up.
After opening the folder, you should see a file-explorer on the left-hand side of the window. Double-click main.c to open the main source file.
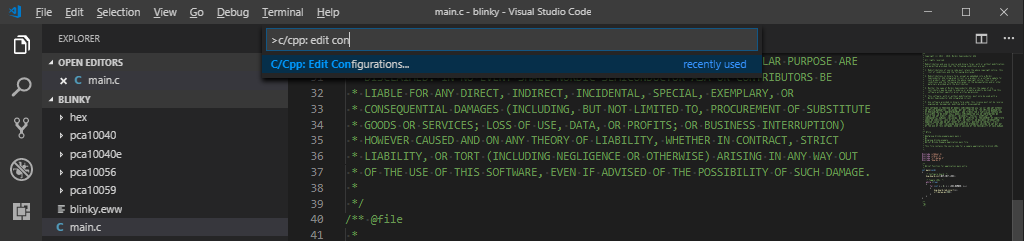
One of the most powerful features of IDE's like VS Code is this ability to trace back through #include to provide the definition of functions or constants. To help the IDE navigate these files, you should define a file named c_cpp_properties.json in a .vscode directory in your blinky example. This file can be automatically created by pressing CTRL+SHIFT+P, then beginning to type c/cpp: edit configurations.
Your c_cpp_properties.json file should be automatically created. This file includes paths to include files and macro definitions that may alter the compilation of a source file. Here's an example you can base your file off. You may need to alter the path of nrfSDK, so it matches that of your nRF5 SDK's root path.
language:json
{
    "env": {
        "nrfSDK": "C:\\nRF5\\nRF5_SDK_15.2.0_9412b96"
    },

    "configurations": [
        {
            "name": "ARMGCC",
            "includePath": [
                "${workspaceFolder}/**",
                "${nrfSDK}/components/**",
                "${nrfSDK}/components",
                "${nrfSDK}/components/libraries/experimental_memobj",
                "${nrfSDK}/components/libraries/experimental_section_vars",
                "${nrfSDK}/modules/nrfx/mdk",
                "${nrfSDK}/modules/nrfx/hal",
                "${nrfSDK}/components/libraries/balloc",
                "${nrfSDK}/components/libraries/experimental_log",
                "${nrfSDK}/components/libraries/experimental_log/src",
                "${nrfSDK}/components/libraries/delay",
                "${nrfSDK}/integration/nrfx",
                "${nrfSDK}/components/libraries/bsp",
                "${nrfSDK}/components/drivers_nrf/nrf_soc_nosd",
                "${nrfSDK}/components/libraries/strerror",
                "${nrfSDK}/components/boards",
                "${nrfSDK}/components/toolchain/cmsis/include",
                "${nrfSDK}/modules/nrfx",
                "${nrfSDK}/components/libraries/util",
                "${nrfSDK}/components/libraries/fifo",
                "${nrfSDK}/components/libraries/uart",
                "${nrfSDK}/integration/nrfx/legacy",
                "${nrfSDK}/components/libraries/delay",
                "${nrfSDK}/modules/nrfx/drivers/include",
                "${workspaceFolder}/sparkfun/blank/config",
                "${workspaceFolder}/sparkfun/blank"
            ],
            "defines": [
                "_DEBUG",
                "UNICODE",
                "_UNICODE",
                "BOARD_SPARKFUN_NRF52840_MINI",
                "BSP_DEFINES_ONLY",
                "CONFIG_GPIO_AS_PINRESET",
                "FLOAT_ABI_HARD",
                "NRF52840_XXAA",
                "DCONFIG_NFCT_PINS_AS_GPIOS"
            ],
            "compilerPath": "C:\\Program Files (x86)\\GNU Tools ARM Embedded\\7 2018-q2-update\\bin\\arm-none-eabi-gcc.exe",
            "cStandard": "c11",
            "cppStandard": "c++17",
            "intelliSenseMode": "clang-x64"
        }
    ],
    "version": 4
}
If everything parses correctly, you should be able to right-click on any #include, function, or constant definition and select "Go to Definition (F12)" to navigate to the source file that declares that bit of code.
This is a super-powerful tool, especially if you're just beginning to familiarize yourself with the nRF5 SDK and the API's it provides.
There's one last bit of setup to do before you can compile and upload the Blinky sketch to your SparkFun nRF52840 Mini Breakout. We need to modify the Makefile so it builds for our board and we need to ensure that, when the code is linked, it doesn't try to overwrite the SoftDevice or the bootloader's home in memory.
These modifications will need to be made for every example you test out in the nRF5. Don't worry! You'll fall into a rhythm as you continue test out examples in the SDK.
The standard "blinky" example includes build options for the Nordic nRF52832 (pca10040) and nRF52840 (pca10056) development kits. We want to add a build option for the SparkFun nRF52840 Mini Breakout. The easiest way to do this is to copy and duplicate the pca10056 folder and rename it to something like sparkfun_nrf52840_mini.
Once you've copied pca10056 to sparkfun_nrf52840_mini, click into your new folder, then click into the blank and armgcc folders. Then open Makefile.
The most obvious change we need to make to this file is the board definition. Look for CFLAGS and ASMFLAGS definitions for -DBOARD_PCA10056, and modify them to -DBOARD_SPARKFUN_NRF52840_MINI:
language:c
CFLAGS += -DBOARD_SPARKFUN_NRF52840_MINI
and
language:c
ASMFLAGS += -DBOARD_SPARKFUN_NRF52840_MINI
(Make sure to delete any ... += -DBOARD_PCA1056, or similar lines, to ensure the Nordic nRF52840 development kit is not enabled.)
We can also use this makefile to call adafruit-nrfutil and load code via serial DFU. To do that, add the following targets to the end of your Makefile:
language:c
dfu-package: $(OUTPUT_DIRECTORY)/nrf52840_xxaa.hex
    @echo Packaging $<
    adafruit-nrfutil dfu genpkg --sd-req 0xFFFE --dev-type 0x0052 --application $<  _build/dfu-package.zip

bootload: $(OUTPUT_DIRECTORY)/nrf52840_xxaa.hex dfu-package
    @echo Flashing: $<
    adafruit-nrfutil --verbose dfu serial --package _build/dfu-package.zip -p $(SERIAL_PORT) -b 115200 --singlebank --touch 1200
Copying the above text will probably paste four spaces instead of tabs. If you get a compilation error like:
Makefile:305: *** missing separator. Stop.
replace the four spaces before each of the four indented lines with an actual tab.
These two targets provide easy, command-line access to nrfutil's DFU-packaging and uploading features.
One last big change you'll need to make is to the memory organization. This example doesn't know we have a bootloader living at address 0x00 in flash.
Open blinky_gcc_nrf52.ld. Then replace the MEMORY section of the linker script with the below memory origin/length combinations:
language:c
MEMORY
{
  FLASH (rx) : ORIGIN = 0x26000, LENGTH = 0xce000
  RAM (rwx) :  ORIGIN = 0x20000000, LENGTH = 0x40000
}
That will move the flash origin from 0x0 to 0x26000 and limit the available space accordingly. (Still nearly 1MB -- 892kB -- to play with!)
As you delve further into nRF52840 development, it may help to know a bit about how the flash memory is mapped. Here's a quick rundown:
| Description | Start Address | End Address | Size (KB) |
|---|---|---|---|
| Bootloader Settings | 0x000FF000 | 0x000FFFFF | 4 |
| Master Boot Record Params | 0x000FE000 | 0x000FEFFF | 4 |
| Bootloader | 0x000F4000 | 0x000FDFFF | 40 |
| Application Code | 0x00026000 | 0x000F3FFF | 824 |
| SoftDevice | 0x00001000 | 0x00025FFF | 148 |
| Master Boot Record | 0x00000000 | 0x00000FFF | 4 |
For more information on the nRF52840's memory map with the S140 programmed, check out Nordic's S140 Memory resource map and usage documentation.
Whew! That's it. To compile the code simply type:
language:makefile
make
Or, if you want to build and program in one swift command:
language:makefile
make bootload SERIAL_PORT=COM7
Make sure your nRF52840 board is in bootloader mode (double-tap reset). (Also make sure to replace "COM7" with your nRF52840's DFU serial port.)
Blinking an LED's fine and all, but it barely scratches the surface of the nRF52840's capabilities. How about we add some Bluetooth to the mix?
Navigate back into your nRF5 SDK's examples folder and find ble_peripheral/ble_app_blinky. Open it up just as you did the previous blinky example.
Once open, just as with the last example, duplicate the pca10056 folder and rename the new folder sparkfun_nrf52840_mini.
And, you guessed it, you'll need to modify the "Makefile" and "blinky_gcc_nrf52.ld" files in "sparkfun_nrf52840_mini/s140/armgcc" to add a "bootload" target, and to modify the Flash origin/size. In the linker, "ld," file only modify the FLASH size, leave the RAM alone.
One last modification I'd recommend making is to the main.c file at the top of the directory. This is the main source file that manages all of the configuration and initialization. Towards the top of the file -- beginning around line 72 -- are LED pin definitions. I recommend setting each of the LED definitions to BSP_BOARD_LED_0. You can also set the BLE device name if you'd like. That section would end up looking something like this:
language:c
#define ADVERTISING_LED                 BSP_BOARD_LED_0                         /**< Is on when device is advertising. */
#define CONNECTED_LED                   BSP_BOARD_LED_0                         /**< Is on when device has connected. */
#define LEDBUTTON_LED                   BSP_BOARD_LED_0                         /**< LED to be toggled with the help of the LED Button Service. */
#define LEDBUTTON_BUTTON                BSP_BUTTON_0                            /**< Button that will trigger the notification event with the LED Button Service */

#define DEVICE_NAME                     "SparkFun_nRF52840"                         /**< Name of device. Will be included in the advertising data. */
Setting each LED to BSP_BOARD_LED_0 kind of abuses the code, but we do what we can with a single on-board LED. It allows us to both tell if the board is connected, and toggle the LED from the app.
Speaking of the app...
To test this example sketch, you'll need another device -- either computer or smartphone -- connected to your nRF52840. Nordic provides a free, handy test tool, nRF Connect for Mobile, that's available for both Android or iOS. We'll demonstrate how to control your nRF52840's LED and monitor the button using this sketch. So go download the app!
Once downloaded, open the app and begin searching for nearby Bluetooth devices. Among those with a strong signal strength, you should see SparkFun_nRF52840. Click the "CONNECT" button next to that.
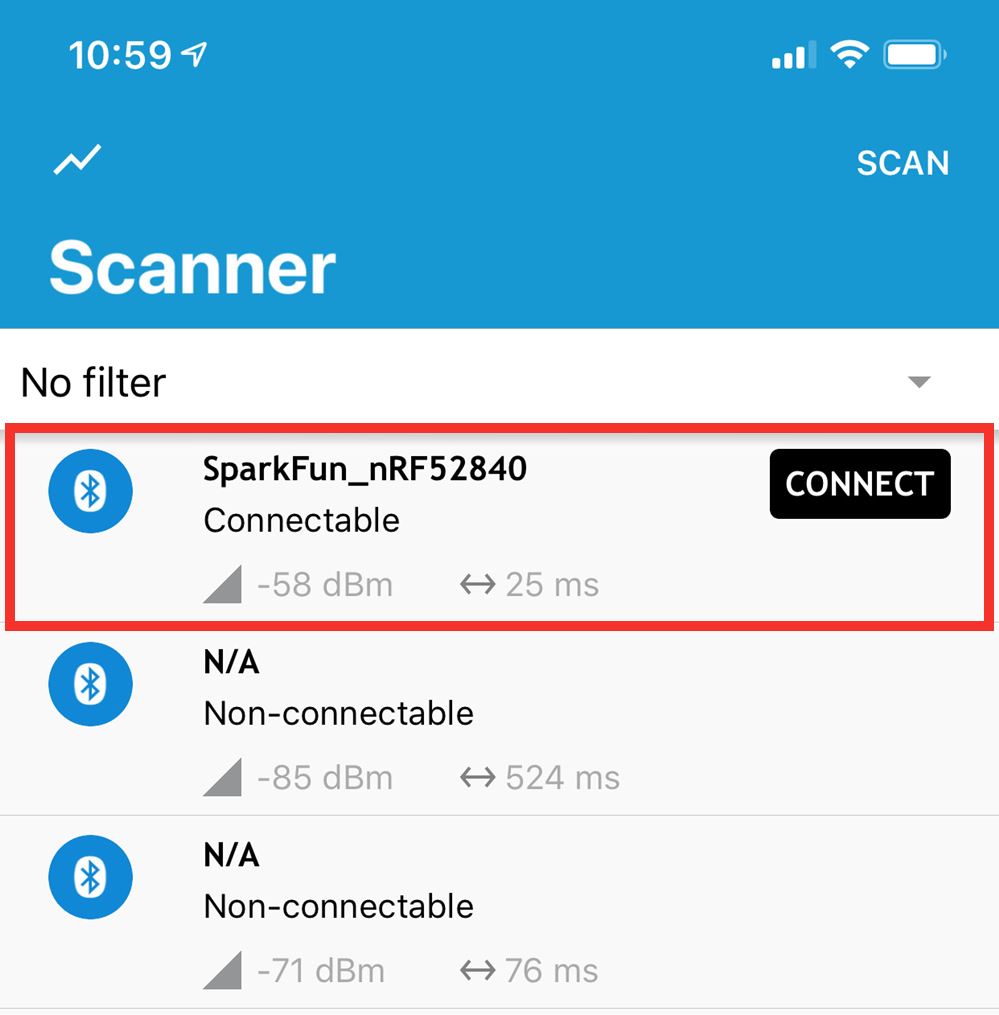
Once connected, the Blue LED should turn off indicating a connection.
Click on the LED Button Service, where you'll be presented with a pair of characteristics: "Nordic Blinky Button" and "Nordic Blinky LED."
To set the LED, click on the up-arrow in the Nordic Blinky LED characteristic. To turn the LED on, type 01 into the value text box. To turn it off, type 00 (note the double-zero).
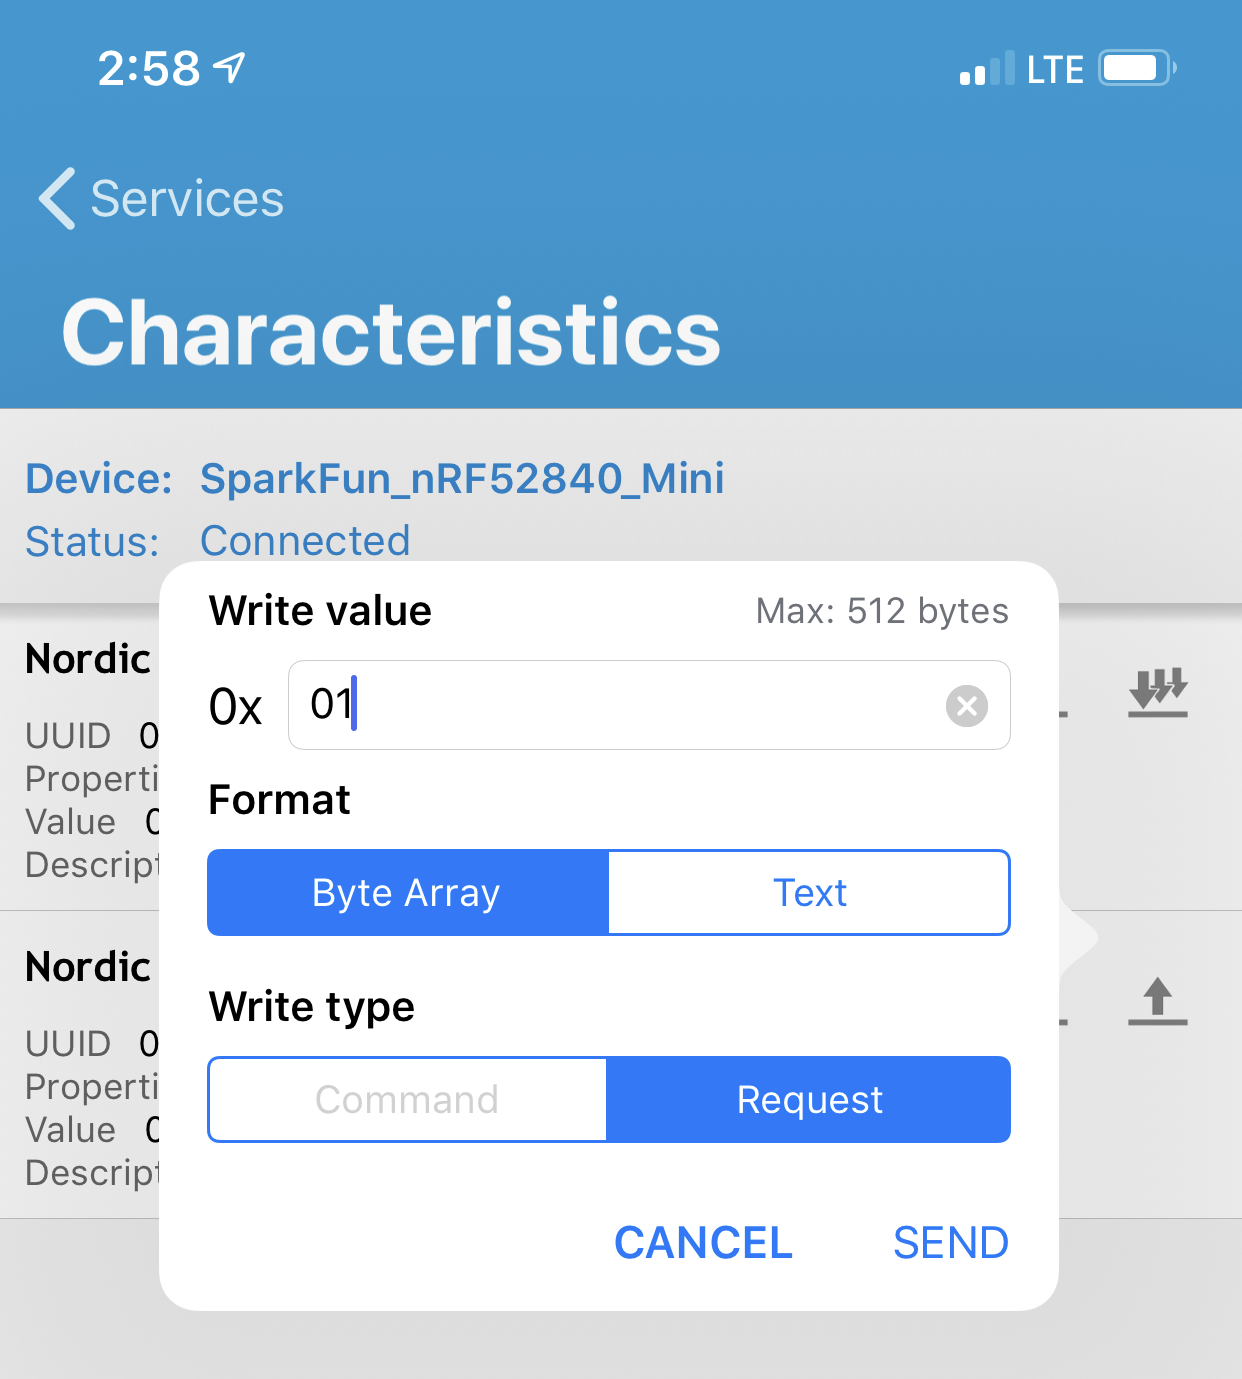
To read the status of the button on pin 13, either tap single-down-arrow for a single read, or subscribe to notifications by tapping the triple-down-arrow. When you press the button down, the value should change to 0x01.
From the last example, I dare you to peek at the contents of sparkfun_nrf52840_mini/config/sdk_config.h. You'll be greeted with a 13k-line header full of #define macros.
Each of the #defines in sdk_config.h either slightly or drastically alter the performance of your application. It's a powerful file, but it is overwhelming. If you have Java installed, you can type:
language:makefile
make sdk_config
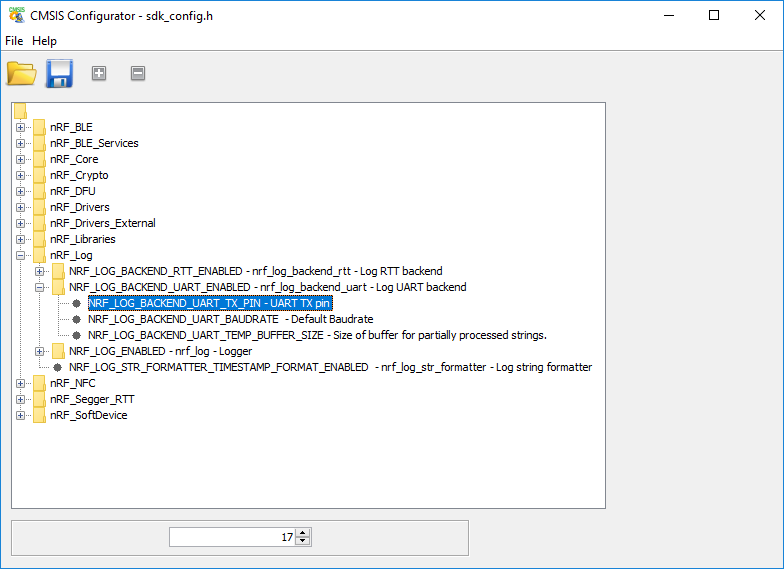
To open a CMSIS Config Wizard. This window allows you to navigate through a list of sorted config macros, and make changes graphically.
If you don't have Java, check out this next section on Backend-Logging...
Most application examples, unfortunately, don't log anything to a USB serial port. But! Most examples do support UART-based logging, but you have to enable it.
Search your config file for NRF_LOG_BACKEND_UART_ENABLED. Set it to 1, then set NRF_LOG_BACKEND_UART_TX_PIN to 17 (or any other pin you'd like to use as TX).
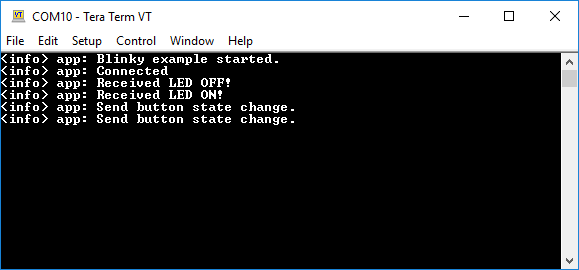
Now, if you hook up a Serial Basic or similar USB-to-serial board from RX on the basic to pin 17 on the nRF52840, you should begin to get debug prints.
USB CDC (serial over USB) logging is, unfortunately, not currently supported.
By default pins 9 and 10, towards the bottom of the board, are only to be used as NFC pins. You can change this by adding the following defines to your Makefile:
language:makefile
ASMFLAGS += -DCONFIG_NFCT_PINS_AS_GPIOS
CFLAGS += -DCONFIG_NFCT_PINS_AS_GPIOS
We have been made aware of a possible issue in the configuration of the memory region for the BLE blinky example. For more details on the issue, users can check out the forum post. If other users also run into issues, they can try this configuration instead (has not been tested or verified):
MEMORY
{
  FLASH (rx) : ORIGIN = 0x26000, LENGTH = 0xda000
  RAM (rwx) :  ORIGIN = 0x200022e0, LENGTH = 0x3dd20
}
Users may run into issues with their file paths when trying to run make. Make sure you are in the same directory as the Makefile, illustrated in the image below. Additionally, users may need to add system paths for Windows 10.
Tutorial Resources:
nRF Resources:
Looking for more nRF52840 nRF5 SDK development tips? Here are some of our favorite resources around the web:
For more tutorials, more to learn, and more project-inspiration, check out these related tutorials:
learn.sparkfun.com | CC BY-SA 3.0 | SparkFun Electronics | Niwot, Colorado