Moving Beyond the Ordinary With the Qwiic Alphanumeric Display
Introduction
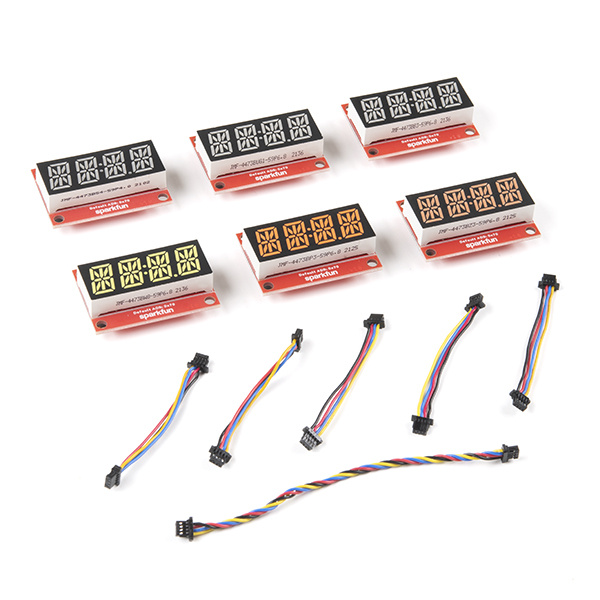
Sometimes you need a display that can not only share information, but also catch the attention of those passing by. LCDs are great at getting a good amount of information on a small screen, but they’re not nearly as eye-catching as an LED. Our Qwiic Alphanumeric Displays combine the best of both worlds, offering the ability to share information, combined with the eye-catching pop of LEDs. In this tutorial, We’ll show you how fast and simple it is to start displaying information on the SparkFun Alphanumeric Display, starting with the most basic, then looking at some more advanced examples.
SparkFun Qwiic Alphanumeric Display Kit
KIT-19297Required Hardware
For this tutorial, you’ll only need the following components:
A Qwiic Alphanumeric Display, in the color of your choosing:
For the more advanced examples using multiple displays, you can mix and match from the individual options above, or pick up one of our kits containing multiple Qwiic Alphanumeric Displays:
And of course, you'll need a microcontroller and some Qwiic Cables to hook it all up.
Setting Up Your Alphanumeric Display
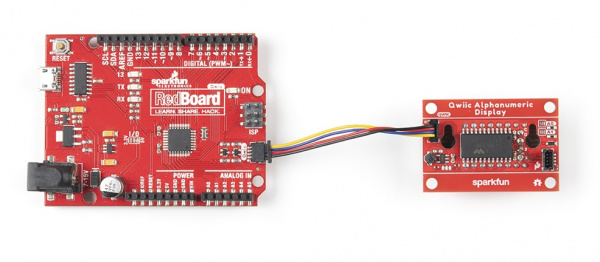
Thanks to our Qwiic system, setup could not be easier. Just follow these simple steps:
Feeling creative? You can change the order of these steps, and your setup will still work perfectly!
Installing the Required Libraries
You can install the SparkFun Qwiic Alphanumeric Display Library in either of a couple of different ways.
In the Arduino IDE, open the Library Manager (either by opening the panel of the left side of the app, or from the dropdown menu going to Sketch/Include Library/Manage Libraries). From there, search “SparkFun Qwiic Alphanumeric”, and click the “Install” button.
Use the following link, download the .ZIP file, and either extract it and install it, or use the “Add .ZIP Library” option in the IDE.
The Basics
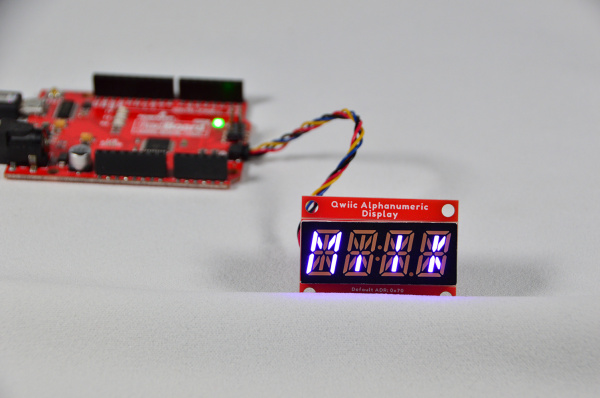
Let’s start at the very beginning, a very good place to start. Once you’ve installed the library, you’ll be able to access all of our example code. Navigate your way to File/Examples/SparkFun Qwiic Alphanumeric Display Arduino Library/Example_01_PrintString, open it and upload it to your microcontroller. If all goes as expected, your display should be showing the work “Milk” for all to see! (Why “Milk”? Eh, why not? It’s four characters in length, shows the use of both uppercase and lowercase letters, and, well, I suppose our engineer likes milk!)
/*****************************************************************************************
 * This example tests illuminating whole 4 letter strings on the 14-segment display.
 *
 * Priyanka Makin @ SparkFun Electronics
 * Original Creation Date: February 3, 2020
 *
 * SparkFun labored with love to create this code. Feel like supporting open source hardware?
 * Buy a board from SparkFun! https://www.sparkfun.com/products/16391
 *
 * This code is Lemonadeware; if you see me (or any other SparkFun employee) at the
 * local, and you've found our code helpful, please buy us a round!
 *
 * Hardware Connections:
 * Attach Red Board to computer using micro-B USB cable.
 * Attach Qwiic Alphanumeric board to Red Board using Qwiic cable.
 *
 * Distributed as-is; no warranty is given.
 ****************************************************************************************/
#include <Wire.h>

#include <SparkFun_Alphanumeric_Display.h> //Click here to get the library: http://librarymanager/All#SparkFun_Qwiic_Alphanumeric_Display by SparkFun
HT16K33 display;

void setup()
{
  Serial.begin(115200);
  Serial.println("SparkFun Qwiic Alphanumeric - Example 1: Print String");

  Wire.begin(); //Join I2C bus

  if (display.begin() == false)
  {
    Serial.println("Device did not acknowledge! Freezing.");
    while (1);
  }
  Serial.println("Display acknowledged.");

  display.print("Milk");
}

void loop()
{
}
If you feel like the bright lights of the Alphanumeric Display aren’t enough to capture the attention of passersby, there’s always the option of adding a little motion to your message. Our library has a built-in function, shiftLeft() (or shiftRight()), that slides your message across the displays. Run File/Examples/SparkFun Qwiic Alphanumeric Display Arduino Library/Example_09_ScrollingString to see it in action.
/**************************************************************************************
 * This example tests scrolling functionality of alphanumeric displays.
 *
 * Priyanka Makin @ SparkFun Electronics
 * Original Creation Date: February 26, 2020
 *
 * SparkFun labored with love to create this code. Feel like supporting open source hardware?
 * Buy a board from SparkFun! https://www.sparkfun.com/products/16391
 *
 * This code is Lemonadeware; if you see me (or any other SparkFun employee) at the
 * local, and you've found our code helpful, please buy us a round!
 *
 * Hardware Connections:
 * Attach Red Board to computer using micro-B USB cable.
 * Attach Qwiic Alphanumeric board to Red Board using Qwiic cable.
 *  Don't close any of the address jumpers so that it defaults to address 0x70.
 * Attach a second Alphanumeric display using Qwiic cable.
 *  Close address jumper A0 so that this display's address become 0x71.
 *
 * Distributed as-is; no warranty is given.
 *****************************************************************************************/
#include <Wire.h>

#include <SparkFun_Alphanumeric_Display.h>  //Click here to get the library: http://librarymanager/All#SparkFun_Qwiic_Alphanumeric_Display by SparkFun
HT16K33 display;

void setup() {
  Serial.begin(115200);
  Serial.println("SparkFun Qwiic Alphanumeric - Example 9: Scrolling String");
  Wire.begin(); //Join I2C bus

  //check if displays will acknowledge
  if (display.begin(0x70) == false)
  {
    Serial.println("Device did not acknowledge! Freezing.");
    while(1);
  }
  Serial.println("Displays acknowledged.");

  display.print("MILK");
  delay(500);
}

void loop()
{
  delay(300);
  display.shiftLeft();
  //Alternatively - you could also shift the string to the right
  //display.shiftRight();
}
Going Beyond the Basics
Our shift function is a fast and super-simple way to scroll text, but the length of the text is limited to four characters. (More if you’re using multiple displays, but we’ll talk about that a little later on.) So, what can you do if you want to scroll a text string that’s longer than the number of display digits you have. We just need to get a little creative with our coding.
Example - Moving text the hard way Suppose I want to try the scrolling example, but I’m lactose intolerant. I want to scroll “soy milk”, but my display is only four characters. For this, we can use a little creative manual character shifting. Take a look at the code below, and you’ll see how the eight characters (I’m including the space between the two words) make their way past the four available spaces.
/*******************************************************************************************
 * This demo shows how to manually scroll a word or words longer than four characters
 * across a digit alphanumeric display.
 *
 * Rob Reynolds @ SparkFun Electronics
 * Original Creation Date: October 16, 2024
 *
 * SparkFun labored with love to create this code. Feel like supporting open source hardware?
 * Buy a board from SparkFun! https://www.sparkfun.com/products/19297
 *
 * This code is Beerware; if you see me (or any other SparkFun employee) at the
 * local, and you've found our code helpful, please buy us a round!
 *
 * Hardware Connections:
 * Attach Red Board to computer using micro-B USB cable.
 * Attach Qwiic Alphanumeric board to Red Board using Qwiic cable.
 *
 * Distributed as-is; no warranty is given.
 *****************************************************************************************/
#include <Wire.h>

#include <SparkFun_Alphanumeric_Display.h>  //Click here to get the library: http://librarymanager/All#SparkFun_Qwiic_Alphanumeric_Display by SparkFun
HT16K33 display;

void setup()
{
  Serial.begin(115200);
  Serial.println("SparkFun Qwiic Alphanumeric - Example 2: Turn On One Segment");
  Wire.begin(); //Join I2C bus


if (display.begin() == false)
  {
    Serial.println("Device did not acknowledge! Freezing.");
    while(1);
  }

  Serial.println("Display acknowledged.");
  delay(2000);

}

void loop()
{
  // Scroll SOY MILK past the 4 available character displays
  display.clear();
  display.print("SOY ");
  delay(1000);
  display.clear();
  display.print("OY M");
  delay(300);
  display.clear();
  display.print("Y MI");
  delay(300);
  display.clear();
  display.print(" MIL");
  delay(300);
  display.clear();
  display.print("MILK");
  delay(300);
  display.clear();
  display.print("ILK");
  delay(300);
  display.clear();
  display.print("LK");
  delay(300);
  display.clear();
  display.print("K");
  delay(300);
  display.clear();
  delay(5000);

}
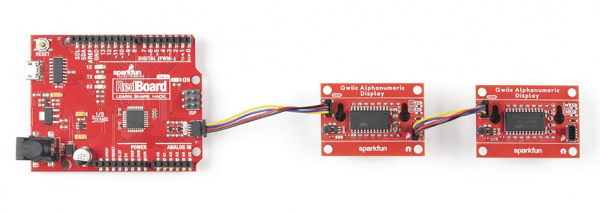
Earlier, I mentioned the possibility of using multiple displays. This takes a little bit of work on the front end, but after that, using four displays is just as easy as using one.
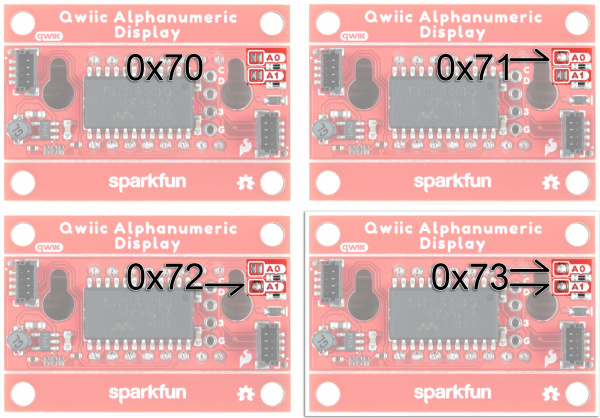
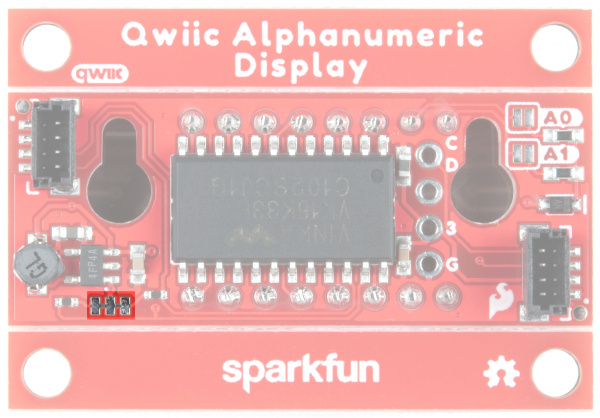
On the rear of the display board, you’ll find a pair of jumpers labeled A0 and A1. These jumpers will allow you to change the I2C address, giving you four options.
We’ve made linking and using multiple displays incredibly simple. There are just a couple of things you need to keep in mind. In your setup(), you will, as usual, check to make sure that your I2C peripheral (in this case your Alphanumeric Display) acknowledges, like this:
if (display.begin() == false)
When using multiple displays, you simply verify that all of them acknowledge, like this:
if (display.begin(0x70, 0x71, 0x72, 0x73) == false)
The big thing the remember here is that when daisy-chaining your displays, they do not need to be connected in numeric order. However, the order in which you verify them in your code must match their physical order, Therefore, if you are using four displays, each of a different color, once you’ve given each its own unique I2C address, you can place the colors in any order you want. Just make sure that you match their I2C address order with the order in which you verify them in your code, something like this:
if (display.begin(0x73, 0x71, 0x70, 0x72) == false) // This is perfectly acceptable
Going beyond the Expected
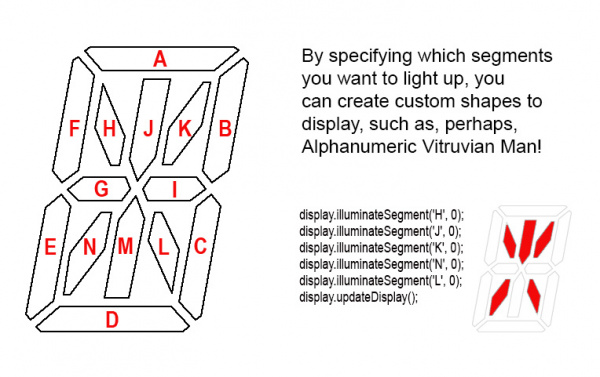
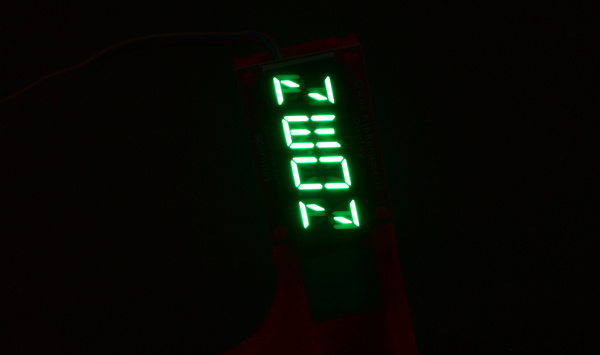
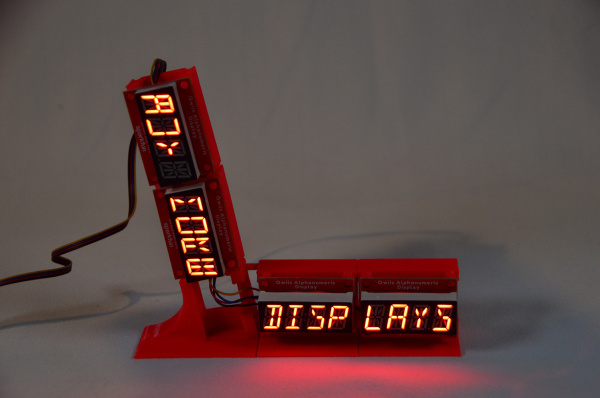
Sometimes it’s fun to take something, completely ignore its intended use, and turn it on its head. Or at least, on its side. I found myself wondering if I could use these Alphanumeric Modules for Vertical display. Of course, if we had single character boards, it would be simple. But with four characters per board, stacking vertically becomes a bit more of a challenge. Luckily, as we learned in Example 02 Turn On One Segment, we can control each of the fourteen segments of each character individually. What that example doesn’t show is that we can turn on multiple segments at once, allowing us to create any number of shapes. In its simplest form, you can think of the segments that make up the letter “U”. If you turn the display on its end, those same segments will give you a low, wide, letter “C”.
The code below will give you an idea of what it takes to create vertical displays.
/*******************************************************************************************
 * This example tests illuminating individual segments to create a vertical display of sorts.
 * We will also use characters that, when turned on their side, can pass for vertical displays.
 * ex using a Z as an N
 *
 * Pass in the segment
 * and digit you wish to illuminate to illuminateSegement().
 *
 *
 *
 * SparkFun labored with love to create this code. Feel like supporting open source hardware?
 * Buy a board from SparkFun! https://www.sparkfun.com/products/16391
 *
 * This code is Beerware; if you see me (or any other SparkFun employee) at the
 * local, and you've found our code helpful, please buy us a round!
 *
 * Hardware Connections:
 * Attach Red Board to computer using micro-B USB cable.
 * Attach Qwiic Alphanumeric board to Red Board using Qwiic cable.
 *
 * Distributed as-is; no warranty is given.
 *****************************************************************************************/
#include <Wire.h>

#include <SparkFun_Alphanumeric_Display.h>  //Click here to get the library: http://librarymanager/All#SparkFun_Qwiic_Alphanumeric_Display by SparkFun
HT16K33 display;

void setup()
{
  Serial.begin(115200);
  Serial.println("SparkFun Qwiic Alphanumeric - Example 2: Turn On One Segment");
  Wire.begin(); //Join I2C bus

  //check if display will acknowledge
  if (display.begin() == false)
  {
    Serial.println("Device did not acknowledge! Freezing.");
    while(1);
  }
  Serial.println("Display acknowledged.");
  display.clear();
  delay(1000);

}

void loop()
{
  //code();
  //delay(5000);
  //name();
  //delay(5000);
  neon();
  delay(5000);
  //zone();
  //delay(5000);
}


void code()
{
  display.clear();

  display.printChar('U', 0);  // Flip it sideways, it becomes a C

  display.printChar('O', 1);  // Sometimes an O is just an O

  // On the next six lines, we illuminate specific segments to create a very wide D
  display.illuminateSegment('A', 2);
  display.illuminateSegment('B', 2);
  display.illuminateSegment('C', 2);
  display.illuminateSegment('E', 2);
  display.illuminateSegment('F', 2);
  display.illuminateSegment('G', 2);
  display.illuminateSegment('I', 2);
  // Thus endeth the creation of the sideways D

  // On the next six lines, we illuminate specific segments to create a very wide E
  display.illuminateSegment('B', 3);
  display.illuminateSegment('C', 3);
  display.illuminateSegment('D', 3);
  display.illuminateSegment('E', 3);
  display.illuminateSegment('F', 3);
  display.illuminateSegment('J', 3);
  display.illuminateSegment('M', 3);
  // Thus endeth the creation of the sideways E


  display.updateDisplay();
  delay(100);
}

void name()
{
  display.clear();

  display.printChar('Z', 0);  // Flip it sideways, it becomes an N

  // On the next six lines, we illuminate specific segments to create a very wide A
  display.illuminateSegment('A', 1);
  display.illuminateSegment('D', 1);
  display.illuminateSegment('E', 1);
  display.illuminateSegment('F', 1);
  display.illuminateSegment('J', 1);
  display.illuminateSegment('M', 1);
  // Thus endeth the creation of the sideways A

  // We will now attempt to make a sideways M
  display.illuminateSegment('A', 2);
  display.illuminateSegment('D', 2);
  display.illuminateSegment('N', 2);
  display.illuminateSegment('H', 2);
  // Thus endeth the creation of the sideways M

  // On the next six lines, we illuminate specific segments to create a very wide E
  display.illuminateSegment('B', 3);
  display.illuminateSegment('C', 3);
  display.illuminateSegment('D', 3);
  display.illuminateSegment('E', 3);
  display.illuminateSegment('F', 3);
  display.illuminateSegment('J', 3);
  display.illuminateSegment('M', 3);
  // Thus endeth the creation of the sideways E

  display.updateDisplay();
  delay(100);
}

void neon()
{
  display.clear();

  display.printChar('Z', 0);  // Flip it sideways, it becomes an N

  // On the next six lines, we illuminate specific segments to create a very wide E
  display.illuminateSegment('B', 1);
  display.illuminateSegment('C', 1);
  display.illuminateSegment('D', 1);
  display.illuminateSegment('E', 1);
  display.illuminateSegment('F', 1);
  display.illuminateSegment('J', 1);
  display.illuminateSegment('M', 1);
  // Thus endeth the creation of the sideways E

  display.printChar('O', 2);  // Sometimes an O is just an O

  display.printChar('Z', 3);  // Flip it sideways, it becomes an N

  display.updateDisplay();
  delay(100);
}

void zone()
{
  display.clear();

  // We will now attempt to make a sideways Z
  display.illuminateSegment('E', 0);
  display.illuminateSegment('F', 0);
  display.illuminateSegment('H', 0);
  display.illuminateSegment('L', 0);
  display.illuminateSegment('C', 0);
  display.illuminateSegment('B', 0);
  // Thus endeth the creation of the sideways Z

  display.printChar('O', 1);  // Sometimes an O is just an O

  display.printChar('Z', 2);  // Flip it sideways, it becomes an N

  // On the next six lines, we illuminate specific segments to create a very wide E
  display.illuminateSegment('B', 3);
  display.illuminateSegment('C', 3);
  display.illuminateSegment('D', 3);
  display.illuminateSegment('E', 3);
  display.illuminateSegment('F', 3);
  display.illuminateSegment('J', 3);
  display.illuminateSegment('M', 3);
  // Thus endeth the creation of the sideways E

  display.updateDisplay();
  delay(100);

  delay(25000);

}
And if you want to get really crazy, you can combine vertical and horizontal! Combining the display.illuminateSegment() calls with the display.printChar() calls (and making sure you assign each to their proper character number) will put you high and above all others with their simple horizontal alphanumeric displays.
/**************************************************************************************
 * This example allows for both vertical and horizontal display of characters.
 * Keep in mind that they are not designed for vertical use, so some of the characters
 * are a little off. Hey, it's the best I could do!
 *
 * Rob Reynolds @ SparkFun Electronics
 * Original Creation Date: November 11, 2024
 *
 * SparkFun labored with love to create this code. Feel like supporting open source hardware?
 * Buy a board from SparkFun! https://www.sparkfun.com/products/19297
 *
 * This code is Beerware; if you see me (or any other SparkFun employee) at the
 * local, and you've found our code helpful, please buy us a round!
 *
 * Hardware Connections:
 * Attach Red Board to computer using micro-B USB cable.
 * Attach Qwiic Alphanumeric board to Red Board using Qwiic cable.
 *  Don't close any of the address jumpers so that it defaults to address 0x70.
 * Attach a second Alphanumeric display using Qwiic cable.
 * Close address jumper A0 so that this display's address become 0x71.
 * Close the necessary jumpers (A0 and/or A1) to change the other displays I2C
 * addresses to 0x72 znd 0x73. See hoolup guide or tutorial for specifics.
 *
 * Distributed as-is; no warranty is given.
 *****************************************************************************************/
#include <Wire.h>

#include <SparkFun_Alphanumeric_Display.h>  //Click here to get the library: http://librarymanager/All#SparkFun_Qwiic_Alphanumeric_Display by SparkFun
HT16K33 display;

void setup() {
  Serial.begin(115200);
  Serial.println("SparkFun Qwiic Alphanumeric - Example 8: Multi Display");
  Wire.begin(); //Join I2C bus

  //check if displays will acknowledge
  //The first address in the begin() function should be the left-most display, traveling to the right from there
  //This is how the string will print across displays, reading from left to right.
  if (display.begin(0x70, 0x71, 0x72, 0x73) == false)
  {
    Serial.println("Device did not acknowledge! Freezing.");
    while(1);
  }
  Serial.println("Displays acknowledged.");
  display.setBrightness(15);
  display.clear();

  //display.print("*BUY MOREDISPLAYS");
}

void loop()
{
  //display.printChar('*', 0);  // An asterisk is an asterisk from any angle!

  // We can make an arrow pointing in any direction. I'll go with Down
  //display.illuminateSegment('G', 0);
  //display.illuminateSegment('H', 0);
  //display.illuminateSegment('N', 0);
  // Thus endeth the creationNof the sideways Down Arrow


  // We will now attempt to make a sideways B
  display.illuminateSegment('A', 0);
  display.illuminateSegment('B', 0);
  display.illuminateSegment('C', 0);
  display.illuminateSegment('E', 0);
  display.illuminateSegment('F', 0);
  display.illuminateSegment('G', 0);
  display.illuminateSegment('I', 0);
  display.illuminateSegment('J', 0);
  // Thus endeth the creation of the sideways B

  // Here is how we make a sideways U
  display.illuminateSegment('A', 1);
  display.illuminateSegment('B', 1);
  display.illuminateSegment('C', 1);
  display.illuminateSegment('D', 1);
  // Thus endeth the sideways U

  // This will hopefully look like a sideways Y
  display.illuminateSegment('H', 2);
  display.illuminateSegment('I', 2);
  display.illuminateSegment('N', 2);
  // Thus endeth the sideways Y

  // We will now attempt to make a sideways M
  display.illuminateSegment('A', 4);
  display.illuminateSegment('D', 4);
  display.illuminateSegment('N', 4);
  display.illuminateSegment('H', 4);
  // Thus endeth the creation of the sideways M

  display.printChar('O', 5);  // Sometimes an O is just an O

  // We will now attempt to make a sideways R
  display.illuminateSegment('D', 6);
  display.illuminateSegment('E', 6);
  display.illuminateSegment('F', 6);
  display.illuminateSegment('H', 6);
  display.illuminateSegment('K', 6);
  display.illuminateSegment('M', 6);
  // Thus endeth the creation of the sideways R

  // On the next six lines, we illuminate specific segments to create a very wide E
  display.illuminateSegment('B', 7);
  display.illuminateSegment('C', 7);
  display.illuminateSegment('D', 7);
  display.illuminateSegment('E', 7);
  display.illuminateSegment('F', 7);
  display.illuminateSegment('J', 7);
  display.illuminateSegment('M', 7);
  // Thus endeth the creation of the sideways E

  display.printChar('D', 8);
  display.printChar('I', 9);
  display.printChar('S', 10);
  display.printChar('P', 11);
  display.printChar('L', 12);
  display.printChar('A', 13);
  display.printChar('Y', 14);
  display.printChar('S', 15);

  display.updateDisplay();

  //display.print("*BUYMOREDISPLAYS");
  //delay(1000);
  //display.clear();
  //delay(250);
  //display.print("*BUYMORESPARKFUN");
  //delay(1000);
  //display.clear();
  delay(25000);

}
Final Thoughts
LEDs are a fast and easy way to add eye-catching pizazz to any project, and, let’s face it, they make everything better. LEDs that can display information quickly go from an ornament to a very useful tool, while maintaining the allure of LEDs. The design, size, and multiple color options of these displays allow for clear visibility from a distance, making for great readability. And now that you know how simple it is to display any number (or letter!) of things to your project in bold, bright characters, your project shelf should look like the Las Vegas Strip in no time!
Or maybe that’s just me…
