Machine Learning @ Home Kit Hookup Guide
 asassy
 Introduction
Machine learning has taken the technology world by storm.
From smart email categorization to make it easier to sift through your inbox, to ML applications that decipher your handwriting and allow you to deposit checks on your mobile phone, to medical diagnosis like detecting cancer. Machine learning is practically ubiquitous in nearly every facet of our lives at this point.
Machine learning itself is a simple idea - ML algorithms use historical data as input to predict new output values. However, the actual practice of machine learning uses complex math and requires quite a bit of computational power, which can seem overwhelming to implement by oneself. But lucky for us, there's no longer a need to build machine learning models from scratch - there are dozens of APIs that have already built out the complex math to run ML models, and we can just use the libraries with our specific parameters.
That's great, it means we have access to all sorts of machine learning models that we can run on our computers. But that doesn't always feel super tangible, just running models on your laptop. What if you wanted to implement machine learning in the real world, in your everyday life? How do you go from building and training a model to deploying to to solve problems in your physical life?
Welcome to the Machine Learning @ Home Kit - this aims to help you bridge the gap between building and training machine learning models, and deploying them in tangible and meaningful ways.
NVIDIA's Jetson Nano has great GPU capabilities, making it ideal for ML applications. This kit brings machine output and interaction into the picture through a number of different SparkFun Qwiic boards for you to turn machine learning into machine working!
The goals of this particular hookup guide is to extend the content from NVIDIA's Getting Started with AI on Jetson Nano course to implement machine learning in practical ways in your own home. It will be "living", meaning it will be periodically iterated upon and additional projects will be added over time. We will go over how to move away from Jupyter labs and actually deploy applications, as well as how to strategically run applications once deployed. For example, we'll review how to save on power, by starting programs on boot, or using a motion sensor/button rather than having the program run all the time.
Let's jump right in and take a look at what's included in this kit so we can start building!
Kit Overview
The Machine Learning @ Home Kit includes all of the hardware that you need to take your Nvidia Jetson Nano learning experience to a practical level around your home or office. We decided on leveraging the SparkFun Qwiic ecosystem of development boards to keep wiring to a minimum and get you up and running with hardware without a rats nest of wires, soldering or getting things crossed. In this section we will review the different Qwiic boards and components of the kit, but we do want to take a moment and cover what other requirements there are in terms of hardware.
Prerequisite Hardware
The Machine Learning @ Home Kit doesn’t include the Nvidia Jetson Nano or any of the required accessories to get started with it.
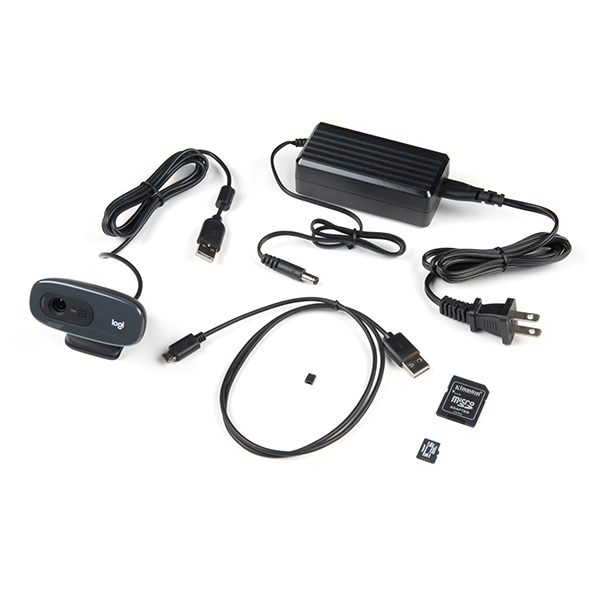
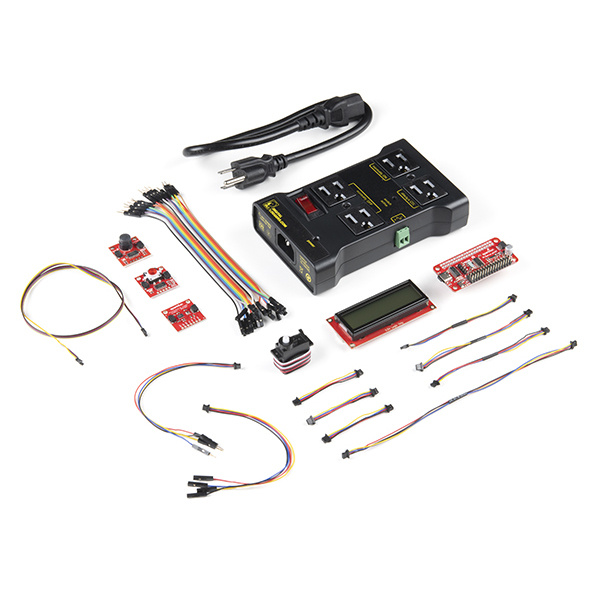
SparkFun DLI Kit (without Jetson Nano)
KIT-16389The best first step to get everything you need in one go is to pickup the DLI Course Kit which includes all of the accessories you need including an Nvidia Jetson Nano if you don’t already have one, a power supply and cable (USB for the 2GB or 5V 4A Barrel for the 4GB), microSD card for the OS and a USB webcam. With the DLI Course kit in hand we highly recommend taking the free online course from the Deep Learning Institute to get you acquainted with the Nano itself, get all of the software setup and ready to go and get some experience with Jupyter Labs under your belt.
Kit Contents
Now, back to the Machine Learning @ Home Kit! The kit includes a bunch of hardware that is designed for you to move your machine learning projects out of Jupyter Labs and the feedback off of your monitor and into the physical world as a response. Let’s jump in and take a look at the components!
IoT Relay
Do you want to control a standard wall outlet device with your microcontroller, but don’t want to mess with the high-voltage wiring? The IoT Power Relay is a controllable power relay equipped with four outputs that help you create an Internet of Things project with safe, reliable power control. With the IoT Power Relay you can easily control the power going to a device with an Arduino, Raspberry Pi or other single-board computer or microcontroller. It provides an alternative to the Power Switch Tail.
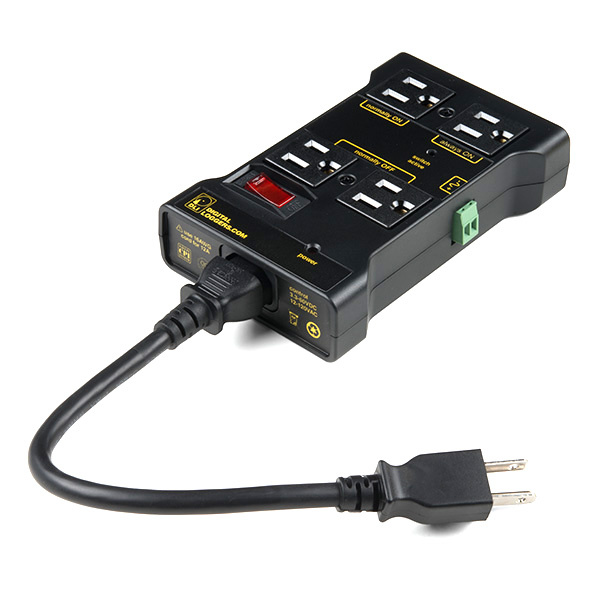
The IoT Power Relay is designed to allow you to safely control an outlet device that operates at 3--48VDC or 12--120VAC. Each IoT Power Relay features a single input (from the included C13 power cable) to four outputs: one normally on, one always on, and two normally off. The durable SPDT control relay is rated at 30/40A, for 400,000 operations.
In this kit, we will be using the relay to be able to safely and reliably control larger loads around your house or office without the need to cut wires and deal with high current A/C voltages. The great thing here is that you can also use it to power the project while controlling a device at the same time!
Servo Phat
The SparkFun Servo pHAT allows your Jetson Nano to control up to 16 servo motors in a straightforward and uncomplicated manner via an I2C connection. Thanks to its I2C capabilities, this PWM HAT saves GPIO pins, allowing you to use them for other purposes. The Servo pHAT also adds a serial terminal connection, which will allow you to connect to a number of other devices that are Serial/UART compatible.
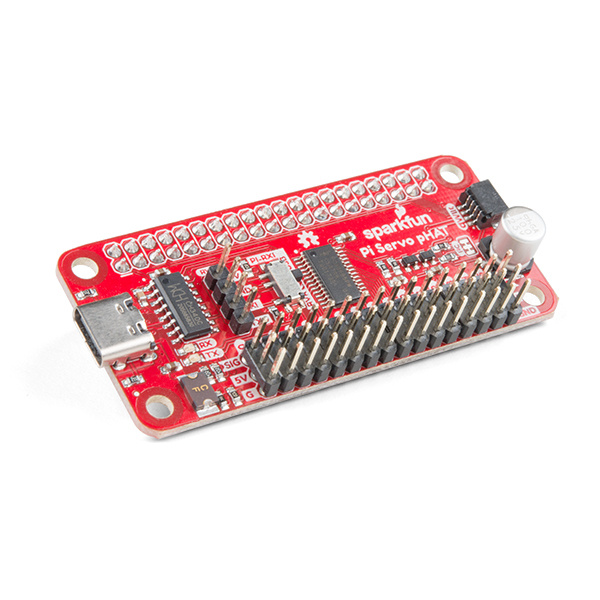
Power to the SparkFun Servo pHAT can be supplied through USB-C connector. This will power either the servo motors only, or power the servo motors as well as the Jetson Nano that is connected to the HAT. We switched to USB-C to allow you to bring more current to your servos than ever before. This USB-C connector can also be used to hook up the Nano via serial port connection to avoid having to use a monitor and keyboard for setting up the Nano. To supply power only to the servo power rail (and not the Pi's 5V power rail), you just need to cut a small trace on the isolation jumper. Doing this allows you to drive heavier loads coming from multiple or larger servos. We've even added power protection circuits to the design, to avoid damage to power sources. Each of this pHAT's 16 servo motor pin headers has been spaced out to the standard 3-pin servo pinout (ground, 5V, signal) to make it easier to attach your servo motors.
Servo
A simple, low-cost, high quality servo for all your mechatronic needs. This servo is very similar in size and specifications to the Hitec HS-55. This little guy is able to take in 6 volts and deliver 20.8 oz-in. of maximum torque at 0.10 sec/60°
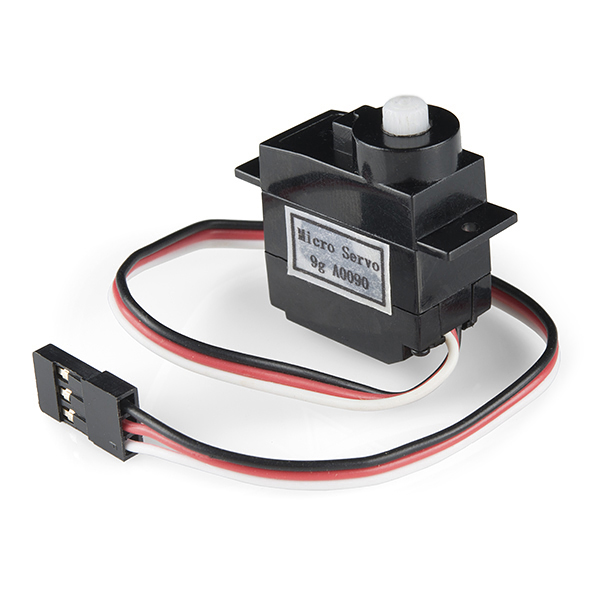
This small servo comes with a standard 3 pin power and control cable and works perfectly to get your Nvidia Jetson projects to start moving!
Qwiic Button
Buttons are an easy and tactile way to interface with your project, but why would you want to deal with debouncing, polling, and wiring up pull-up resistors? The Qwiic Button with built-in red LED simplifies all of those nasty worries away into an easy to use I2C device! Utilizing our Qwiic Connect System, using the button is as simple as connecting a cable and loading up some pre-written code!
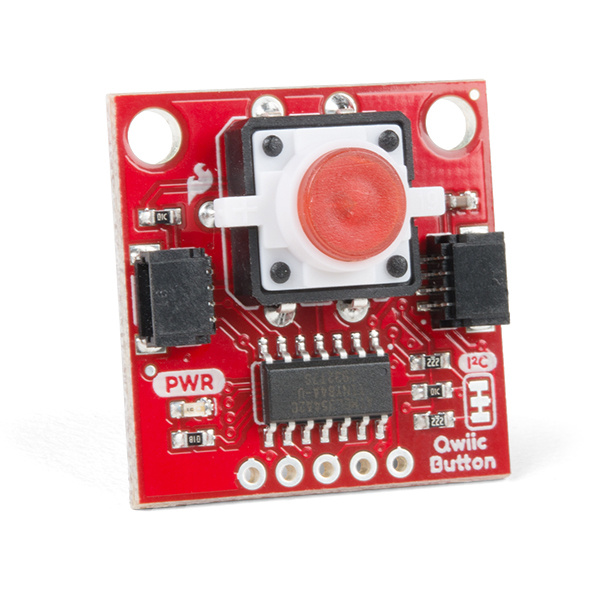
If you need multiple buttons for your project, fear not! Each button has a configurable I2C address, so you can daisy-chain multiple buttons over Qwiic and still address each one individually. We've got an example in our Arduino library that provides a super-easy way to configure your Qwiic Button to whatever I2C address you desire. You can download the library through the Arduino library manager by searching 'SparkFun Qwiic Button' or you can get the GitHub repo as a .zip file and install the library from there. In addition to handling blinking and debouncing, the Qwiic Button has configurable interrupts that can be configured to activate upon a button press or click. We've also taken the liberty of implementing a FIFO queue onboard the Qwiic Button where it keeps an internal record of when the button was pressed. This means that code on your microcontroller need not waste valuable processing time checking the status of the button but instead can run a small function whenever the button is pressed or clicked! For more information on interrupts check out our guide here!
Qwiic PIR Motion Sensor
Passive Infrared (PIR) sensors are great for detecting motion in a small area around the sensor. The 170µA SparkFun EKMC4607112K Qwiic PIR uses an EKM-series PIR sensor from Panasonic® paired with an ATTiny84 to interact with it using I2C with the Qwiic system. The EKM-series PIR sensors are optimized for small movements to offer motion-sensing options for continuously powered applications. A great way to enable a webcam or run a machine learning program when there is actually something in front of the project detected!
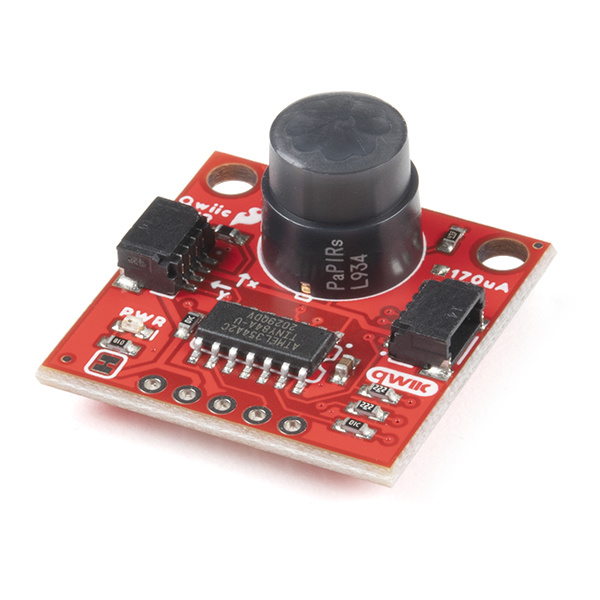
PIR sensors do not return specific distance data but instead monitor for IR light coming from objects in their field of view and will activate their signal when motion is detected in their sensing area, making them perfect for applications such as turning devices on automatically when motion is detected. Applications include home and building automation for energy saving, automated on/off lighting control, security, appliances, and IoT. Panasonic's low-profile PIR motion sensors (10.9mm versus standard 14.4mm height offer space savings for constrained designs) consist of a lens to create various detection zones, an optical filter to block non-infrared light, pyroelectric sensing elements, electromagnetic shielding to all circuitry, and an impedance converter to get an electrical signal. This PIR sensor offers digital output across 32 zones at 5m detection distance with 90° x 90° detection area.
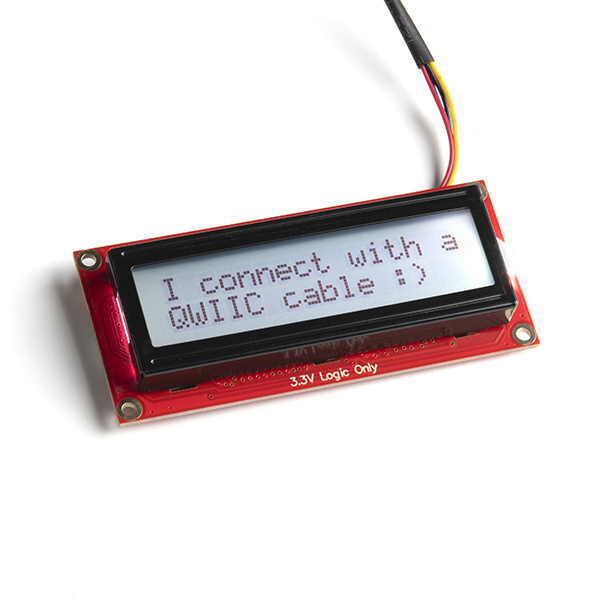
Qwiic SerLCD Display
The SparkFun SerLCD is an AVR-based, serial enabled LCD that provides a simple and cost effective solution for adding a 16x2 Black on RGB Liquid Crystal Display into your machine learning project.
We've seriously overhauled the PCB design on the back of the screen by including an ATmega328P that handles all of the screen control, meaning a backpack is no longer needed! This display can now communicate in three different ways: serial, I2C, and SPI. This version comes equipped with a Qwiic connector, bringing serial LCDs into the Qwiic ecosystem. This simplifies the number of wires needed and allows your project to display all kinds of text and numbers.
Qwiic SparkFun Environmental Combo Sensor
The SparkFun CCS811/BME280 Environmental Combo Breakout takes care of all your atmospheric-quality sensing needs with the popular CCS811 and BME280 ICs. This unique breakout provides a variety of environmental data, including barometric pressure, humidity, temperature, TVOCs and equivalent CO2 (or eCO2) levels. To make it even easier to use this breakout, all communication is enacted exclusively via I2C, utilizing our handy Qwiic system. However, we still have broken out 0.1" spaced pins in case you prefer to use a breadboard.
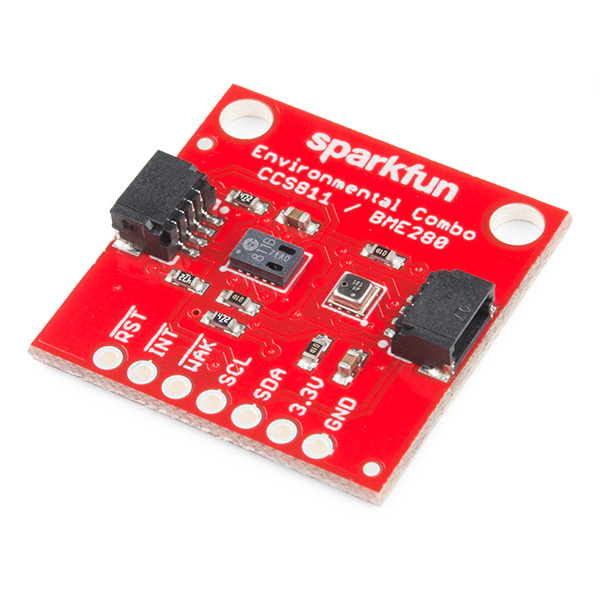
The CCS811 is an exceedingly popular sensor, providing readings for equivalent CO2 (or eCO2) in the parts per million (PPM) and total volatile organic compounds in the parts per billion (PPB). The CCS811 also has a feature that allows it to fine-tune its readings if it has access to the current humidity and temperature. Luckily for us, the BME280 provides humidity, temperature and barometric pressure! This allows the sensors to work together to give us more accurate readings than they’d be able to provide on their own. We also made it easy to interface with them via I2C.
Software Overview and Setup
This section is going to walk you through getting up and starting from a software perspective. With the advent of the Nvidia Jetson 2GB also came the use of Docker and its Containers as a way to manage different OS images rather than having to burn different OS images to microSD cards and swap them out as needed.
For those unfamiliar with Docker Containers, they are portable units of software that combine an application and all of its dependencies (code, runtime, system tools, system libraries, etc.) into a single package that is agnostic to the host OS. In other words, regardless of its environment the application will always run the same. This removes the need to build complex environments from scratch repetitively and simplifies the process of deploying applications.
For a quick start, we can just burn the basic OS to a microSD card, download whatever containers we need for what content we are working with, and then open those containers. The process is a little different and new for those who are used to managing SD cards for the Raspberry Pi or other single board computers, but it is an improvement and much more efficient in terms of time.
This section is a little long, but the setup is a crucial part of getting your first home automation project up and running! So take your time getting all of the settings configured correctly.
NVIDIA Jetson Nano OS Image
With all of the container talk, we still need a base operating system. You can find the most up-to-date image from Nvidia for the Jetson Nano here.
Once you download it, you can write the image to your microSD card by following Nvidia's instructions according to your computer’s operating system: Windows, macOS, or Linux.
Setup and Boot Through Display or Headless
You can load the OS Image and setup your Jetson Nano one of two ways: with a display, keyboard, and mouse attached, or in headless mode via a connection with another computer.
If you choose the first method, simply insert the microSD card, and connect the display via HDMI and power via USB-C, as well as the keyboard and mouse via USB. The Nano will boot up - it might take a few minutes - and will lead you to a configuration window. This will guide you through choosing a time-zone, a keyboard language, and setting up a user profile.
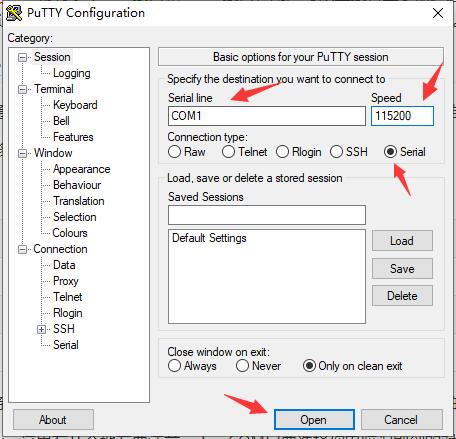
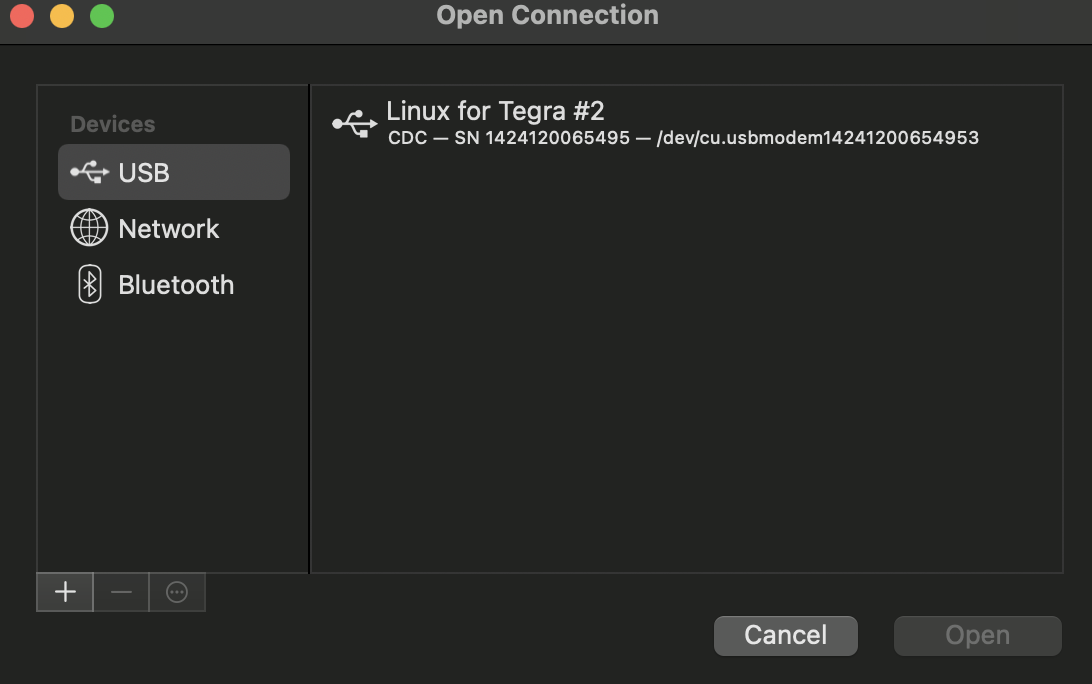
Setting up through headless mode is quite similar...you'll still connect the power via USB-C and insert the microSD card, but instead of connecting a display, mouse and keyboard, you'll connect the Micro USB-C to your computer. Using a terminal application (PuTTY is popular for Windows, Serial for Macs), you can communicate with the Jetson Nano through USB serial communication.
If you use PuTTy, you'll have to go to the device manager in Windows and look for Communication Ports to determine which port the Jetson Nano is running under. If you aren't able to find the Communications Port, go to the Action menu within the Device Manager, and then select Add legacy hardware. You'll continue through the menu by clicking next, which will take you to a list of hardware that cana be installed. Select Ports (COM & LPT), continue on clicking next (the Standard port types option will work), and you'll be finished. Within puTTY, enter the COM port number, and set the speed to 115200.
If you use Serial, the device will show up within the USB tab, and you'll be able to double click on it to enter the Nano's terminal. Remember to press enter once in the terminal to prompt it to ask you user/password settings, otherwise the cursor will just blink.
Within the Nano's terminal, through whichever method you communicate through USB serial, the Jetson Nano will prompt you with the same configuration setup as it did when connected to the display. It will just be done through the command line versus through a GUI.
Network Settings
Unfortunately, the Jetson Nano does not come equipped with Wifi, but we need it to access the DLI course Docker Container and JupyterLabs. There are a few ways to connect to WiFi - at first glance, it's obvious that the Nano comes equipped with an Ethernet port, so you can connect to your personal network by simply using an Ethernet cable.
However, it's likely you'll want to use the Jetson Nano wirelessly, and the easiest way to go about that is using a wireless network adapter that plugs into the USB port, like the Edimax adapter we carry here. These adapters just work smoothly; in most cases there are no additional drivers to install or setup to go through (and if there are drivers to install, we've written a tutorial on how to do that). Once the USB is plugged into the Nano, the device just automatically recognizes it, and you can go about selecting your network.
If you are using a 2GB and a separate display, connection through the WiFi dongle included should be straightforward using the GUI and selecting your network during setup.
If you are operating your Jetson Nano through headless mode, you'll have to use the command line to connect to the network. We'll start by using the following command:
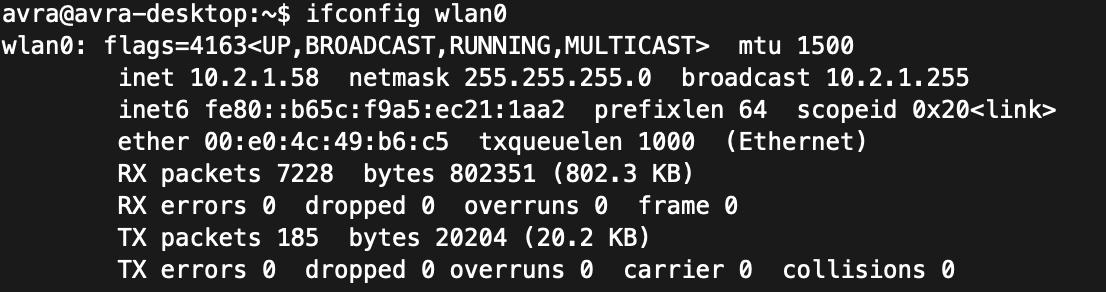
ifconfig wlan0Enter
ifconfig stands for interface configuration, so it allows you to setup the network interfaces of the Nano. wlan0 is the name of the first wireless network interface. This will tell us the status of wlan0 - if the Wifi adapter dongle is not properly plugged in or working, you won't see the status like shown below.
Once we know the adapter is working and the device has the capabilities of connecting to a network, we can list all of the possible network connections by typing the following command, which calls the Network Manager:
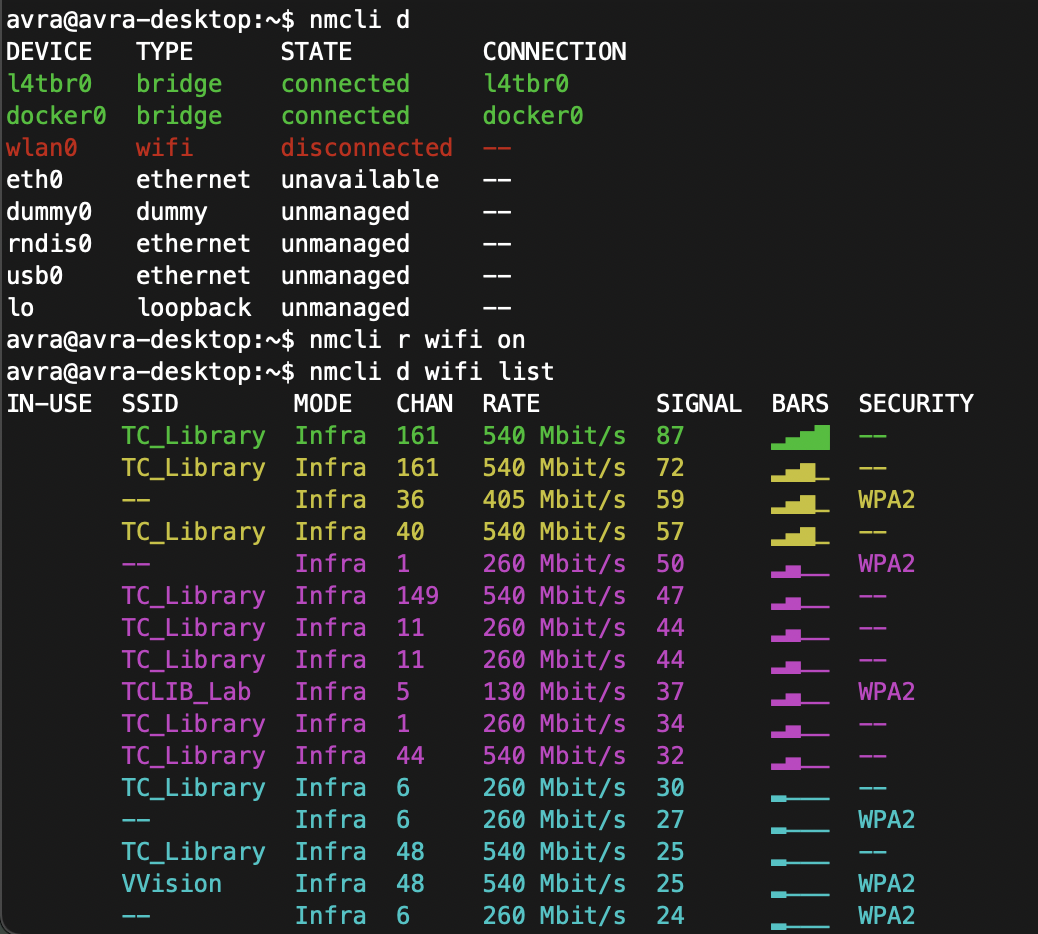
nmcli dEnter
As seen below, the wlan0 device is not connected to anything. So, to connect to my network, we'll have to first ensure that the WiFi module is on by using the following prompt:
nmcli r wifi onEnter
And then we can scan the list of visible WiFi networks as well as their signal strenghts, data rate, channel, security, etc.
nmcli d wifi listEnter
Once you see the wireless network you want to connect to, type the following command, and remember that both the SSID and password are case sensitive.
sudo nmcli d wifi connect [SSID] password [PASSWORD]Enter
If the WiFi is public and doesn't have a password, then the following command works for connecting:
nmcli --ask dev wifi connect [SSID]Enter
Finally, you can check that you are connected by prompting the Network Manager to show you all of the active connections:
nmcli con show --active

If you run into issues, refer to the tutorial we wrote that has references for getting unstuck.
Download and Install the DLI Course Container
Once you have your Jetson Nano up and running and the basic configuration complete including connecting it to your personal network, either through WiFi or Ethernet), open a command prompt and type the following command to download the DLI Course container that we will use as our starting point and then add to it as we go!
docker pull nvcr.io/nvidia/dli/dli-nano-ai:v2.0.1-r32.6.1Enter
The container will take some time to download. It is a good time to grab some coffee, watch some YouTube videos or take a nap!
Launch the DLI Course Container
When the container image has completely downloaded you will again gain control of the command prompt. Once you do you can launch the container by typing the following command into the prompt. Make sure to have your USB camera plugged in at this point.
sudo docker run --runtime nvidia -it --rm --network host --volume ~/nvdli-data:/nvdli-nano/data --device /dev/i2c-1 --device /dev/video0 nvcr.io/nvidia/dli/dli-nano-ai:v2.0.1-r32.6.1
Notice that it is one command that is run on one line - you should run it altogether. NVIDIA does a good job of explaining the command that runs the Docker container and JupyterLabs inside of it:
- --runtime nvidia will use the NVIDIA container runtime while running the l4t-base container
- -it means run in interactive mode
- --rm will delete the container when finished
- --network host allows the container to use your Jetson host network and ports
- --volume defines a mounting directory, and is used to share the persistent data files and the USB camera between the Jetson host and the container
- --device allows access to the video device
This command will start a personal JupyterLab server in a local Docker container. Since you'll be using it whenever you want to build applications, which presumably is often, I recommend creating a Bash script using the nano text editor so that you don't have to go looking for the command each time, you can just run the script. If you'd like to do this, open a text editor like nano (you can always install it using sudo apt install nano), copy and paste the command above, and save the file with a .sh extension. You'll need to set execute permission on your script using the chmod command chmod +x script-name-here.sh and then you'll be able to run your script anytime you want by using ./script-name-here.sh.
If you have run the DLI Course container before, you may notice that this command has been slightly changed from the previous version you find in the course materials. We added a device flag addition for /dev/i2c-1. This option gives the container access to the i2c-1 bus that all of your SparkFun Qwiic Boards will connect through. Without this flag you would get a bunch of errors when you start trying to work with the different boards in your kit.
You'll know that the DLI Course Container is launched and successful when it shows the following message:

Copy the url (which is simply the Nano's specific IP address followed by :8888) and use the password dlinano to enter JupyterLabs. Notice that we already within the folder nvdli-nano, which gives us access to the DLI-Nano Notebooks directory.
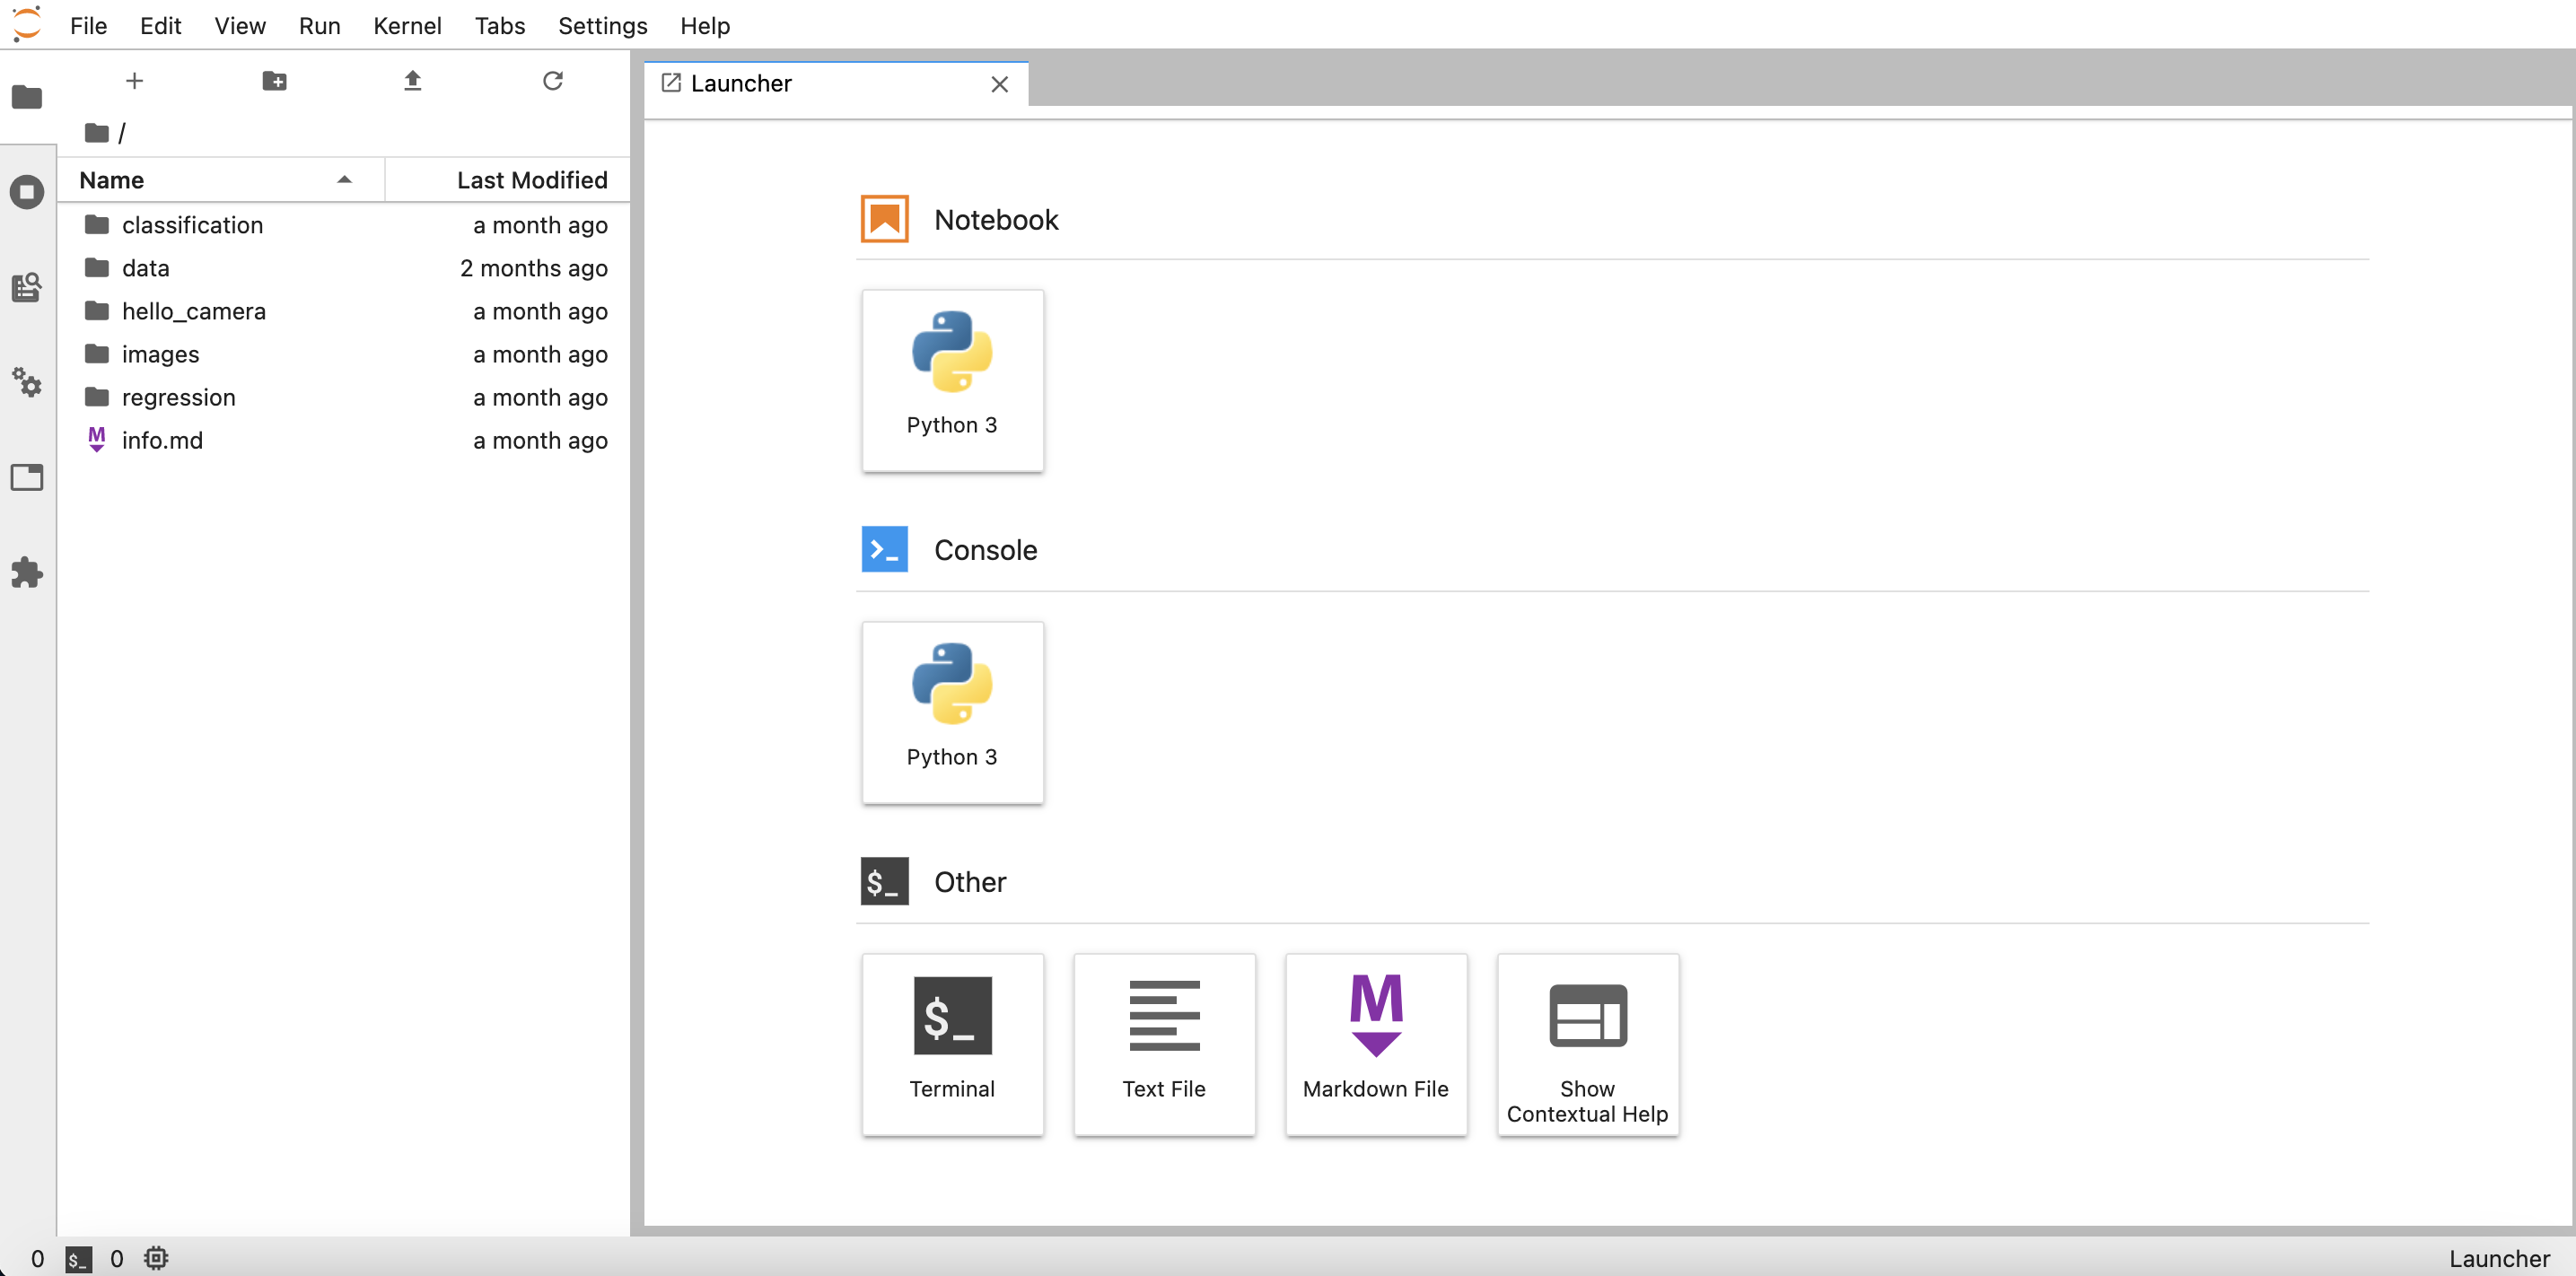
Navigate JupyterLab
Welcome to JupyterLab! JupyterLab enables you to arrange your work area with notebooks, text files, terminals, and notebook outputs. The main page will provide you with options to start from scratch and create your own Python 3 Notebook or Console, as well as open a terminal tab or create a Markdown file. And, because we loaded the DLI course image onto the Nano, we have access to all the associated course documents and examples, as seen in the file directory.
Once you are logged into Jupyter Notebooks you will need to open a new terminal window to download the Jupyter Notebooks for the Qwiic Boards as well as install the Qwiic Python libraries.
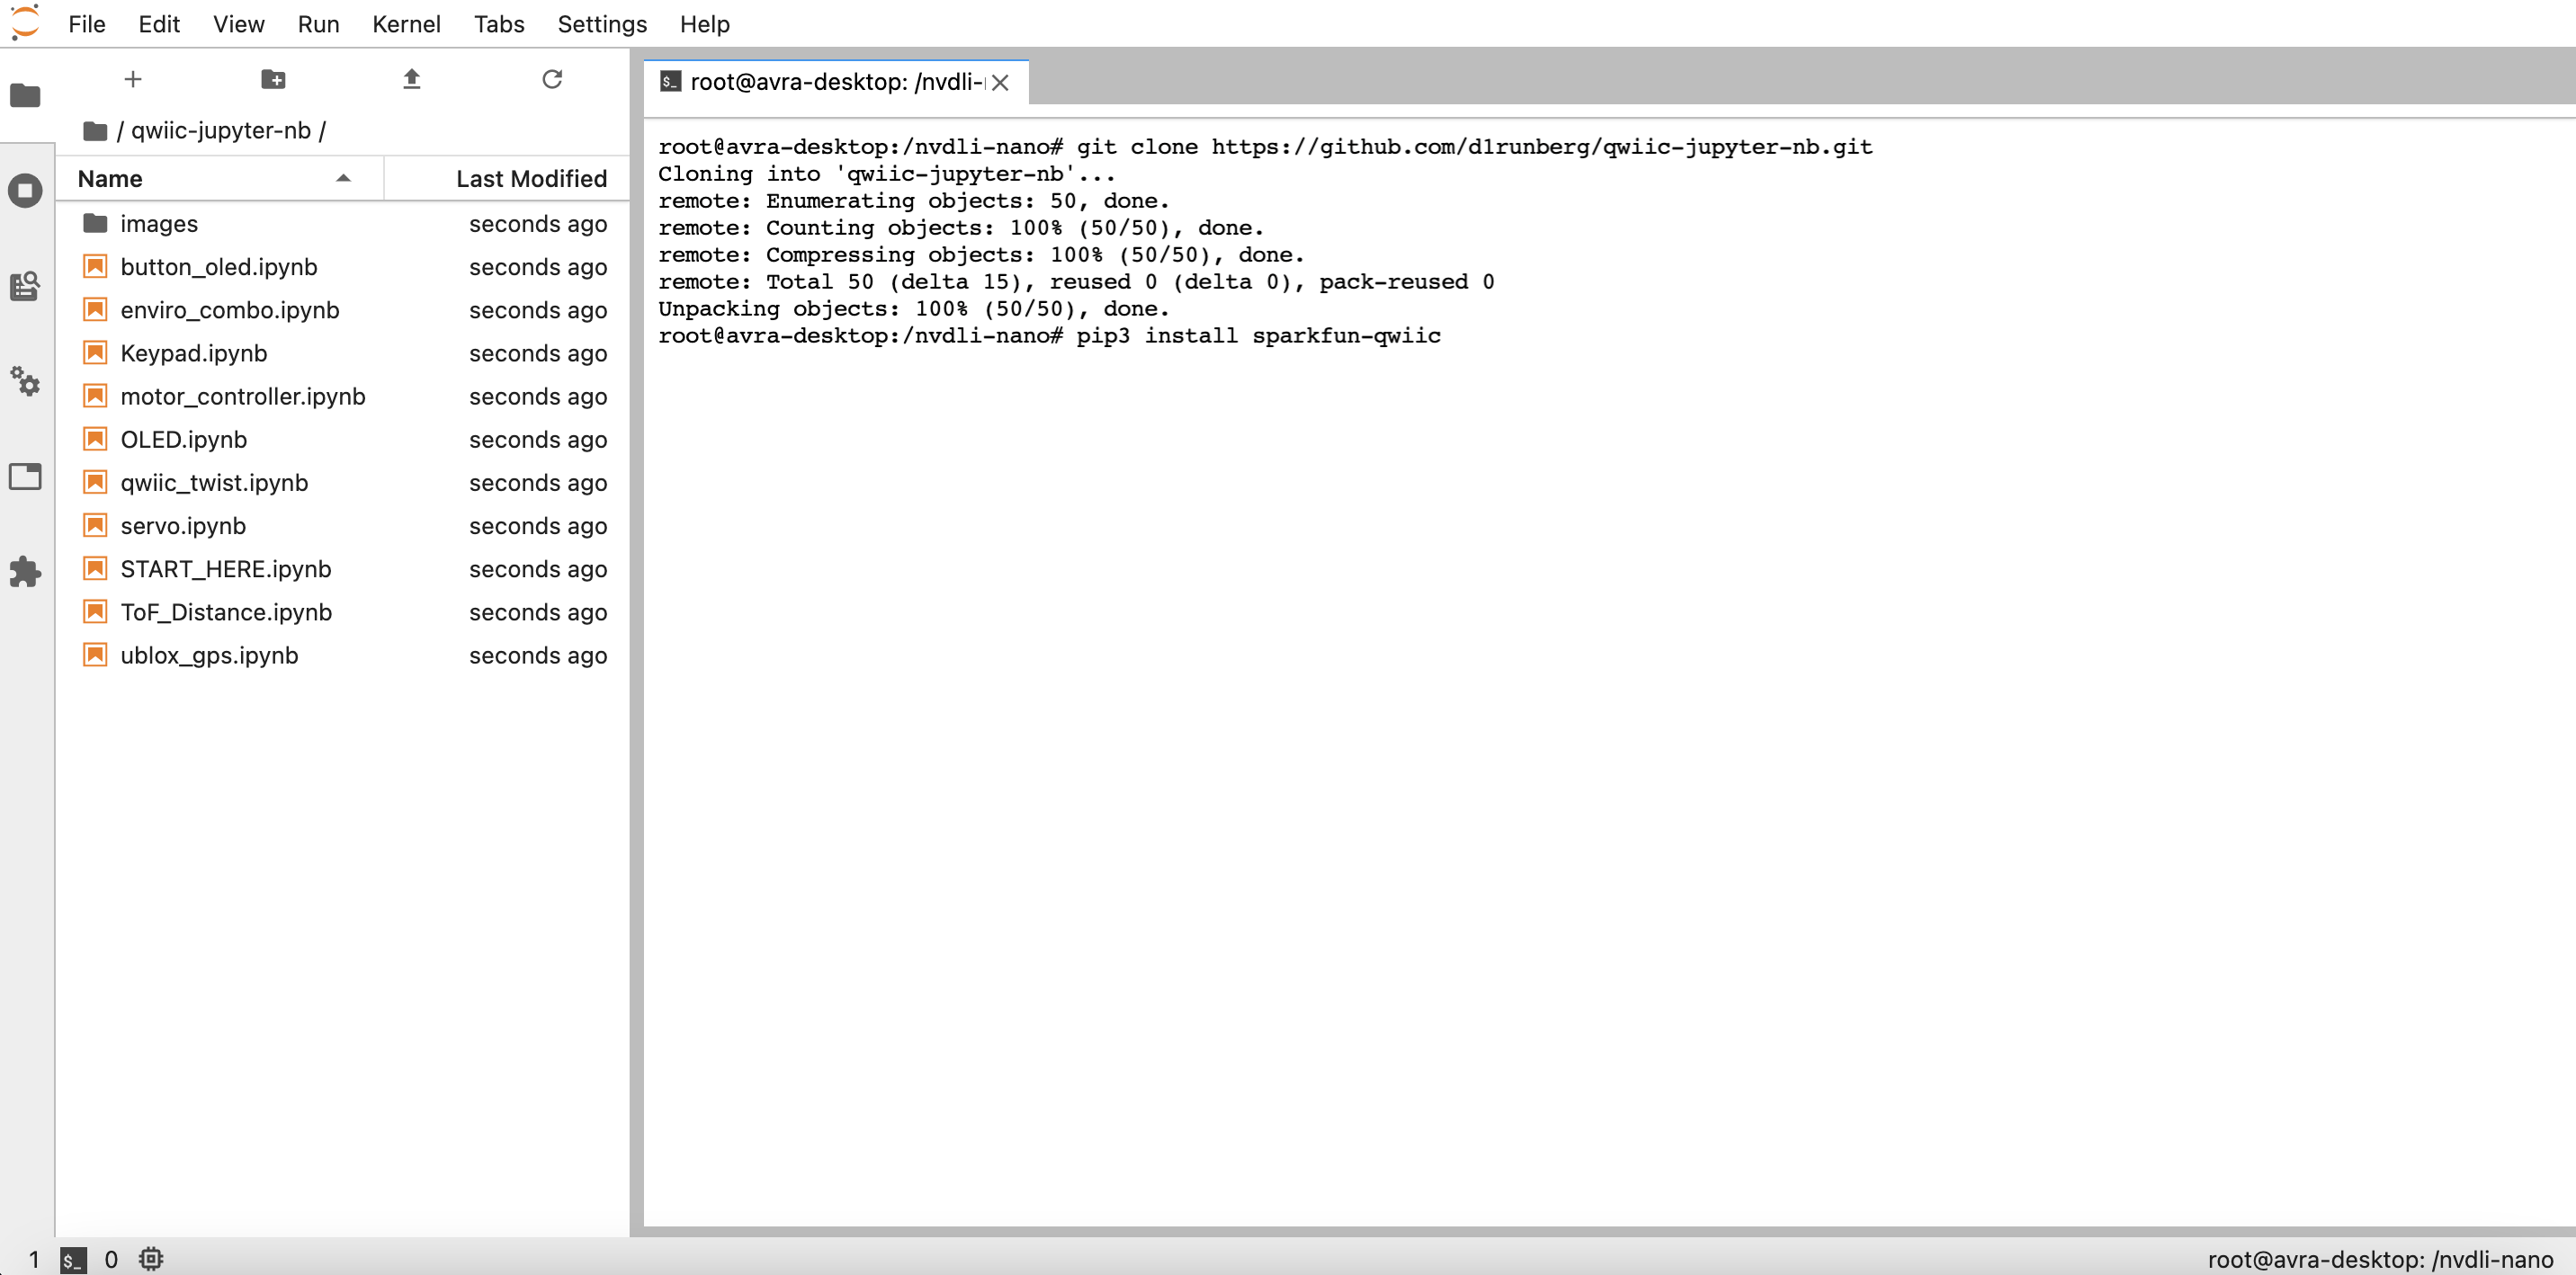
Once you open the terminal window from the Launcher window, you can download the SparkFun Qwiic Jupyter Notebooks from GitHub with the following command:
git clone https://github.com/d1runberg/qwiic-jupyter-nb.git [Enter]
This command will download a folder with the contents of our Jupyter Notebooks as well as the assets required to display images, etc. You should now be able to see the SparkFun Qwiic Notebooks directory in the directory tree on the left side of JupyterLabs!
Once the SparkFun Qwiic Notebooks downloads you need to install the Qwiic Python libraries before digging in and using them.
Installing Qwiic Libraries
With the terminal window in Jupyter Notebooks still opened you can install the SparkFun Qwiic Python libraries through pip by typing the following command:
pip3 install sparkfun-qwiic[Enter]
This will install the entire Qwiic Py package with libraries for the Qwiic boards that are supported in Python.
Once the installation is complete, you should be good to go and can close the terminal window.
You're officially good to go to start developing applications! Remember, the container we opened is built to delete the container when finished, so if you were to close down JupterLabs as is right now, you'd lose the Qwiic Jupyter Notebooks and Qwiic libraries that you just downloaded and installed.
You can work with nearly any Qwiic device that has a python library, which means you can extend your project well beyond the scope of the Machine Learning Kit. Before you jump into the deep end and working with machine learning, make sure you're well accainted with just running an example with a Qwiic board in JupterLabs.
Workshop 1: Building a Pet Feeder
Alright, let me know if this sounds familiar to you - you've got a rambunctious _____ that tends to steal more food than they're allowed. Fill in the blank...could be a pet, a child, a friend (are they really?) or a roommmate. Whoever it is, it's problematic for you, either because their taking your food or they are simply eating too much. And, it's exhausting to monitor it yourself! What if you could create an automated food bin that would only open for specific people/pets?
This is the kind of problem that the Machine Learning @ Home Kit is well equipped to handle. It requires a system that can use images as data that will determine if a food bin is opened or not. Back in GTC 2021, one of our creative technologists, Derek, actually built it out, as seen linked below. It is highly recommended to just go through and watch the entire presentation, as it provides a thorough framework for making your way through image classification with the Jetson Nano and showcases how changing very little code can build a vastly different project. Furthermore, it's practically a step-by-step explanation for how to build out your own pet/human feeder.
As Derek does such a good job building out the hardware part of the project in the video, we'll just do a run-through of the software changes he made here.
The first thing required is to attach the SparkFun Pi Servo pHAT to the Jetson Nano, and then the servo itself. You can watch the video to get ideas about the mechanics of opening and closing the 'bin'.

As Derek explains, there are two major changes needed to personalize the DLI course example code for this project. The first is to write out a python script for operating the Qwiic servo. The second is change the parameters for the image classification to inputs of yourself and whoever you want to prevent from eating food.
Let's tackle the first part - coding in Python to drive the Qwiic servo through the Pi Servo pHAT. Open up a blank Python 3 Notebook in JupyterLabs, and test out the following script. It will use the Pi Servo Hat library to start the servo and move it specific increments at certain times.
#import the necessary libraries
import pi_servo_hat
import time
import math
import sys

#an object of our servo
myServo = pi_servo_hat.PiServoHat()

#starts up the servo
myServo.restart()

#initializes the position at (0,0)
myServo.move_servo_position(0,0)

#pauses for 1 second
time.sleep(1)

#moves the position 180 degrees
myServo.move_servo_position(0,180)

#pauses for 1 second
time.sleep(1)

#moves back to the initialized position
myServo.move_servo_position(0,0)
Okay, so we've got the servo moving, and we can use it to open and close our food bin. But, we need it to move only when a specific person/pet is in front of the bin. This is where the machine learning classification comes in with the USB camera.
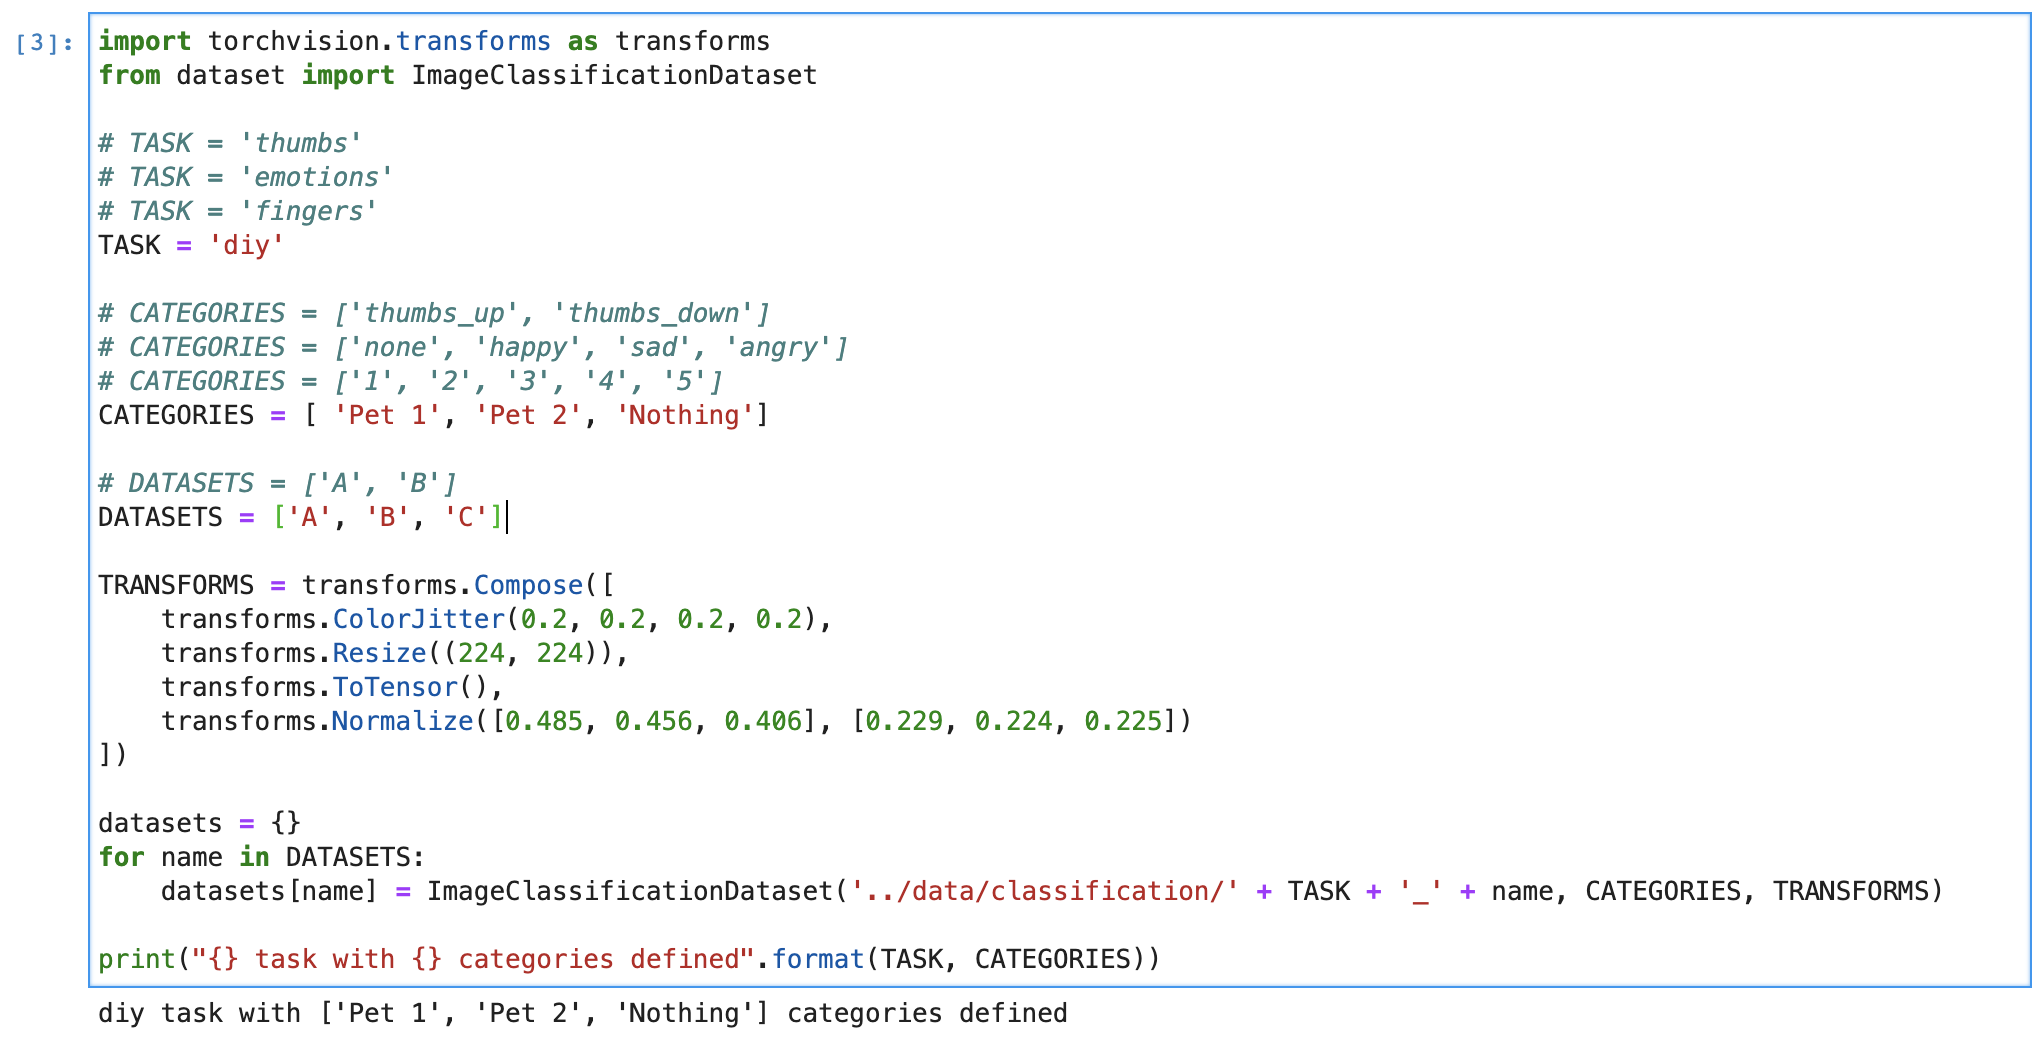
Within JuptyerLabs, go into the classifications folder and open up the classification_interactive.ipynb file. This notebook is a template of sorts for data collection, training, and testing with the Jetson Nano and camera; the DLI Course already has a few examples laid out for you to play with, like determining if your thumbs are up or down, your emotions, how many fingers you're holding up, or your own DIY task. However, no matter which dataset you are training, the data collection and model really remain the same, it's just the content of the data that is changing. Start off by running all of the code blocks up until the Task section.
Things start to change within this notebook once we get here. We'll comment out the task of 'thumbs' and instead call the 'diy' task. Similiarly, the categories will change from 'thumbs up, thumbs down' to the last category of diy. It is here that you'll make the decision of who you want to create this food bin for. In Derek's example, he just did himself, 'Derek', or 'nothing', which is two categories. If that's similiar to your case (you could replace 'nothing' with someone else's name), then fill in the category names and keep the datasets set to two variables. If you're in a situation with two pets and yourself, fill in the variable names, and then uncomment the datasets option with three variables. Now you can run the code block. Here's an example of how it could look:
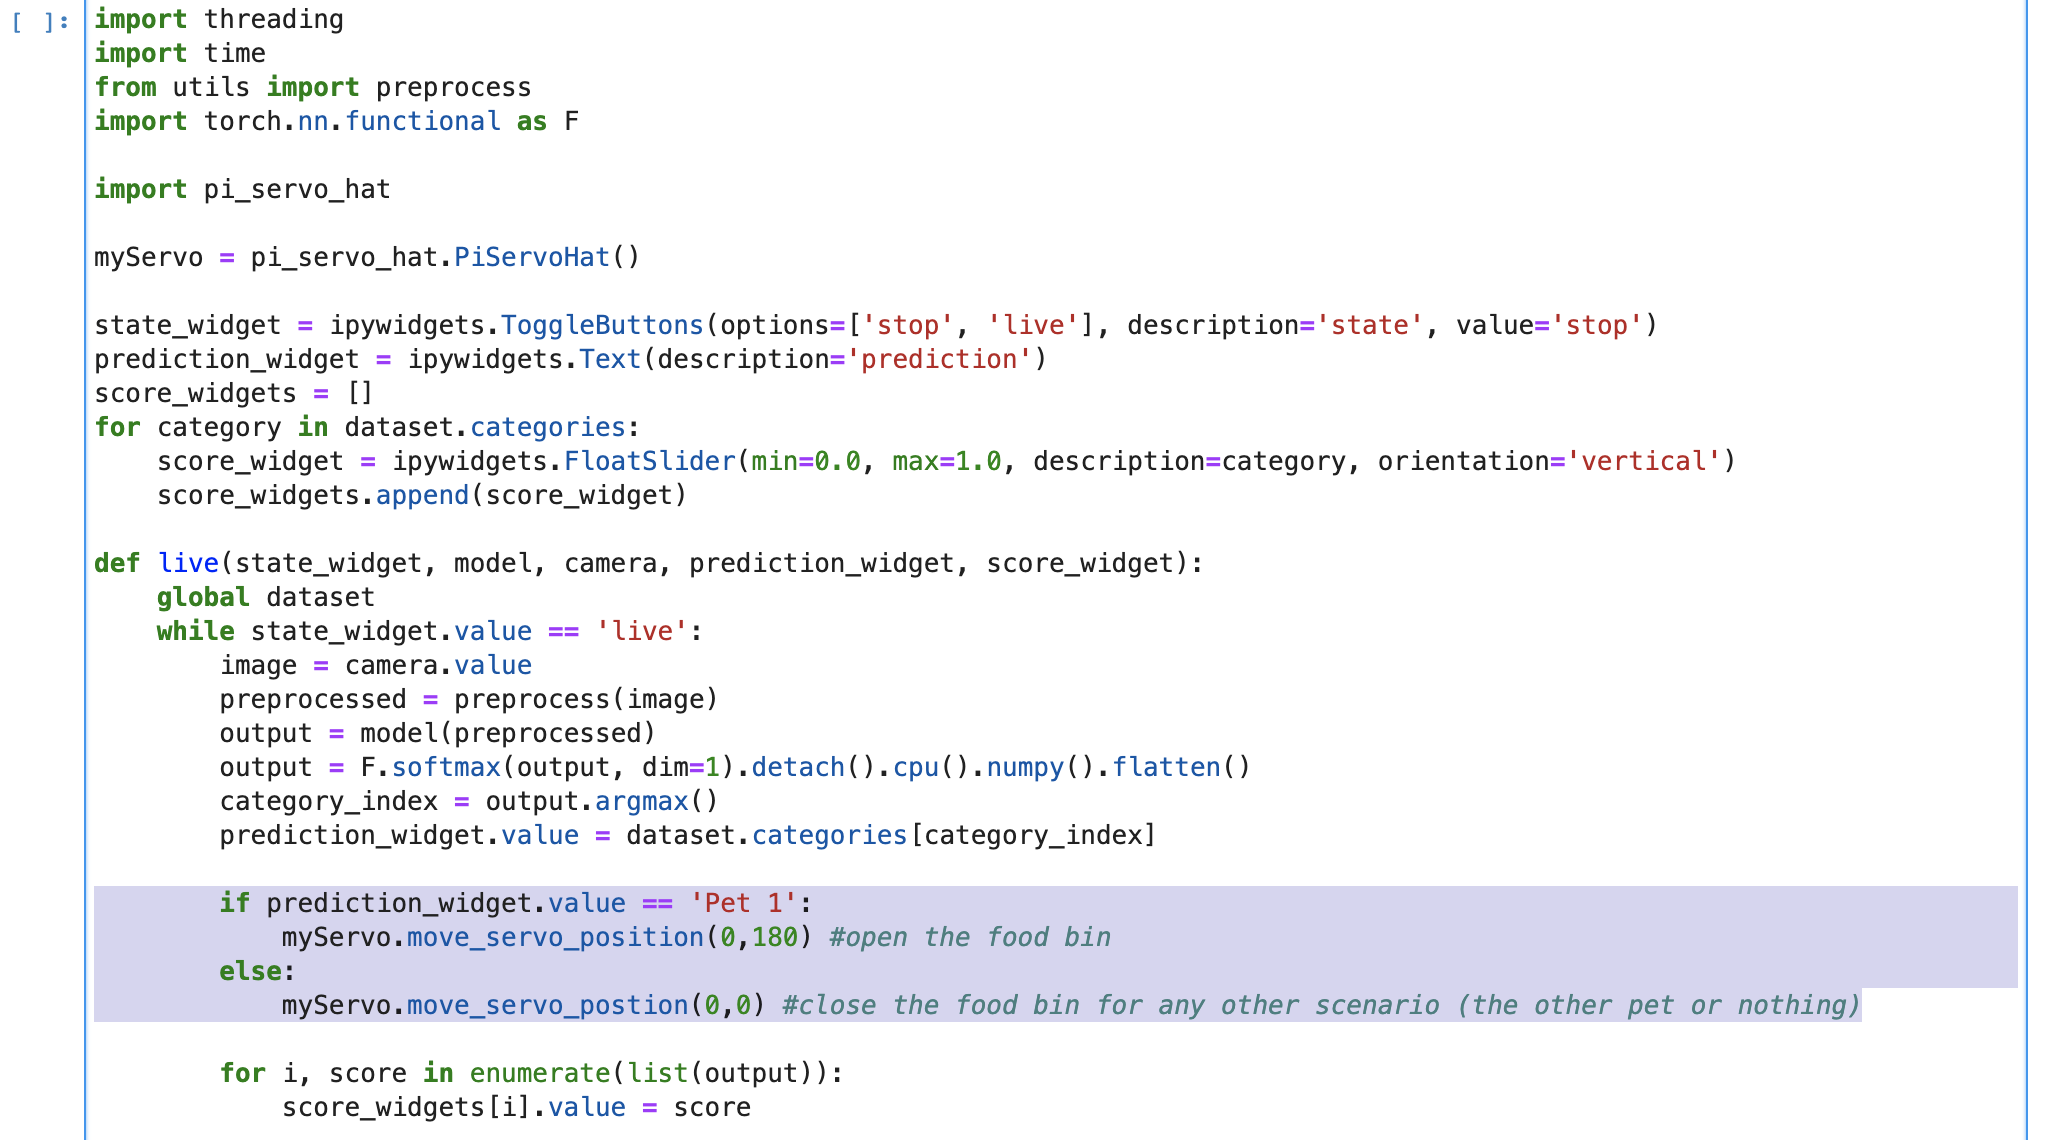
Since we're not changing the model itself, we can keep going down until we hit the Live Execution code block. It's here that we can actually call the servo to move based on who is in front of the camera. Firstly, we'll add the pi_servo_hat library underneath the other library imports. Then, under the live function, we can add the following code to move the servo depending on what the who is in front of the camera in real time.
if prediction_widget.value == 'Pet 1':
    myServo.move_servo_position(0,180) #open the food bin
else:
    myServo.move_servo_position(0,0) #close the food bin
Since only one pet/human is allowed into the food bin, the else statement covers all other scenarios where either nothing is presented or the wrong person/pet is in front of the camera.
Once you run all of the code blocks, you'll find the interactive tool ready for use. Click on the category you'd like to train (pet 1 or pet two or nothing), and start adding photos of that specific category. The more the better, but shoot for at least 100. Try to get all angles and all situations, maybe that means a dog with or without a collar, before and after going to the groomer, etc. Continue doing so with category you have.
Next is to decide how many epochs, or cycles through the full training dataset, you will need for an accurate application. There's actaully an interesting issue when training machine learning models on sample data called overfitting. Overfitting is when too many epochs are used, and the training model learns patterns that are too specific to the sample data, and therefore perform with less accuracy with real world data. Mess around with how a lower number and higher number of epochs change the way your model reacts to real world inputs, but for now, let's do 5 epochs.
And that's about it, you're ready to train the model! Once trained, you can test how accurate it is by showing the camera real world data, like your face or your dog's face. When you show input of the category you set to open the food bin, it should do exactly that. Now nobody can get your skittles, they're all for you!
Workshop 2: Cooking with Bananas
As you can tell, we're trying to build applications that help out a bit around the home; especially since we're all spending a bit more time at home these days. Specifically, problems that can be solved using hardware, and thus bringing machine learning into the physical and tangible world.
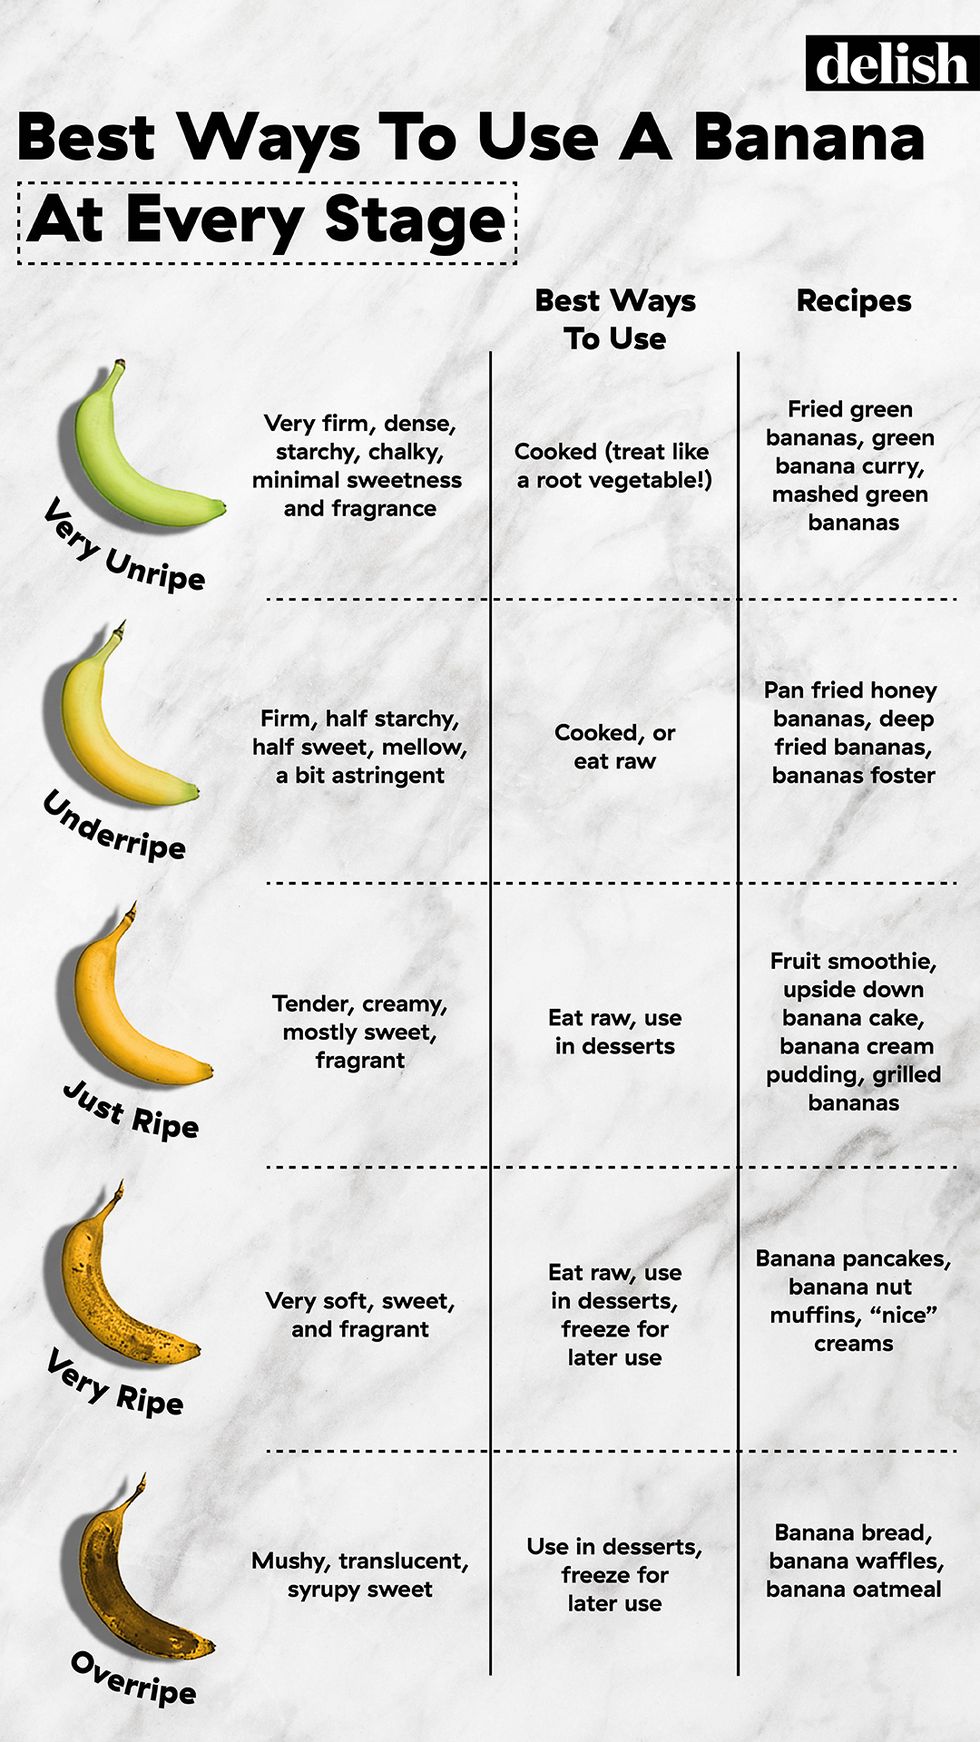
Another problem that could be tackled is food waste in the kitchen. Sometimes, you just don’t get around to eating food when it’s at it’s freshest, but you still don’t want to waste it and throw it away. One of the most common foods for this is bananas! When bananas go bad, it’s fun to mix things up and bake banana bread, but you can get sick of banana bread pretty quick, which makes cooking with overripe bananas pretty tricky. What other recipes can you make with bananas at any ripeness? And can the Machine Learning @ Home Kit tell you what to make just by one look at a banana?
Let’s build it out; it’s fairly similar to the pet feeder, because we’re just giving the model different training data and using a different Qwiic device. For starters, we’ll connect the Qwiic SerLCD up to the Pi Servo pHAT, and do the same thing as before: simply test out if we can get it working within JupyterLabs.
from __future__ import print_function
import qwiic_serlcd
import time
import sys

def runExample():

    print("\nSparkFun Qwiic SerLCD   Example 1\n")
    myLCD = qwiic_serlcd.QwiicSerlcd()

    if myLCD.connected == False:
        print("The Qwiic SerLCD device isn't connected to the system. Please check your connection", \
            file=sys.stderr)
        return

    myLCD.setBacklight(255, 255, 255) # Set backlight to bright white
    myLCD.setContrast(5) # set contrast. Lower to 0 for higher contrast.
    myLCD.clearScreen() # clear the screen - this moves the cursor to the home position as well

    time.sleep(1) # give a sec for system messages to complete

    myLCD.print("Hello World!")
    counter = 0
    while True:
        print("counter: %d" % counter)
        myLCD.setCursor(0,1)
        myLCD.print(str(counter))
        counter = counter + 1
        time.sleep(1)

if __name__ == '__main__':
    try:
        runExample()
    except (KeyboardInterrupt, SystemExit) as exErr:
        print("\nEnding Example 1")
        sys.exit(0)
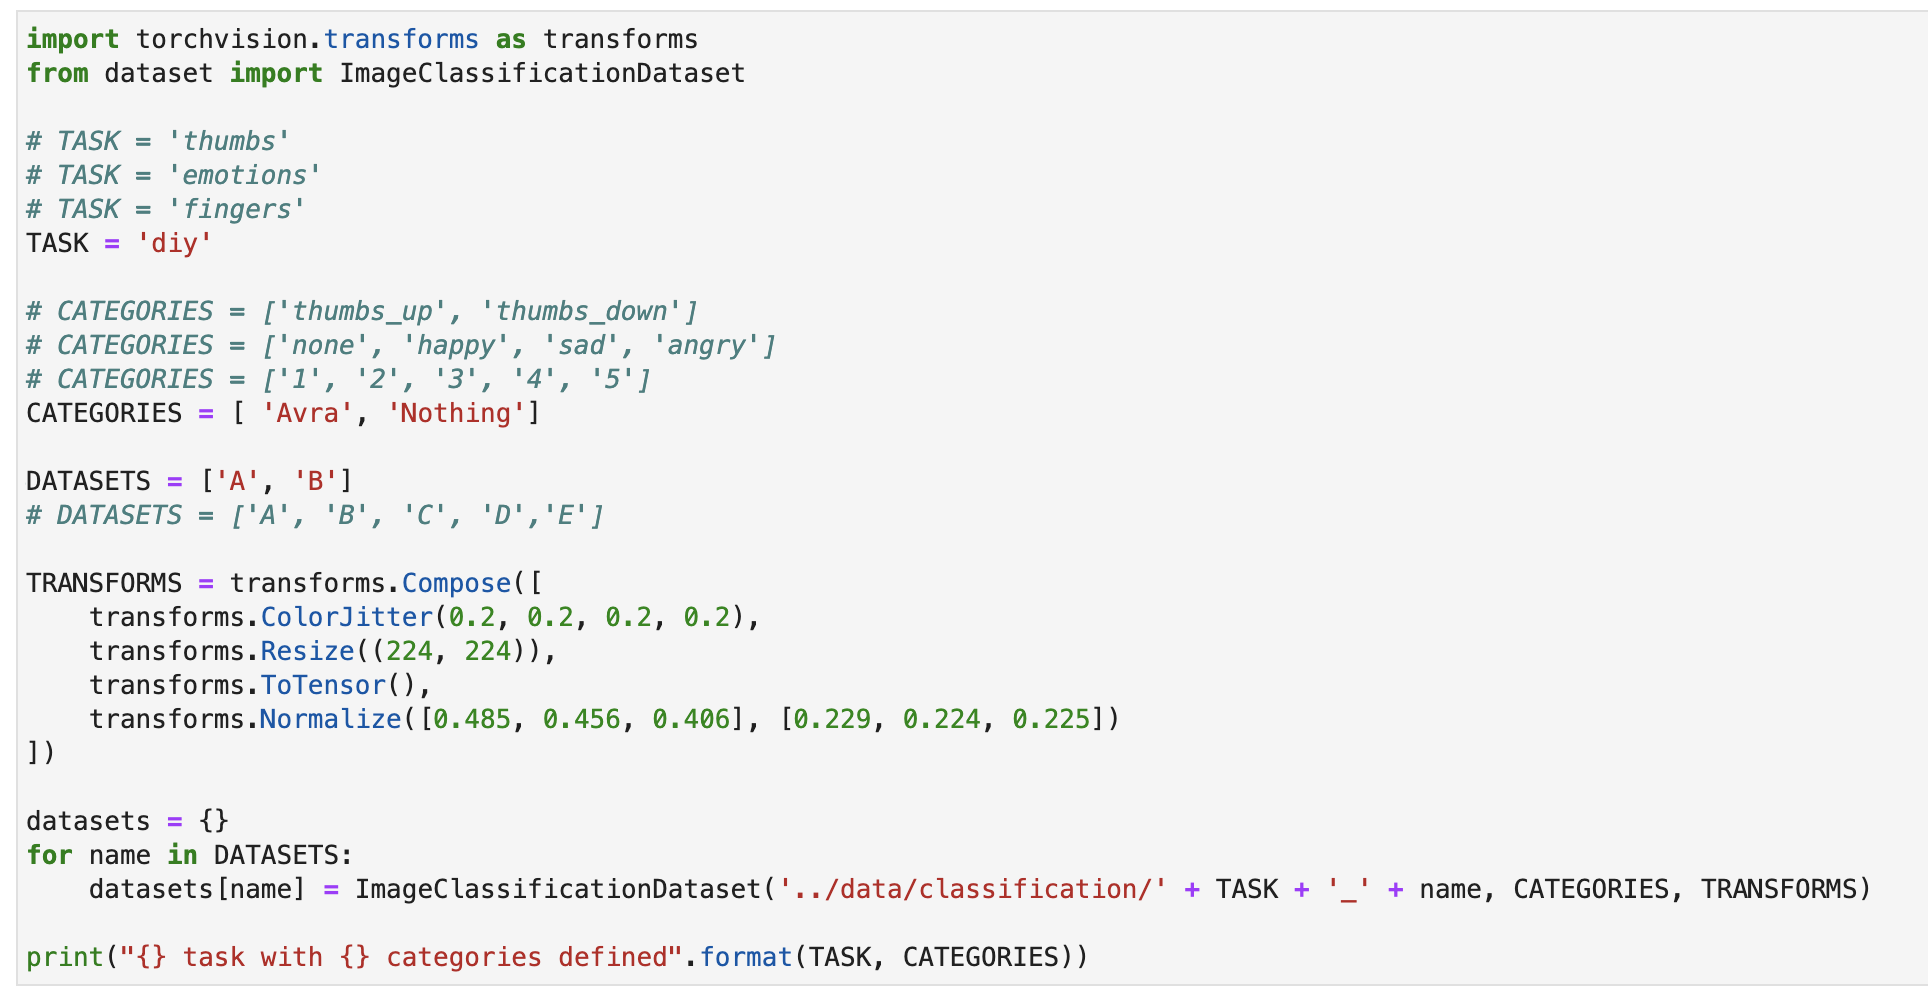
Great, the display checks out! Now, let’s go back and make a copy of classification_interactive.ipynb for this new project, where we will go and run everything up until the Task section again.
This time, we’ll have five different categories: 'Very Unripe', 'Underripe', 'Ripe', 'Very Ripe', 'Overripe’. This means I’ll have to add additional datasets as well…all the way up to ‘E’.
Again, we can run all of the code blocks up to Live Execution. We’ll still import the SerLCD library like we did with the servo, as well as create an object for it. In this case, we’ll write out a different if statement, one that can accommodate each condition of a banana. So if a banana is underripe, the display will recommend a different recipe than if the banana is very underripe, etc. It could be structured similiarly to this:
if prediction_widget.value == 'Very Unripe':
    myLCD.print("Make some fried green bananas")
if prediction_widget.value == 'Unripe':
    myLCD.print("Make bananas foster")
if prediction_widget.value == 'Ripe':
    myLCD.print("Make some fried green bananas")
if prediction_widget.value == 'Very Unripe':
    myLCD.print("Make a fruit smoothie")
if prediction_widget.value == 'Very ripe':
    myLCD.print("Make banana pancakes")
if prediction_widget.value == 'Overripe':
    myLCD.print("Make banana bread")
This will take us back to the interactive tool again, and will be a bit more time consuming this time, as we'll need data for each stage of ripeness. So buy some bananas that are very unripe, and over the course of a week or two, train them at each stage periodically. Again, it's important you get as many different viewpoints and inputs as possible. Finally, train the data and see what your Qwicc SerLCD display recommends you to make!
Workshop 3: Power Loads
One of the main use cases we see is automating power loads and electrical systems. Let’s say you forget to turn your oven off and leave you house for a period of time - it’s something that’s happened to most of us, and a real safety concern! Or, you just want to be more conscious of turning your lights off when you leave a room. How about if you only want a light on if you’re at your desk? We can implement projects of these nature with the Machine Learning @ Home Kit because it comes with an IoT Power Relay.
NVIDIA has a Python library specifically for manipulating the Jetson GPIO, either for inputs or outputs. We'll have to first install the package natively on the Nano (outside of JupyterLabs) test it, and then add it to the docker command to containerize the library.
Back in whatever terminal emulator you're using (i.e Serial), we can install the Jetson.GPIO library with the following commands:
sudo pip install Jetson.GPIO
Then, we'll have to set permissions by creating a group and add your username to that group that can access the GPIO. If you don't know your username, just write out the command whoami.
sudo groupadd -f -r gpio
sudo usermod -a -G gpio your_user_name
Finally, for the new rule to take place, either reboot the Nano using the command sudo reboot or reload the udev rules by running:
sudo udevadm control --reload-rules && sudo udevadm trigger
Now that the library is installed, we're almost ready to test it. Connect the your jumper wires to the screw terminals in the green socket, and then connect them to a ground pin and a number pin of your choice on the Nano. Now, open up your python3 interpreter by simply typing python3, and run the script below.
#load in libraries
import Jetson.GPIO as GPIO
import time

#sets the pin getting power sent to
output_pin = 21

#set pin numbering
GPIO.setmode(GPOI.BCM)

#setup GPIO channel with pin, ouput, and what the initial value is
GPIO.setup(output_pin, GPIO.OUT, initial = GPIO.LOW)

#set value of output pin
GPIO.output(output_pin, GPIO.HIGH)

time.sleep(10)

#clean up the channels so that all pins are set in their default state
GPIO.cleanup()
Now you know the drill, it’s time to go into Task, and change the categories and datasets needed. If you only want the lamp to turn on when you’re at your desk, you’ll really only need two datasets: you, and nothing else.
Down in Live Execution, we’ll set the IoT relay to only turn on when the category is set to your face. So the if statement will look very similar to the pet feeder situation…it’ll either be if you are in the frame, else for any other scenario. The full code is set up here.
Nearly any home automation is accessible to you through the Machine Learning @ Home Kit, and now that you know how to go through and train a wide variety of datasets, we can being deploying them as real world applications. That’s what we’ll get to next, as this living hookup guide continues.