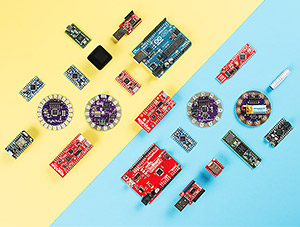
Arduino libraries take a complex task and boil it down to simple to use functions. Arduino users have written lots of exciting add-ons for Arduino. For example, capacitive sensing takes difficult timing and pulsing of digital pins. We can write the code from scratch, or we can stand on the shoulders of great people who are smarter than we are.
Capacitive touch sensing is a very popular interface. The CapacitiveSensor library takes care of everything so that we don’t have to write code like this:
language:c
*sOut &= ~sBit;        // set Send Pin Register low
*rReg &= ~rBit;        // set receivePin to input
*rOut &= ~rBit;        // set receivePin Register low to make sure pullups are off
*rReg |= rBit;         // set pin to OUTPUT - pin is now LOW AND OUTPUT
*rReg &= ~rBit;        // set pin to INPUT
*sOut |= sBit;         // set send Pin High
interrupts();         // enable interrupts

while ( !(*rIn & rBit)  && (total < CS_Timeout_Millis) ) {
    total++;
}

if (total > CS_Timeout_Millis)
    return -2;         //  total variable over timeout

// set receive pin HIGH briefly to charge up fully
noInterrupts();         // disable interrupts
*rOut  |= rBit;        // set receive pin HIGH - turns on pullup
*rReg |= rBit;         // set pin to OUTPUT - pin is now HIGH AND OUTPUT
*rReg &= ~rBit;        // set pin to INPUT
*rOut  &= ~rBit;       // turn off pullup
*sOut &= ~sBit;        // set send Pin LOW
interrupts();         // re-enable interrupts

while ( (*rIn & rBit) && (total < CS_Timeout_Millis) ) {
    total++;
}

if (total >= CS_Timeout_Millis)
    return -2;     // total variable over timeout
else
    return 1;
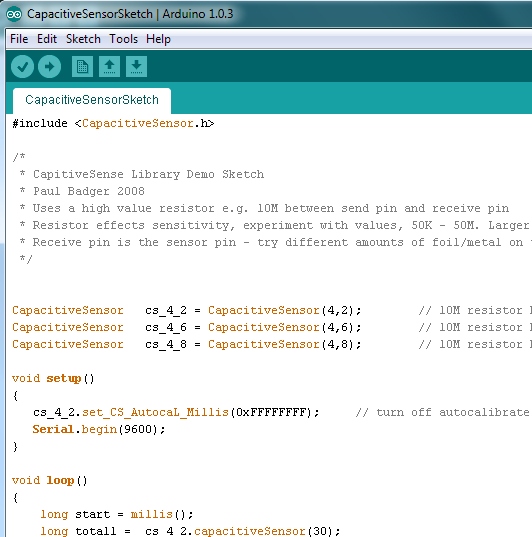
All that code can be replaced with a much easier to use and understand statement such as:
language:c
senseReading = myCapPad.capacitiveSensor(30);
The myCapPad.capacitiveSensor() takes care of all the heavy lifting and the senseReading variable contains the value sensed from our capacitive pad. Libraries make complex tasks easier so that we can focus on larger projects.
There are thousands of libraries out there! And luckily it’s pretty easy to install them. This tutorial will show you how to install a library in Arduino v1.0.5 but should apply for many past, present, and future versions of Arduino.
Make sure you have a good understanding of the following concepts before getting any further into this tutorial.
The Arduino website also has great instructions on installing libraries if you need more information for using the Arduino IDE's library manager, importing a *.zip library, and manual installation.
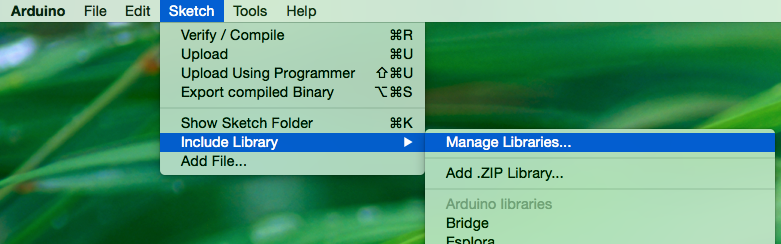
The library manager was added starting with Arduino IDE versions 1.5 and greater (1.6.x). It is found in the 'Sketch' menu under 'Include Library', 'Manage Libraries...'
When you open the Library Manager you will find a large list of libraries ready for one-click install. To find a library for your product, search for the product name or a keyword such as 'k type' or 'digitizer', and the library you want should show up. Click on the desired library, and the 'Install' button will appear. Click that button, and the library should install automatically. When installation finishes, close the Library Manager.

Alternatively, if you have a library of your own you would like to add or a library that hasn't been added to the Library Manger yet, you can click the 'Add .ZIP Library' option, which will then allow you to choose a folder or *.zip file containing the library of your choice.
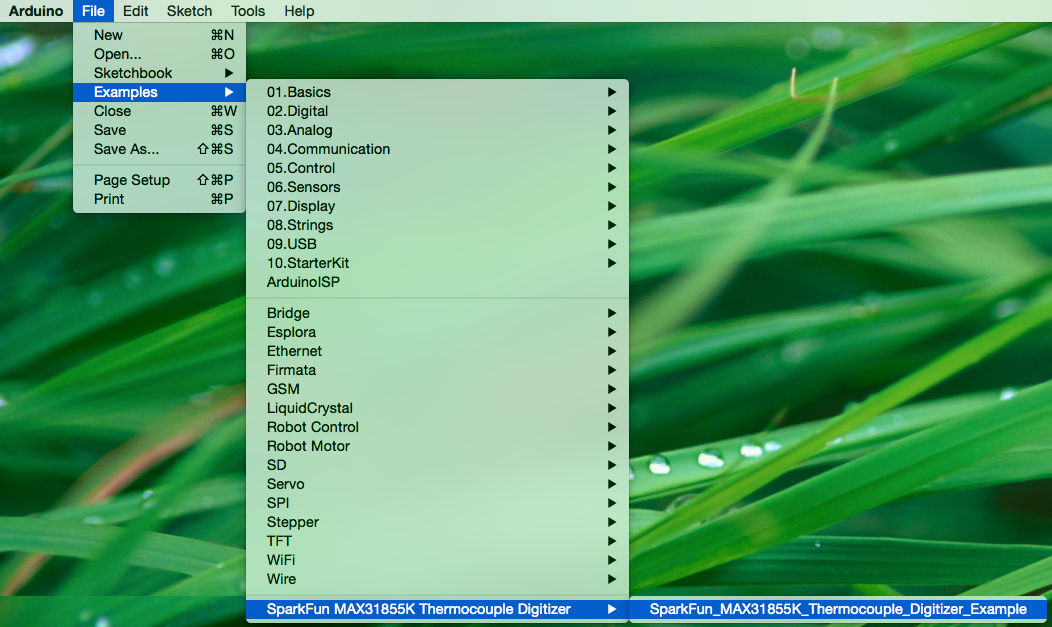
Now that the library is installed, an example sketch can be found in the 'Examples' submenu.
Since this is a relatively new feature of the Arduino IDE at the time of this writing not all SparkFun products will have libraries in the library manager. We are adding new products and working our way through older products over time. If you don't find the library you need in the manager or for some reason cannot install one of the modern IDE releases, follow the instructions in the following sections.
This section covers manually installing a library under the Windows environment and utilizes quite a few screen shots. If you’re more of a text learner then check out the Arduino tutorial on installing libraries.
We are going to use the Capacitive Sense library for this example. Navigate to the library’s page and download the zip file.

Find the zip file on your local computer (wherever downloaded files end up). Under Windows, you should be able to double click on the file to open it up.
This particular library contains libraries for both the basic Arduino and the more advanced Arduino Due. You can use both if you’d like, but, for this example, we will be copying and installing only the CapacitiveSensor folder.
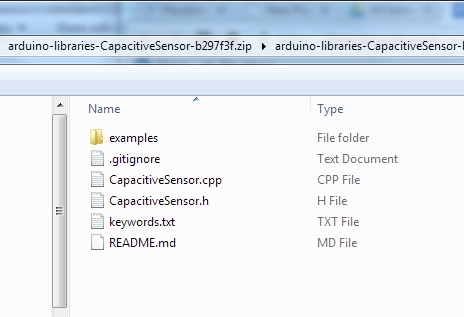
Libraries will usually contain a *.cpp file and .h file. Most will also contain an examples folder.
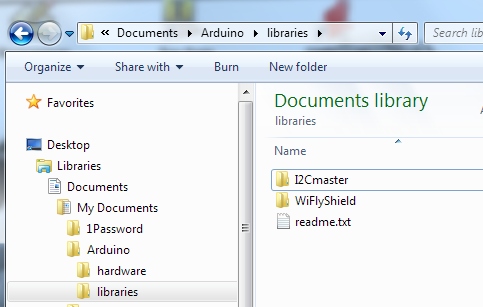
Under Windows, Arduino stores all the add-on libraries within the My Documents folder. Here we see the location of the Arduino libraries folder.
Open an explorer window and navigate to the libraries folder under My Documents. Now copy the new CapacitiveSensor folder to the libraries folder.
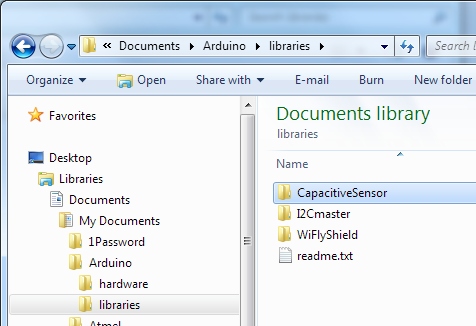
Success!

To verify the library has been installed correctly, open up the Examples folder under the Arduino IDE. Wait. Where’s the CapacitiveSensor example? Did you have Arduino open when you copied and pasted the directory? Arduino checks the library directory at startup so if you already have Arduino open, you will need to restart Arduino any time you add to the libraries directory.
If you don’t see the CapacitiveSensor example try closing and re-opening Arduino IDE.
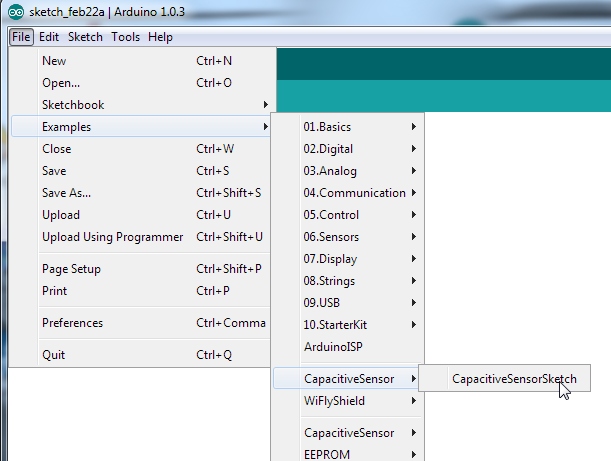
There it is! Let’s open the example provided with our new library.
Examples are the greatest thing about libraries! Good libraries will have well written examples showing how to use the library. These sketches are wonderful resources for example code and learning how to write good code under Arduino.
You now have the Capacitive Sensor library installed! Feel free to start from the example sketch, or begin writing your own code using the functions provided by the library. A library usually has documentation either on its site or written into readme files and example code. In general, to quickly learn how to use a library check out the example code.
This section covers manually installing a library under the Mac OS X environment. If you’re more of a text learner then check out the Arduino tutorial on installing libraries.
We are going to use the Capacitive Sense library for this example. Navigate to the library’s page and download the zip file.
Find the zip file on your local computer (wherever downloaded files end up). Unzip it, and look at the folder contents.

This particular library contains libraries for both the basic Arduino and the more advanced Arduino Due. You can use both if you’d like, but, for this example, we will be copying and installing only the CapacitiveSensor folder.
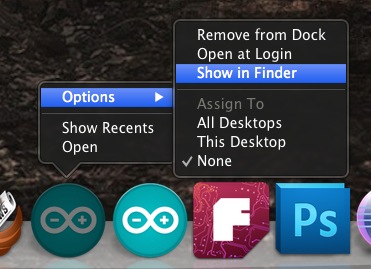
Now we need to add this folder to the Libraries folder for Arduino. This folder is somewhat hidden in OS X. To get there you can do one of two things. Option one, right-click on the Arduino icon located in your Dock. Go up to 'Options', then click 'Show in Finder'.
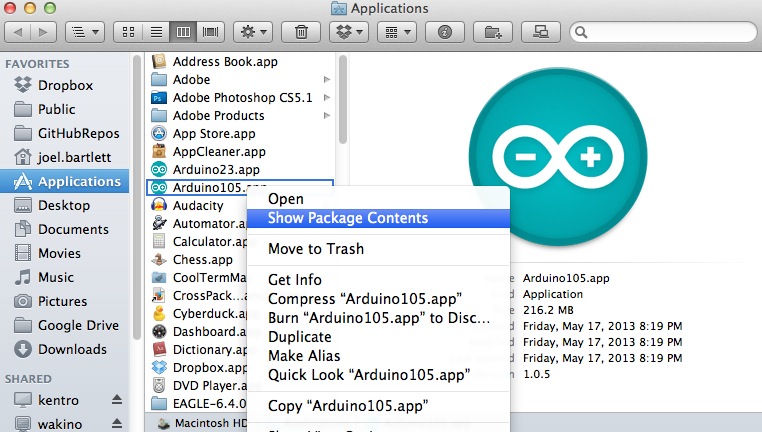
Option two, find the Arduino app located in your applications folder within Finder. Now, right-click on the Arduino app, and select 'Show Package Contents'. Either option should get you to this point.
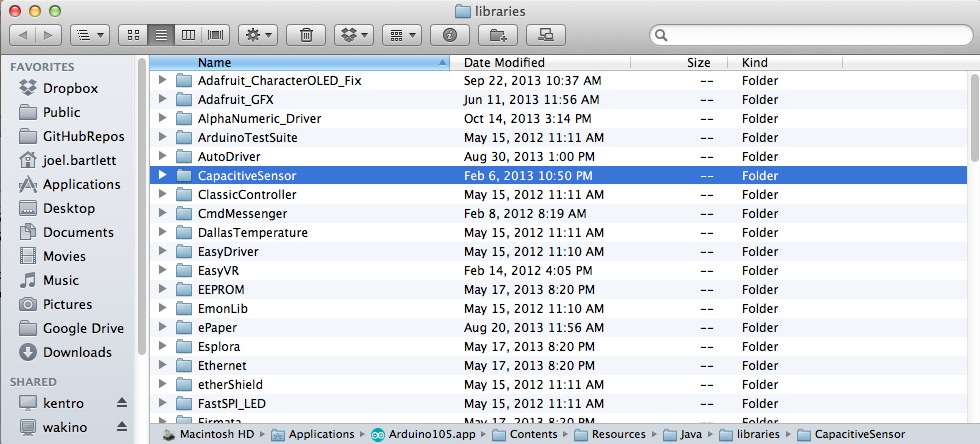
Navigate through the following folders, 'Contents -> Resources -> Java', until you reach the 'libraries' folder.
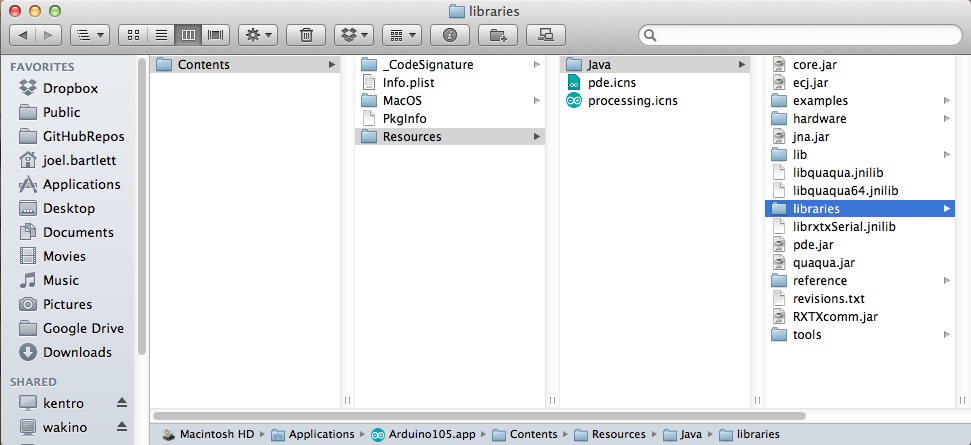
Inside the libraries folder is where you want to copy/move the library folder you just downloaded and unzipped. You'll also notice this is where all the default libraries live as well as any other libraries you may have installed in the past.
Next, make sure that restart the Arduino IDE if it was open when you installed the library. This is a very important, often overlooked step. If you don't restart, the library you just installed will not yet be available to the IDE.
To verify the library has been installed correctly, open up the 'File > Examples' folder under the Arduino IDE.
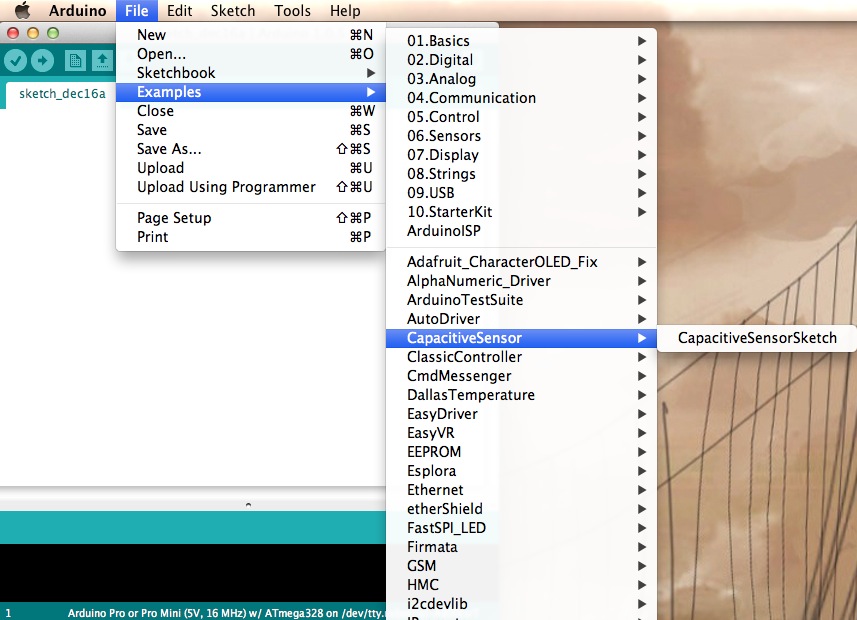
There it is! Let’s open the example provided with our new library.
Examples are the greatest thing about libraries! Good libraries will have well written examples showing how to use the library. These sketches are wonderful resources for example code and learning how to write good code under Arduino.
You now have the Capacitive Sensor library installed! Feel free to start from the example sketch, or begin writing your own code using the functions provided by the library. A library usually has documentation either on its site or written into readme files and example code. In general, to quickly learn how to use a library check out the example code.
If you're looking for some great libraries to get started with, here are some of our favorites:
You may not realize it, but you're probably already using libraries! If you've used:
Serial.print("Hello world!");
Then you're using the Serial() library built in to Arduino. Arduino has quite a few built-in libraries. Here’s the list of the standard libraries that you can start using immediately!
Once you’ve used a handle of different libraries, consider writing your own! Here’s a good tutorial showing how to write your own library so that you can help the world by making complex tasks a little easier.
If you would like to have it included in the Arduino IDE Library Manager, make sure that your library fits the standards.
Then submit an issue request for you 3rd party library in the GitHub repo for the Arduino IDE linked below. For an example of submitting a request, check out SparkFun's fingerprint scanner TTL library request.
Check out our Arduino Comparison Guide! We've compiled every Arduino development board we carry, so you can quickly compare them to find the perfect one for your needs.
If you're looking for more Arduino tutorials, have a look at these:
Or check out this blog post for more ideas.
learn.sparkfun.com | CC BY-SA 3.0 | SparkFun Electronics | Niwot, Colorado