When it comes to portable electronics, one of the most important features is how to maximize the battery life. The ATmega328P, used on popular boards like the SparkFun RedBoard, Arduino Uno, and Pro Mini are actually quite power hungry. The RedBoard and Arduino Uno, draw around 15mA minimum, which doesn't sound like much but as you'll see in this guide, we can drastically bring that down with just a few tricks. In this guide we'll see if we can reduce the supply current to less than 10uA with a couple hardware and software tricks.
If you have not worked with the Arduino development platform before, you may want to check out the tutorials below before diving into this tutorial.
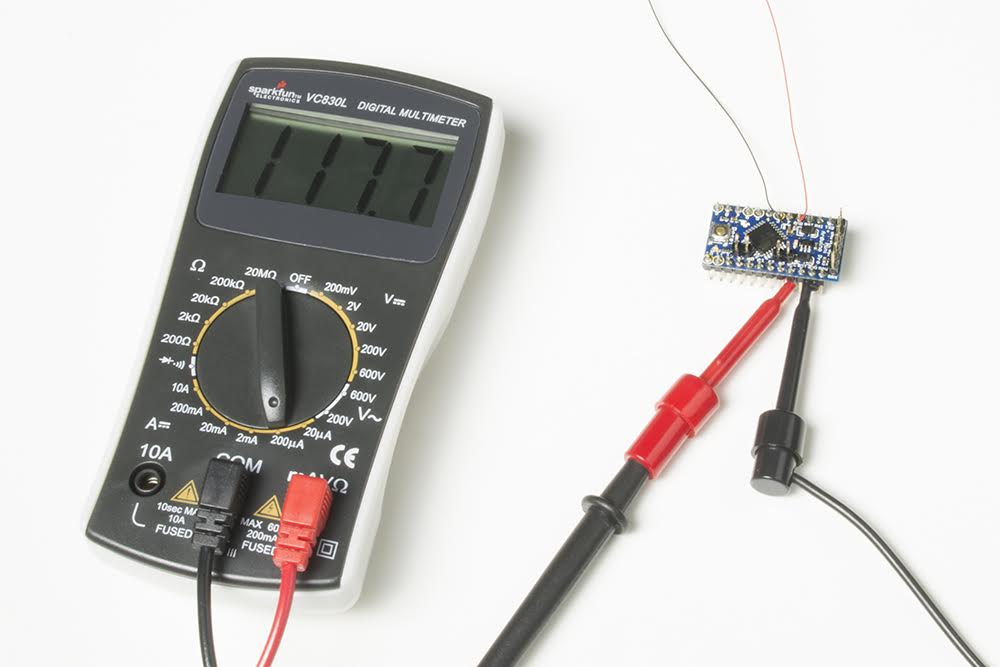
If you have never worked with a multimeter before, take a look at our extensive guide on using a multimeter to measure the various components of your circuit.
Every integrated circuit (IC) needs power to function. By reducing the number of ICs needed, you can save a bit of power. The Arduino Uno and RedBoard both have a USB bridge that converts the USB signals to signals that the Arduino's Universal Asynchronous Receiver Transmitter (UART) can use. The FT231x, used on the RedBoard, alone draws around 10mA. Just by replacing the SparkFun RedBoard with a 5V Pro Mini, not only do you save quite a bit of physical space, you can reduce the supply current from 15mA, down to just 4mA.
Linear regulators are great. They're cheap and can regulate a higher voltage to a lower voltage with as few as 3 pins (Vin, ground Vout). The downside of a linear regulator however is they can get pretty hot when you have a large difference between the input and output voltage, or if you're drawing a lot of current. You can calculate the power that gets wasted in the form of heat with a simple equation:
With a linear regulator, the input current is equal to the output current. Linear regulators are, at best, only around 70% efficient. The more current you draw, the lower the efficiency.
Without going into too much detail, switch mode power supplies are much more efficient because the input current doesn't have to be the same as the output current. With a light load, you can find switching regulators that are over 90% efficient. With a switching regulator, you can not only reduce the input voltage (using a buck converter), but also increase the voltage (using a boost converter). Other ICs, like the TPS61200 used on the PowerCell, are perfect for battery powered applications, because it can efficiently reduce the battery's voltage or boost it!
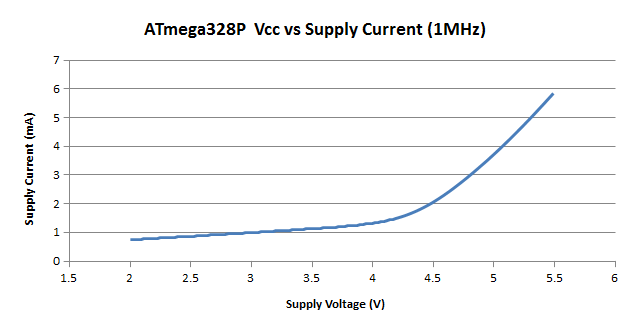
One of the easiest ways to reduce current is to lower the voltage you give to the Arduino. Just by reducing the voltage from 5V to 3.3V, the current drops from ~4mA, down to ~1mA!
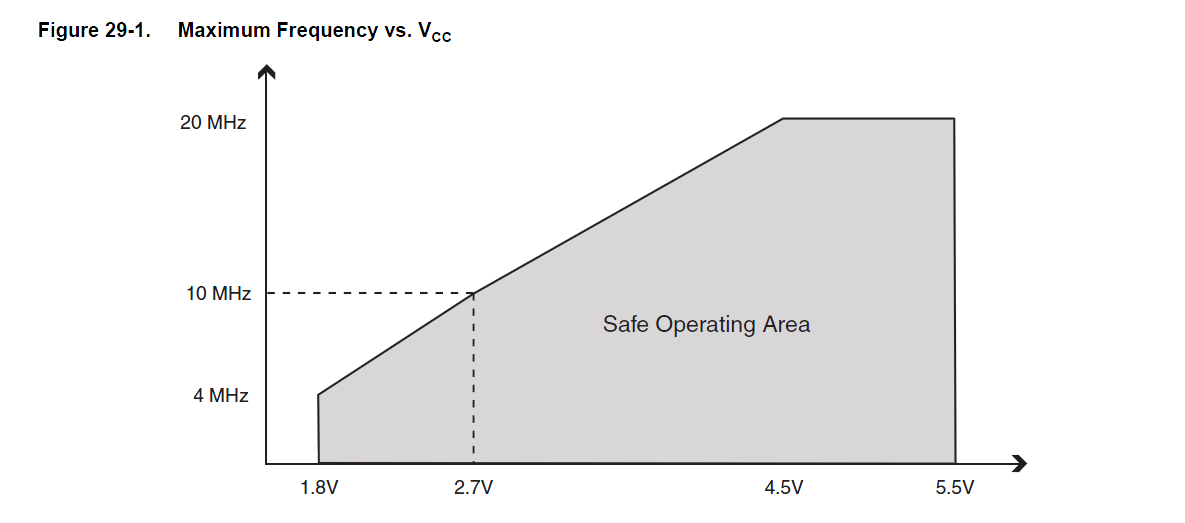
Reducing the voltage, does have a catch though. Reducing the system voltage too much, without reducing clock speed, could make the microcontroller start to behave strangely. The RedBoard, Uno, and 5V Pro Mini all use a 16MHz crystal. Looking at the datasheet for the 328P, we can see that at 3.3V, the recommended maximum frequency is around 13MHz. The relationship between clock speed and system voltage is the reason our 3.3V Pro Mini uses a 8MHz clock instead of 16MHz.
Below I've created a graph that shows how just by reducing the voltage, you can significantly reduce the power consumption of your Arduino. For my test, I uploaded a blank sketch onto the 328P running at 1MHz.
In projects where the Arduino doesn't need to execute a large number of instructions in a short amount of time or in projects where timing isn't an issue, reducing the clock speed of the microcontroller can shave a few milliamps off the supply current. For example, running the Arduino at 5V and reducing the clock speed from 16MHz down to just 8MHz can drop the current needed from 12mA down to ~8.5mA.
To better understand the relationship clock speed has with the microcontroller, let's look at the graph below.
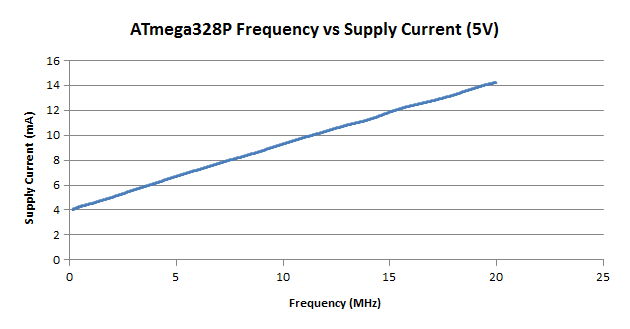
As you can see, reducing the clock speed can triple the battery life. The trade off of course is that you won't be able to execute as many instructions per second, and for some applications, this solution isn't an option.
So far we've talked about how to reduce the power of the Arduino, but we haven't talked about why it uses the power it does. Inside the ATmega328P, lies a series of circuits that work together to offload work from the processor, and each of these draws some amount of power. The Arduino's analogWrite() function, for example, doesn't have the processor create a PWM signal by counting the clock cycles itself. Instead, the Arduino uses one of the built in timers to count clock cycles and send an interrupt request to the processor. From there, the processor stops what it's doing and handles the interrupt by switching the pin's state. By offloading some of the work, the microcontroller is able to do multiple things at the same time. Some of the other circuitry built into the ATmega328P include:
Each of these independent components need power to work, and, unless you manually disable them, they will continue to draw power. The brown-out detection actively monitors the system voltage to ensure it doesn't drop below its threshold. If it does, the controller powers down until the voltage is increased above that threshold. The analog to digital converter (ADC) does just as the name suggests, it take the analog voltage (which can be any value from 0V up to VCC) and converts it to a digital value that the microcontroller can use (0-1023 for 10-bit converters). If your project doesn't need to use the ADC, disabling it will cut down on the power draw drastically.
But what if you still need the ADC? Thankfully there are registers where you can disable some of these circuits with software. Using software allows you to enable the circuits you need, when you need them, and, when you're done, you can disable them again. All of the registers are well documented in the datasheet for the ATmega328p, but, if directly writing to registers makes you uncomfortable, there is a library available that you can download from the link below. For instructions on how to install an Arduino library, check out this tutorial.
This library allows you to set how long to enter into sleep mode, from a few milliseconds, up to indefinitely. It also allows you to specify which parts of the micro to disable, making it a pretty powerful and versatile library for your low-power needs.
In this first example, let's load the sketch below onto our Arduino, which is running off of 5V at 16MHz. To see how little current is needed in sleep mode, I'm using a bare bones Arduino by using the ATmega328P on a breadboard to minimize the current I'm using.
language:c
#include "LowPower.h"

void setup()
{
  pinMode(13,OUTPUT);
}

void loop()
{
  digitalWrite(13,HIGH);
  delay(2000);
  digitalWrite(13,LOW);
  LowPower.powerDown(SLEEP_2S, ADC_OFF, BOD_OFF);
}
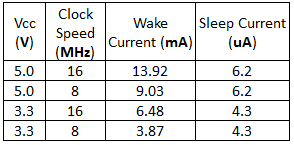
In this sketch the Arduino blinks an LED on for two seconds and is then powered down for two seconds, and during that time the ADC and brown-out detect (BOD) are disabled. When powered down, the Arduino's current drops from 14mA, down to just 6uA! If we use some of the other power saving tricks from previous sections, we can see in the table below just how low we can get the sleep current.
If you're wondering why clock speed doesn't affect the sleep current, during power down the clock is also disabled. Obviously you won't want to keep the Arduino in low-power mode. But, in projects where you don't need to take readings continuously, shutting the Arduino down 50% of the time, and using the techniques we covered, can allow the battery to last over seven times longer!
More information on low-power modes and options can be found in the datasheet for the 328P.
For more power-related fun, check out the following SparkFun tutorials.
learn.sparkfun.com | CC BY-SA 3.0 | SparkFun Electronics | Niwot, Colorado