RED-V Development Guide
Introduction
This guide will help you get the RED-V RedBoard or Thing Plus up and running for the exhaust port. Depending on personal preference, there are a few environments to get started with the boards. All wings report in... we're going in full-throttle.
Required Software
Computer with Freedom Studio installed on it or a Zephyr RTOS build environment set up - that is how we will program the board and interface with it.
Suggested Reading
If you aren't familiar with the RED-V hardware, we recommend checking out these tutorials before continuing.
RED-V RedBoard Hookup Guide
RED-V Thing Plus Hookup Guide
What is RISC-V?
RISC-V (pronounced “risk-five”) is a free and open instruction set architecture (ISA) developed by the Computer Science Division of the University of California, Berkeley. The RISC-V ISA is designed to provide "a new level of free, extensible software and hardware freedom on architecture." According to the RISC-V Foundation, the key benefits of RISC-V are:
- "Software architects / firmware engineers / software developers
- RISC-V is much more than an open ISA, it is also a frozen ISA. The base instructions are frozen and optional extensions which have been approved are also frozen. Because of the stability of the ISA, software development can confidently be applied to RISC-V knowing that your investment will be preserved. Software written for RISC-V will run on all similar RISC-V cores forever. The frozen ISA provides a solid foundation that software managers can depend on to preserve their software investments. Because the RISC-V ISA is open, this translates to hardware engineers having more flexibility over the processor implementation. With this power, software architects can become more influential in the final hardware implementation. They can provide input to hardware designers to make the RISC-V core more software centric.
- CTOs / Chip designers / System Architects
- Innovation is the key enabler of RISC-V. Because the ISA is open, it is the equivalent of everyone having a micro architecture license. One can optimize designs for lower power, performance, security, etc. while keeping full compatibility with other designs. Because there is significantly more control over the hardware implementation, all technical recipients of the architecture can make suggestions at a much earlier point than previously was possible. The result is a solution with significantly fewer compromises. RISC-V also supports custom instructions for designs which require particular acceleration or specialty functions.
- Board designers
- In addition to the frozen ISA benefits, RISC-V’s open ISA can provide several additional benefits. For example, if engineers are implementing a soft RISC-V core in an FPGA, often the RTL source code is available. Since RISC-V is royalty free this creates significant flexibility to port a RISC-V based design from an FPGA to an ASIC or another FPGA without any software modifications. Designers who are concerned with security from a trust perspective will also appreciate RISC-V. When the RTL source code is available, this enables deep inspection. With the ability to inspect the RTL, one can establish trust."
For more information about RISC-V, head to the RISC-V Foundation website.
Software Installation (Freedom Studio)
In this section, we're going to figure out how to get started developing on our SparkFun RED-V development board. There are a handful of development environments out there that are compatible with the RED-V but we're going to be checking out Freedom Studio and Zephyr RTOS. Both development environments have a decent assembly of example code to help get you up and learning RISC-V.
Installing Freedom Studio
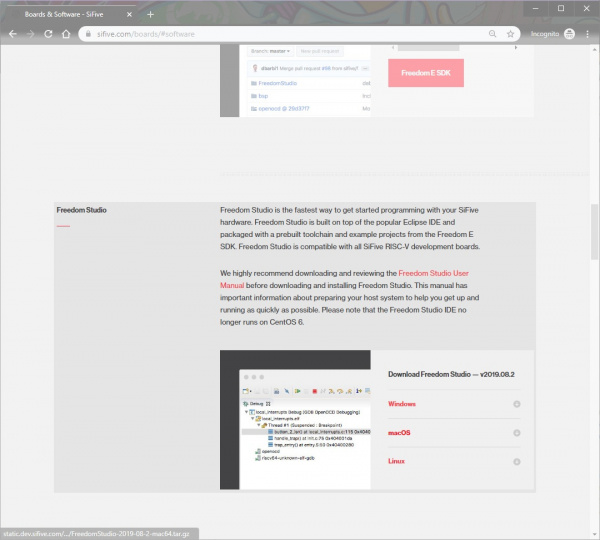
The quickest way to get started programming your RED-V is through SiFive's Eclipse-based Freedom Studio. If you have not already, head over to SiFive's website to download Freedom Studio for your operating system and unzip the files.
You'll need to scroll down to the section where it says Freedom Studio and click on your respective operating system.
This is useful if you were to compile code for the boards using command line. To build and upload an example using the branched SDK, the target boards are
sparkfun-redv and
sparkfun-redv-thing. The command below is for the RED-V board:make PROGRAM=sparkfun-welcome TARGET=sparkfun-redv CONFIGURATION=release uploadmake PROGRAM=sparkfun-welcome TARGET=sparkfun-redv-thing CONFIGURATION=release uploadThe Freedom Studio bundle contains some pretty lengthy paths in our system which can occasionally cause problems during extraction on Windows systems. Due to this, it's important to enable long paths as well as unzip to a location like C:/FreedomStudio/ to keep your paths as short as possible. To enable long paths, simply download and double click the below registry file. This is only necessary on a Windows machine. Follow the prompts to install the paths.
Drivers (Freedom Studio)
With the software installed, you'll need to make sure that the drivers are installed for your computer. If you have a Windows operating system, you will need to install the drivers in order to upload code or send serial data to the FE310.
Windows
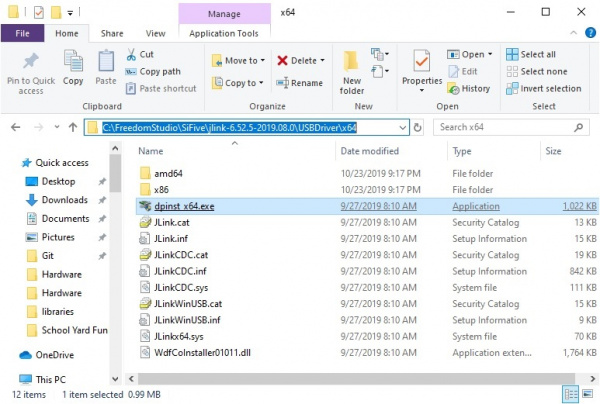
To install the drivers, head to the Freedom Studio program's driver folder. The drivers should be located under the following path:
language:bash
C:\FreedomStudio\SiFive\jlink-6.52.5-2019.08.0\USBDriver
The drivers are dependent on the operating system that you are using. For 64-bit based OS, you'll need to click on the Windows version with the x64 in the folder name. For 32-bit based OS, you'll need to click on the one with the x86 in the folder name. We'll be using a Windows 10 64-bit based OS, so we'll click on the folder named x64 and then dpinst_x64.exe
After clicking on the driver executable, follow the prompts to install the drivers for your Windows.
Examples (Freedom Studio)
Example: Hello World!
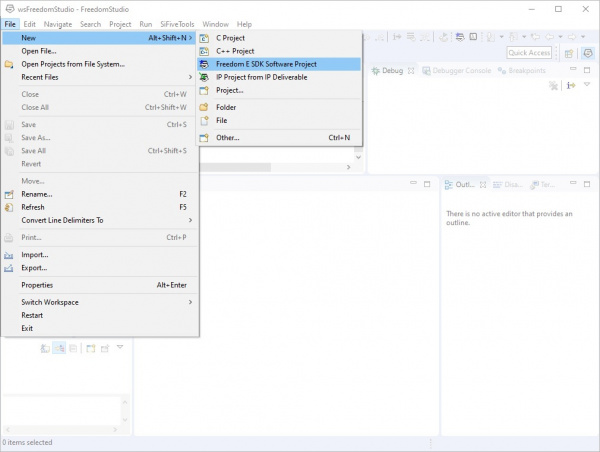
Once everything is unzipped, you'll simply need to run 'FreedomStudio.exe' to install the application. Upon opening Freedom Studio, we'll want to create a new project from one of our example templates. To do this, go to File > New > Freedom E SDK Software Project.
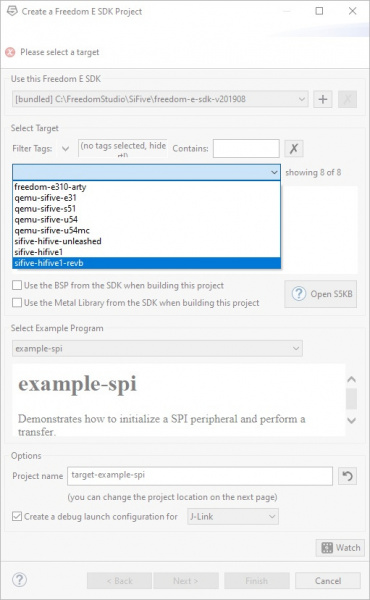
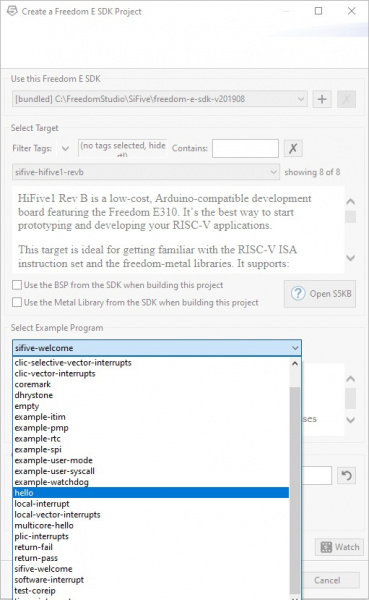
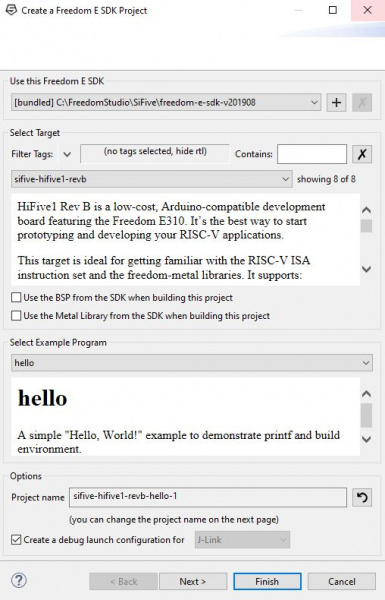
SparkFun's RED-V RedBoard and Thing Plus are very similar to to SiFive's HiFive1 RevB, so we'll be selecting the HiFive1 Rev B (sifive-hifive-revb) as our target board selection.
To start, let's keep it simple by flashing the "Hello World" example to our RED-V and see some serial output.
Select hello from the drop down menu. Hit Finish to load the example. You'll need to wait a little as the example project builds.
Run
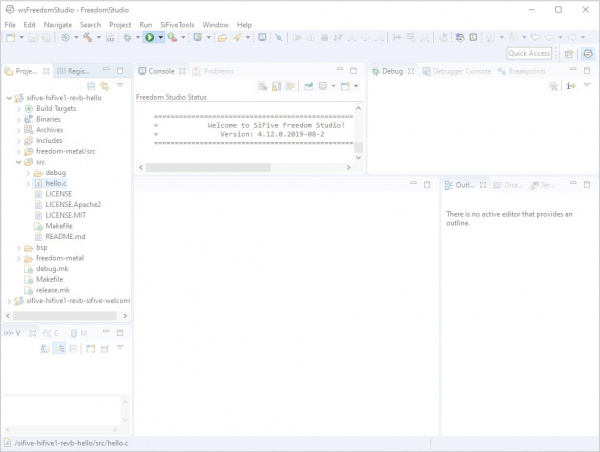
After the sketch builds, a window will open to edit the debug configuration. For now, click on the Close button. Now that the example is built, hit the run button to upload and execute the code on the RED-V. If you have more than one project saved, simply click on the drop down menu next to the run button to select the project to compile and run.
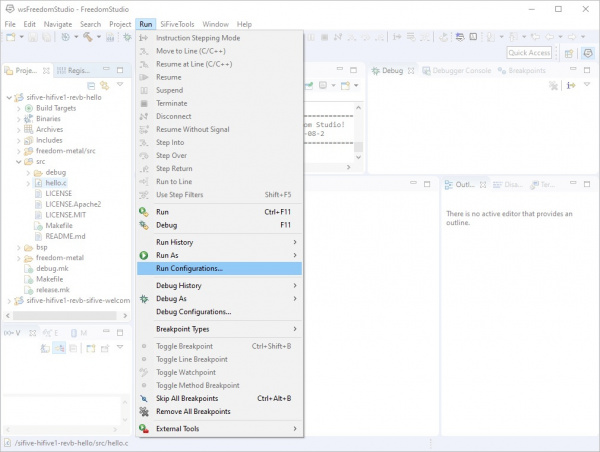
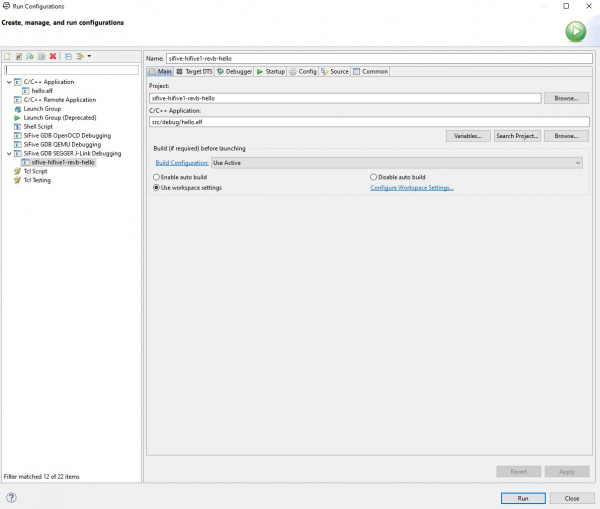
Freedom Studio will then attempt to flash and run the sketch. However, your GDB server might be configured incorrectly to be able to flash code through Freedom Studio. To fix this, go to Run -> Run Configurations... from the menu.
Open the SiFive GDB SEGGER J-Link Debugging tree on the left hand side of the window, select your project, and hit the Run button. This will flash the code over USB and begin running your code as well.
Drag and Drop
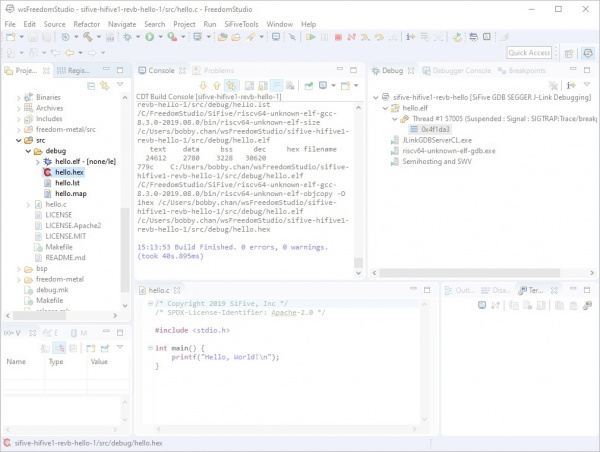
Another way to flash is using the shortcut CTRL+B to build all the files; this will generate a *.hex file in the Project Explorer under src -> debug -> hello.hex .
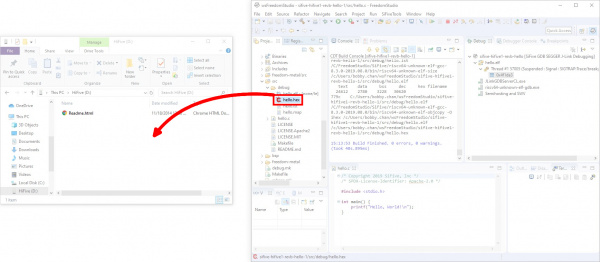
You may have noticed that the RED-V shows up as a flash drive when you plug it into your computer. With the window for the drive opened, drag and drop the *.hex directly onto this drive to program the RED-V.
What You Should See
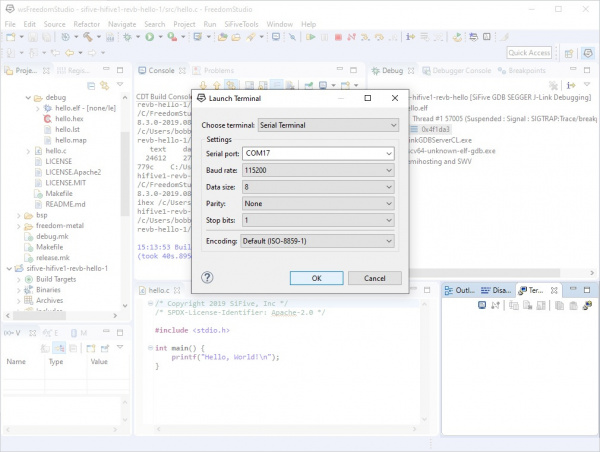
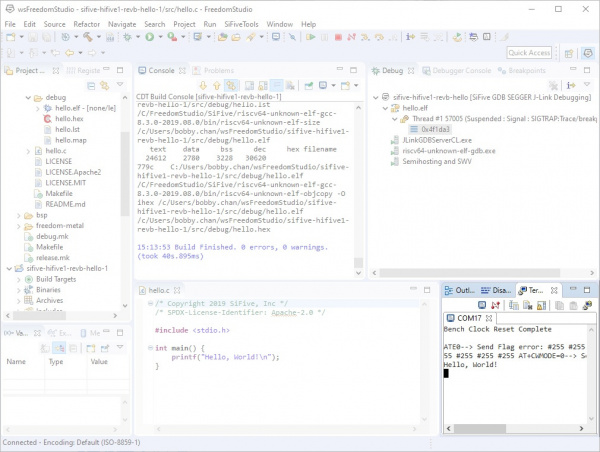
The program will begin running once the code has been uploaded to the RED-V RedBoard. To see the serial output, you'll need a serial terminal. While you could connect using your favorite serial terminal, we'll use the one built into the Freedom Studio. In the Freedom Studio software, you'll notice a window on the bottom right of the software. Click on the tab labeled as Terminal and then the icon with the monitor.
A new window will pop up asking for you to choose your serial terminal and the settings. Click on the Choose terminal: menu and select Serial Terminal. The board will show up as two COM ports on your computer: one for the bootloader and another one for the example program. Most likely the COM port will show up as the one with the second to highest number. The default baud rate of the example projects are set to 115200 baud (8 data bits, no parity, 1 stop bit, default encoding). With the correct settings, hit the OK button to connect. The example code will print "Hello World!" once so we'll need to hit the reset button on the board one time.
You'll some serial output as the RED-V boots up. Once it enters the example program, the RED-V RedBoard will output the familiar message that all programmers know and love: "Hello, World!"
language:bash
Bench Clock Reset Complete

ATE0--> Send Flag error: #255 #255 #255 #255 AT+BLEINIT=0--> Send Flag error: #255 #255 #255 #255 AT+CWMODE=0--> Send Flag error: #255 #255 #255 #255
Hello, World!
Example: Blink
0. In order to properly use a pin as an output, make sure to also follow the sequence to disable and enable the I/O pin in the code.
Now that we have output some serial to a terminal window, let's try to blink the LED on the RED-V. Let's just use the example project that we have open already in Freedom Studio. Copy and paste the example below into the text editor.
language:c
/******************************************************************************
    RED-V_blink.c

    WRITTEN BY: Ho Yun "Bobby" Chan and "Tron Monroe"
    @ SparkFun Electronics
    DATE:  11/21/2019

    DEVELOPMENT ENVIRONMENT SPECIFICS:
      Firmware developed using Freedom Studio v4.12.0.2019-08-2
      on Windows 10

    ========== RESOURCES ==========
    Freedom E SDK

    ========== DESCRIPTION ==========
    Using the built-in LED. To test with different pin,
    simply modify the reference pin and connect a standard LED
    and 100?O resistor between the respective pin and GND.

    LICENSE: This code is released under the MIT License (http://opensource.org/licenses/MIT)
  ******************************************************************************/


#include <stdio.h>      //include Serial Library
#include <time.h>       //include Time library
#include <metal/gpio.h> //include GPIO library, https://sifive.github.io/freedom-metal-docs/apiref/gpio.html

//custom write delay function since we do not have one like an Arduino
void delay(int number_of_microseconds){ //not actually number of seconds

// Converting time into multiples of a hundred nS
int hundred_ns = 10 * number_of_microseconds;

// Storing start time
clock_t start_time = clock();

// looping till required time is not achieved
while (clock() < start_time + hundred_ns);

}

int main (void) {
  printf("RED-V Example: Blink\n");

  struct metal_gpio *led0; //make instance of GPIO

  //Note: The sequence of these commands matter!

  //Get gpio device handle, i.e.) define IC pin here where IC's GPIO = 5, pin silkscreen = 13
  //this is the GPIO device index that is referenced from 0, make sure to check the schematic
  led0 = metal_gpio_get_device(0);

  // quick check to see if we set the metal_gpio up correctly, this was based on the "sifive-welcome.c" example code
  if (led0 == NULL) {
    printf("LED is null.\n");
    return 1;
  }
  //Pins are set when initialized so we must disable it when we use it as an input/output
  metal_gpio_disable_input(led0, 5);

  //Set as gpio as output
  metal_gpio_enable_output(led0, 5);

  //Pins have more than one function, make sure we disconnect anything connected...
  metal_gpio_disable_pinmux(led0, 5);

  //Turn ON pin
  metal_gpio_set_pin(led0, 5, 1);


  while (1) {//loop through, sort of like an Arduino loop()

      //Turn OFF pin
      metal_gpio_set_pin(led0, 5, 0);
      //Use custom "delay" function
      delay(2000000); //2000000 "micro-seconds" ~ 1 second, through experimentation...
      //Turn ON pin
      metal_gpio_set_pin(led0, 5, 1);
      //Use custom "delay" function
      delay(2000000);

  }

  // return
  return 0;
}
When ready, hit the run button to compile and upload. You can also compile and drag the *.hex into the drive.
What You Should See
There'll be an output on the terminal window indicating that we are using the blink code. What we are more interested in is if the LED is turning on and off. Check your board and you should see the built-in LED begin to blink about once a second! Make sure to check out the comments in the example code. Toggling the LED is not as intuitive and straight forward as controlling an LED on an Arduino.
Software Installation (Zephyr RTOS)
Again, there are a handful of development environments out there that are compatible with the RED-V but for the scope of this tutorial, we're going to be checking out Freedom Studio and Zephyr RTOS. Both development environments have a decent assembly of example code to help get you up and learning RISC-V. Let's check out the Zephyr RTOS software.
Installing Python
The next method to get started is using Zephyr RTOS. We've had the best luck using Zephyr on Linux-based operating systems, so we'd recommend using your favorite Linux distro. From there, we want to make sure we have Python 3 and pip installed, so run the following commands.
language:bash
sudo apt-get install python3
sudo apt-get install python3-dev python python3-pip
sudo pip3 install ipython
sudo pip3 install numpy
sudo pip3 install pyelftools
Installing CMake and Ninja
We'll need quite a few things like CMake and Ninja to compile things, so run the below code to get all of your dependencies set up.
language:bash
sudo apt-get install --no-install-recommends git cmake ninja-build gperf \
ccache dfu-util device-tree-compiler wget \
python3-pip python3-setuptools python3-tk python3-wheel xz-utils file \
make gcc gcc-multilib
We'll also need to update CMake on our system, go ahead and download the package here. We used version 3.15.4 on Ubuntu v18.04.3 when writing this tutorial.
Run the below commands to extract, make, and install it.
language:bash
cd ~/Downloads
tar xvzf cmake-3.15.4.tar.gz
cd cmake-3.15.4
./configure
make
sudo make install
Installing West and Zephyr RTOS
Zephyr uses a tool called west to build code for and flash the RED-V, we'll want to install this as root to avoid any permissions issues. We used version 0.6.3 on Ubuntu v18.04.3 when writing this tutorial.
language:bash
sudo pip3 install west
west init zephyrproject, make sure to avoid using sudo. Otherwise, you may get an error during compiling. The GitHub issue linked uses a different board but you may run into the same issue.
We'll then want to create and initialize our west project, to do this, run the following.
language:bash
west init zephyrproject
cd zephyrproject
west update
sudo pip3 install -r zephyr/scripts/requirements.txt
We'll need the Zephyr SDK as well as this is where all of our toolchains are bundled. Grab it from GitHub and install it in your home directory. If you'd like to install a different version of the SDK, simply change the version number everywhere it shows up.
language:bash
cd ~/
wget https://github.com/zephyrproject-rtos/sdk-ng/releases/download/v0.10.3/zephyr-sdk-0.10.3-setup.run
chmod +x zephyr-sdk-0.10.3-setup.run
./zephyr-sdk-0.10.3-setup.run -- -d ~/zephyr-sdk-0.10.3
export ZEPHYR_TOOLCHAIN_VARIANT=zephyr
export ZEPHYR_SDK_INSTALL_DIR=$HOME/zephyr-sdk-0.10.3
We'll also need to update our device tree compiler, follow the link below to find an appropriate download.
Run the commands below to install the new DTC.
language:bash
cd ~/Downloads
sudo apt install ./device-tree-compiler_1.4.7-1_amd64.deb
Drivers (Zephyr RTOS)
We'll need some J-Link software so we can communicate with the Segger J-Link OB on the RED-V. Head to Segger to download the software under "J-Link Software and Documentation pack for Linux, DEB installer, 64-bit." Read through the license agreement before accepting the terms and hit the "Download software" button. We used version 6.56a on Ubuntu v18.04.3 when writing this tutorial.
We should still be in the Downloads folder, so installing the software is as simple as running the below command. Depending on the software package, you may need to update the version name.
language:bash
sudo apt install ./JLink_Linux_V646a_x86_64.deb
Examples (Zephyr RTOS)
Examples: Hello World
Phew, that's all done. Now we can move to the directory that was earlier created when we ran west init zephyrproject and build a project.
language:bash
cd ..
cd zephyrproject/zephyr
west build -b hifive1_revb samples/hello_world
We can now check to make sure our RED-V is connected. You should see a SEGGER device pop up when you run lsusb. If it's connected, go ahead and run west flash. Note that this may take a couple of tries, sometimes it helps to give the ol' reset button a tap or two and try again.
language:bash
west flash
What You Should See
Once uploaded, try opening a serial terminal to connect to the RED-V. Let's use the GNU screen. If you don't have it installed yet, type the following in the command line.
language:bash
sudo apt-get install screen
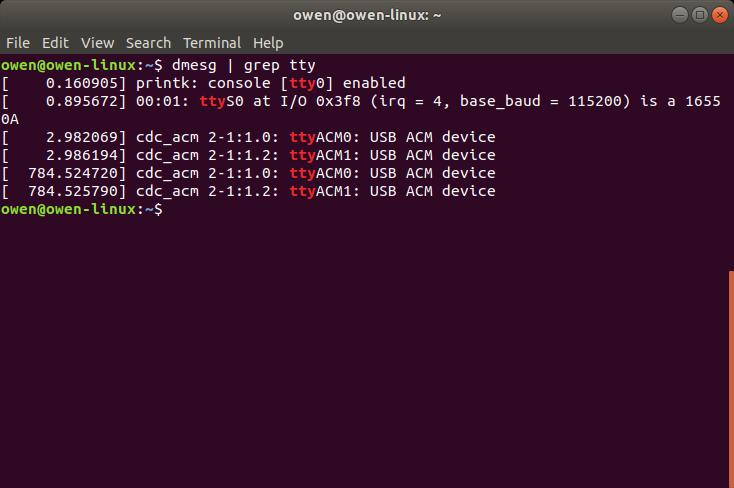
There are two serial ports that the RED-V enumerates to when inserted into the USB port. Type the following command to view the serial ports connected.
language:bash
dmesg | grep tty
Unplug and replug the RED-V to your USB port and type the command again. The messages that appear multiple times will be the RED-V. In this case, it should either be ttyACM0 or ttyACM1.
Connect to one of the ports using the following command set at 115200 baud.
language:bash
screen /dev/ttyACM0 115200
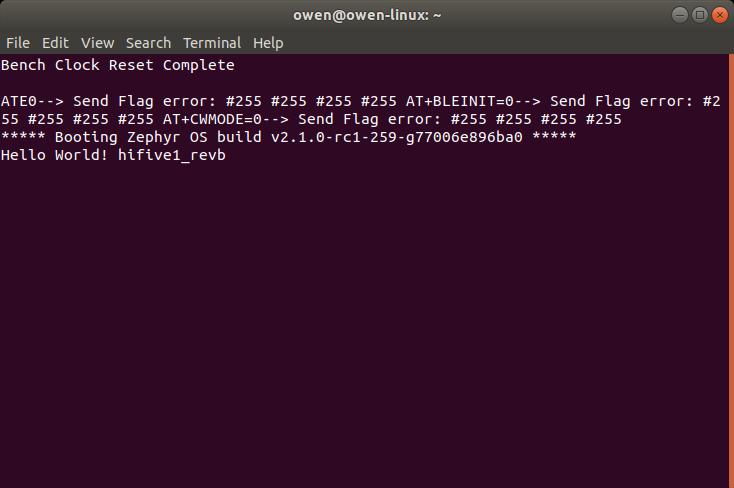
Since the example code only prints the message once, we'll need to hit the reset button once on the RED-V. You should see something similar to the Hello Wold example in Freedom Studio.
language:bash
Bench Clock Reset Complete

ATE0--> Send Flag error: #255 #255 #255 #255 AT+BLEINIT=0--> Send Flag error: #255 #255 #255 #255 AT+CWMODE=0--> Send Flag error: #255 #255 #255 #255
***** Booting Zephyr OS build v2.1.0-rc1-259-g77006e896ba0 *****
Hello, World! hifive1_revb
To disconnect CTRL + A and then \. You'll be asked by the application if you would like to exit. Type y and ENTER to exit the session.
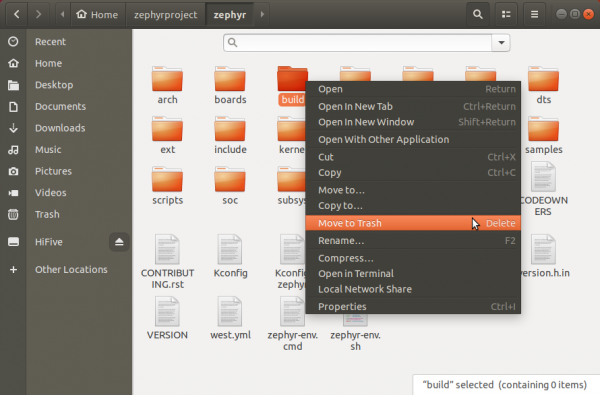
If you want to build a different project, simply delete the build directory using the following command to delete the folder. Then run west build again for your other project.
language:bash
rm -rv build/
For those that prefer the GUI, just head to the folder and to manually delete.
Examples: Blinky
Let's try to control the build-in LED on the RED-V. Head to the blink example and modify for GPIO pin 5.
language:bash
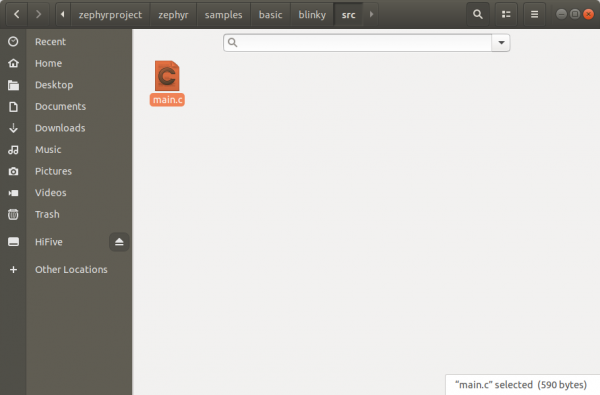
cd ~/zephyrproject/zephyr/samples/basic/blinky/src
gedit main.c
You can also navigate to the example using the GUI to open the blink example.
Once the modified.c file is open, change the definition for LED from DT_ALIAS_LED0_GPIOS_PIN to 5. We'll need to use the GPIO pin reference for the FE310 as opposed to the silkscreen label on the RED-V. You can also copy and paste the following into the file.
language:c
/*
 * Copyright (c) 2016 Intel Corporation
 *
 * SPDX-License-Identifier: Apache-2.0
 */

#include <zephyr.h>
#include <device.h>
#include <drivers/gpio.h>

#define LED_PORT    DT_ALIAS_LED0_GPIOS_CONTROLLER
#define LED     5

/* 1000 msec = 1 sec */
#define SLEEP_TIME  1000

void main(void)
{
    u32_t cnt = 0;
    struct device *dev;

    dev = device_get_binding(LED_PORT);
    /* Set LED pin as output */
    gpio_pin_configure(dev, LED, GPIO_DIR_OUT);

    while (1) {
        /* Set pin to HIGH/LOW every 1 second */
        gpio_pin_write(dev, LED, cnt % 2);
        cnt++;
        k_sleep(SLEEP_TIME);
    }
}
After changing, save the changes and hit CTRL+C in the terminal window. Head back to the zephyr folder to delete the build folder if you have not already. Then recompile the blink example and flash it to your RED-V board.
language:bash
cd ~/zephyrproject/zephyr/
rm -rv build/
west build -b hifive1_revb samples/basic/blinky
west flash
What You Should See
Check the built-in LED on the RED-V board. You should see the build-in LED blink every second!
Troubleshooting
Freedom Studio
Below is an issue that you may run into when using the RED-V in Freedom Studio.
Issues Uploading to the RED-V Again
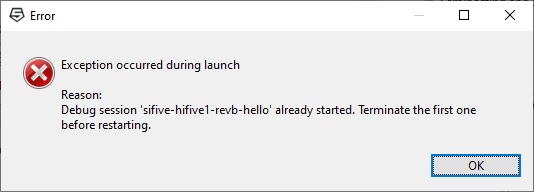
There are a few reasons why if you have problems uploading code. If you recently uploaded code and the board is still connected to your computer, you'll need to make sure to hit terminate (i.e. the button that looks like a red square) before uploading again. This is because Freedom Studio is still connected to the board in debug mode.
If you uploaded several times to the board and have issues uploading after clicking on the terminate button, try disconnecting the RED-V from your USB port. Then re-insert the board back.
Zephyr RTOS
Below is one issue that you may run into when using the RED-V in Zephry RTOS.
Issues Compiling
If you have issues compiling, you may have missed a step when installing the software for the Zephry RTOS. Try going through the command lines again to ensure that the software and tools are installed correctly. You also may need to run the west build command a few more times to compile.
Resources and Going Further
Now that you've successfully got your RED-V up and running, it's time to incorporate it into your own project! For more information, check out the resources below:
- Freedom Studio
- Zephyr
Or check out the RISC-V assembly and C programming tutorial by Martin Fink from Western Digital using PlatformIO IDE. The board HiFive1 development board which is similar to the RED-V development board. You may need to adjust the values so that the code applies to the GPIO pins on the RED-V's FE310-002.
Or check out this blog post for ideas.

