
There's a lot of love for Hannah Harto around the SparkFun office, so when we saw her campaign to launch a national tour, the enthusiasm level was high. After some measured and rational debate, we persuaded our fearless leader to risk a sizeable investment in the Internet and bring Harto to SparkFun headquarters!
ReplaceMeOpen
ReplaceMeClose
In this tutorial, we will show you how to make your own (possibly haunted) MDK apron, complete with downloadable audio clips from your Harto!
Here are some skills used in this tutorial. If you are unfamilir with any of them, please take a look before building your MDK Apron.
Here is a list of the electronics parts you'll need to create this project. We've included a little bit of soldering and a little bit of sewing. The basic tools for those tasks aren't on this list, so make sure to include those if you don't already have them!
You also need a few non-electronic parts:
Let's start with the buttons!
We used five buttons, shaped like a grilled cheese sandwich, a taco, nachos, a corndog, and a "Just say no to baking!" icon. If you'd like to use the same shapes, you can download the PDF or vector files here!
All of the instructions for completing a button out of these or any other shapes have already been demonstrated in the LDK Experiment 4 tutorial. Cut out your shapes, either using our templates or your own favorite foods, and follow the same steps to create your buttons!
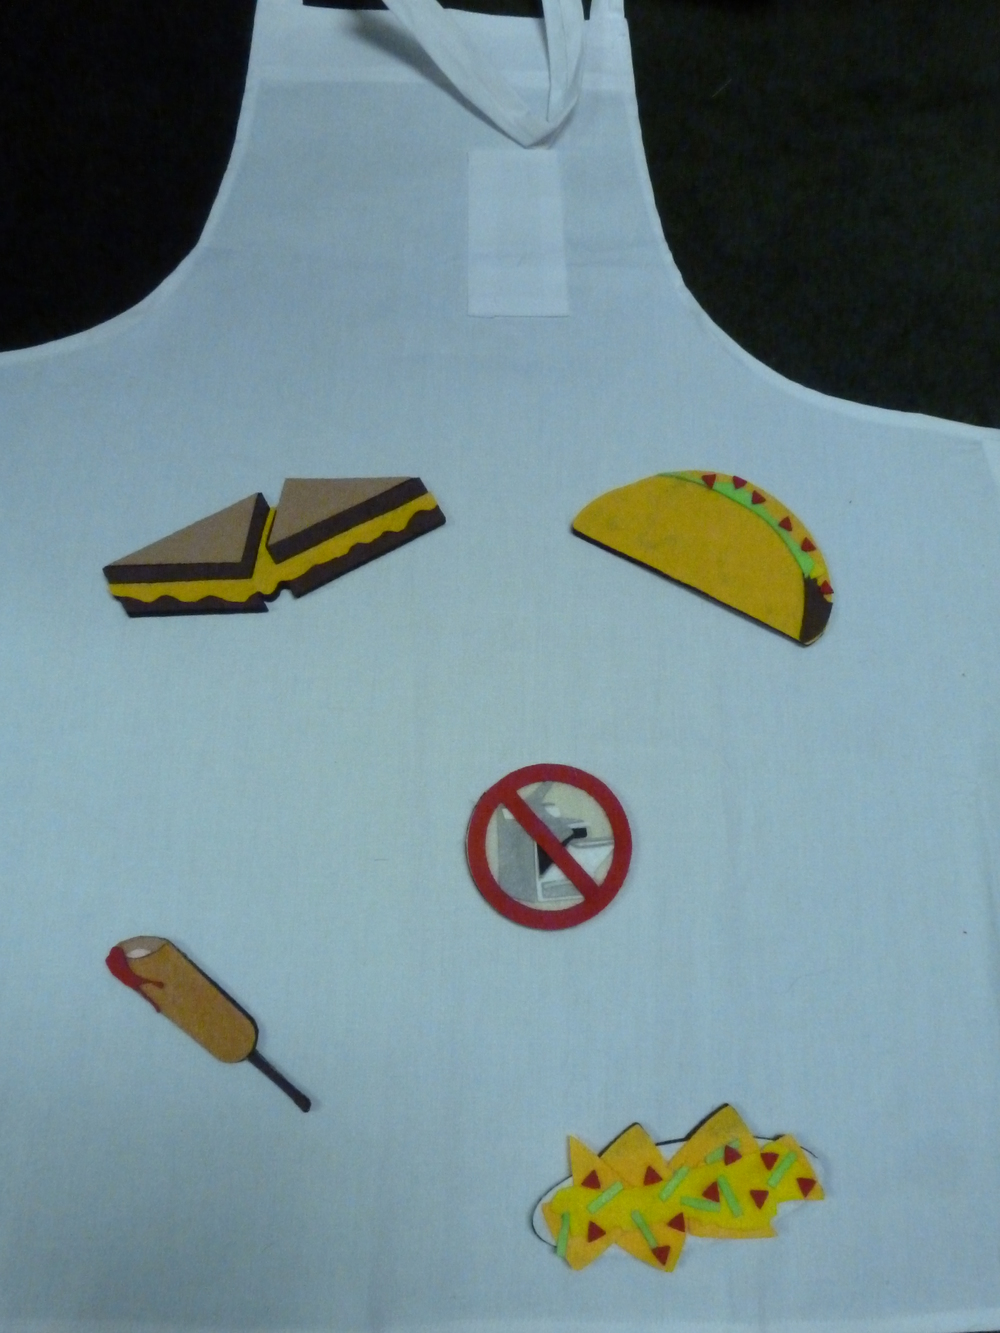
You may have noticed in the video that the buttons are a little bit glitchy. I chose to consider that some of the charm of a handmade gift, but you can reduce the false positive rate on those by making them smaller, so that they don't flex every time the body wearing them moves! If you REALLY want precision, you can create plain old felt shapes that AREN'T buttons, place them, and then place regular ol' LilyPad buttons next to them and wire THOSE up. It doesn't have the fun factor of mashing down on the big felt shapes to generate the sound, but you'll get a LOT more precision.
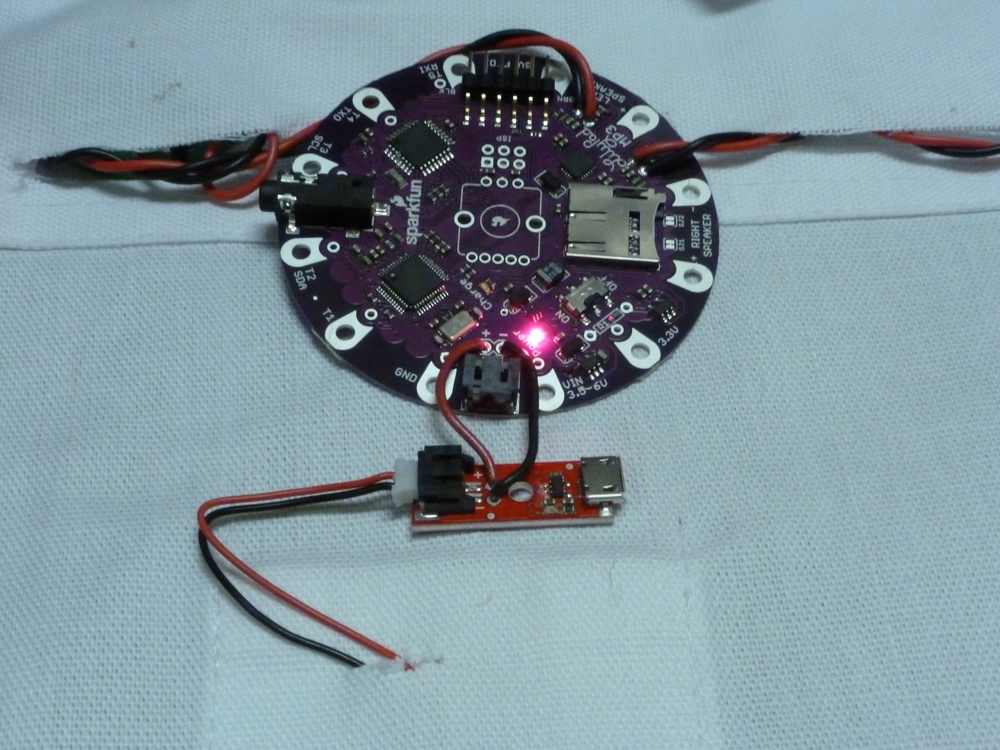
We're working with the LilyPad MP3 trigger, a very cool piece of hardware that will let us play sound clips through the apron. To get there, we'll have to add speakers, and we're also going to throw in a lithium polymer battery charger to make it easy to charge the apron up when the batteries die. For this portion of the apron, we're going to do a little bit of soldering. Wire will give us better sound running to the speakers than thread would. The wire will also form a very solid connection to the charger, which is likely to take a little bit of stress when plugging and unplugging the battery.
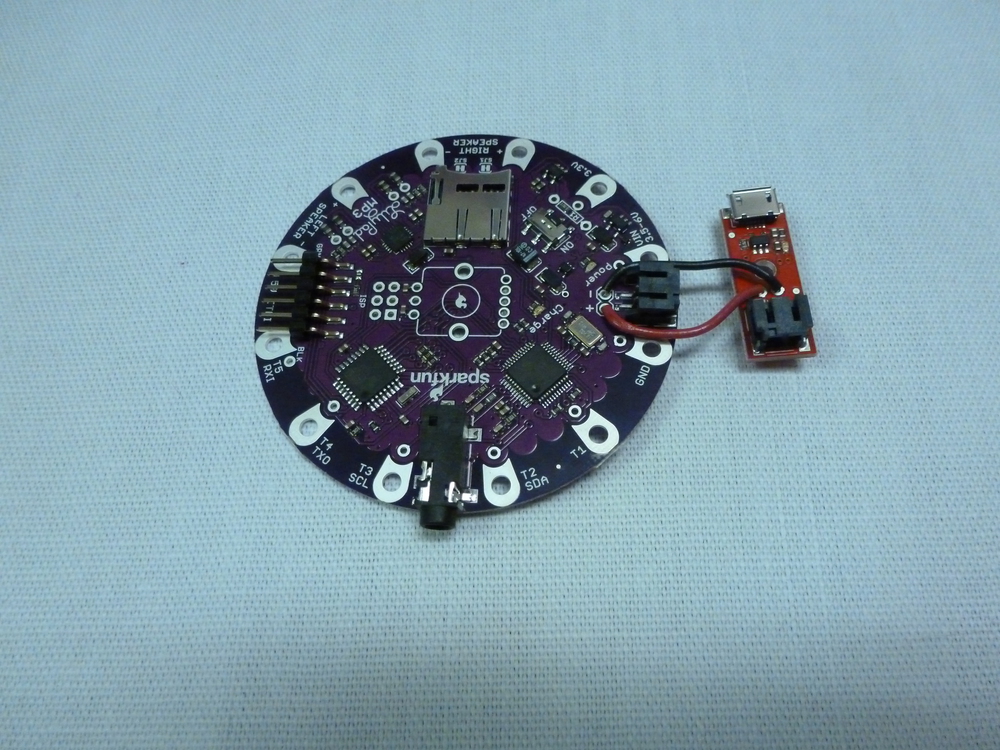
Start with the charger. Both the charge board and the MP3 trigger have a black JST connector on them. Behind the connector, each board has two small through-holes, labeled positive and negative. Using stranded hookup wire, connect these, positive to positive and negative to negative. To power your circuit, you will plug the Lithium Polymer battery into the JST connector on the red charge board. To charge the circuit, plug a micro USB cable into the silver connector on the red board. An LED will illuminate to let you know it's charging.
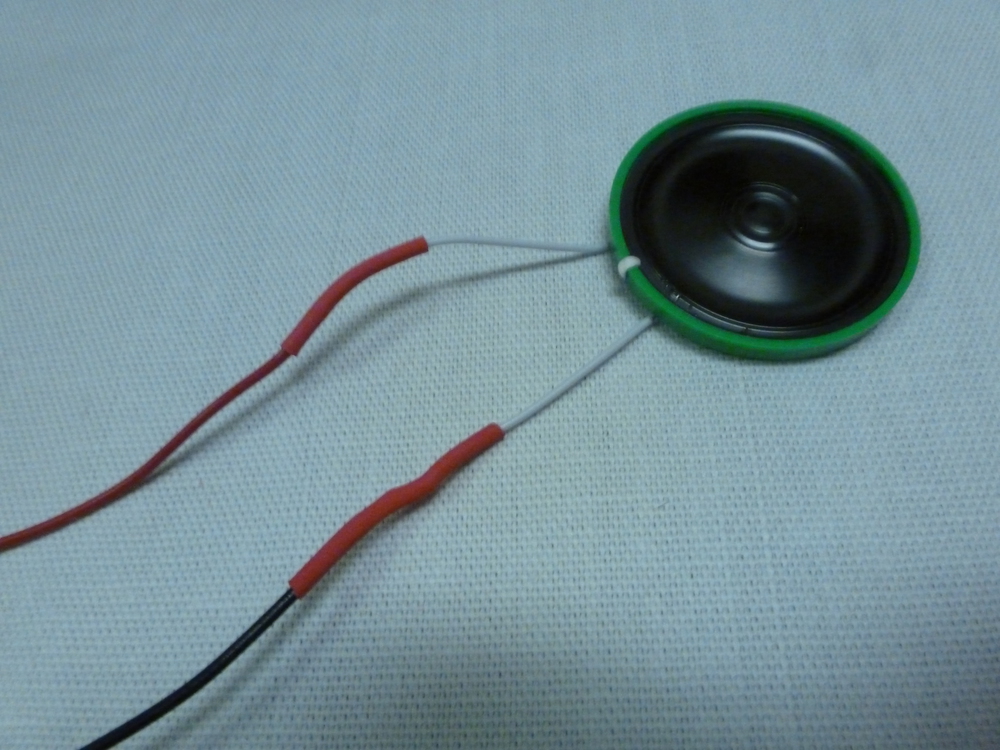
Next, the speakers. The white wires on your speakers aren't long enough to reach the top of the apron where you need them, so you're going to extend them with more hookup wire. Strip and solder the ends. Once they're solidly connected, cover the junction up with a bit of heatshrink to help protect it.

Over the sew tabs for the left and right speakers, there are two pairs of through-hole solder holes. If you flip the board over, those holes are labeled L and R for left and right. Each set also has a positive and negative.
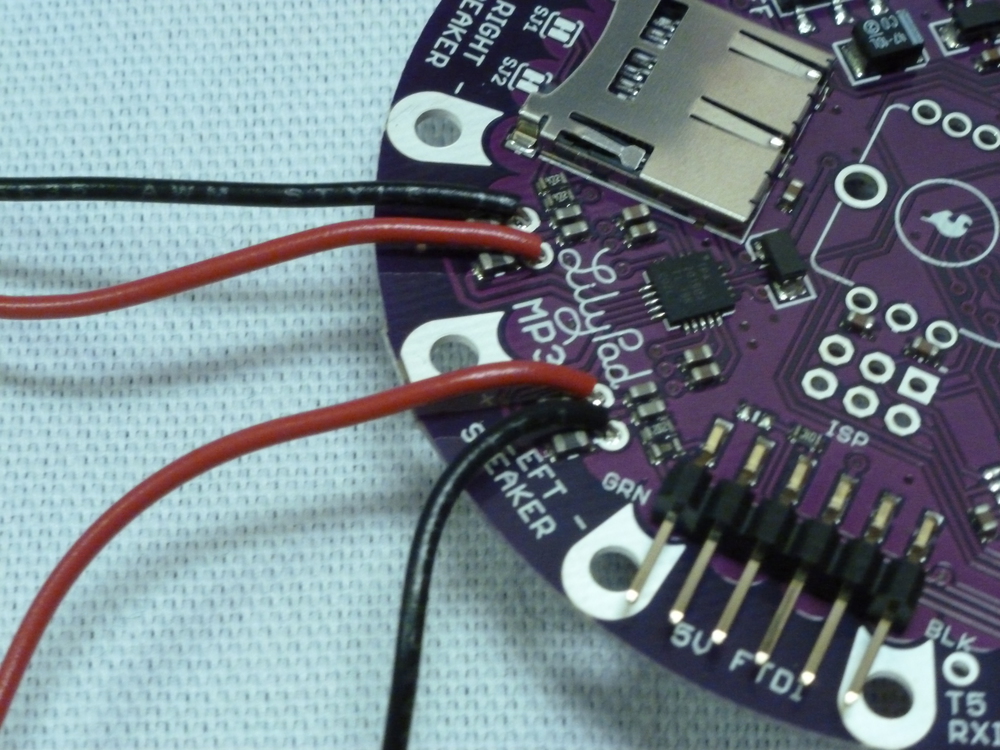
Go ahead and solder both sides of one speaker into the left set of through holes, and both sides of the other speaker into the right set.Notice the tiny '+' and '-' signs on the back of the speakers. Match each wire accordingly.

Next, you'll want to get these parts placed on the apron. Ours had two key features that we really liked: a wide double-thickness hem at the top edge and a pencil pocket. We made heavy use of these features, so if you don't have them, you might have to get a little creative.
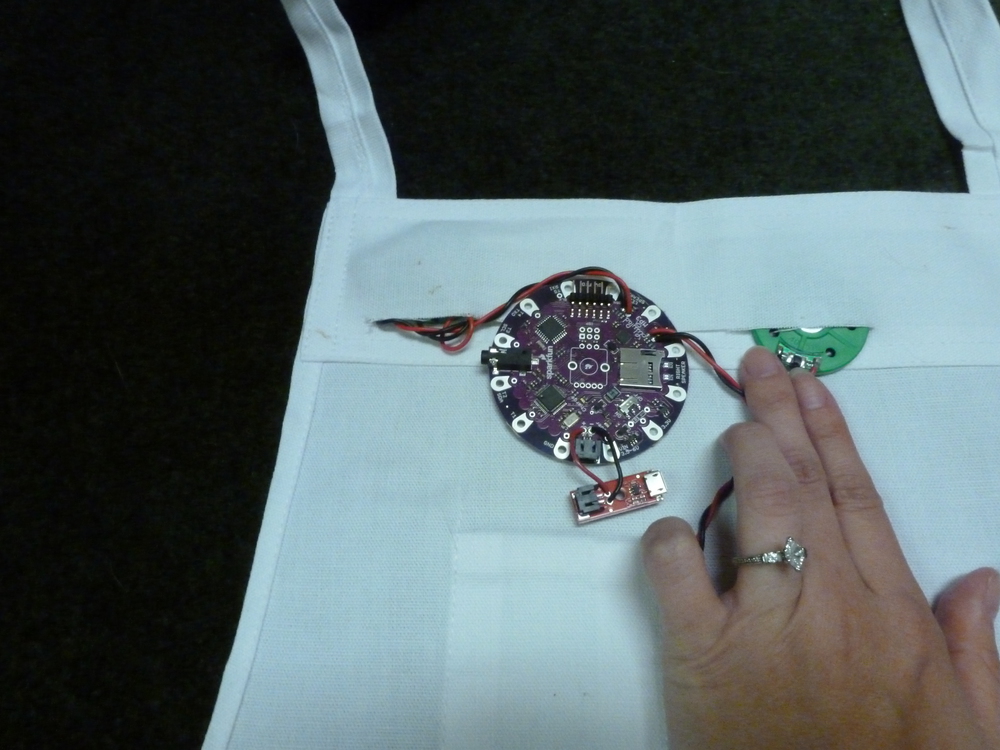
First, we cut a slit along the bottom of that wide top hem, turning it into a sort of inverted pocket. We slid the two speakers into that pocket, black sides facing towards what will be the front of the apron. Once we were happy with them, we secured them with a couple of small dots of hot glue on the back sides.

Next, we cut a tiny hole in the back of the pocket.
This allowed us to drop the lithium polymer battery into the pocket, then poke the wire through the back and plug it into the red charge board. Turn on the power switch on the MP3 trigger, and you should see an LED light up.
You could use another couple of drops of hot glue to hold these boards on, but you'll be doing it on a single-thickness of fabric, so it could show through. I recommend a couple of quick stitches with regular, non-conductive thread to hold everything in place while you sew your traces.
With your speakers and charger attached, you're ready to get down to some serious sewing!
Here's a diagram of how you're going to want to put this bad boy together. All of these traces can be sewn by machine -- I used a machine because that allowed me to use a white top thread and a conductive bottom thread, which made the stitches nearly invisible from the front of the apron. If you hand sew, they're going to be a little more visible. Regardless of the route you choose, you'll need to hand stitch the MP3 trigger and button edges onto the ends of the traces. You can do this by winding your conductive thread around the trace and knotting it before you sew down the corresponding component tab. It's easy and effective!
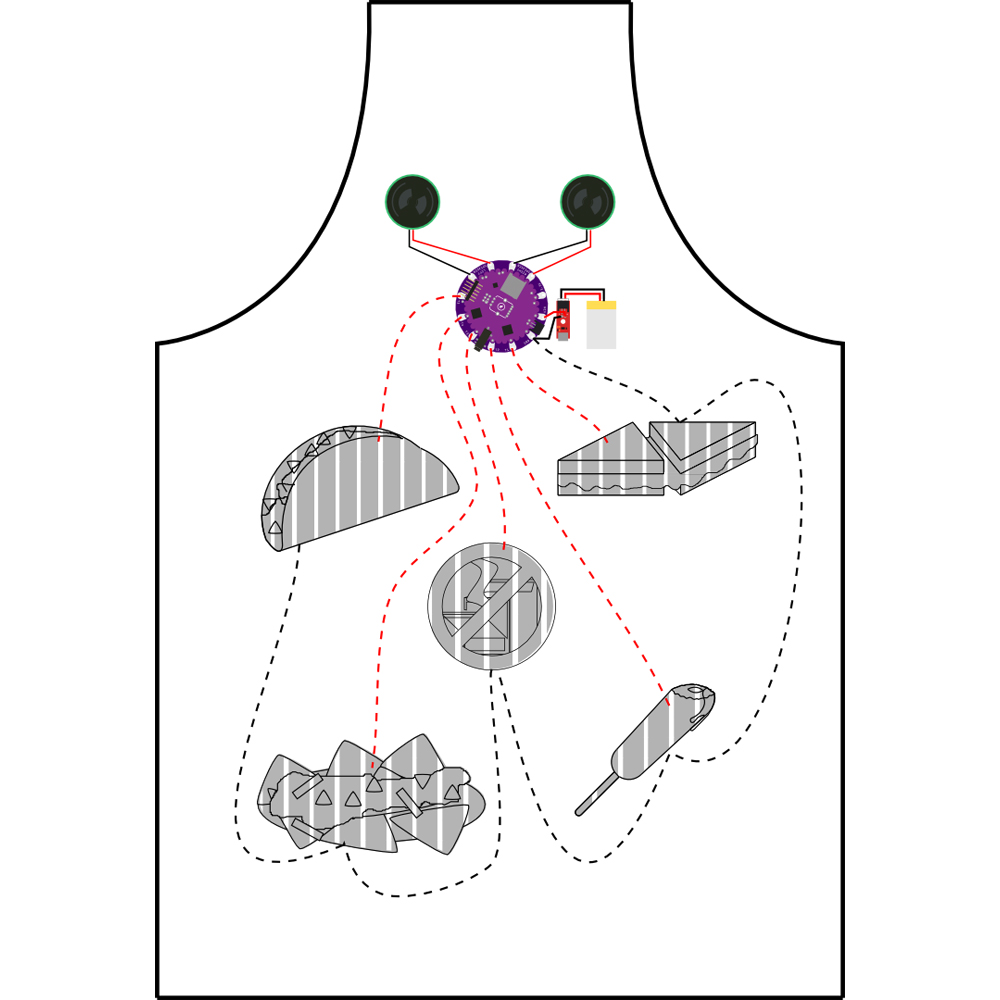
A quick note on placement: we wanted the buttons on the front of the apron, but the circuitry on the back where you couldn't see it. So, when you're looking at the diagram, grey components are on the opposite side of the fabric as the colored components.
As shown in the diagram, you're linking one side of each button to a numbered track tab on the MP3 player. The other sides of the buttons will all meet at the GND pin. It's fine for those threads to touch, cross, or contact each other -- they're all going to the same place! It's also important to note that when I say 'side' of the button, I mean those two conductive edges you made while you were following the button tutorial, which are the two spots that aren't conductively connected to each other unless the button is being pushed. The end result should be that when you press a button, connecting the two sides of it, you're also connecting the associated numbered pin to ground. That's what tells the MP3 trigger to play a sound.
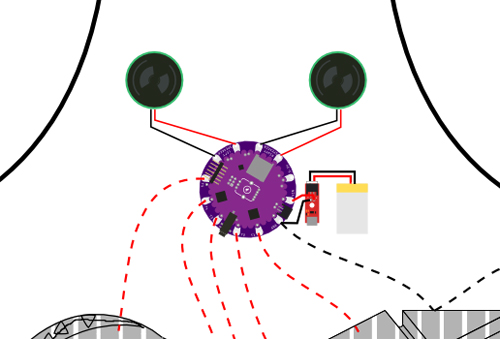
Here's a quick detail shot of the top of the apron, so you can see the connections to the MP3 board.
You've got a beautiful apron and an awesome circuit, but the project lacks Hart, no? Here are four sets of audio clips you can choose from to finish up! Choose any 5 sounds clips from these downloads to associate with your 5 buttons!
Download the entire set here.
Download the entire set here.
Download the entire set here.
Download the entire set here.
Uploading your chosen tracks to the MP3 trigger is a cinch! You'll need to pop your flash memory card into an SD card reader, and plug it into your computer.
When you unzip the sound files, you might notice that each file has a name that starts with a number between one and five. We've named the files to correspond with the pin that has the matching food in our diagram. If you moved the foods around and connected them to other pins, or if you cherry picked sound files and don't have one of each number, you'll need to change the names. The file you want to play when you press the button attached to pin one should start with the digit 1, pin two should start with 2, etc.
Once you've got one track with each number, save those to your memory card. Take it out of your card reader and pop it into the SD card slot on your MP3 trigger. It's that easy! Power it up, and try pressing the buttons to hear your sounds!
If you were using our felt templates, you also got a couple of extra pieces -- an MDK monogram and the spatula glass logo. We used those to embellish our pencil pocket and give it a little bit of pizazz!
Charging your apron is easy. The red charge board you connected at the very beginning has a plug for a micro USB on it. You can connect this to any micro USB charge cord, or just a USB to Micro USB plugged into your computer.
If you need to wash the apron, be gentle! No machine washing, just a gentle hand wash or spot clean, and make sure that you unplug the battery first!
Thanks again to Hannah Hart for visiting and making this all possible!

learn.sparkfun.com | CC BY-SA 3.0 | SparkFun Electronics | Niwot, Colorado