Getting Started with the SparkFun Air Velocity Sensor
Introduction
Need to keep track of the airflow in your data center or around your servers? How about making sure your HVAC and air control systems are functioning at full capacity? Or, if you're more fun, what about figuring out how fast your RC airplane is going? Well, the SparkFun Air Velocity Sensor Breakout - FS3000-1005 and FS3000-1015 can help you with all that and more! It's super easy, super Qwiic to hookup, and super fun to play with. Let's have a look!
Required Materials
There are two versions of the SparkFun Air Velocity Sensor with different upper ranges:
SparkFun Air Velocity Sensor Breakout - FS3000-1005 (0 to 7.23m/s)
SparkFun Air Velocity Sensor Breakout - FS3000-1015 (0 to 15m/s)
For this tutorial, you'll need the following components:
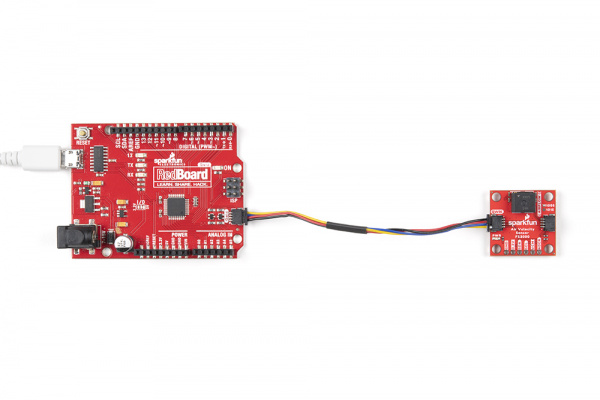
Connect the SparkFun Air Velocity Sensor to the Redboard
Step 1:
Connect the SparkFun Air Velocity Sensor Breakout to the SparkFun RedBoard Qwiic using a Qwiic Cable.
Alternatively, if you're using header pins:SDA (A4) on the RedBoard to SDA on the FS3000 sensor.
SCL (A5) on the RedBoard to SCL on the FS3000 sensor.
3.3V on the RedBoard to 3.3V on the FS3000 sensor.
GND on the RedBoard to GND on the FS3000 sensor.
Step 2:
Connect the USB Micro-B Cable from the RedBoard to your computer.
Program the RedBoard
Ardunio Code
Below is the Arduino code that will read data from the FS3000 sensor and display it in the Serial Monitor. Open Arduino and copy and paste the code below.
#include <Wire.h>
#include <SparkFun_FS3000_Arduino_Library.h> // Include the library for the FS3000 sensor

FS3000 fs; // Create an instance of the FS3000 class to interact with the sensor
void setup()
{
    Serial.begin(115200); // Initialize the serial communication at a baud rate of 115200
    Serial.println("Example 1 - Reading values from the FS3000"); // Print a message to indicate that the program has started

 Wire.begin(); // Start the I2C communication protocol

if (fs.begin() == false) // Attempt to initialize the FS3000 sensor over I2C
{
    Serial.println("The sensor did not respond. Please check wiring."); // Print an error message if the sensor does not respond
    while(1); // Stop the program (freeze) if the sensor initialization fails
}

// Set the measurement range based on the sensor model:
// FS3000-1005 measures air velocity from 0 to 7.23 meters per second
// FS3000-1015 measures air velocity from 0 to 15 meters per second
fs.setRange(AIRFLOW_RANGE_7_MPS); // Set the sensor to measure in the 0-7.23 m/s range
// fs.setRange(AIRFLOW_RANGE_15_MPS); // Uncomment this line instead if using the FS3000-1015 model

    Serial.println("Sensor is connected properly."); // Print a message to confirm the sensor is connected and working
}

void loop()
{

    Serial.print("FS3000 Readings \tRaw: "); // Print a label for the raw data output
    Serial.print(fs.readRaw()); // Read and print the raw sensor data (an integer value between 0 and 3686)
    Serial.print("\tm/s: "); // Print a label for the air velocity in meters per second
    Serial.print(fs.readMetersPerSecond()); // Read and print the air velocity in meters per second (a float value)
    Serial.print("\tmph: "); // Print a label for the air velocity in miles per hour
    Serial.println(fs.readMilesPerHour()); // Read and print the air velocity in miles per hour (a float value)
    delay(1000); // Wait for 1 second before taking another reading
}
Required Libraries
To run the code above, you'll need to install the SparkFun FS3000 Arduino Library. You can download and install it directly from the Arduino IDE: Open the Arduino IDE. Go to Sketch > Include Library > Manage Libraries. Search for "SparkFun FS3000" and click "Install".
Alternatively, you can install the library by visiting this link and following the installation instructions.
Run Code and View Data
Step 1:
Upload the code to your SparkFun RedBoard Qwiic.
Step 2:
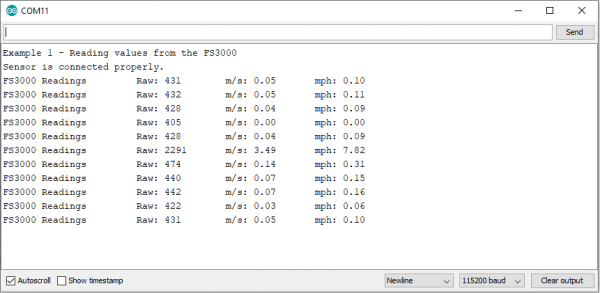
Open the Serial Monitor (found under Tools > Serial Monitor in the Arduino IDE).
Step 3:
Set the baud rate to 115200.
You should see real-time data readings for raw sensor data, air velocity in meters per second (m/s), and air velocity in miles per hour (mph).
Troubleshooting
If the sensor does not respond, double-check your wiring and ensure that the correct range is set for your specific sensor model.
Make sure the Qwiic connections are secure and that the correct COM port is selected in the Arduino IDE.

