
The Empire's finest have a distinct nasal and mechanical voice when talking through their intercoms. As you work diligently on that Stormtrooper costume and apply for the 501st, you can up your armor game by including a voice changer.
There are pre-built solutions available for budding Stormtrooper cadets, but most are bulky and sometimes require wiring outside the helmet. However, with a little bit of coding and wiring, you can build your own inside a helmet using SparkFun parts.
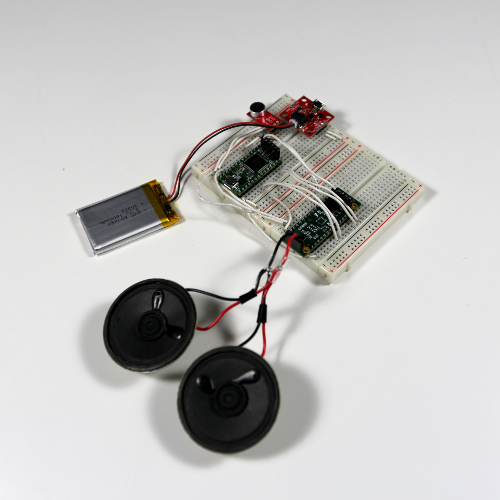
In this tutorial, we'll build the voice changer on a breadboard for testing. Each helmet will be different, so the wiring will have to be adjusted. The parts list below details what you'll need for the breadboard prototype.
Note that from the resistor kit you'll need:
We suggest you be familiar with the following before embarking upon this tutorial:
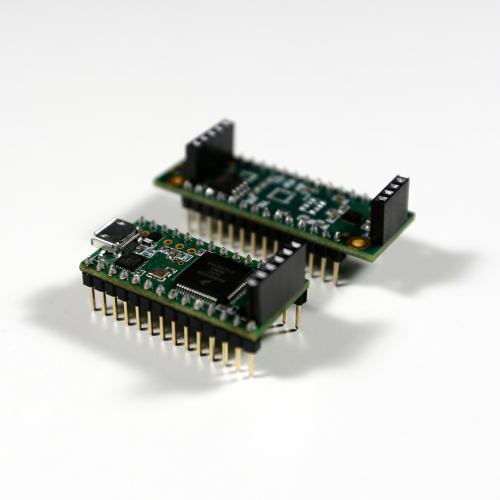
To start, solder headers onto the Teensy and Prop Shield. You'll also want to solder female headers to the edge pins on the Teensy, the edge pins on the Prop Shield, and the Prop Shield's audio out port.
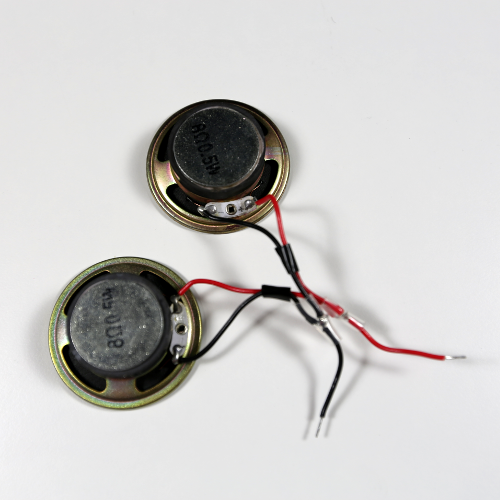
Cut and strip six lengths of wire, each about 6 inches long. Solder them to the speakers (note that you'll need to splice two wires to one for each positive and negative terminal).
Connect the components as shown in the breadboard. Follow the wires if you plan to put this into a helmet.

One of the coolest tools for developing on the Teensy is the PJRC Audio System Design Tool. With it, you can drag and drop blocks that correspond to various components on the Teensy, like the ADC and DAC, in addition to useful functions like filters. After connecting them with "patch cords," you can export the whole thing as Arduino code. Pretty sweet.
Feel free to try it out and replicate the block diagram.

Doing a basic microphone-to-speaker pass through requires simply connecting the ADC to the DAC. To add features, we'll need to put blocks in between those two.
Stormtrooper voices are marked by a nasal sound that can easily be accomplished by turning the treble way up and turning the bass way down. To accomplish this in the Design Tool, we'll use a state variable filter with a corner frequency set to 2000 Hz. Frequencies below that are considered "bass" (for a voice), and frequencies above that are "treble." By separating the low and high frequencies, we can put them back into a mixer and play with the individual gain. In the code, we'll set the treble gain to 0.25 (so as not to blow out the amplifier) and bass to 0.01 (we want it pretty much gone). You can play with any of the GAIN parameters in the code to adjust the volume and treble/bass mix.
You'll also notice that we added a biquad filter right after the ADC. We ultimately want to use this as a low-pass filter to reduce feedback we might get between the microphone and speakers. However, if we enable it in the code, it reduces the quality of the sound, as we effectively filter out most of the voice frequencies we want. Feel free to play with the FEEDBACK_SUPPRESSION and LOWPASS_CUTOFF parameters in the code to try setting the low-pass filter to an acceptable frequency.
The peak is an analysis block that gives us a measure of the amplitude of the audio signal. We use this to determine when someone is talking into the microphone. Play with the SQUELCH_CUTOFF parameter to adjust the volume where the Teensy begins playing sound through the speakers.
playFlashRaw allows us to play a raw audio file that has been loaded into the Prop Shield's serial flash memory. We'll upload the "click" and "static burst" sounds and play them whenever a user starts or finishes talking. Change the BEGIN_CLICK parameter to choose whether to play the click sound at the start, and change END_SOUND to choose whether to play a randomly chosen click or static burst at the end of talking.
Click the export button to get the necessary Arduino code. You can just copy it into a sketch!
If you want to try the other blocks, feel free to drag them in and connect some patch cables. To really get some distorted sound, I recommend the Bitcrusher (details for each audio block can be found on the righthand side of the Audio System Design Tool).
To play the quintessential Stormtrooper "click" and "static burst" sounds, we need to rip them from a sound clip, convert them to a raw format and load them into the Prop Shield's serial flash memory.
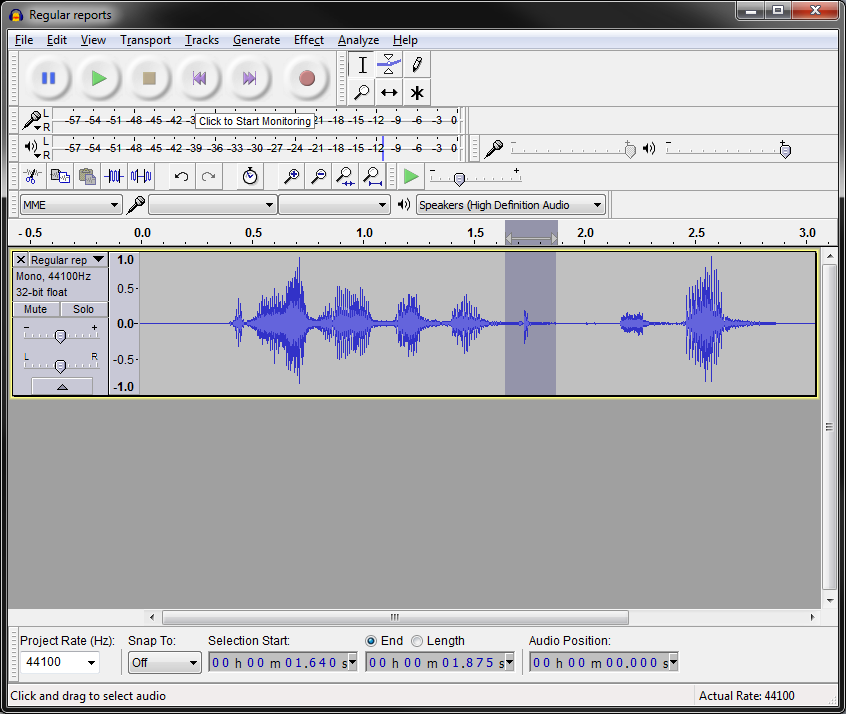
Find a Stormtrooper sound clip, like this one. Download it and open it with an editing program, like Audacity.
Make sure the project is set to 44.1kHz, highlight the portion of the clip you want (we'll highlight the "click" noise) and crop it (Trim Audio in Audacity).
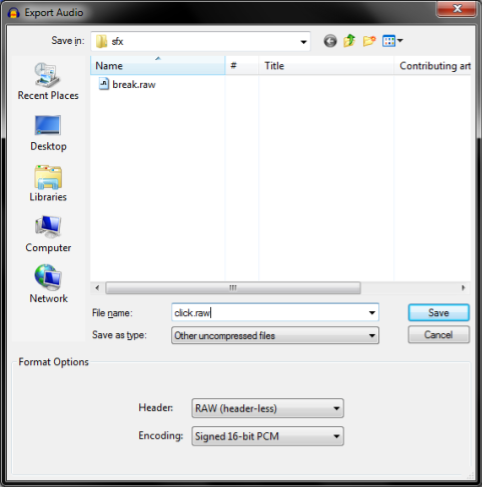
Export the clip (File > Export Audio...), name the new file click.raw and adjust the file options to:
Repeat this process for the static burst sound, which we named break.raw.
Now that we have the raw sound clips, we need to upload them to the Teensy. To do that, we'll use the TeensyTransfer Tool.
Download the TeensyTransfer repository as a ZIP file. Open a new Arduino sketch and select Sketch > Include Library > Add .ZIP Library. Find and select the TeensyTransfer-master.zip file. This will install the TeensyTransfer library.
Open File > Examples > TeensyTransfer-master > teensytransfertool.
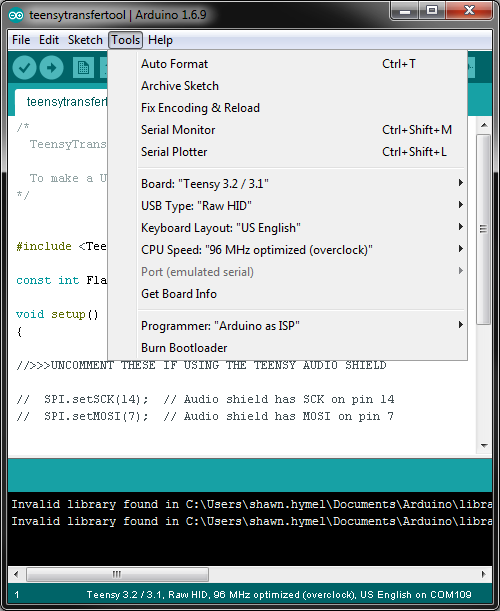
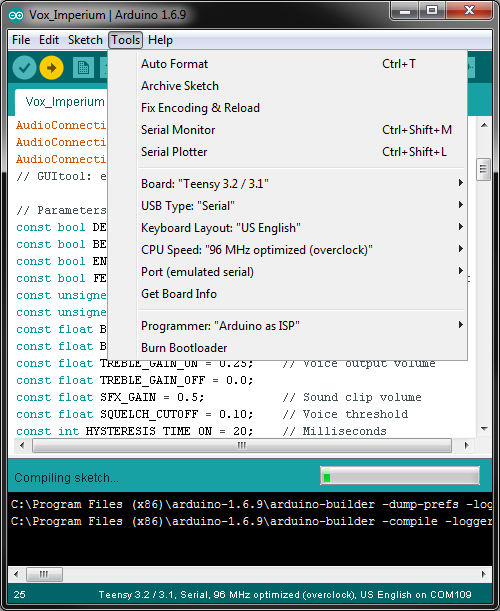
In Tools, select:
Upload the sketch to the Teensy. Find the downloaded TeensyTransfer-master.zip file and unzip it. Go to TeensyTransfer-master/extras and unzip the pre-compiled teensytransfer program for your operating system:
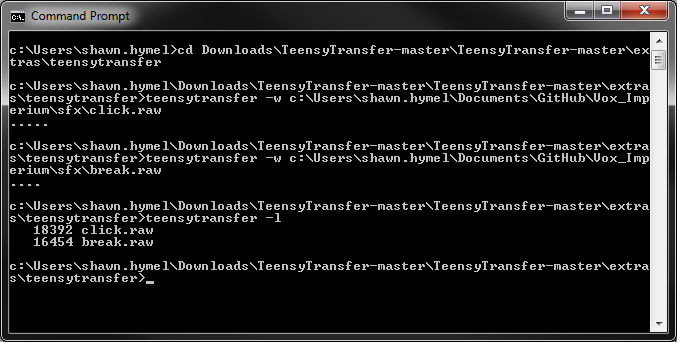
Open a command prompt, navigate to the TeensyTransfer-master/extras/teensytransfer directory and run the program to upload the raw audio clips to the Prop Shield's flash memory:
cd <Downloads directory>TeensyTransfer-master/extras/teensytransfer
teensytransfer -w <GitHub directory>/Vox_Imperium/sfx/click.raw
teensytransfer -w <GitHub directory>/Vox_Imperium/sfx/break.raw
You can check if the transfer worked by entering teensytransfer -l, and the tool should output the files found on the serial flash memory.
Create a new Arduino sketch and copy in the code:
language:c
#include <Audio.h>
#include <Wire.h>
#include <SPI.h>
#include <SD.h>
#include <SerialFlash.h>

// GUItool: begin automatically generated code
AudioInputAnalog         adc1;           //xy=255,182
AudioFilterBiquad        biquad1;        //xy=394,182
AudioPlaySerialflashRaw  playFlashRaw1;  //xy=535,319
AudioFilterStateVariable filter1;        //xy=558,189
AudioAnalyzePeak         peak1;          //xy=559,255
AudioMixer4              mixer1;         //xy=710,196
AudioOutputAnalog        dac1;           //xy=844,196
AudioConnection          patchCord1(adc1, biquad1);
AudioConnection          patchCord2(biquad1, 0, filter1, 0);
AudioConnection          patchCord3(biquad1, peak1);
AudioConnection          patchCord4(playFlashRaw1, 0, mixer1, 2);
AudioConnection          patchCord5(filter1, 0, mixer1, 0);
AudioConnection          patchCord6(filter1, 2, mixer1, 1);
AudioConnection          patchCord7(mixer1, dac1);
// GUItool: end automatically generated code

// Parameters
const bool DEBUG = false;
const bool BEGIN_CLICK = true;  // Play click on voice start
const bool END_SOUND = true;    // Play click/burst on voice end
const bool FEEDBACK_SUPPRESSION = false;  // Enables input filter
const unsigned int LOWPASS_CUTOFF = 2200; // Hz
const unsigned int CROSSOVER_FREQ = 2000; // Filter center freq
const float BASS_GAIN_ON = 0.01;
const float BASS_GAIN_OFF = 0.0;
const float TREBLE_GAIN_ON = 0.25;    // Voice output volume
const float TREBLE_GAIN_OFF = 0.0;
const float SFX_GAIN = 0.5;           // Sound clip volume
const float SQUELCH_CUTOFF = 0.10;    // Voice threshold
const int HYSTERESIS_TIME_ON = 20;    // Milliseconds
const int HYSTERESIS_TIME_OFF = 400;  // Milliseconds

// Pins
const int FLASH_CS = 6;               // Serial flash chip select
const int AMP_ENABLE = 5;             // Amplifier enable pin

// On/Off state machine states
typedef enum volState {
  QUIET,
  QUIET_TO_LOUD,
  LOUD,
  LOUD_TO_QUIET,
} VolState;

// Global variables
elapsedMillis fps; // Sample peak only if we have available cycles
VolState state = QUIET;
unsigned long timer;

void setup() {

  if ( DEBUG ) {
    Serial.begin(9600);
  }

  // Initialize amplifier
  AudioMemory(20);
  dac1.analogReference(EXTERNAL); // much louder!
  delay(50);                      // time for DAC voltage stable
  pinMode(AMP_ENABLE, OUTPUT);

  // wait up to 10 seconds for Arduino Serial Monitor
  unsigned long startMillis = millis();
  if ( DEBUG ) {
    while ( !Serial && ( millis() - startMillis < 10000 ) );
  }

  // Butterworth lowpass filter (reduces audio feedback)
  if ( FEEDBACK_SUPPRESSION ) {
    biquad1.setLowpass(0, LOWPASS_CUTOFF, 0.707);
  } else {
    biquad1.setLowpass(0, 8000, 0.707);
  }

  // Configure the State Variable filter
  filter1.frequency(CROSSOVER_FREQ);
  filter1.resonance(0.707);

  // Adjust gain into the mixer
  mixer1.gain(0, BASS_GAIN_OFF);
  mixer1.gain(1, TREBLE_GAIN_OFF);
  mixer1.gain(2, SFX_GAIN);

  // Initialize serial flash
  if ( !SerialFlash.begin(FLASH_CS) ) {
    if ( DEBUG ) {
      Serial.println( "Unable to access SPI Flash chip" );
    }
  }

  // Use the time since boot as a seed (I know, not great, but
  // the audio toolbox took away my analogRead)
  int seed = micros() % 32767;
  if ( DEBUG ) {
    Serial.print("Seed: ");
    Serial.println(seed);
  }
  randomSeed(seed);

  if ( DEBUG ) {
    Serial.println("Finished init");
  }
}

void loop() {

  if ( (fps > 24) && peak1.available() ) {

    // State machine
    switch ( state ) {

      // Wait until the mic picks up some sound
      case QUIET:
        if ( peak1.read() > SQUELCH_CUTOFF ) {
          timer = millis();
          state = QUIET_TO_LOUD;
        }
        break;

      // If sound continues, play sound effect
      case QUIET_TO_LOUD:
        if ( peak1.read() <= SQUELCH_CUTOFF ) {
          state = QUIET;
        } else {
          if ( millis() > timer + HYSTERESIS_TIME_ON ) {

            if ( DEBUG ) {
              Serial.println("ON");
            }

            // Turn on amp, play sound, turn on mic
            digitalWrite(AMP_ENABLE, HIGH);
            if ( BEGIN_CLICK ) {
              playFile("click.raw");
            }
            mixer1.gain(0, BASS_GAIN_ON);
            mixer1.gain(1, TREBLE_GAIN_ON);

            // Go to next state
            state = LOUD;
          }
        }
        break;

      // Filter mic input and play it through speakers
      case LOUD:
        if ( peak1.read() <= SQUELCH_CUTOFF ) {
          timer = millis();
          state = LOUD_TO_QUIET;
        }
        break;

      // If no sound for a time, play click or burst
      case LOUD_TO_QUIET:
        if ( peak1.read() > SQUELCH_CUTOFF ) {
          state = LOUD;
        } else {
          if ( millis() > timer + HYSTERESIS_TIME_OFF ) {

            if ( DEBUG ) {
              Serial.println("OFF");
            }

            // Play a random sound
            if ( END_SOUND ) {
              if ( random(2) ) {
                playFile("click.raw");
              } else {
                playFile("break.raw");
              }
            }

            // Turn off mic and amp
            digitalWrite(AMP_ENABLE, LOW);
            mixer1.gain(0, BASS_GAIN_OFF);
            mixer1.gain(1, TREBLE_GAIN_OFF);
            state = QUIET;
          }
        }
        break;

      // You really shouldn't get here
      default:
        break;
    }
  }
}

// Play a sound clip from serial flash
void playFile( const char* filename ) {

  if ( DEBUG ) {
    Serial.print("Playing file: ");
    Serial.print(filename);
  }

  // Start playing the file
  playFlashRaw1.play(filename);

  // A brief delay for the library read info
  delay(5);

  // Wait for the file to finish playing
  while ( playFlashRaw1.isPlaying() );

  if ( DEBUG ) {
    Serial.println("...done");
  }
}
Make sure the board has the following settings:
Upload the sketch to the Teensy, and you're ready to join the Imperial Army!
Whenever you speak into the microphone, you'll hear a click followed by a nasal version of your voice. When you stop talking, the Teensy will play a click or a static burst. You can disable the initial click by changing BEGIN_CLICK to false, and you can disable the ending sound by changing END_SOUND to false.
You can also plug a LiPo battery into the Power Cell to power the whole contraption.
This project is meant to be hacked! Try changing some of the variables in the Parameters section of the code to see if you can get the voice to sound the way you want. You can also import the block diagram into the Audio System Design Tool by copying in everything before the // GUItool: end automatically generated code line and clicking Import in the Audio System Design Tool. Add some new blocks and really distort your voice!
Here's an example of the project wired into a Scout Trooper helmet:
Project Resources:
For more fun audio projects, check out these tutorials:
learn.sparkfun.com | CC BY-SA 3.0 | SparkFun Electronics | Niwot, Colorado