Hey y’all! We’re chomping at the bit to share some Matter projects with you, so our amazing engineer Dryw has created a demo for y’all to follow along with! In this example, he is helping us get our Thing Plus Matter board connected to a Google Nest Hub, as well as the Google Home app, and set up as a light device. This tutorial is available in both video and written format, so pick your favorite and let’s dive in!
Note: If this is your first time working with the Thing Plus Matter, be sure to check out the hookup guide and walkthrough video to get started with Simplicity Studio, as you will need all of that up and running before following along here.
Here are all of the parts you’ll need to follow along with this tutorial; this project is super self-contained, so hooking it up is as simple as plugging in your board! The smart hub used in this demo is the Google Nest Hub (Gen 2), which you can find here; because we are taking advantage of a Google product, you will also need access to an Android device to get connected.
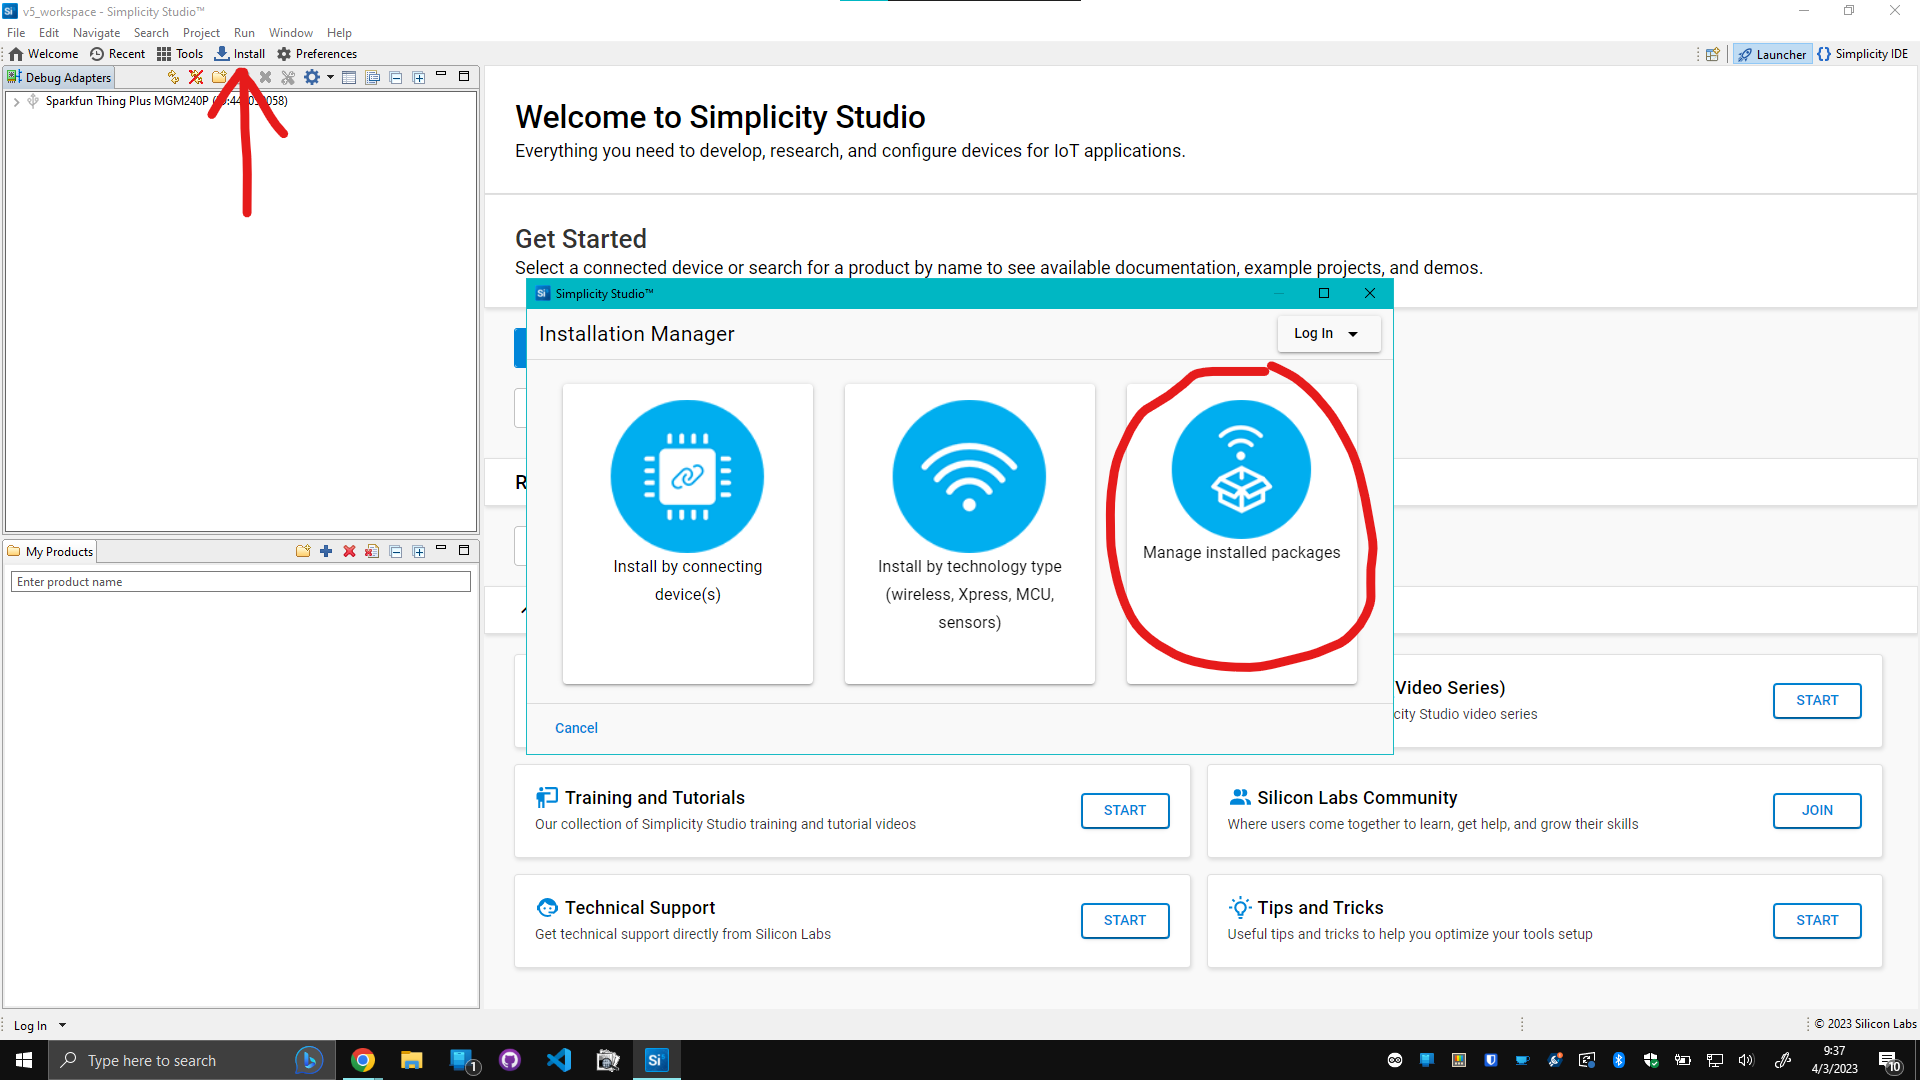
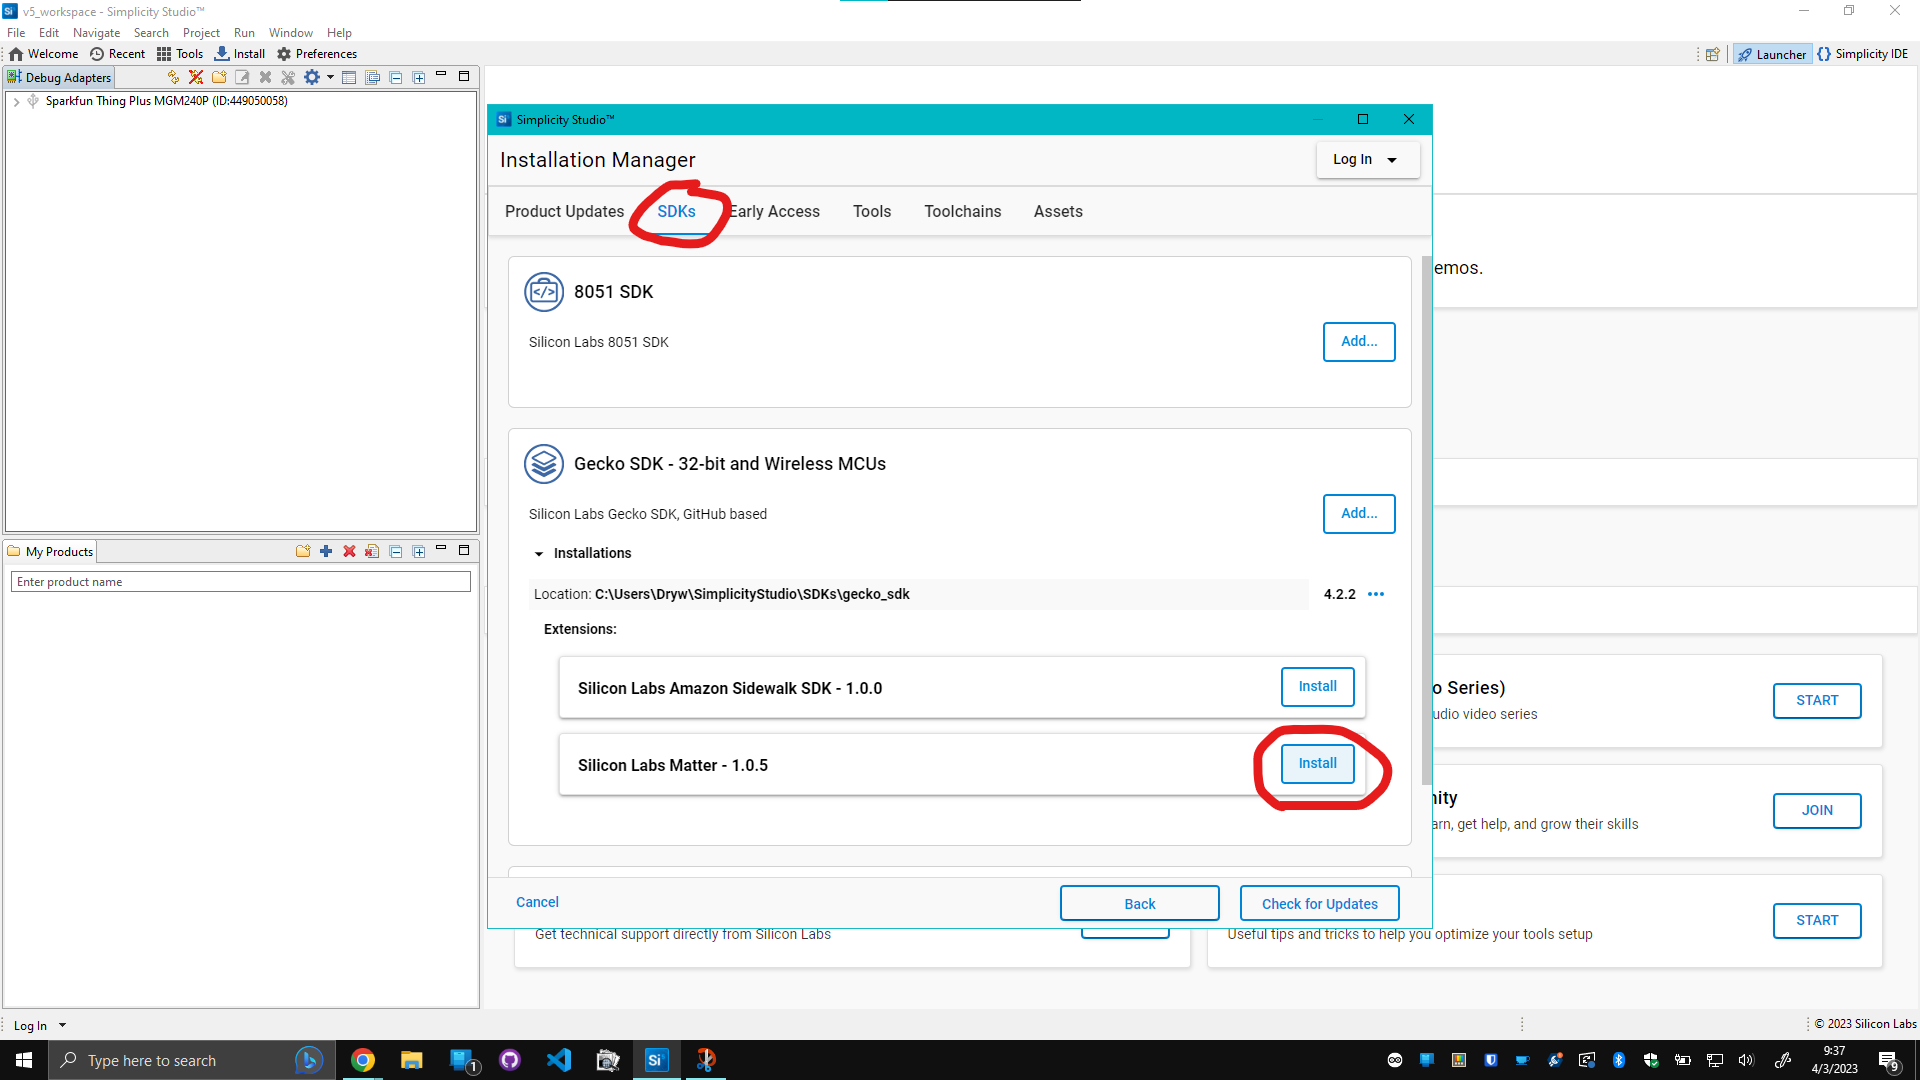
Alrighty! So, first things first, we’re gonna hop over to Simplicity Studio with our board connected, and install an SDK for Matter integration. To get to that, click on the ‘Install’ button on the top left of the studio; this will open up the installation manager, and from there we’ll select ‘Manage Installed Packages’. With that opened up, make your way to the ‘SDK’ tab and install the latest ‘Silicon Labs Matter’ package.
Now that that’s done, close out of the installation manager and navigate to the ‘Example Projects & Demos’ tab: here we’ll select the ‘Matter’ filter on the left, and hit ‘Create’ on the ‘Matter - SoC Light over Thread’ resource.

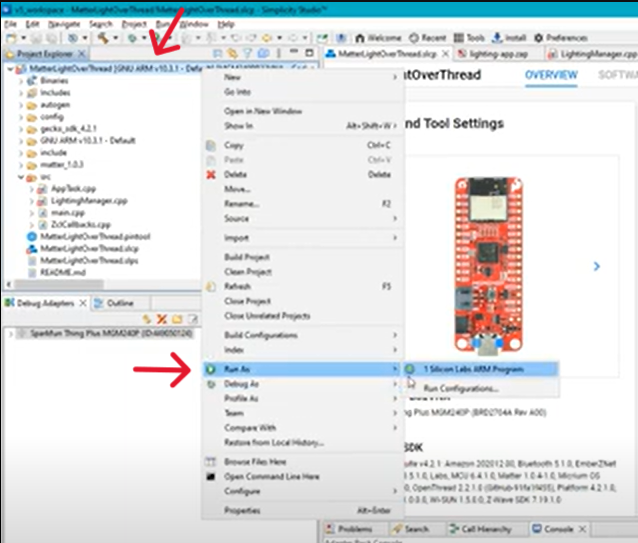
This will prompt a window where you can customize the project and name it to your liking; for today, we’re gonna stick with the default settings and hit ‘Finish’ to build out the project. Next, we’ll go up to the top left and right click on the ‘MatterLightOverThread’ dropdown, hover over ‘Run As’, and select ‘1 Silicon Labs ARM Program’. This will compile the project and automatically flash your board!
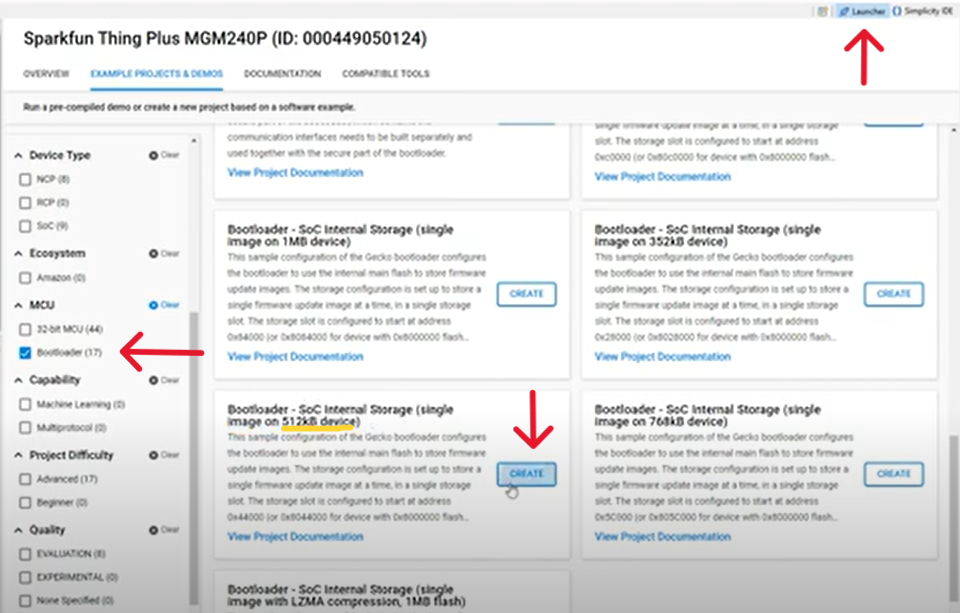
With that done, we’ll head up to the top right of the studio and select ‘Launcher’. Once there, scroll down within the filters options and select ‘Bootloader’ – we’re looking for the 512kB device option, which is down at the bottom of the available options. When you’ve found it, go ahead and hit create and step through the same ‘Run As’ process as before.
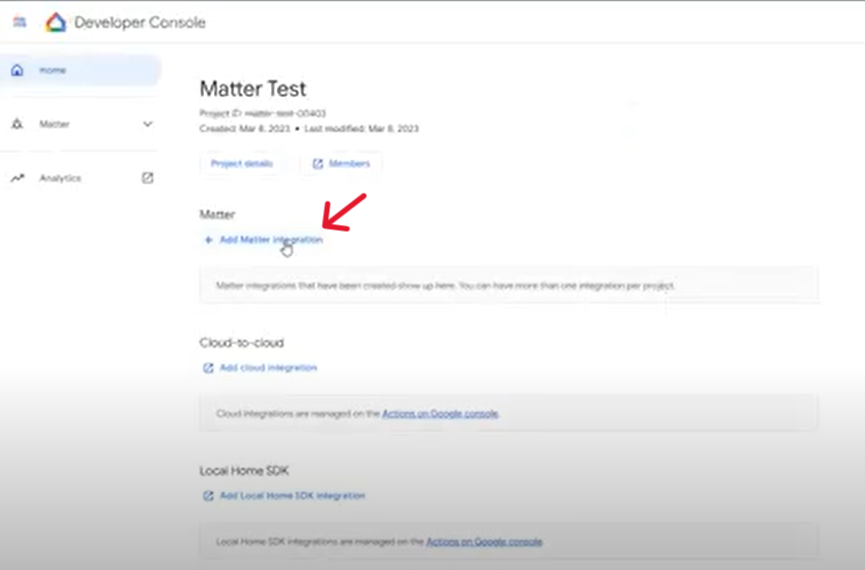
And that’s it for the Thing Plus Matter side of things, so let’s talk about getting your Google Nest Hub set up! You’ll want to go to your Google Home Console and sign in with the same account that your hub is connected to. Once you’re logged in, go ahead and create a project. This will pull up a page to either add this project to an existing one, or create a new one; we’re going to create a new one and name it something fun, like ‘Matter Test’. With our project created, we’re going to select ‘Add Matter Integration’ inside the Developer Console.
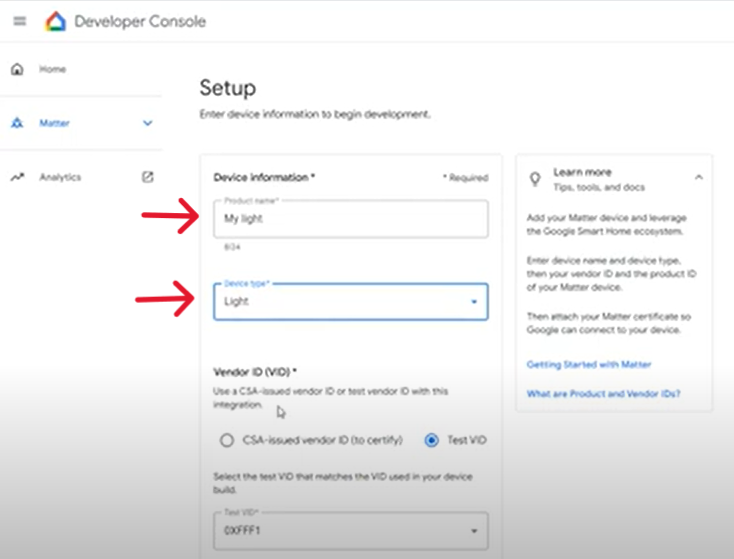
From there, we’ll need to enter some device information to the setup page. First, a fancy name for it and the type of device we’re creating, which in this case is a light.
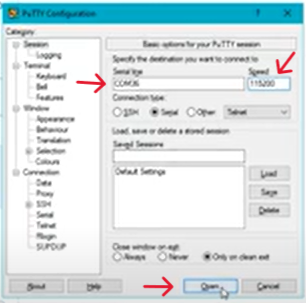
We also need to include a Test Vendor ID (VID) and Product ID (PID) for our device. To locate these, open up your preferred serial terminal (for this demo, we used PuTTY) with your board connected via USB. Select the COM port for your board, set the baud rate to 115200 and the connection type as Serial, then open up the terminal.
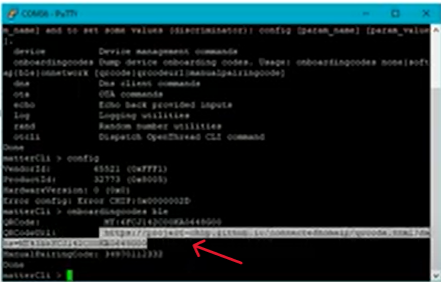
Once inside, type in ‘help’ and hit enter. This will produce a list of commands available to you, of which we will be using ‘config’, so go ahead and type that in next.
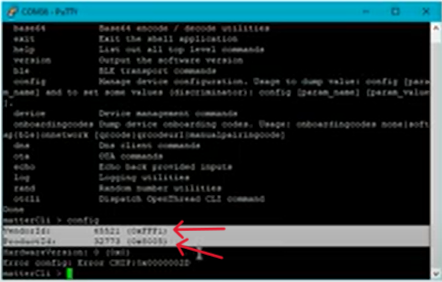
This will output our VID and PID, which you can now input into the device setup page on the Google Home Developer Console (we’ll be using the hexadecimal values). With that done, we can hit ‘Continue’ and move on! There will be a page brought up where you can customize the images for your device, but we’re just going to leave it as is for now.
Since we’ve got it open, we’ll go ahead and input ‘onboardingcodes ble’ into our serial terminal. This will output a link to a QR code for the test certificate to our board. Copy that link and throw it into a web browser; we’ll need it later. If, for some reason, you are unable to acquire the link via serial terminal, it is available here!
Woohoo! Almost there! Next we need to commission our Thing Plus Matter to the Google Nest Hub; to do this, go ahead and get your Android device paired with the hub. Once that’s done, open up the Google Home app and click the ‘+’ in the top left corner, then select ‘Setup a Device’. Create a new device and select which home your Google Nest Hub is connected to; this will prompt a bluetooth scan to start running. This scan can be a bit finicky sometimes, so if for some reason it does not detect your device, you will be prompted to select a device type: select ‘Matter Enabled Device’ and scan the QR code we pulled up earlier. The commissioning process will automatically begin at this point, and takes about a minute or so to wrap up. Once connected, select a room and set a name for the device; this should complete the setup process and the device should appear as a light both in your Google Home app and on the Nest Hub, and you will be able to control the onboard LED from either of those devices!
A video walkthrough of how to get up and running with Thing Plus Matter and Simplicity Studio
learn.sparkfun.com | CC BY-SA 3.0 | SparkFun Electronics | Niwot, Colorado